
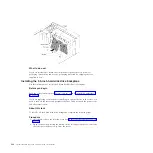
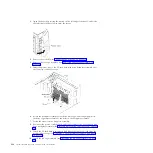


10.
Reinstall the DVD drive (see “Installing a DVD drive” on page 231 and
“Installing an optional tape drive” on page 234) which you removed before in
drive bay 1.
11.
Connect the drive cables to the back of the drive bay 1.
12.
Reinstall the fan cage assembly (see “Installing the fan cage assembly” on
page 306).
13.
Reinstall the air baffle (see “Installing the air baffle” on page 211).
14.
Install and lock the left-side cover (see “Installing the left-side cover” on page
205).
What to do next
If you have replaced a component or installed an optional device in the server, you
need to reconnect the power cords and all external cables, and turn on the server
and peripheral devices.
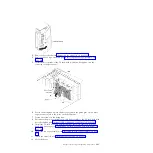
Removing a memory module
Use this information to remove a memory module.
Before you begin
Read the safety information in “Safety” on page vii and “Installation guidelines”
on page 34.
If you are replacing a component or installing an optional device in the server, you
need to turn off the server and peripheral devices, and disconnect the power cords
and all external cables.
About this task
To remove a dual inline memory module (DIMM), complete the following steps.
Procedure
1.
Carefully turn the server on its side so that it is lying flat, with the cover facing
up.
Attention:
Do not allow the server to fall over.
2.
Unlock and remove the left-side cover (see “Removing the left-side cover” on
page 39).
3.
Remove the air baffle if installed (see “Removing the air baffle” on page 210).
4.
Locate the DIMM connectors on the system board (see “System-board internal
connectors” on page 27).
Attention:
To avoid breaking the retaining clips or damaging the DIMM
connectors, handle the clips gently.
5.
Move the DIMM retaining clips on the side of the DIMM connector to the open
position by pressing the retaining clips away from the center of the DIMM
connector.
Chapter 6. Removing and replacing components
293
Содержание 7383
Страница 1: ...System x3500 M4 Type 7383 Installation and Service Guide ...
Страница 2: ......
Страница 3: ...System x3500 M4 Type 7383 Installation and Service Guide ...
Страница 8: ...vi System x3500 M4 Type 7383 Installation and Service Guide ...
Страница 42: ...24 System x3500 M4 Type 7383 Installation and Service Guide ...
Страница 65: ...Figure 19 Server with sixteen 2 5 inch hard disk drives Chapter 2 Installing optional devices 47 ...
Страница 200: ...182 System x3500 M4 Type 7383 Installation and Service Guide ...
Страница 235: ...Figure 53 Server with eight 2 5 inch hard disk drives Chapter 6 Removing and replacing components 217 ...
Страница 236: ...Figure 54 Server with sixteen 2 5 inch hard disk drives 218 System x3500 M4 Type 7383 Installation and Service Guide ...
Страница 237: ...Figure 55 Server with twenty four 2 5 inch hard disk drives Chapter 6 Removing and replacing components 219 ...
Страница 360: ...342 System x3500 M4 Type 7383 Installation and Service Guide ...
Страница 416: ...398 System x3500 M4 Type 7383 Installation and Service Guide ...
Страница 470: ...452 System x3500 M4 Type 7383 Installation and Service Guide ...
Страница 479: ...Taiwan Class A compliance statement Notices 461 ...
Страница 480: ...462 System x3500 M4 Type 7383 Installation and Service Guide ...
Страница 487: ......
Страница 488: ... Part Number 46W8192 Printed in USA 1P P N 46W8192 ...