Faxing
359
Procedure
NOTE:
The names of the dialog boxes and the buttons may be different from those given in the following procedure depending
on the application you are using.
NOTE:
To use this feature, you must install the fax driver. (For details, see "Starting Dell Printer Easy Install" for Windows
®
or
"Installing the Drivers and Software" for Macintosh.)
1
Open the file you want to send by fax.
2
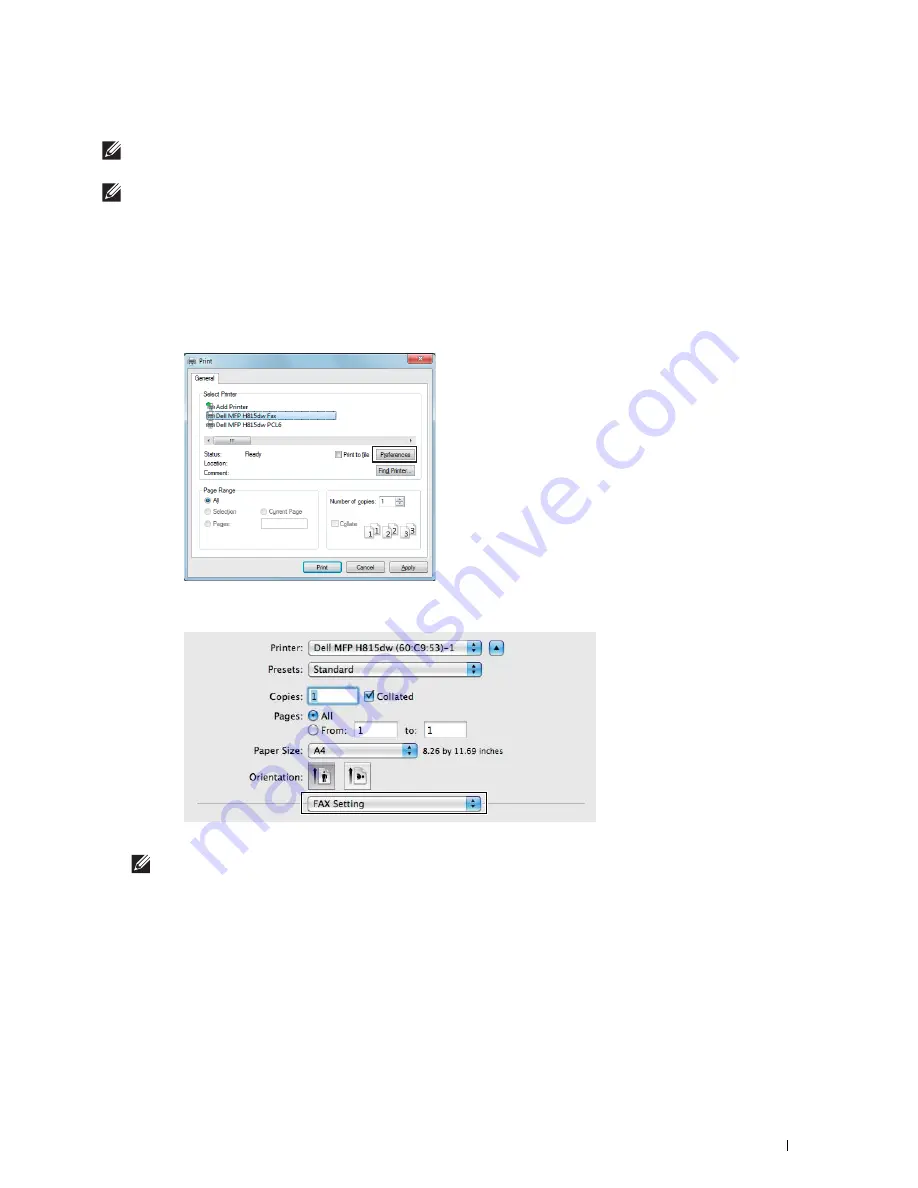
Open the print dialog box from the application, and then select
Dell MFP H815dw Fax or Dell MFP S2815dn
Fax
.
3
Click
Preferences
in Windows
®
, or select
FAX Setting
in Macintosh.
For Microsoft
®
Windows
®
:
For Apple Macintosh:
4
When the setting dialog box appears, specify the following settings.
NOTE:
The settings done here are only applied to a single fax job.
Содержание H815dw
Страница 2: ......
Страница 24: ...24 Contents Template Last Updated 2 7 2007 ...
Страница 26: ...26 ...
Страница 30: ...30 Notes Cautions and Warnings ...
Страница 32: ...32 Dell Cloud Multifunction Printer H815dw Dell Smart Multifunction Printer S2815dn User s Guide ...
Страница 38: ...38 Product Features ...
Страница 44: ...44 About the Printer ...
Страница 46: ...46 ...
Страница 48: ...48 Overview of the Printer Setup ...
Страница 86: ...86 Loading Paper ...
Страница 100: ...100 Installing Printer Drivers on Windows Computers ...
Страница 104: ...104 Installing Printer Drivers on Macintosh Computers ...
Страница 114: ...114 ...
Страница 180: ...180 Dell Printer Configuration Web Tool ...
Страница 282: ...282 ...
Страница 316: ...316 Copying ...
Страница 344: ...344 Scanning For Apple Macintosh Password for Scanner Enter the password ...
Страница 380: ...380 Dell Document Hub ...
Страница 386: ...386 ...
Страница 404: ...404 Understanding Your Printer Software ...
Страница 424: ...424 Using Digital Certificates ...
Страница 434: ...434 Understanding Printer Messages ...
Страница 440: ...440 Specifications ...
Страница 441: ...441 Maintaining Your Printer 31 Maintaining Your Printer 443 32 Clearing Jams 469 ...
Страница 442: ...442 ...
Страница 451: ...Maintaining Your Printer 451 8 Close the front cover and put back the operator panel to the original position ...
Страница 468: ...468 Maintaining Your Printer ...
Страница 476: ...476 Clearing Jams 8 Insert the MPF into the printer 9 Close the rear cover ...
Страница 482: ...482 Clearing Jams 7 Press down the levers on both sides of the fusing unit 8 Close the rear cover ...
Страница 499: ...499 Troubleshooting 33 Troubleshooting Guide 501 ...
Страница 500: ...500 ...
Страница 530: ...530 Troubleshooting Guide ...
Страница 531: ...531 Appendix Appendix 533 ...
Страница 532: ...532 ...


