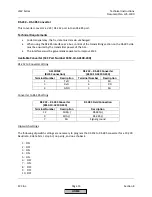


LMV Series
Technical Instructions
Document No. LV5-1000
SCC Inc.
Page 7
Section 9
9-5: Creating an LMV5 Startup Report
The following steps outline the procedure for saving, viewing and printing a startup report to a
PC. The LMV5 must be in standby or lockout and have a burner ID to create a backup report.
Saving the .mdb file
1.
Ensure that the ACS450 software is open, and the PC is connected to the AZL5 at the user,
service, or OEM level. See Sections 9-2 or 9-3 if necessary. A full report will be saved at any
password level. The report can be filtered later by password level when it is viewed.
2.
Go to the ACS450 “System LMV5x” dropdown menu, and select “Backup for offline mode”.
3.
The ACS450 will then read the parameters on the LMV5 and compose a report. The status
of the backup will be indicated on the backup window. The backup process may take up to 10
minutes. This report will be automatically saved in
C:\Program Files (x86)\ACS450\daten.
The
file name is automatically saved as the burner ID of the LMV5.
4.
After the backup process is complete, go to the ACS450 “System LMV5x” dropdown menu,
and select “Disconnect”. A window will appear that asks “Do you want to store parameters for
offline mode?
”
Since this was just done in Step 3, it is not necessary to repeat. Click
“
No
”
.
5.
The ACS450 is now disconnected from the LMV5, and the .mdb file is saved. Once
disconnected, the .mdb file can be viewed or printed with the ACS450 software.
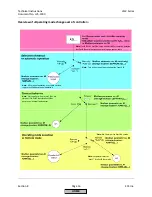
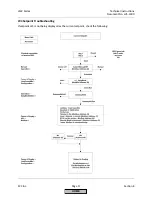
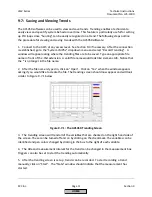
Viewing and printing the .mdb file contents
6.
Ensure that the ACS450 software is open, and
not connected
to the LMV5. Go to the “File”
dropdown menu, and select “Show Parameters”. When this is selected, a dialogue window will
appear. Select the .mdb file to be opened. The default location for the .mdb files is
C:\Program
Files (x86)\ACS450\daten.
7.
Once the file is selected, another window will appear for the access level. Any level can be
chosen to view and print the parameter list without needing a password. The level chosen will
affect what parameters appear, so selecting the OEM level will show all parameters available.
Once the access level is selected, a list of the parameters and their settings should appear.
8.
Once the parameter list is visible on the screen, it can be viewed and / or printed. The fault
and lockout history can also be viewed and / or printed. To access the fault and lockout history,
go to the “Parameters” dropdown menu and slide the cursor to “Operating State”. The options
of “Fault History” and “Lockout History” should appear. Click on either to view.
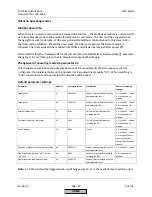
Note
: Many people prefer to create the startup report in a more universal document format,
such as a .pdf file type. This can be done with Adobe ® software that has a writer function. To
create the .pdf files, simply print the desired pieces of the .mdb file to the .pdf writer instead of
an actual paper and toner printer. Most people prefer to have a .pdf file of the parameter list,
fault history, and lockout history. These pieces provide a very inclusive LMV5 startup report.
HOME
Summary of Contents for LMV 5 Series
Page 2: ...Intentionally Left Blank ...
Page 41: ...LMV Series Technical Instructions Document No LV5 1000 SCC Inc Page 7 Section 2 HOME ...
Page 42: ...Technical Instructions LMV Series Document No LV5 1000 Section 2 Page 8 SCC Inc HOME ...
Page 43: ...LMV Series Technical Instructions Document No LV5 1000 SCC Inc Page 9 Section 2 HOME ...
Page 44: ...Technical Instructions LMV Series Document No LV5 1000 Section 2 Page 10 SCC Inc HOME ...
Page 45: ...LMV Series Technical Instructions Document No LV5 1000 SCC Inc Page 11 Section 2 HOME ...
Page 46: ...Technical Instructions LMV Series Document No LV5 1000 Section 2 Page 12 SCC Inc HOME ...
Page 47: ...LMV Series Technical Instructions Document No LV5 1000 SCC Inc Page 13 Section 2 HOME ...
Page 48: ...Technical Instructions LMV Series Document No LV5 1000 Section 2 Page 14 SCC Inc HOME ...
Page 49: ...LMV Series Technical Instructions Document No LV5 1000 SCC Inc Page 15 Section 2 HOME ...
Page 50: ...Technical Instructions LMV Series Document No LV5 1000 Section 2 Page 16 SCC Inc HOME ...
Page 51: ...LMV Series Technical Instructions Document No LV5 1000 SCC Inc Page 17 Section 2 HOME ...
Page 52: ...Technical Instructions LMV Series Document No LV5 1000 Section 2 Page 18 SCC Inc HOME ...
Page 53: ...LMV Series Technical Instructions Document No LV5 1000 SCC Inc Page 19 Section 2 HOME ...
Page 54: ...Technical Instructions LMV Series Document No LV5 1000 Section 2 Page 20 SCC Inc HOME ...
Page 55: ...LMV Series Technical Instructions Document No LV5 1000 SCC Inc Page 21 Section 2 HOME ...
Page 373: ...Intentionally Left Blank ...