


Technical Instructions
LMV Series
Document No. LV5-1000
Section 9
Page 6
SCC Inc.
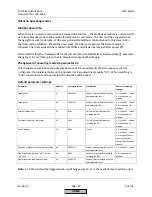
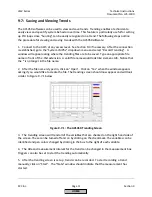
4.
On the main menu in the AZL5, scroll down to “Updating”. When “Enter” is pressed, a
password prompt will appear. Either the service or OEM level password will be necessary. After
access is gained, scroll down to “Load_SW_from_PC” and press “Enter”. This screen will state
“Start Process with ENTER”. Do not press “Enter” at this time.
Note:
If the AZL5 displays “Version Conflict”, press “Esc” on the AZL5 in order to get to the
main menu. When the AZL5 is in a “Version Conflict”,
only
the service password will grant
access to the
“
Load_SW_from_PC” option.
5.
Open up the ACS450 on the computer, go to the “System LMV5x” dropdown menu, and
select “Update AZL Flash”. The ACS450 will then ask for the .bin file. Locate and open the
correct .bin file. Once the .bin file is opened, press “Enter” on the AZL5 to begin the update.
Note:
It is important that steps 4 and 5 are completed as specified above. Make sure to press
“Enter” on the AZL5 immediately after opening the .bin file on the computer. If these steps are
performed too far apart, the update process could take a long time, or not happen altogether.
6.
The AZL5 screen should say “SW-Update” on the top. If everything is working properly, the
AZL5 should say “clearing flash” and then it should say “programming”. During the process,
there should be a horizontal bar on the AZL5 screen and also on the computer screen that
slowly fills in from the left to the right. The update procedure takes at least 5 minutes. When
everything is finished, the ACS450 should say “Transfer finished, press cancel” and the AZL
should say “SW-Update OK, FLASH : V05.00, cancel : left key”.
7.
Press “Esc” on the AZL5. It will go into “System Test” and then come up normally. The AZL5
flash update is now complete.
HOME
Summary of Contents for LMV 5 Series
Page 2: ...Intentionally Left Blank ...
Page 41: ...LMV Series Technical Instructions Document No LV5 1000 SCC Inc Page 7 Section 2 HOME ...
Page 42: ...Technical Instructions LMV Series Document No LV5 1000 Section 2 Page 8 SCC Inc HOME ...
Page 43: ...LMV Series Technical Instructions Document No LV5 1000 SCC Inc Page 9 Section 2 HOME ...
Page 44: ...Technical Instructions LMV Series Document No LV5 1000 Section 2 Page 10 SCC Inc HOME ...
Page 45: ...LMV Series Technical Instructions Document No LV5 1000 SCC Inc Page 11 Section 2 HOME ...
Page 46: ...Technical Instructions LMV Series Document No LV5 1000 Section 2 Page 12 SCC Inc HOME ...
Page 47: ...LMV Series Technical Instructions Document No LV5 1000 SCC Inc Page 13 Section 2 HOME ...
Page 48: ...Technical Instructions LMV Series Document No LV5 1000 Section 2 Page 14 SCC Inc HOME ...
Page 49: ...LMV Series Technical Instructions Document No LV5 1000 SCC Inc Page 15 Section 2 HOME ...
Page 50: ...Technical Instructions LMV Series Document No LV5 1000 Section 2 Page 16 SCC Inc HOME ...
Page 51: ...LMV Series Technical Instructions Document No LV5 1000 SCC Inc Page 17 Section 2 HOME ...
Page 52: ...Technical Instructions LMV Series Document No LV5 1000 Section 2 Page 18 SCC Inc HOME ...
Page 53: ...LMV Series Technical Instructions Document No LV5 1000 SCC Inc Page 19 Section 2 HOME ...
Page 54: ...Technical Instructions LMV Series Document No LV5 1000 Section 2 Page 20 SCC Inc HOME ...
Page 55: ...LMV Series Technical Instructions Document No LV5 1000 SCC Inc Page 21 Section 2 HOME ...
Page 373: ...Intentionally Left Blank ...