4 – Mixer configuration and settings
2
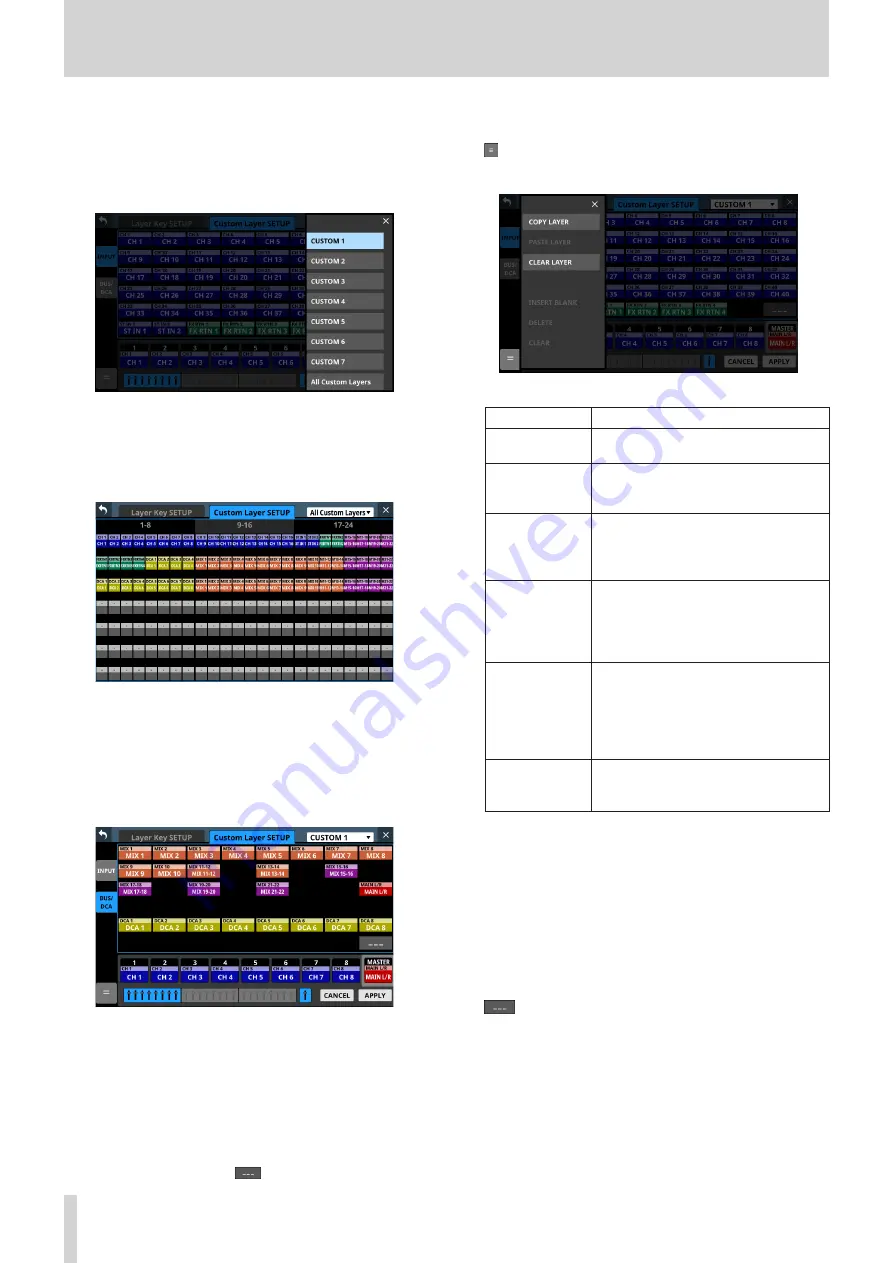
Custom Layer selection
o
This shows the name of the custom layer that is being
edited.
o
Tap this area to open a window where the custom layer
can be selected.
Tap the name of the custom layer to be edited to close this
window and show the names of the modules assigned to
the layer in the custom layer slot buttons (
5
).
o
Tap “All Custom Layers” in the window to close the
window and open the All Custom Layers display.
This shows the names of the modules assigned to all 7
custom layers on one line per layer.
Tap a button shown to switch to display of its custom
layer.
3
Module group switching buttons
Tap these buttons to change which group of modules
assigned to the layer is shown.
4
Module buttons
o
These are the buttons for the modules in the group
assigned to the layer.
o
Use the module group switching buttons to select the
shown group.
5
Custom layer slot buttons
In sets of 8, this shows the names of modules assigned to
the custom layer that is being edited. Modules that are not
assigned will appear blank (
).
Use the block selection buttons (
7
) to switch the 8 channels
that are shown.
6
button
Tap this button to open the custom layer editing menu.
Items that can be used will be shown highlighted.
Menu item
Function
COPY LAYER
This copies the setting state of the
selected custom layer to a buffer.
PASTE LAYER
This pastes the custom layer setting
state copied to the buffer to the selected
custom layer.
CLEAR LAYER
This clears all the settings of the selected
custom layer.
A confirmation message will appear
before clearing is executed.
INSERT BLANK
This inserts a blank at the position of the
selected slot button (framed in yellow).
When this is done, the contents assigned
to the selected slot button and the slot
buttons to its right will be shifted right.
DELETE
This deletes the assignment of the
selected slot button (framed in yellow)
and shifts left by one slot the settings to
its right.
Doing this causes the rightmost slot
button to become blank.
CLEAR
This removes the assignment of the
selected slot button (framed in yellow).
This does not move any slot buttons.
7
Block selection buttons
o
The block selection button for the 8 channels that are
shown is highlighted.
o
Tap one of these buttons to switch the shown 8-channel
block, which shows custom layer and slot buttons (
4
).
8
CANCEL button
Tap this button to cancel setting changes.
9
APPLY button
Tap this button to confirm setting changes.
0
button
Tap this button to make the assignment of the selected slot
(framed in yellow) blank.
q
MASTER slot button
This shows the name of the module assigned to the MASTER
fader (MAIN L/R by default) that does not depend on layer
selection.
48
TASCAM Sonicview 16/Sonicview 24


