


VarioLink 6022/7522
11-49
Utility mode
11
3
Touch [7 Expert Adjustment].
The Expert Adjustment screen appears.
4
Touch [5 Finisher Adjustment].
The Finisher Adjustment screen appears.
5
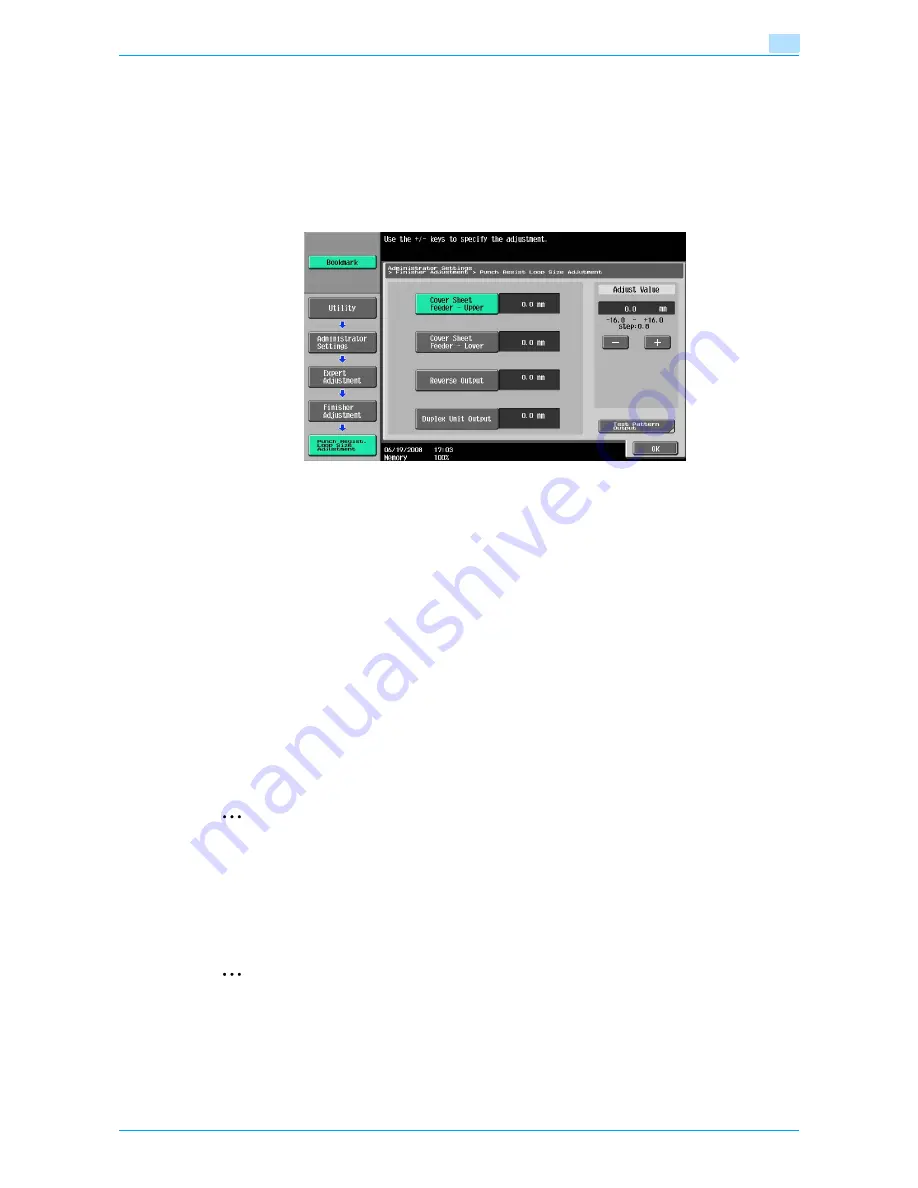
Touch [7 Punch Resist Loop Size Adjustment].
The Punch Resist Loop Size Adjustment screen appears.
6
Touch the button for the desired adjustment parameter.
7
Check the angle of the punched holes.
–
If the punched holes are angled, touch [+] to change the adjustment. If the angle cannot be adjusted
by touching [+] or if the paper is wrinkled, touch [-] to change the adjustment.
–
Each time [+] or [-] is touched, the value is increased or decreased by one increment.
8
Touch [OK].
–
To cancel the setting and select the default, press the [Reset] key.
The angle of the punched holes is adjusted.
If no adjustment of the angle of the punched holes was necessary in step 6, this completes the
procedure.
9
Use a Punch setting to print another sample copy.
10
Check the print result.
–
Check that the angle of the punched holes was adjusted.
–
If more adjustment is necessary, repeat steps 7 through 10.
2
Note
Set the value by mm. Refer to the conversion rate below.
1 inch = 25.4 mm
11.6.8
1st Z-Fold Position Adjustment/2nd Z-Fold Position Adjustment
The first and second folding position when printing with the "Z-Fold" setting can be adjusted for each paper
size.
2
Note
[1st Z-Fold Position Adjustment] and [2nd Z-Fold Position Adjustment] do not appear if optional Z
folding unit is not installed.
0
Before making any adjustments, use the "Z-Fold" setting to print a single sample copy. Perform the
adjustment while checking the sample that was created. In addition, to adjust both the 1st and 2nd
folding positions for Z-folding, be sure to adjust the 1st folding position first.
Содержание VarioLink 6022
Страница 1: ...Océ VarioLink 6022 VarioLink 7522 Copy Operations User s Guide Printing for Professionals ...
Страница 18: ...VarioLink 6022 7522 x 15 Explanation of manual conventions ...
Страница 19: ...VarioLink 6022 7522 x 16 ...
Страница 22: ...1 Before Making Copies ...
Страница 80: ...2 Basic copy operations ...
Страница 107: ...VarioLink 6022 7522 2 28 Basic copy operations 2 Binding Position screen Zoom screen Frame Erase screen ...
Страница 151: ...VarioLink 6022 7522 2 72 Basic copy operations 2 4 Touch OK and then touch OK again ...
Страница 159: ...3 Additional copy operations ...
Страница 189: ...4 Troubleshooting ...
Страница 237: ...5 Specifications ...
Страница 248: ...6 Copy paper originals ...
Страница 278: ...7 Application functions ...
Страница 300: ...VarioLink 6022 7522 7 23 Application functions 7 6 Press the Start key ...
Страница 318: ...VarioLink 6022 7522 7 41 Application functions 7 7 Press the Start key ...
Страница 357: ...8 Replacing toner cartridges and staple cartridges and emptying hole punch scrap box ...
Страница 378: ...9 Care of the machine ...
Страница 385: ...10 Managing jobs ...
Страница 399: ...11 Utility mode ...
Страница 478: ...12 Authentication Unit Biometric Type AU 101 ...
Страница 503: ...13 Authentication Unit IC Card Type AU 201 ...
Страница 529: ...14 Appendix ...
Страница 536: ...15 Index ...
Страница 540: ...Printing for Professionals Beyond the Ordinary ...


