


VarioLink 6022/7522
7-47
Application functions
7
4
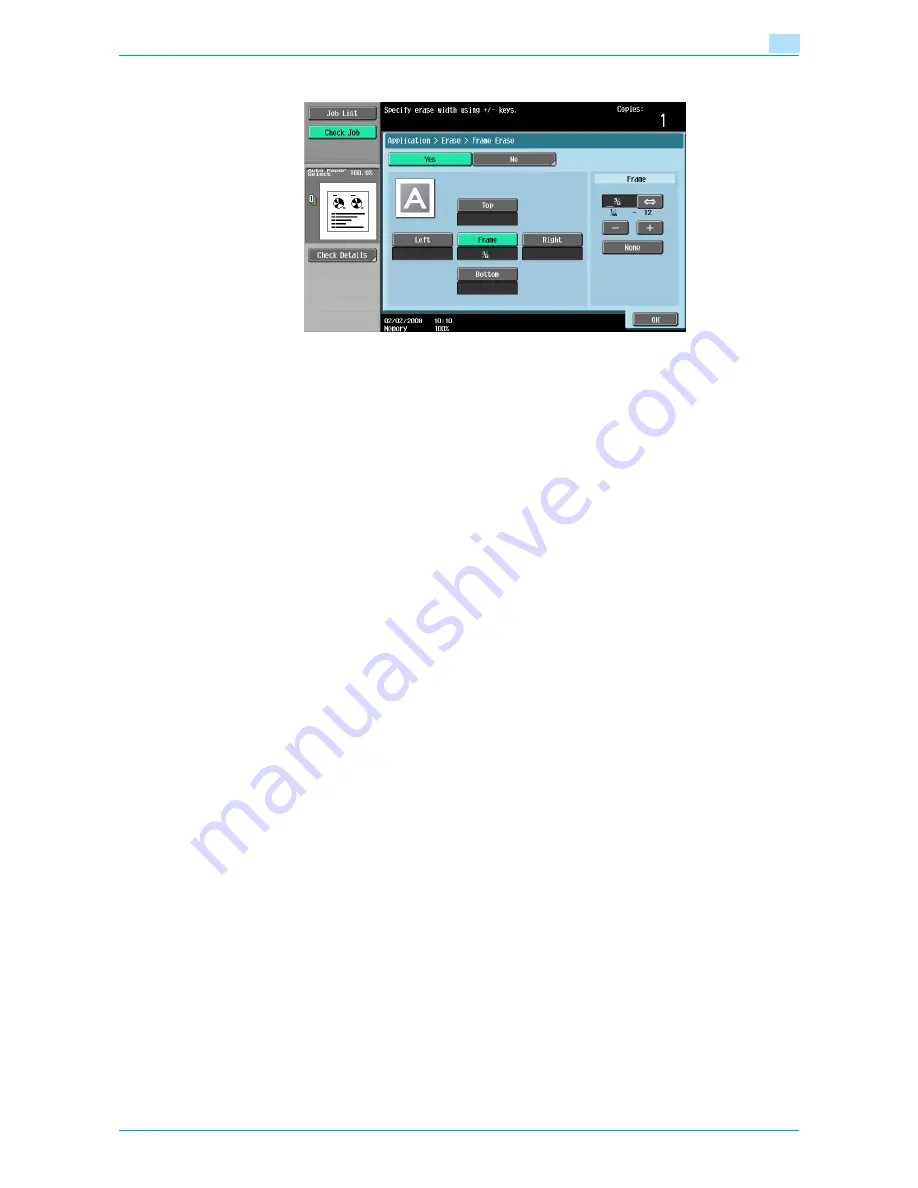
Touch the button for the desired position to be erased.
–
To cancel the setting and select the default, press the [Reset] key.
–
To cancel the "Frame Erase" function, touch [No].
?
What happens when [Frame] is selected?
%
The same width is erased on all four sides of the original. The factory default setting is "Frame".
?
Can the settings be combined?
%
"Frame" cannot be combined with the other settings ("Top", "Left", "Right" or "Bottom").
5
Touch [<->] to switch between the integer and the fraction, and then touch [–] and [+] to specify the
width to be erased.
–
To specify a different width to be erased depending on the position, specify different settings for
"Top", "Left", "Right", and "Bottom".
–
When using the keypad to specify the settings, press the [C] (clear) key, and then specify the setting.
–
If a decimal value is displayed in the screen, press the [C] (clear) key, and then use the keypad to
type in the setting. For details on switching between decimal and fraction values, refer to
"System
Settings" on page 11-15
.
–
If a decimal value is displayed in the screen and the specified value is outside the allowable range,
the message "Input Error" appears.
Type a value within the allowable range. If the value was incorrectly entered, press the [C] (clear) key
to erase the value, and then specify the correct value.
6
Touch [OK].
7
Specify any other desired copy settings.
8
Using the keypad, type in the desired number of copies.
9
Press the [Start] key.
7.14.2
Erasing black marks along center fold ("Center Erase" function)
This function erases black marks along the center fold of printed sheets which tend to be created when using
the original glass to scan thick original such as a book.
Use this function also for the original already having black marks along the center fold.
With frame erasing, the same width can be erased along all four sides of the original or a different width can
be erased along each side of the original.
1
Position the original to be copied.
–
For details on positioning the original, refer to
"Feeding the original" on page 2-6
.
Содержание VarioLink 6022
Страница 1: ...Océ VarioLink 6022 VarioLink 7522 Copy Operations User s Guide Printing for Professionals ...
Страница 18: ...VarioLink 6022 7522 x 15 Explanation of manual conventions ...
Страница 19: ...VarioLink 6022 7522 x 16 ...
Страница 22: ...1 Before Making Copies ...
Страница 80: ...2 Basic copy operations ...
Страница 107: ...VarioLink 6022 7522 2 28 Basic copy operations 2 Binding Position screen Zoom screen Frame Erase screen ...
Страница 151: ...VarioLink 6022 7522 2 72 Basic copy operations 2 4 Touch OK and then touch OK again ...
Страница 159: ...3 Additional copy operations ...
Страница 189: ...4 Troubleshooting ...
Страница 237: ...5 Specifications ...
Страница 248: ...6 Copy paper originals ...
Страница 278: ...7 Application functions ...
Страница 300: ...VarioLink 6022 7522 7 23 Application functions 7 6 Press the Start key ...
Страница 318: ...VarioLink 6022 7522 7 41 Application functions 7 7 Press the Start key ...
Страница 357: ...8 Replacing toner cartridges and staple cartridges and emptying hole punch scrap box ...
Страница 378: ...9 Care of the machine ...
Страница 385: ...10 Managing jobs ...
Страница 399: ...11 Utility mode ...
Страница 478: ...12 Authentication Unit Biometric Type AU 101 ...
Страница 503: ...13 Authentication Unit IC Card Type AU 201 ...
Страница 529: ...14 Appendix ...
Страница 536: ...15 Index ...
Страница 540: ...Printing for Professionals Beyond the Ordinary ...


