


VarioLink 6022/7522
7-43
Application functions
7
3
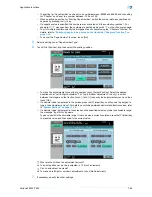
Touch [Left Bind] or [Right Bind].
–
If the original contains only pages in the landscape orientation, they will be bound at the top,
regardless of which setting is selected.
–
To cancel the setting and select the default, press the [Reset] key.
–
To cancel the "Booklet" function, touch [No].
–
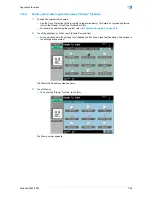
To adjust the image position widthwise and lengthwise as desired, touch [Image Shift], specify the
shift amount, then touch [OK].
–
For details of shift amount setting, refer to
"Adding a binding margin to copies ("Page Margin"
function)" on page 7-36
.
–
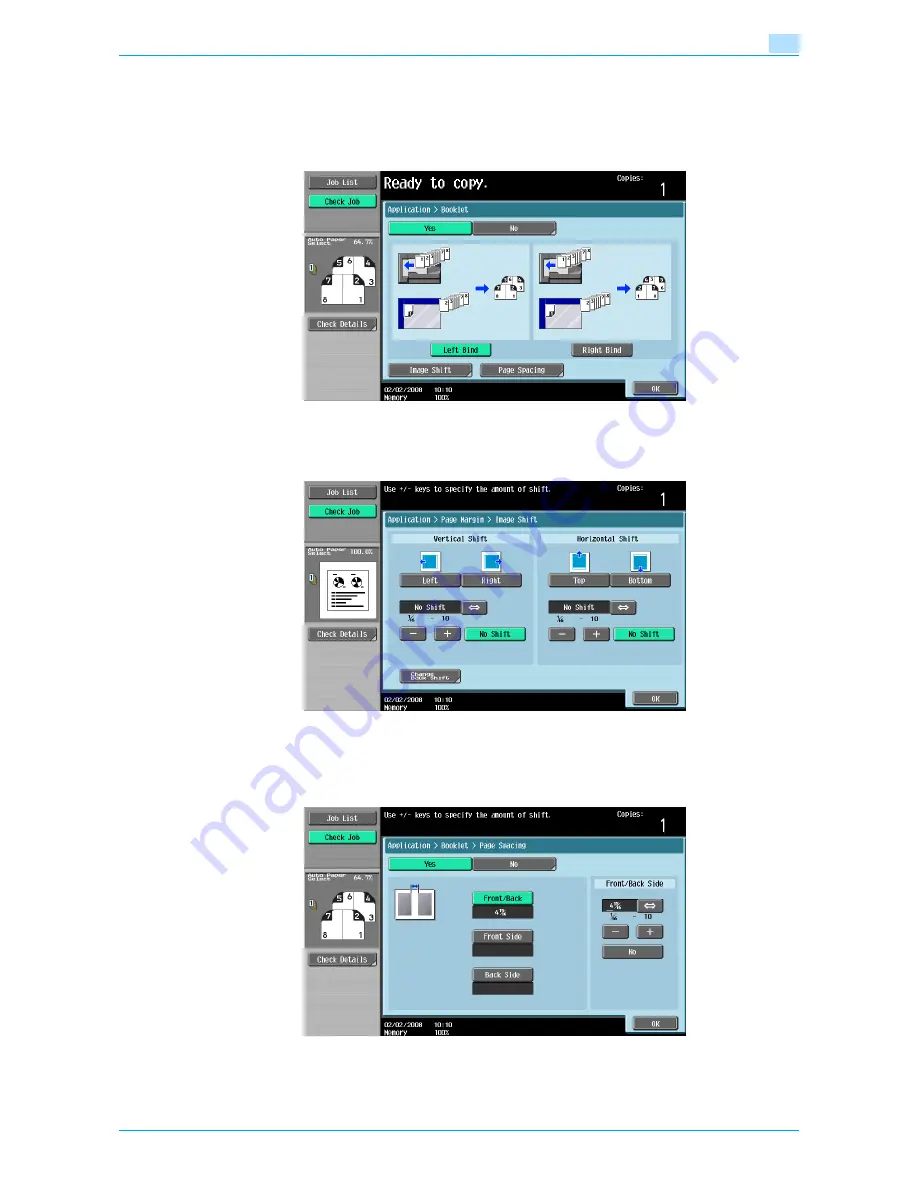
To make the specified amount of blank space in the center between the two images on a page,
touch [Page Spacing].
Select [Front/Back] to make the same amount of blank space, or [Front Side]/[Back Side] to specify
the different amount for each, then use [-], [+], or control panel keypad to enter the desired amount.
Touch [OK] to complete the setting.
4
Touch [OK].
Содержание VarioLink 6022
Страница 1: ...Océ VarioLink 6022 VarioLink 7522 Copy Operations User s Guide Printing for Professionals ...
Страница 18: ...VarioLink 6022 7522 x 15 Explanation of manual conventions ...
Страница 19: ...VarioLink 6022 7522 x 16 ...
Страница 22: ...1 Before Making Copies ...
Страница 80: ...2 Basic copy operations ...
Страница 107: ...VarioLink 6022 7522 2 28 Basic copy operations 2 Binding Position screen Zoom screen Frame Erase screen ...
Страница 151: ...VarioLink 6022 7522 2 72 Basic copy operations 2 4 Touch OK and then touch OK again ...
Страница 159: ...3 Additional copy operations ...
Страница 189: ...4 Troubleshooting ...
Страница 237: ...5 Specifications ...
Страница 248: ...6 Copy paper originals ...
Страница 278: ...7 Application functions ...
Страница 300: ...VarioLink 6022 7522 7 23 Application functions 7 6 Press the Start key ...
Страница 318: ...VarioLink 6022 7522 7 41 Application functions 7 7 Press the Start key ...
Страница 357: ...8 Replacing toner cartridges and staple cartridges and emptying hole punch scrap box ...
Страница 378: ...9 Care of the machine ...
Страница 385: ...10 Managing jobs ...
Страница 399: ...11 Utility mode ...
Страница 478: ...12 Authentication Unit Biometric Type AU 101 ...
Страница 503: ...13 Authentication Unit IC Card Type AU 201 ...
Страница 529: ...14 Appendix ...
Страница 536: ...15 Index ...
Страница 540: ...Printing for Professionals Beyond the Ordinary ...


