background image

Cleaning and Adjusting the Printer

63

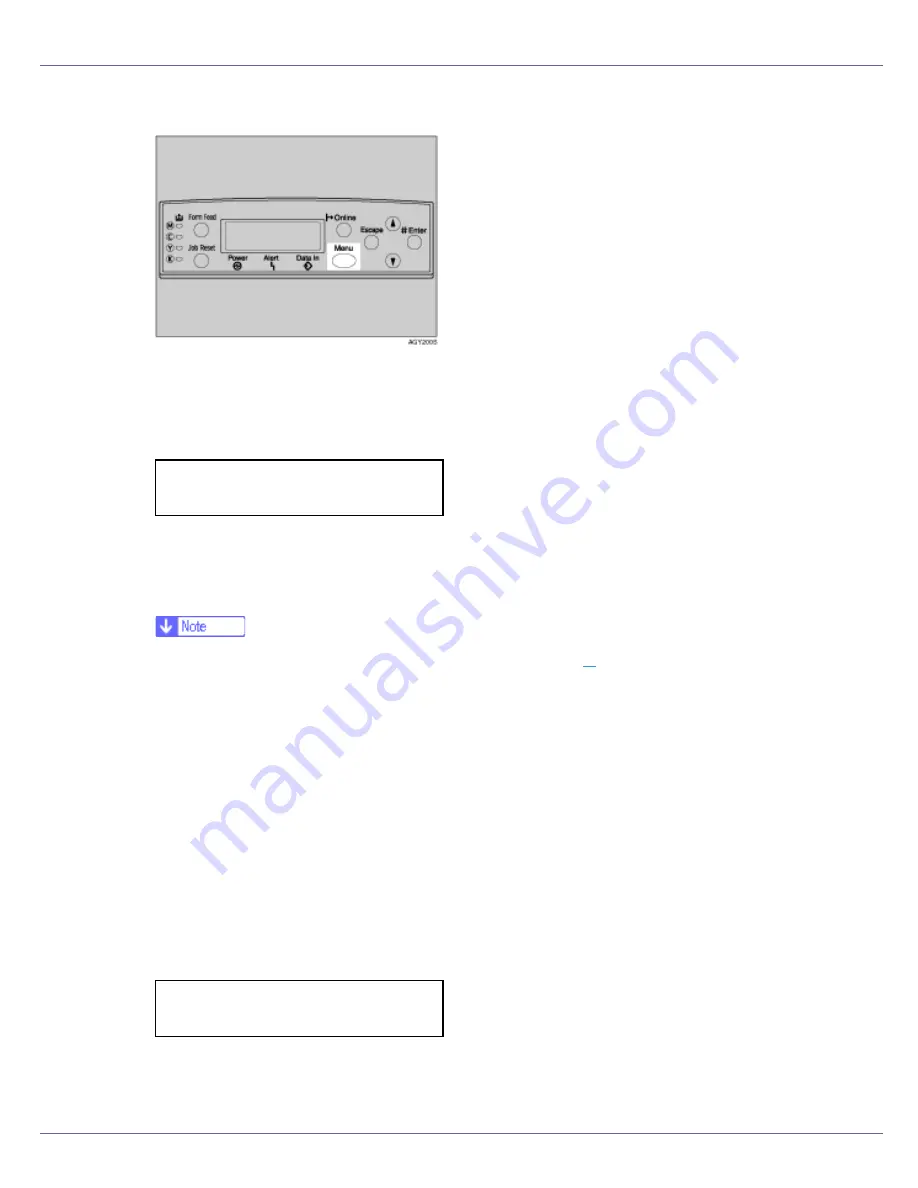
A

Press the 

{

Menu

}

 key.

The 

[

Menu

]

screen appears.

B

Press the 

{U}

 or 

{T}

 key to display [

Maintenance

], and then press the 

{

#

Enter

}

 key.

The maintenance menu appears.

C

Press the 

{U}

 or 

{T}

 key to display [

Color Calibrate

], and then press the 

{

#

Enter

}

 key.

If you perform only correction 2, proceed to step 

L

.

D

Check [

Start Calibr. 1

] is displayed, and then press the 

{

# Enter

}

 key.

E

Check [

Yes

] is displayed, and press 

{

# Enter

}

 key to print gradation cor-

rection sheet 1.

F

Set the gradation correction value of the highlighted part using correc-
tion 1. For setting K (black) gradation, hold the correction value (0-6) for
“K” of the correction value setting sheet 1 over the color sample (K) for
gradation correction 1 of the Color Calibration Sample Sheet, and set
the numerical value of the closest color using either the 

{U}

 or 

{T}

 key.

Set the correction value using the supplied Color Calibration Sample Sheet
and the gradation correction sheet 1 printed in the previous step.

Set M (magenta), C (cyan), and Y (yellow) using the same method.

  Menu:

   Maintenance

  Calibrate 1:

   K:3 M:3 C/Y:3/3

Содержание LP222cn

Страница 1: ...your document management partner Operator Manual LP222cn LP222cn LP222cn LP222cn Printer Operator Guide...

Страница 2: ...procedures other than those specified in this manual might result in hazardous radiation exposure Do not copy or print any item for which reproduction is prohibited by law Copying or printing the fol...

Страница 3: ...ore than nec essary These actions could cause an electric shock or fire Do not incinerate spilled toner or used toner Toner dust is flammable and might ignite when exposed to an open flame Disposal sh...

Страница 4: ...r if necessary If your skin comes into contact with toner or used toner wash the affected area thoroughly with soap and water If toner or used toner gets into your eyes flush immediately with large am...

Страница 5: ...hour Components inside the machine become very hot and can cause a burn if touched Lifting the paper feed unit carelessly or dropping it may cause an injury Do not touch the inside of the controller b...

Страница 6: ...careful when replac ing fusing unit removing misfed paper The inside of this printer becomes very hot Do not touch parts labelled v indicating a hot surface Touching these parts will result in burns T...

Страница 7: ...n for help Caution Changes or modifications not expressly approved by the party responsible for compliance could void the user s authority to operate the equipment Caution in case of 100BaseTX environ...

Страница 8: ...NMB 003 du Canada IEEE 802 11b Interface Unit Type H R WL11B Pour emp cher que cet appareil cause du brouillage au service faisant l objet d une licence il doit tre utilis l int rieur et devrait tre p...

Страница 9: ...Administrator mode in Web Image Monitor Starting User Management Tool of SmartDeviceMonitor for Admin Connecting to the printer via telnet Connecting to the printer via ftp To use the default account...

Страница 10: ...luetooth is displayed when the optional Bluetooth interface unit is installed Displaying administrator menus You can display the administrator menus by using specific key combinations on the control p...

Страница 11: ...ental changes Level 1 You can preserve settings for the Maintenance System Host Interface PCL Menu PS Menu PDF Menu and Language menus Level 2 You can preserve settings for the Paper Input Maintenance...

Страница 12: ...the optional Bluetooth interface unit is in stalled If the settings are changed to Private after registering computers that use this printer with the operating mode set to PublicPrivate only register...

Страница 13: ...d This Manual 10 Guide to the Printer Exterior Front View 11 Exterior Rear View 12 Inside 14 Control Panel 15 Setting Up Where to Put the Printer 17 Checking the Contents of the Box 20 Unpacking 22 In...

Страница 14: ...Type E 66 Attaching IEEE 1394 Interface Board Type B 70 Attaching IEEE 802 11b Interface Unit Type H 73 Attaching Bluetooth Interface Unit Type 3245 77 Attaching IEEE 1284 Interface Board Type A 81 A...

Страница 15: ...ows operating systems are as follows Microsoft Windows 95 operating system Microsoft Windows 98 operating system Microsoft Windows Millennium Edition Windows Me The product names of Windows 2000 are a...

Страница 16: ...n this manual the following important symbols are used Indicates a potentially hazardous situation which if instructions are not followed could result in death or serious injury Indicates a potentiall...

Страница 17: ...e place at an authorized dealer or an appropriate collection site If you dispose of the used toner containers yourself dispose of them according to local regulations Dispose at an authorized dealer or...

Страница 18: ...octor if necessary If your skin comes into contact with toner or used toner wash the affected area thoroughly with soap and water If toner or used toner gets into your eyes flush immediately with larg...

Страница 19: ...r Components inside the machine become very hot and can cause a burn if touched Lifting the paper feed unit carelessly or dropping it may cause an injury Do not touch the inside of the controller boar...

Страница 20: ...power and be careful when replac ing fusing unit removing misfed paper The inside of this printer becomes very hot Do not touch parts labelled v indicating a hot surface Touching these parts will resu...

Страница 21: ...is machine model meets the EN ERGY STAR Guidelines for energy efficiency The ENERGY STAR Guidelines intend to establish an international energy saving system for developing and introducing energy effi...

Страница 22: ...this sym bol Be sure to read the instructions all of which are described in the Safety In formation section The statements above are notes for your safety If this instruction is not followed paper mig...

Страница 23: ...ked by objects or in any way obstructed 4 Control Panel Contains keys for printer control and a panel display that displays the printer s status 5 Front Cover Open this to replace the fusing unit or t...

Страница 24: ...l this out when printing on paper that is longer than A4 or 8 1 2 11 5 Controller Board Slide this out to install options such as the memory unit user account enhance unit or printer hard disk Plug ca...

Страница 25: ...tilator helps keep internal components from overheating Overheating results in malfunction Make sure the ventilator is not blocked by objects or in any way obstructed 11 Optional Paper Feed Unit Conne...

Страница 26: ...s of paper 4 Toner Cartridges When the Add Toner color message appears on the display replace the toner car tridge of the indicated color 5 Photo Conductor Unit Color Black When the Replace Color PCU...

Страница 27: ...ngoing print job 5 Form Feed key When the printer is offline press this to print all data left in the printer s input buffer You can use this to force the printer to print data received in the online...

Страница 28: ...e lamp is unlit the printer is offline disabling data reception from the host com puter Press to return to the ready condition 10 Menu key Press this key to make and check the current printer settings...

Страница 29: ...uld cause an electric shock or fire The supplied power cord is for use with this equipment only Do not use with other appliances Doing so may result in fire electric shock or injury Do not handle the...

Страница 30: ...recommended or minimum space requirements are as fol lows A 13 cm 5 2 inches or more B 11 cm 4 4 inches or more C 35 cm 14 0 inches or more D 61 cm 24 4 inches or more Optimum Environmental Condition...

Страница 31: ...ventilation you may detect an odd smell To keep the workplace comfortable we recommend you keep it well ventilated Environments to Avoid Areas exposed to direct sunlight or strong light Dusty areas Ar...

Страница 32: ...low If there are any missing or defective items contact your sales representative Manuals and CD ROMs Quick Installation Guide CD ROM Printer Drivers and Utilities CD ROM Display Version Manuals HTML...

Страница 33: ...re 2 Color Calibration Sample Sheet Image density adjusting card User registration card Additional Documentation This package does not include an interface cable Please purchase one to use with your h...

Страница 34: ...is dirty Be careful not to let it touch your hands or clothes A Remove the plastic bag B Position the printer where it is to be used Lifting the printer requires at least two people Lift using the ins...

Страница 35: ...following procedure describes installing the waste toner bottle and photo conductor unit A Open the printer s right cover B Place the waste toner bottle in the position shown in the illustration C Lo...

Страница 36: ...t and right that are securing the inner cover and then unlock E Lift the inner cover until it stays up F Take out the black photo conductor unit G Remove the cap attached to the photo conductor unit T...

Страница 37: ...ove the tape from around Photo Conductor Unit by peeling it down ward and then remove unit s top cover Do not remove the unit s bottom cover yet Install the new Photo Conductor Unit as soon as you tak...

Страница 38: ...t Color J Align the green arrow at the tip of the photo conductor unit with the rail inside the printer Make sure the green arrow fits securely to the rail before proceeding to the next step If you do...

Страница 39: ...carefully in sliding the unit from its cover until it clicks into place If the photo conductor unit is not correctly installed print quality will be lost For example certain colors may not print L Rep...

Страница 40: ...Setting Up 28 M Lower the inner cover carefully N Push the left and right edge of the inner cover to secure it O Close the printer s right cover carefully...

Страница 41: ...of them according to local regulations Do not store toner used toner or toner containers in a place with an open flame The toner might ignite and cause burns or a fire Keep toner used or unused and t...

Страница 42: ...he toner cartridge C Hold the toner cartridge horizontally as illustrated and then shake it in the plastic bag from side to side about 10 times Do not open the shutter on the bottom of the toner cartr...

Страница 43: ...er cartridge vertically You can check the location for each toner cartridge by reading the labels on the printer The illustration uses the yellow cartridge as an example G Push the toner cartridge in...

Страница 44: ...Setting Up 32 I Close the printer s upper left cover If the toner cartridge is not set properly you cannot close the upper left cov er...

Страница 45: ...Misfeeds might occur Do not mix different types of paper in a single paper tray A Pull the paper tray out of the printer until it stops Lift it slightly and then pull it fully out Place the paper tray...

Страница 46: ...Setting Up 34 B Remove the adhesive tape and packing material C Press PUSH and then adjust the rear guide to the paper size you want to load D Adjust the side guides to the paper size you want to load...

Страница 47: ...r print side up in the paper tray Make sure the top of the stack is not higher than the limit mark inside the tray To avoid misfeeds set the rear and side to the exact paper size F Slide the paper tra...

Страница 48: ...A Check the printer s power switch is set to Off b If it is set to On a Turn it off B Attach the power cord to the socket on the back of the printer C Plug the other end of the power cord securely int...

Страница 49: ...on the control panel lights Wait until Ready appears on the display panel The machine may make a noise while initializing This noise does not indi cate a malfunction Do not turn off the power switch...

Страница 50: ...you want to use the display in English the following procedures are unnecessary The default setting is English A Press the Menu key The Menu screen appears B Press the U or T key to display Language C...

Страница 51: ...Setting Up 39 E Press the Enter key Wait for two seconds Menu appears on the display F Press the Online key The initial screen appears Ready...

Страница 52: ...the connection to the computer A Press the Menu key The Menu screen appears B Press the U or T key to display List Test Print and then press the Enter key The menu for selecting the contents to be tes...

Страница 53: ...sage appears on the display If there is an error message see Troubleshooting Maintenance Guide D Check the options For details about the configuration page see Interpreting the Configura tion Page Sof...

Страница 54: ...e Menu screen appears B Press the U or T key to display Maintenance and then press the Enter key C Press the U or T key to display Image Density and then press the Enter key D The following message ap...

Страница 55: ...U or T key to set the image density value and then press the Enter key You can adjust the image density from 10 to 10 Increasing the value makes the printouts darker and decreasing the value makes the...

Страница 56: ...SDRAM module Memory Unit Type D 128MB Memory Unit Type E 256MB Install the module to the SDRAM module slot on the controller board There are two types of memory unit 128 MB and 256 MB D Install the p...

Страница 57: ...f the following can be installed IEEE 1394 Interface Board Type B IEEE 1284 Interface Board Type A IEEE 802 11b Interface Unit Type H Bluetooth Interface Unit Type 3245 G Install the network data prot...

Страница 58: ...ork Data Protection Unit Type C See p 83 Attaching Network Data Protection Unit Type C 5 IEEE 1394 Interface Board Type B IEEE 802 11b Interface Unit Type H Bluetooth Interface Unit Type 3245 IEEE 128...

Страница 59: ...ng from the upper unit Before using the new paper feed unit you must make settings in the printer driver A Turn off the power and then unplug the power cable B Check the package contains the following...

Страница 60: ...e is to be installed Make sure you have enough space to access the back of the printer E Pull the paper tray out of the paper feed unit until it stops Lift it slightly and then pull it fully out Place...

Страница 61: ...49 H Lift using the inset grips on both sides of the printer I Align the printer with the two upright pins on the paper feed unit and then lower it slowly Be sure not to place the printer on the pape...

Страница 62: ...sporting the Printer in the Maintenance Guide When moving the printer remove the paper feed unit After finishing installation check the paper feed unit is installed properly print the configuration pa...

Страница 63: ...Installing Options 51 When adjusting the printing position see Adjusting Tray Registration Maintenance Guide...

Страница 64: ...f the power and then unplug the power cable B Check the contents of the package for the following AD440 Duplex Unit C Remove the adhesive tape D Open the front cover by pushing the front cover release...

Страница 65: ...cover After finishing installation check the duplex unit is installed properly print the configuration page from the List Test Print menu If it is installed prop erly you will see Duplex Unit for Opti...

Страница 66: ...Installing Options 54 For details about printing the configuration page see p 40 Test Printing...

Страница 67: ...he memory unit to physical shocks Available memory varies depending on model type Before using the new memory unit you must make settings in the printer driv er A Turn off the power and then unplug th...

Страница 68: ...r hand and then slowly pull out the controller board The controller board may be difficult to pull out D Hold the handles with both hands and then pull the controller board completely out There are tw...

Страница 69: ...default SDRAM module press down the levers on both sides to remove the default module Install a new SDRAM module To increase memory capacity to the maximum of 512 MB remove the de fault SDRAM module a...

Страница 70: ...d with the palm of your other hand until it stops Malfunctions can occur if the controller board is not set properly K Secure the controller board to the printer using the two screws removed in step B...

Страница 71: ...from the start of the procedure If you cannot install it properly even after attempting reinstalla tion contact your sales or service representative For details about printing the configuration page...

Страница 72: ...r hard disk Do not subject the printer hard disk to physical shocks Before using the new printer hard disk you must make the settings in the printer driver A Check the package contains the following P...

Страница 73: ...ws will be used again in step K to secure the controller board D Hold the machine with one hand grasp the handle with the other hand and then slowly pull out the controller board The controller board...

Страница 74: ...y aligning it with the controller board slot Slide it in the direction of the arrow and then connect it to the connector on the controller board G Secure the printer hard disk using the supplied screw...

Страница 75: ...with one hand and then push the lower handle of the controller board with the palm of your other hand until it stops Malfunctions can occur if the controller board is not set properly K Secure the co...

Страница 76: ...ion contact your sales or service representative For details about printing the configuration page see p 40 Test Printing Formatting the Printer Hard Disk If it becomes necessary to format the printer...

Страница 77: ...isk Type 3000 If you still cannot install it properly contact your sales or service representative To avoid malfunction do not turn off the power while formatting the printer hard disk D Press the Ent...

Страница 78: ...Do not subject the user account enhance unit to physical shocks A Check the package contains the following User Account Enhance Unit Type E B Turn off the power and then unplug the power cable C Remo...

Страница 79: ...ther hand and then slowly pull out the controller board The controller board may be difficult to pull out E Hold the handles with both hands and then pull the controller board completely out The user...

Страница 80: ...hen insert it into the controller board pressing it down until it clicks into place G Make sure that the user account enhance unit is firmly connected to the controller board H Align the controller bo...

Страница 81: ...finishing installation check the user account enhance unit is installed properly print the configuration page from the List Test Print menu If it is installed properly you will see Accounting Module f...

Страница 82: ...k 1 or later The client cannot install the printer driver without using an ac count that has administrators access rights Before touching the 1394 interface board ground yourself by touching some thin...

Страница 83: ...B Turn off the power and then unplug the power cable C Loosen the two screws and remove the cover of the 1394 interface board installation unit The removed cover and two screws are not used when insta...

Страница 84: ...led prop erly print the configuration page from the List Test Print menu If it is in stalled properly you will see IEEE1394 for Controller Option If the 1394 interface board is not installed properly...

Страница 85: ...ic electricity Static electricity can damage the 802 11b inter face unit Do not subject the 802 11b interface unit to physical shocks A Check the contents of the package for the following IEEE 802 11b...

Страница 86: ...e power and then unplug the power cable C Loosen the two screws and remove the cover of the 802 11b interface unit installation unit The removed cover and two screws are not used when installing the i...

Страница 87: ...o secure the interface unit F Attach the antenna to the card with the label facing down and the un even side of the antenna facing up G With the antenna and indented end toward the printer front cover...

Страница 88: ...nt the configuration page from the List Test Print menu If it is installed properly you will see IEEE 802 11b for Controller Option If the 802 11b interface unit is not installed properly reinstall it...

Страница 89: ...ooth interface unit touch something metal to discharge static electricity Static electricity thing damage the Bluetooth inter face unit Do not subject the Bluetooth interface unit to physical shocks A...

Страница 90: ...r and then unplug the power cable C Loosen the two screws and remove the cover of the Bluetooth interface unit installation unit The removed cover and two screws are not used when installing the inter...

Страница 91: ...s 79 E Tighten the two screws to secure the interface unit F With the INSERT side toward the printer front cover slowly insert the card into the Bluetooth interface unit until it stops G Press the ant...

Страница 92: ...menu If it is installed properly you will see Bluetooth for Controller Option If the Bluetooth interface unit is not installed properly reinstall it from the start of the procedure If you cannot insta...

Страница 93: ...interface board to physical shocks A Check the package contains the following IEEE 1284 Interface Board Type A B Turn off the power and then unplug the power cable C Loosen the two screws and remove t...

Страница 94: ...lation check the 1284 interface board is installed prop erly print the configuration page from the List Test Print menu If it is in stalled properly you will see Parallel Interface for Controller Opti...

Страница 95: ...ks Use the under slot for the data protection unit A Check the package contains the following Network Data Protection Unit Type C B Turn off the power and then unplug the power cable C Remove the cove...

Страница 96: ...tion unit until the card clicks into the place E Reattach the cover over the network data protection unit Fasten the screw to secure the cover Do not touch the network data protection unit while the m...

Страница 97: ...ielded cables create electromagnetic inter ference that could cause malfunctions Ethernet cable is not supplied with this machine Select your cable according to the network environment A Attach one fe...

Страница 98: ...Connecting the Printer 86 Reading the LED Lamps 1 Yellow lit when 100 BASE TX is being used Unlit when 10 BASE T is being used 2 Green lit when the printer is properly connected to the network...

Страница 99: ...00 XP Windows Server 2003 Mac OS X v10 3 3 or higher Windows 98 SE Me supports USB1 1 speeds Mac OS X supports only the standard USB port A Connect the square shaped connector of the USB2 0 cable to t...

Страница 100: ...Use shielded interface cable Unshielded cables create electromagnetic inter ference that could cause malfunctions A Turn off the printer and computer B Connect the cable to the interface connector of...

Страница 101: ...eet long A Connect the interface cable to the 1394 interface board B Connect the other end to the host computer You can use either connector Either of the two connectors for the 1394 interface unit ca...

Страница 102: ...lowing table shows the control panel settings and their default values These items appear in the Host Interface menu If DHCP is in use the IP address subnet mask and gateway address are all set automa...

Страница 103: ...selection screen appears F Press the U or T key to select Active or Not Active and then press the Enter key After the settings are made about two seconds later the screen returns to the active protoc...

Страница 104: ...ape key when no value is entered and the screen will return to the network setup menu without the IP address changing K Make the other settings in the same way and then press the Enter key After the s...

Страница 105: ...ernet SNAP Usually use the default setting Auto Select When you first select Auto Select the frame type detected by the printer is adopted If your network can use more than two frame types the printer...

Страница 106: ...out two seconds later the screen returns to the network setup menu S Press the Online key The initial screen appears T Print a configuration page to confirm the settings made For details about printin...

Страница 107: ...Subnet Mask Gateway Address DHCP Frame Type NW and Active Protocol under Network Setup For details about setting items under Configuring the Printer for the Network see Software Guide The 802 11b inte...

Страница 108: ...u The factory default is 802 11 Ad hoc To use an IEEE 802 11b card for which the SSID Network Name setting is not necessary select Ad hoc The transmission mode of IEEE 802 11b can also be set using a...

Страница 109: ...eb Browser Software Guide K Press the U or T key to display SSID and then press the Enter key The following message appears on the display If an SSID has been set you can check the set SSID Press the...

Страница 110: ...llowing message appears on the display R Press the U or T key to display Active and then press the Enter key The following message appears on the display When setting the WEP Setting to Active you wil...

Страница 111: ...or hexadecimal and 5 or 13 for ASCII If you try to enter too many characters the following message appears hexadecimal ASCII For ASCII character strings each capital letter and lowercase letter is rec...

Страница 112: ...Configuration 100 For details about printing the configuration page see p 40 Test Printing...

Страница 113: ...Mask1394 are automatically set IP over 1394 A Press the Menu key The Menu screen appears B Press the U or T key to display Host Interface menu and then press the Enter key The interface setting menu...

Страница 114: ...t mask Do not set 011 022 033 044 as the IP address To get the IP address for the printer contact your network administrator G Press the U or T key to enter the left most entry field of the IP ad dres...

Страница 115: ...The Menu screen appears B Press the U or T key to display Host Interface menu and then press the Enter key The interface setting menu appears C Press the U or T key to display IEEE 1394 Setup and the...

Страница 116: ...ngs are made about two seconds later the screen returns to the IEEE 1394 setting menu G Set Bidi SCSI print in the same way H Press the Online key The initial screen appears I Print a configuration pa...

Страница 117: ...v er 2003 and Windows NT 4 0 you must have an account that has Manage Printers permission Log on as an Administrator The Quick Install is not available when using this printer under USB connec tion If...

Страница 118: ...t dialog box of the installer and then take out the CD ROM To stop installation of the selected software click Cancel before installa tion is complete Restart the computer and then reinstall the other...

Страница 119: ...ertain operating system setting If this is the case launch Setup exe on the CD ROM root directory C Select an interface language and then click OK D Click Install manuals E Follow the instructions on...

Страница 120: ...TCP IP 19 Installing the PostScript 3 Printer Driver Windows 95 98 Me IPP 21 Installing the PostScript 3 Printer Driver Windows 2000 TCP IP 22 Installing the PostScript 3 Printer Driver Windows 2000 I...

Страница 121: ...ws Server 2003 USB 55 Troubleshooting USB 56 Printing with Parallel Connection 58 Installing the PCL or RPCS Printer Driver 58 Installing the PostScript 3 Printer Driver Windows 95 98 Me 59 Installing...

Страница 122: ...sword Protected Documents 99 Using Commands 101 Sample Print 102 Printing the First Set 102 Printing the Remaining Sets 103 Deleting a Sample Print File 104 Checking the Error Log 104 Locked Print 106...

Страница 123: ...ing Top Page 162 About Menu and Mode 163 Access in the Administrator Mode 164 Displaying Web Image Monitor Help 165 Using SmartDeviceMonitor for Admin 167 Installing SmartDeviceMonitor for Admin 168 C...

Страница 124: ...203 status 203 syslog 204 upnp 204 web 204 wiconfig 205 wins 207 SNMP 209 Getting Printer Information over the Network 210 Current Printer Status 210 Printer configuration 216 Understanding the Displ...

Страница 125: ...iles 251 Creating a Desktop Printer Icon 251 Setting Up Options 252 Installing the ColorSync Profiles 252 Installing Adobe Type Manager 253 Installing Screen fonts 254 Changing to EtherTalk 254 Mac OS...

Страница 126: ...SSL Encryption 285 SSL Secure Sockets Layer Encryption 285 User Settings for SSL Secure Sockets Layer 289 Installing the Certificate Using SmartDeviceMonitor for Client 290 Installing Font Manager 20...

Страница 127: ...information about paper replacing supplies and dealing with paper jams and error messages Software Guide HTML this manual Provides basic information about installing the printer driver and software u...

Страница 128: ...all applications currently running B Insert the CD ROM into the CD ROM drive The installer starts Auto Run may not work with certain operating system settings If this hap pens launch Setup exe on the...

Страница 129: ...ttings If this hap pens launch Setup exe on the CD ROM root directory Select a printer to whose IP address is displayed in Connect To to install SmartDeviceMonitor for Client when using TCP IP Quick I...

Страница 130: ...ions can be established through Ethernet IEEE 802 11b and IEEE 1394 IP over 1394 Available ports are determined based on the combination of Windows operating system version and connection method used...

Страница 131: ...E 1394 IP over 1394 None Connection Method Available Ports Ethernet IEEE 802 11b SmartDeviceMonitor for Client port Standard TCP IP LPR port IEEE 1394 IP over 1394 SmartDeviceMonitor for Client port S...

Страница 132: ...er and remote printer see p 49 Using as the Net Ware Print Server Remote Printer Local Connection Local connections can be established via parallel USB IEEE 1394 SCSI print and Bluetooth connections W...

Страница 133: ...inter driver for each method of connection For the USB connection see p 52 Installing the Printer Driver Using USB For the parallel connection see p 58 Printing with Parallel Connection For the IEEE 1...

Страница 134: ...ettings If this hap pens launch Setup exe on the CD ROM root directory C Select an interface language and then click OK The default interface language is English D Click SmartDeviceMonitor for Client...

Страница 135: ...ngs If this hap pens launch Setup exe on the CD ROM root directory C Select an interface language and then click OK The default interface language is English D Click PCL RPCS Printer Drivers E The sof...

Страница 136: ...n Help Up to 8 numeric characters can be entered No alphabetic characters or sym bols are available O Select the Default Printer check box to configure the printer as default P Click Finish Installati...

Страница 137: ...the printer settings The details shown in Comment Driver and Port vary depending on the operating system printer model and port I Click Port and then click Add J Click SmartDeviceMonitor and then clic...

Страница 138: ...out restarting the computer may appear Restart the computer to complete installation To stop installation of the selected software click Cancel before installa tion is complete A message appears if th...

Страница 139: ...ge and then click Finish K On the Start menu point to Settings and then click Printers The Printers window appears L Click the icon of the printer you want to use On the File menu click Properties M O...

Страница 140: ...installed The English printer driver is installed when the following language is selected Cestina Magyar Polski Portugues Suomi D Click PostScript 3 Printer Driver Add Printer Wizard starts E Click Ne...

Страница 141: ...e of any existing port If a name is not specified here the address entered in the Printer URL box becomes the IPP port name R Click Detailed Settings to configure proxy server IPP user name and oth er...

Страница 142: ...SmartDeviceMonitor and then click Next I Click TCP IP and then click Search A list of printers using TCP IP appears J Select the printer you want to use and then click OK Only printers that respond t...

Страница 143: ...talled when the following language is selected Cestina Magyar Polski Portugues Suomi D Click PostScript 3 Printer Driver Add Printer Wizard starts E Click Next F Click Local printer and then click Nex...

Страница 144: ...e can be set after the printer driver installation For information about User Code see the printer driver Help Installing the PostScript 3 Printer Driver Windows XP Windows Server 2003 TCP IP Installi...

Страница 145: ...nge the printer name if you want and then click Next Select the Yes check box to configure the printer as default M Click Next N Specify whether or not to print a test page and then click Next O Click...

Страница 146: ...ypted communication enter https printer s address printer Internet Explorer 5 01 or a higher version must be installed example IP address 192 168 15 16 http 192 168 15 16 printer https 192 168 15 16 p...

Страница 147: ...M into the CD ROM drive The installer starts Auto Run may not work with certain operating system settings If this hap pens launch Setup exe on the CD ROM root directory C Select an interface language...

Страница 148: ...er Code see the printer driver Help Installing the PostScript 3 Printer Driver Windows NT 4 0 IPP Installing this printer driver requires Administrators permission Log on using an account that has Adm...

Страница 149: ...ck Detailed Settings to make necessary settings For information about the settings see SmartDeviceMonitor for Client Help L Click OK M Check that the name of the printer whose driver you want to insta...

Страница 150: ...click the icon of the printer you want to use On the File menu click Properties C Click the Details tab and then click Configure Port The Port Settings dialog box appears For TCP IP timeout setting ca...

Страница 151: ...e agreement appears in the License Agreement dialog box After reading the agreement click I accept the agreement and then click Next F Select a printer driver you want to use in the Printer Program di...

Страница 152: ...allation of the selected software click Cancel before installa tion is complete A message appears if there is a newer version of the printer driver already installed If there is you cannot install the...

Страница 153: ...ars select RICOH NetworkPrinter Driver C Model K Click Finish in the Add Standard TCP IP Printer Port Wizard dialog box L Check that the name of the printer whose driver you want to install is se lect...

Страница 154: ...then click Next G Click Create a new port H Click Standard TCP IP in Create a new Port and then click Next I Click Standard TCP IP and then click OK J Click Next in the Add Standard TCP IP Printer Por...

Страница 155: ...Preparing for Printing 36 A User Code can be set after the printer driver installation For information about User Code see the printer driver Help...

Страница 156: ...is English D Click PCL RPCS Printer Drivers E The software license agreement appears in the License Agreement dialog box After reading the agreement click I accept the agreement and then click Next F...

Страница 157: ...inter driver use Add Printer See p 70 If a Message Appears during Installation Installing the PostScript 3 Printer Driver Windows 2000 Installing this printer driver requires Administrators permission...

Страница 158: ...her or not to print a test page and then click Next O Click Finish The printer driver installation starts A User Code can be set after the printer driver installation For information about User Code s...

Страница 159: ...and then click OK K Check that the name of the printer whose driver you want to install is se lected and then click Next L Change the printer name if you want and then click Next Select the Yes check...

Страница 160: ...lick Add Port G Select LPR Port and then click OK H Enter the printer s IP address in the Name or address of server providing lpd box box I Enter lp in the Name of printer or print queue on that serve...

Страница 161: ...rinter using the SmartDevice Monitor port Recovery Printing and Parallel Printing cannot be used from the client If you print with a Windows XP or Windows Server 2003 print server notifica tion functi...

Страница 162: ...er the printer driver in stallation For information about User Code see the printer driver Help O Select the Default Printer check box to configure the printer as default P Click Finish The printer dr...

Страница 163: ...se for Printer window I Select the printer you want to use and then click OK J Check the location of the selected printer is shown and then click Next K Change the printer name if you want and then cl...

Страница 164: ...Wizard starts E Click Next F Click Network printer and then click Next G Click Next H Double click the computer name you want to use as a print server in the Shared printers window I Select the printe...

Страница 165: ...he default interface language is English The printer driver with the selected language will be installed The English printer driver is installed when the following language is selected Cestina Magyar...

Страница 166: ...hap pens launch Setup exe on the CD ROM root directory C Select an interface language and then click OK The default interface language is English The printer driver with the selected language will be...

Страница 167: ...Preparing for Printing 48 A User Code can be set after the printer driver installation For information about User Code see the printer driver Help...

Страница 168: ...ample Operating system Windows 98 NetWare version 4 1 File server name CAREE Queue name R QUEUE A Insert the CD ROM into the CD ROM drive The installer starts Auto Run may not work with certain operat...

Страница 169: ...3 open the printer properties from the Printers and Faxes window Q On the Printer Settings tab clear the Form Feed and Enable Banner check boxes Under Windows 2000 XP Windows Server 2003 or Windows NT...

Страница 170: ...Settings tab in the printer properties dialog box Banner Page Do not use NetWare to configure a banner page Follow the procedure below to disable banner pages according to the operating system used U...

Страница 171: ...SB port is added to the Printers window A Check that the power of the printer is off B Connect the printer and computer using the USB cable C Turn on the power of the printer The plug and play functio...

Страница 172: ...nd then click Browse The Browse for Folder dialog box appears N Insert the CD ROM into the CD ROM drive When Auto Run starts click Exit To disable Auto Run press the Shift key when inserting the CD RO...

Страница 173: ...and play is enabled and the icon of the printer connected to the USB port is added to the Printers window If the printer driver is not installed follow the plug and play instructions of the printer to...

Страница 174: ...2003 USB Installing a printer driver requires Administrators permission Log on using an account that has Administrators permission If the printer driver has already been installed plug and play is en...

Страница 175: ...river are stored in the following location RPCS D DRIVESRPCSWIN2K_XP Language DISK1 PCL 5c D DRIVESPCL5cWIN2K_XP Language DISK1 PCL 6 D DRIVESPCL6WIN2K_XP Language DISK1 PostScript 3 D DRIVESPS3WIN2K_...

Страница 176: ...l Serial Bus controllers remove any conflicting devices Conflicting devices have a yellow or icon by them Take care not to accidentally remove required devices For details see Windows Help When using...

Страница 177: ...ory C Select an interface language and then click OK The default interface language is English D Click PCL RPCS Printer Drivers E The software license agreement appears in the License Agreement dialog...

Страница 178: ...ROM drive The installer starts Auto Run may not work with certain operating system settings If this hap pens launch Setup exe on the CD ROM root directory C Select an interface language and then click...

Страница 179: ...ting system settings If this hap pens launch Setup exe on the CD ROM root directory C Select an interface language and then click OK The default interface language is English The printer driver with t...

Страница 180: ...Select an interface language and then click OK The default interface language is English The printer driver with the selected language will be installed The English printer driver is installed when th...

Страница 181: ...ault interface language is English The printer driver with the selected language will be installed The English printer driver is installed when the following language is selected Cestina Magyar Polski...

Страница 182: ...alled connecting or disconnecting the optional IEEE 1394 cable causes the printer icon to change Windows 2000 If Found New Hardware Wizard appears every time the computer is started or the cable is co...

Страница 183: ...connected If the printer driver has already been installed the printer icon is added to the Printers window In this case printer driver installation is not neces sary If printing does not work properl...

Страница 184: ...ting or disconnecting the optional IEEE 1394 cable causes the printer icon to change A Connect the printer and computer using the IEEE 1394 interface cable When the Found New Hardware Wizard dialog bo...

Страница 185: ...not work properly after the installation delete the port and reinstall the printer driver For details see Printer Does Not Print Mainte nance Guide If you do not want to install the printer when Found...

Страница 186: ...led in the printer Only one Bluetooth adaptor or Bluetooth equipped computer can be con nected via BIP Only JPEG images that can be printed using BIP User Codes are disabled for BIP You cannot print i...

Страница 187: ...ck the Ports tab J Under Port select the COMx check box X indicates the COM port number used by Bluetooth K Click OK Close the Printers window If a dialog box appears while transmitting a print job re...

Страница 188: ...the password entry which is required to trans mit print jobs see p 69 Printing in the Security Mode Printing in the Security Mode A Send the print job to the printer in use Depending on the computer...

Страница 189: ...SWIN2K_XP or DRIVERSRPCS T4 If the installer starts click Cancel to quit For Windows XP Professional and Windows Server 2003 A On the Start menu click Printers and Faxes B Click Add a printer C Follow...

Страница 190: ...orts bidirectional communications and updates the printer status automatically The PCL printer driver supports bidirectional communications You can up date printer status manually The PostScript 3 pri...

Страница 191: ...IEEE 1394 and Activate must be selected in the Bidi SCSI print Under Windows 2000 XP or Windows Server 2003 Enable bidirectional sup port must be selected and Enable printer pooling must not be select...

Страница 192: ...lick the Device Settings tab E Select options installed from the Option area and then make the neces sary settings F Select the total amount of the memory in Total Memory when the option al SDRAM modu...

Страница 193: ...C On the File menu click Properties D Make the necessary settings and then click OK With some applications the printer driver settings are not used and the ap plication s own default settings are appl...

Страница 194: ...s Making printer default settings the printer properties To change the printer default settings including option configuration settings log on using an account that has Manage Printers permission Memb...

Страница 195: ...a specific application To make printer settings for a specific application open the Printing Preferences dialog box from that application The following explains how to make settings for the WordPad ap...

Страница 196: ...ars B Click the icon of the printer you want to use C On the File menu click Properties The printer properties dialog box appears D Make the necessary settings and then click OK Settings you make here...

Страница 197: ...e the properties displayed in the Print dialog box of an application Settings made here are used as defaults when printing from this application A On the File menu click Print The Print dialog box app...

Страница 198: ...ve Full Control permission by default You cannot change the printer default settings for each user Settings made in the printer properties dialog box are applied to all users A On the Start menu point...

Страница 199: ...the following procedure are valid for the current ap plication only General users can change the properties displayed in the Print dialog box of an application Settings made here are used as defaults...

Страница 200: ...settings To make the printer default settings open the printer properties dialog box from the Printers window You cannot change the printer default settings for each user Settings made in the printer...

Страница 201: ...displayed in the Print dialog box of an application Settings made here are used as defaults when printing from this application A On the File menu click Print The Print dialog box appears B Select th...

Страница 202: ...You cannot change the printer default settings for each user Settings made in the printer properties dialog box are applied to all users A On the Start menu point to Settings and then click Printers T...

Страница 203: ...Windows XP Windows Server 2003 Accessing the Printer Properties Making printer default settings the printer properties To change the printer default settings including option configuration settings l...

Страница 204: ...ettings and then click OK Settings you make here are used as the default settings for all applications For details see the printer driver Help Making printer settings from an application You can make...

Страница 205: ...e Full Control permission by default You cannot change the printer default settings for each user Settings made in the printer properties dialog box are applied to all users A On the Start menu point...

Страница 206: ...tings for all applications For details see the printer driver Help Making printer settings from an application You can make printer settings for a specific application To make printer settings for a s...

Страница 207: ...ect the printer you want to use in the Name list and then click Prop erties The printer properties dialog box appears C Make the necessary settings and then click Apply D Click OK to start printing Fo...

Страница 208: ...nters window appears B Click the icon of the printer you want to use C On the File menu click Properties The printer properties dialog box appears D Make the necessary settings and then click OK E Cli...

Страница 209: ...Properties Making printer default settings the printer properties To change the printer default settings including option configuration settings log on using an account that has Manage Printers permis...

Страница 210: ...ation You can make printer settings for a specific application To make printer settings for a specific application open the Printing Preferences dialog box from that application The following explains...

Страница 211: ...and Faxes The Printers and Faxes window appears B Click the icon of the printer you want to use C On the File menu click Properties The printer properties dialog box appears D Make the necessary setti...

Страница 212: ...r the current ap plication only General users can change the properties displayed in the Print dialog box of an application Settings made here are used as defaults when printing from this application...

Страница 213: ...sing an account that has Full Control permission Members of the Ad ministrators Server Operators Print Operators and Power Users groups have Full Control permission by default You cannot change the pr...

Страница 214: ...operties displayed in the Print dialog box of an application Settings made here are used as defaults when printing from this application A On the File menu click Print The Print dialog box appears B S...

Страница 215: ...e manuals provided with the Mac OS D Configure the settings and then click OK Setting up for printing from an application A Open the file you want to print B On the File menu click Print C Check that...

Страница 216: ...d PDF Direct Print is not available with some versions of DeskTopBinder Lite Use DeskTopBinder Lite installed from the CD ROM provided with this print er PDF Direct Print settings can be made from PDF...

Страница 217: ...e The Function palette contains buttons for functions that are already configured through DeskTopBinder Lite enhancement Using these buttons you can print Windows files preview printouts convert image...

Страница 218: ...d check box at the bottom right of the screen and then click OK Click Next repeatedly until Finish appears Click Finish to close the Extended Features Wizard screen E Move the PDF file you want to pri...

Страница 219: ...Change the icon displayed on the tool bar 3 Printer name Displays a list of RPCS drivers that support PDF direct printing 4 Duplex Print on both sides of sheets 5 Layout Print multiple pages on a sing...

Страница 220: ...se the file cannot be printed 16 Group Password If a group password is assigned to DeskTopBinder Lite and this machine enter the group password in this field Otherwise printing cannot start Using Comm...

Страница 221: ...or deleted using Web Image Monitor after you se lect Sample Print using the control panel will appear on the display panel However an error message will appear if you try to print or delete those Sam...

Страница 222: ...to print The job is saved on the hard disk F Check the print job and then use the control panel to print the remaining sets or delete them p 103 Printing the Remaining Sets p 104 Deleting a Sample Pri...

Страница 223: ...ress the U or T key to display Sample Print and then press the Enter key C Press the U or T key to display the file you want to delete and then press the Enter key D Press the U or T key to display De...

Страница 224: ...ogs will be deleted A Press the Menu key The Menu screen appears B Press the U or T key to display Sample Print and then press the Enter key The user ID and the time when the job was stored appear C P...

Страница 225: ...nt using the control panel will still appear on the display panel However an error message will appear if you try to print or delete those Locked Print files Print jobs are not saved on the hard disk...

Страница 226: ...E In the Password box enter a four to eight digit password 0 9 F Execute a command to print The job is saved on the hard disk G Enter the password using the control panel and then specify whether to...

Страница 227: ...the hard disk is deleted Deleting a Locked Print File A Press the Menu key The Menu screen appears B Press the U or T key to display Locked Print and then press the Enter key C Press the U or T key to...

Страница 228: ...ut stored in stead in the locked print error log until the number of locked print error files reaches 20 If you turn off the power the logs will be deleted A Press the Menu key The Menu screen appears...

Страница 229: ...Other Print Operations 110 The initial screen appears...

Страница 230: ...paper in the paper that does not agrees with the size and form specified by the printer driver or there is no paper You can form feed using tray A Press the Form Feed key and then select the paper tra...

Страница 231: ...eiving data if the Data In indicator is lit or blinking B Press the Job Reset key The Job Reset screen appears C Select the current job or all jobs including the current job using the U or T key It is...

Страница 232: ...as a network printer print jobs from other users computer cannot be canceled from a client computer When the print job you selected starts printing it takes some time before the print job disappears f...

Страница 233: ...s too short Set a longer period of time for I O Timeout on the Host In terface menu If the print job you want to cancel is not being printed A Double click the printer icon on the desktop A window app...

Страница 234: ...l Printing the print data is saved in the hard disk before printing To use this function set it from the menu See p 202 spoolsw Do not turn off the printer or the computer when a print job is being sp...

Страница 235: ...de using telnet or Web Image Monitor Using Web Image Monitor In System on the Configuration menu click Enable in Spool Printing For details see Web Image Monitor Help Using telnet Enter spoolsw spool...

Страница 236: ...aper the paper will be delivered from a tray containing paper from a tray containing paper in the portrait direction Therefore if the cover paper is set to landscape orien tation the orientation cover...

Страница 237: ...r printing is guaranteed A4 Letter and Legal sized paper can be printed 256 MB standard 128 MB B5 JIS A4 Letter and Legal sized paper printing is guaranteed Duplex printing 1200 x 600 dpi 128 MB stand...

Страница 238: ...Other Print Operations 119 To duplex print at 1200 x 1200 dpi the optional SDRAM module must be in stalled High density images cannot be printed if the SDRAM module is not installed...

Страница 239: ...t Appear only when the optional hard disk is installed For details see p 102 Sample Print Locked Print Appear only when the optional hard disk is installed For Details see p 106 Locked Print Paper Inp...

Страница 240: ...t Alert WL LAN Signal WL LAN Defaults Image Area Key Repeat Menu Prt Err Report Auto Continue Memory Overflow Copies Printer Lang Sub Paper Size Page Size Def Print Lang Duplex Blank Pages Energy Save...

Страница 241: ...when the optional IEEE 1394 interface board is installed IEEE 802 11b appears when the optional IEEE 802 11b interface unit is in stalled PCL Menu PS Menu Menu I O Buffer I O Timeout Network Setup IEE...

Страница 242: ...g the Control Panel 123 PDF Menu Language Menu PDF Change PW PDF Group PW Resolution Color Setting Color Profile Menu English German French Italian Dutch Swedish Norwegian Danish Spanish Finnish Portu...

Страница 243: ...e Menu screen appears B Press the U or T key to display Paper Input and then press the Enter key C Press the U or T key to display Tray Locking and then press the Enter key D Press the U or T key to d...

Страница 244: ...reen appears F Press the Online key The initial screen appears Paper input menu parameters This section explains about parameters that can be set on the Paper Input menu Bypass Size You can specify th...

Страница 245: ...er 2 Glossy Paper Default Plain Paper Only the installed trays appear on the display panel Tray Locking If you use various types of paper you can lock a tray to prevent printing on different types of...

Страница 246: ...lect is selected in Pa per Source from the printer driver The tray selected here is used when no tray is selected for a print job Default Tray 1 Only installed trays appear on the display panel It is...

Страница 247: ...Letter 8 1 2 x 11 size paper so load them in the same paper tray A Press the Menu key The Menu screen appears B Press the T or U key to display List Test Print and then press the Enter key C Press th...

Страница 248: ...troller Option The items are displayed when the controller options are installed Printer Language The version number of the printer language is displayed Options The options installed are displayed Pa...

Страница 249: ...nformation Interface information is displayed List Test Print menu parameters This section explains about parameters that can be set on the List Test Print menu Config P Er Log You can print the confi...

Страница 250: ...ttings Using the Control Panel 131 PDF Config Page You can print an installed PS3 font and the Disk Directory List which shows the optional hard disk Hex Dump You can print the data sent by the comput...

Страница 251: ...the optional hard disk unit after initial set up A Press the Menu key The Menu screen appears B Press the T or U key to display Maintenance and then press the Enter key C Press the T or U key to displ...

Страница 252: ...lay Maintenance and then press the Enter key C Press the T or U key to display WL LAN Signal and then press the Enter key Check the display for result D Press the Escape key The initial screen appears...

Страница 253: ...o reset the wireless LAN setting on the Maintenance menu Comm Mode Channel Trans Speed WEP Setting and SSID can be select ed on the Host Interface menu A Press the Menu key The Menu screen appears B P...

Страница 254: ...Maintenance Guide Image Density You can select the print image density Prt Test Sheet You can print the image density test sheet Black Cyan Magenta Yellow 10 to 10 Reset Reset the image density value...

Страница 255: ...g internal units see Replacing Consumables Maintenance Guide HD Format You can format the hard disk when the optional hard disk is installed For details about formatting the hard disk see Attaching Pr...

Страница 256: ...set the wireless LAN to default The menu appears when the 802 11b in terface unit is installed Image Area You can extend the printable area by about 2 5 mm 0 01 inch Do not enlarge Enlarge Default Do...

Страница 257: ...nergy Saver Timer A Press the Menu key The Menu screen appears B Press U or T key to display System and then press the Enter key C Press U or T key to display Energy Saver and then press the Enter key...

Страница 258: ...s 10 minutes 15 minutes Default Off When set to on and certain errors occur the current job may be canceled and the printer automatically perform the next queued job Memory Overflow You can specify wh...

Страница 259: ...8 1 2 x 14 8 1 2 x 11 5 1 2 x 8 1 2 7 1 4 x 10 1 2 8 x 13 8 1 2 x 13 8 1 4 x 13 A4 210 x 297 B5 JIS 182x257 A5 148 x 210 A6 105 x 148 16K 195 x 267 4 1 8 x 9 1 2 3 7 8 x 7 1 2 C5 Env 162x229 C6 Env 11...

Страница 260: ...nergy Saver mode the Power indicator is unlit but the Online indicator remains lit Energy Saver 2 You can specify the number of minutes Energy Saver mode is applied E Saver On Off You can specify whet...

Страница 261: ...Set Time 10 to 999sec by 1sec Unit of Measure You can specify the unit of measurement in mm or inch for the custom pa per size mm inch Default value is destination dependant B W Page Detect Specify w...

Страница 262: ...ommand Default Driver Command RAM Disk If the optional hard disk is not installed for PDF Direct Print select a value of 2 MB or higher This menu appears only when the optional hard disk is not instal...

Страница 263: ...ng Printer Settings Using the Control Panel 144 Off On After changing the setting turn off the power of the printer briefly and then turn it on again Default On For information see Web Image Monitor H...

Страница 264: ...reen appears B Press the U or T key to display Host Interface and then press the Enter key C Press the U or T key to display I O Timeout and then press the Enter key D Press the U or T key to select t...

Страница 265: ...nds 20 seconds 25 seconds 60 seconds Default 15 seconds Network Setup You can make network related settings For details see Configuration Setup Guide DHCP You can select On or Off to use DHCP with TCP...

Страница 266: ...gateway address cannot be changed To change it set DHCP to off Contact your network administrator for infor mation about the network configuration Default 000 000 000 000 Frame Type NW You can select...

Страница 267: ...tional IEEE 1394 board is installed For details about IEEE 1394 Setup see Setup Guide DHCP You can select On or Off to use TCP IP with DHCP On Off Default On IP Address1394 You can specify the IP add...

Страница 268: ...directional communication for SCSI print On Off Default On IEEE 802 11b You can make settings for wireless LAN This menu appears only when the optional 802 11b interface unit is installed Comm Mode Yo...

Страница 269: ...rs used are ASCII 0x20 0x7e 32 bytes An SSID is set automatically to the nearest access point if no SSID has been set If no SSID has been set for the 802 11 ad hoc mode an SSID is set au tomatically a...

Страница 270: ...When using 64 bit WEP up to 10 hexadecimal or 5 ASCII characters can be entered When using 128 bit WEP up to 26 hexadecimal or 13 ASCII characters can be entered The WEP key can also be set using Web...

Страница 271: ...to display PCL Menu and then press the En ter key C Press the U or T key to display Orientation screen and then press the Enter key D Press the U or T key to select the orientation and then press the...

Страница 272: ...u can select only fonts downloaded to the op tional hard disk Font Number You can specify the ID of the default font you want to use 0 to 50 Internal 1 to 50 Download Point Size You can specify the po...

Страница 273: ...egal ISO 4 ISO 6 ISO 11 ISO 15 ISO 17 ISO 21 ISO 60 ISO 69 Win 3 0 Default PC 8 Courier Font You can select a courier type font Regular Dark Default Regular Ext A4 Width You can extend the width of th...

Страница 274: ...hen press the Enter key C Press the U or T key to display Data Format and then press the Enter key D Press the U or T key to select TBCP and then press the Enter key Wait for two seconds The PS Menu s...

Страница 275: ...the data format selected using the control panel is Binary Data The printer driver data format is binary and the data format selected using the control panel is TBCP Default Binary Data Resolution You...

Страница 276: ...Menu and then press the Enter key C Press U or T key to display Resolution and then press the Enter key D Press U or T key to select the resolution and then press the En ter key Wait for two seconds T...

Страница 277: ...t be installed Current PW The password can be set using Web Image Monitor but must be sent through the network For increased security use this menu on the control panel to set the password directly De...

Страница 278: ...Making Printer Settings Using the Control Panel 159 Presentation Photographic User Setting Default Auto...

Страница 279: ...key to display Language and then press the En ter key C Press the U or T key to select the language and then press the Enter key Wait for two seconds The Menu screen appears D Press the Online key The...

Страница 280: ...rations from Web Image Monitor become available Recommended Web browser Windows Internet Explorer 5 5 or higher Netscape Navigator 7 0 or higher Mac OS 8 1 or higher Netscape Navigator 7 0 or higher S...

Страница 281: ...ress Every Web Image Monitor page is divided into the following areas 1 Header area The link to help and dialog box for keyword search appears 2 Menu area The dialog box for switching to the user mode...

Страница 282: ...tus can be viewed but the printer settings cannot be changed 1 Status Printer status including the amount of remaining paper in paper trays and the amount of remaining toner is displayed 2 Job Allows...

Страница 283: ...settings for the printer interface settings and security 5 Reset Printer Job Click to reset current print jobs and print jobs in queue This button is located on Top Page 6 Reset Device Click to reset...

Страница 284: ...play area appears Downloading Help A In the OS list select the operating system B In the Language list select the language C Click Download D Download Help by following the instructions on the screen...

Страница 285: ...Monitoring and Configuring the Printer 166 E Click Apply...

Страница 286: ...CP IP IPX SPX NetWare Novell Client for Windows NT 2000 XP Windows Server 2003 TCP IP IPX SPX Windows XP TCP IP IPX SPX Novell Client for Windows NT 2000 XP Windows NT 4 0 TCP IP IPX SPX Client Servic...

Страница 287: ...ification e mail to a computer Installing SmartDeviceMonitor for Admin Follow the procedure below to install SmartDeviceMonitor for Admin A Quit all applications currently running B Insert the CD ROM...

Страница 288: ...ters using the selected protocol appears Select the protocol of the printer whose configuration you want to change C In the list select a printer whose configuration you want to change D On the Tools...

Страница 289: ...page of Web Image Monitor appears F Select Level 1 or Level 2 in the Lock Operation Panel Menu list G Click Apply H Quit Web Image Monitor For details about setting items see Help in the General Setti...

Страница 290: ...d by User Codes Starting User Management Tool Follow the procedure below to start User Management Tool A Start SmartDeviceMonitor for Admin B On the Group menu point to Search Device and then click TC...

Страница 291: ...er Management Tool C On the File menu click Export User Statics List D Specify the save location and file name and then click Save E Click Finish on the File menu to quit User Management Tool Resettin...

Страница 292: ...add new users and set functions applicable to them A Start SmartDeviceMonitor for Admin B Click the Access Control List tab of User Management Tool C On the Edit menu click Add New User D Enter the U...

Страница 293: ...all printers in the selected group and then click On or Off E Quit SmartDeviceMonitor for Admin For details about the setting value for Energy Saver mode see SmartDe viceMonitor for Admin Help Settin...

Страница 294: ...Monitor for Admin B On the Group menu point to Search Device and then click TCP IP IPX SPX or TCP IP SNMPv3 The status of printers is indicated by icons in the list For details about status icons see...

Страница 295: ...etup Tool starts when the network interface board is default Follow the instruction on the screen E Enter the user name and password and then click OK Top Page of Web Image Monitor appears Contact you...

Страница 296: ...r Client Options dialog box appears D Click the printer you want to monitor and then select the To Be Monitored check box in the Monitoring Information Settings area To display the printer status in t...

Страница 297: ...onitor for Client is interrupted and the network printer cancels the job because something went wrong send the print job again Print jobs sent from another computer do not appear in the print queue wi...

Страница 298: ...Page of Web Image Monitor appears When setting SSL a protocol for encrypted communication under environ ment which server authentification is issued enter https printer s ad dress C Click Login on Top...

Страница 299: ...ify column To make detailed settings for these items click Edit next to Details of E mail Notification Settings C Click Apply D Quit Web Image Monitor On demand E mail Notification A In the menu area...

Страница 300: ...B Enter your user name and password Contact your network administrator for information about the settings C Enter a command D Quit telnet msh logout The configuration message about saving the changes...

Страница 301: ...d to restore the default settings so that all access ranges become 0 0 0 0 The access range restricts computers from use of the printer by IP address If you do not need to restrict printing make the s...

Страница 302: ...terface_name You can give interface s AutoNet parameter priority Priority settings are available when multiple interfaces are installed ip1394 can be specified only when the IEEE 1394 interface is ins...

Страница 303: ...devicename clearname Reset the printer name to its default dhcp Use the dhcp command to configure DHCP settings View settings The following command displays the current DHCP settings msh dhcp Configu...

Страница 304: ...tion msh dhcp domainname dhcp static Specify whether to obtain the domain name from the DNS server or use the domain name set by a user To obtain the domain name from the DHCP server specify dhcp To u...

Страница 305: ...server configuration The following command enables or disables the DNS server address msh dns number server server address The following command displays a configuration using the IP address 192 168 1...

Страница 306: ...ds registration msh dns arecord dhcp own dhcp You can specify the method of registering an A record when the dynamic DNS function is enabled and DHCP is used own To register an A record using the prin...

Страница 307: ...only when the IEEE 1394 interface is installed wlan can be specified only when the IEEE 802 11b interface is installed Deleting the Domain Name msh domainname interface_name clear name help Use the he...

Страница 308: ...roadcast address default gateway address for the printer View settings msh ifconfig Configuration msh ifconfig interface_name parameter address If you did not enter an interface name it is automatical...

Страница 309: ...t mask and broadcast address are the same as that for the ethernet interface and IEEE 802 11b interface When installing the optional 1394 Interface board set the IP address and sub net mask so that it...

Страница 310: ...f User authorization settings are basic and digest Use off to remove a user s authorization If user authorization is specified register a user name You can register up to 10 users IPP user configurati...

Страница 311: ...mode rp NDS context name msh netware context SAP interval msh netware sap interval Setting login mode for file server msh netware login server Setting login mode for NDS tree msh netware login tree S...

Страница 312: ...the Network rendezvous Use the rendezvous command to display rendezvous related settings View settings Rendezvous settings are displayed msh rendezvous Current computer name display msh rendezvous cn...

Страница 313: ...endezvous clear cname location cname Reset the computer name The default computer name will be displayed when the computer is restarted location Reset the location information The previous location in...

Страница 314: ...oute add host net destination gateway Adds a host or network route to destination and a gateway address to gateway in the table Specify the IP address to destination and gateway Host becomes the defau...

Страница 315: ...y when the IEEE 1394 interface is installed msh set protocol When protocol is specified information about tcpip appletalk netware and smb appears msh set lpr msh set ftp msh set rsh msh set diprint ms...

Страница 316: ...down msh set ftp up down msh set rsh up down msh set diprint up down msh set web up down msh set snmp up down msh set ssl up down If Secured Sockets Layer SSL an encryption protocol function is not av...

Страница 317: ...TTL value is increased The acceptable TTL value is between 1 and 255 smb Use the smb command to configure or delete the computer or workgroup name for SMB Computer Name settings msh smb comp Set comp...

Страница 318: ...p is added you can view settings one by one To display the current community specify its registration number Display msh snmp Community name configuration msh snmp number name community_name You can c...

Страница 319: ...number ip addr ipx address You can configure a host address according to the protocol used The network interface board accepts requests only from hosts that have addresses with access types of read on...

Страница 320: ...sable SNMP v3 TRAP configuration display msh snmp v3trap msh snmp v3trap 1 5 If a number from 1 5 is entered settings are displayed for that number only Configuring a sending address for SNMP v3 TRAP...

Страница 321: ...ress Interval configuration msh sntp interval polling_time You can specify the interval at which the printer synchronizes with the op erator specified NTP server The default is 60 minutes The interval...

Страница 322: ...sw lpr on off msh spoolsw ipp on off msh spoolsw smb on off msh spoolsw ftp on off You can specify the settings for diprint lpr ipp and smb sprint Use the sprint command to make settings for IEEE 1394...

Страница 323: ...ring web Use the web command to display and configure parameters on Web Image Monitor View Settings msh web URL Configuration You can set URLs linked by clicking URL on Web Image Monitor Specify 1 or...

Страница 324: ...nfig View IEEE 802 11b settings msh wiconfig cardinfo If IEEE 802 11b is not working correctly its information is not displayed Configuration msh wiconfig parameter Parameter Value configured mode ap...

Страница 325: ...ed by key phrase is overwritten To use this function set the same key number and WEP key for all ports that trans mit data to each other You can omit the numbers with val The key number is set to 1 wh...

Страница 326: ...e the following command to configure a WINS server IP address msh wins interface_name primary secondary IP ad dress auth open shared You can set an authorization mode when us ing WEP The specified val...

Страница 327: ...IP Scope ID Selection You can specify the NBT scope ID msh wins interface_name scope scope ID The scope ID can be entered using up to 31 alphanumeric characters Be sure to specify the interface ip139...

Страница 328: ...For details see SNMP Setup Tool Help The default community names are public and admin You can get MIB informa tion using these community names Start SNMP Setup Tool Windows 95 98 Me Windows 2000 Wind...

Страница 329: ...The machine is initializing or calibrating Call Service Center There is a malfunction in the machine Canceled The job is reset Canceling Job The job is being reset Card Counter not inserted The machi...

Страница 330: ...or Memory Switch A memory switch error has occurred Error Optional Font An error has occurred in the font file of the ma chine Error Optional RAM An error has occurred in the optional memory unit Erro...

Страница 331: ...ted The machine is waiting for key card or key counter to be inserted Key Counter not inserted The machine is waiting for key counter to be left in it Loading Toner Toner is being supplied Low Black T...

Страница 332: ...per of selected size and type Mismatch Paper Type Indicated paper tray does not contain paper of selected type Near Replacing Black PCU Prepare the new black photoconductor unit Near Replacing Color P...

Страница 333: ...y The paper feed tray is not correctly set Not Detected Interposer Interposer unit is not correctly set Not Detected LCT A large amount of paper feed tray is not cor rectly set Not Detected Magenta To...

Страница 334: ...jammed in the input tray Paper Misfeed Internal Output The paper has jammed inside the machine Paper Misfeed Output Tray The paper has jammed in output tray Paper on Finisher Shift Tray 2 The paper re...

Страница 335: ...CU It is time to replace the photoconductor unit Replace Transfer Belt It is time to replace the transfer belt SD Card Authentication failed SD card authentication failed Setting Remotely The RDS sett...

Страница 336: ...scription No ID number of the paper tray Name Name of the paper tray PaperSize Size of paper loaded in the paper tray status Current status of the paper tray Normal Normal NoInputTray No tray PaperEnd...

Страница 337: ...o commands see p 190 info Print Log Information This is a record of the most recent 16 jobs printed Use the following command to display print log information UNIX Use the prnlog command and rsh rcp a...

Страница 338: ...ot completed normally Canceled An rcp rsh or lpr command print request was canceled possibly due to the printing application Not applicable to the ftp or rprinter command Time Time the print requested...

Страница 339: ...tion Soft switch appletalk mode AppleTalk protocol in selection Net Network number Object Macintosh printer name Type Type of printer Zone Name of the zone that the printer belongs to TCP IP mode up m...

Страница 340: ...te printer number Print server name Print server name File server name Name of the connect file server Context name Context of print server Switch mode Active mode NDS Bindery this value is fixed Pack...

Страница 341: ...face transmitting mode Authentication TX Rate IEEE 802 11b interface speed WEP encryption WEP enabled or disabled Encryption key WEP key IP over 1394 Host name DHCP DHCP on off Address IP address netm...

Страница 342: ...ulti I F Ethernet ether IEEE 802 11b wlan appears when IEEE 802 11b is selected IP over 1394 ip1394 appears when IEEE1394 is selected DDNS ether Dynamic DNS function on an Ethernet connection on off w...

Страница 343: ...Monitoring and Configuring the Printer 224 v1Trap v2Trap v3Trap SNMPv1v2Remoto Setting SNMPv3 Privacy Shell mode Mode of the remote maintenance tool Item Description...

Страница 344: ...ready exists Use another community name add_sess_ipx bad trap addr IPXaddress community community name The IPX address 00 00 00 00 00 00 is una vailable when the community access type is TRAP Specify...

Страница 345: ...Speed of the network 10 Mbps or 100 Mbps Current IP address current IP address The IP address current IP address was re ceived from the dhcp server Current IPX address IPX address Current ipx address...

Страница 346: ...OS name with the IP address nbtd start The nbtd service has started available only in the DHCP mode NetBEUI Computer Name computer name The NetBEUI computer name is specified nmsd start NetBEUI The nm...

Страница 347: ...uested community name is not de fined session_ipx community name not defined The requested community name is not de fined Set context to NDS context name An NDS context name has been set shutdown sign...

Страница 348: ...ied SMTP server name is incor rect An incorrect SMTP server is specified The specified SMTP server IP address could not be found in the DNS server A server other than the SMTP server has been specifie...

Страница 349: ...mpt to log in to the network Access to the network was denied Verify that the print server name and password are correct Login to the file server failed The print server is not registered or a passwor...

Страница 350: ...o use On the File menu click Properties The printer properties appear C On the Sharing tab click Shared as D To share the printer with users using a different version of Windows click Additional Drive...

Страница 351: ...after the spooler pauses briefly When the expansion function is not used the function is automatically set as available Setting a Client A From the Start button on the task bar point to Program point...

Страница 352: ...rver This procedure assumes an environment is already prepared for normal Net Ware running the printing service setting The procedure is explained with the following example settings File server s nam...

Страница 353: ...Next G Click Bindery mode enter the file server name in the File Server Name box and then click Next In the File Server Name box enter the name of the file server in which a print server is created Yo...

Страница 354: ...tWare 5 5 1 or NetWare 6 0 set it to the NDS mode When using NetWare 5 5 1 or NetWare 6 0 set the printer as a print server A Log on to the file server as a supervisor or supervisor equivalent B Start...

Страница 355: ...gs are applied and NIB Setup Tool quits J Turn the printer off and then on again To check that the configuration is made correctly enter the following from the command prompt F NLIST USER A B If the p...

Страница 356: ...twork connection is established based on the string entered in the File Server Name F box When NDS mode is selected the network connection is established based on the string entered in the NDS Tree bo...

Страница 357: ...then click Create H Select the object in which the printer is located and then click Create on the Object menu I In the Class of new object box click Printer and then click OK For Net Ware 5 click Pri...

Страница 358: ...ver To start CAREE load pserver print_server_name Setting Up as a Remote Printer NetWare 3 x Follow the procedure below to use the printer as a remote printer under NetWare 3 x Setting up using NIB Se...

Страница 359: ...the Enter key H To create a new print server press the Insert key and then enter a print server name For a currently defined print server select a print server in the Print Server list Use the same p...

Страница 360: ...server by entering the following from the console of the NetWare server If the print server is in operation quit and restart it To quit CAREE unload pserver To start CAREE load pserver print_server_na...

Страница 361: ...acters I In the NDS Tree T box enter the NDS tree name and create the file serv er You can also click Browse to browse through available NDS trees and NDS contexts Enter up to 32 alphanumeric characte...

Страница 362: ...Select the Define additional properties check box and then click Create L Assign print queues to the created printer Click Assignments and then click Add in the Assignments area M In the Available obj...

Страница 363: ...Enter the printer number and then click OK Check the settings and then click OK Use the same printer number specified as the remote printer number using NIB Setup Tool X Start the print server by ent...

Страница 364: ...he network administrator for the local setting information C To print under Windows 2000 XP Windows Server 2003 or Windows NT 4 0 install Printing service for UNIX as the network application To print...

Страница 365: ...format 192 168 15 16 host NP 192 168 15 16 is the IP address host is the printer s host name and NP is replaced by comments Insert a space or tab between 192 168 15 16 and host between host and NP re...

Страница 366: ...Command Prompt Windows NT 4 0 Start Programs Command Prompt Match the data format of the file to be printed with the emulation mode of the printer If the message print requests full appears no print...

Страница 367: ...sing a printer with the host name host to print a PostScript file named file 1 or file 2 located in the C PRINT directory the command line is as fol lows c rcp b C PRINT file1 C PRINT file2 host filet...

Страница 368: ...The following shows the examples of printing a PostScript file named file 1 in the C PRINT directory and printing file 1 and file 2 ftp put C PRINT file1 filetype RPS ftp mput C PRINT file1 C PRINT fi...

Страница 369: ...ssary to install a printer driver and PostScript Printer Description PPD files to print from a Mac OS Follow the procedure below to install a printer driver and a PPD file into a Mac OS using Mac OS 8...

Страница 370: ...be PS icon appears at the left of the printer name in the list Follow the procedure on p 252 Setting Up Options to make option settings otherwise close the Chooser dialog box Creating a Desktop Printe...

Страница 371: ...If the option you want to select is not displayed PPD files may not be set up correctly To complete the setup check the name of the PPD file dis played in the dialog box Installing the ColorSync Profi...

Страница 372: ...s particular settings need to be created by ColorSync For details see the appropriate manuals for your computer dis play Installing Adobe Type Manager Quit all applications currently running before in...

Страница 373: ...the Mac OS 8 and 9 folder E Double click the Fonts folder F Double click the Screen font folder G Double click the TrueType or Type1 folder Select the font type you want to use H Copy the fonts you wa...

Страница 374: ...The following describes how to configure Mac OS 9 1 If you are using a different version of Mac OS use the following procedures as a reference and see the manuals for your Mac OS version Confirm the C...

Страница 375: ...below to install a PPD file to print from Mac OS X You need an administrator name and a password phrase For details con sult your network administrator A Insert the CD ROM into the CD ROM drive B Dou...

Страница 376: ...er models and then click Add F Close the Printer List dialog box and then quit Print Center When printing with a USB connection to a Macintosh computer printer lan guage does not change automatically...

Страница 377: ...r language to Auto Detect or PS before print ing Changing to EtherTalk You need an administrator name and a password phrase For details con sult your network administrator Follow the procedure below t...

Страница 378: ...Mac OS Configuration 259 Configuring the Printer Use the control panel to enable AppleTalk The default is active...

Страница 379: ...contents of the print images At most the printer can save 30 jobs or 1 000 pages for Sample Print and Locked Print If you turn off the power the job saved on the hard disk will be deleted Sample Prin...

Страница 380: ...l hard disk must be installed on the printer The number of pages the printer can save varies depending on the contents of the print images At most the printer can save 30 jobs or 1 000 pages for Sampl...

Страница 381: ...this to identify the user associated with the job E After making the necessary settings you want click Print The Locked Print job is sent to the printer F Enter the password using the control panel an...

Страница 382: ...tton on the Print Quality tab Black and White Prints everything including color documents in black and white Black and White printing is faster than Color To stop black and white areas being printed w...

Страница 383: ...riate CRD for the document you are printing The selected CRD is also referred to when Fine or Super Fine is selected for Color Setting The following items are available Auto Photographic Presentation...

Страница 384: ...is function to set the Image Rendering mode Photographic Performs dithering in an appropriate form for photographs Text Performs dithering in an appropriate form for text Gray Reproduction Use this fu...

Страница 385: ...se steps to install Printer Utility for Mac on the machine A Start the Macintosh B Insert the CD ROM into the CD ROM drive The CD ROM icon appears C Double click the hard disk icon to open it D Double...

Страница 386: ...se If you change zones select a name from Available Network Zones Click Choose Printer on the Printer Utility for Mac menu if you want to change the printer D Select the printer you want to use Printe...

Страница 387: ...ompletion message appears click OK G Click Cancel Some fonts cannot be downloaded Before downloading read the documentation about the fonts you want to use Displaying Printer Fonts You can display the...

Страница 388: ...m the control panel all of the data on the printer hard disk drive is deleted Before initializing be sure to check the data on the hard disk drive Do not turn off the power switch until initializing i...

Страница 389: ...nters on the network assign different names so you can identify them If several printers have the same name a digit appears next to the printer name in Chooser You can enter up to 31 digits and letter...

Страница 390: ...estart Printer on the File menu B Confirm the message that appears on the screen and then click Restart The printer restarts The fonts downloaded in the printer memory will be deleted If the printer r...

Страница 391: ...lk zone list select the zone you changed H In the Select a PostScript Printer list select the printer you want to use I Close the Chooser dialog box Mac OS X A On the Utility menu click Select Zone Th...

Страница 392: ...Console is recommended for users with an understanding of PostScript Do not download any file other than PostScript files to the printer Launch Dialogue Console must be used at your own responsibilit...

Страница 393: ...users to manage their network print status SmartDeviceMonitor for Client Help 1394 Utility For the optional IEEE 1394 interface unit For details see the Readme file or the manual provided with the op...

Страница 394: ...printer drivers and the PPD files are included on the CD ROM pro vided with this printer PostScript printer drivers allow the computer to com municate with the printer using a printer language PPD fil...

Страница 395: ...ded with Windows 95 98 Me NetWare Client provided with Windows 95 98 Novell Client provided with Windows 95 98 Windows 2000 TCP IP provided with Windows 2000 IPX SPX provided with Windows 2000 NetWare...

Страница 396: ...ing Operating system Protocol stack Windows 95 98 Me TCP IP provided with Windows 95 98 Me IPX SPX provided with Windows 95 98 Me NetWare Client provided with Windows 95 98 Me Novell Client provided w...

Страница 397: ...ers Enables you to check the print job log using the user ID For Recovery Printing or Parallel Printing the options on the printers must be the same If a necessary option is not installed a printer c...

Страница 398: ...etails about printing a configuration page see p 128 Printing a Configuration Page For details about configuring the printer if the router cannot be configured see the instructions below Configuring t...

Страница 399: ...interface is IEEE 1394 IP over 1394 Gateway address DNS server address domain name Settings are made for DHCP acquired values that have the highest interface priority If the gateway address is outside...

Страница 400: ...ddress is not assigned by a DHCP server automatically a tem porary IP address starting with 169 254 which is not used on the network can be automatically selected by the printer You must change this s...

Страница 401: ...Top Page of Web Image Monitor appears C Click Login The dialog box for entering the user name and password appears D Enter the user name and password and then click OK Contact your network administrat...

Страница 402: ...ting For a static IP setting If the IP address or host name is changed the A and PTR records are updat ed If the A record is registered CNAME is also registered CNAMEs that can be registered are as fo...

Страница 403: ...s BIND 8 2 3 or higher For DHCP setup when the DHCP server updates records Microsoft DNS servers with standard Windows 2000 Server Windows Server 2003 features BIND 8 2 3 or higher DNS servers with st...

Страница 404: ...from a certificate authority and install it Configuration flow self signed certificate A Creating and installing the server certificate Install the server certificate using Web Image Monitor B Enabli...

Страница 405: ...Create F Make the necessary settings Common Name Enter the server certificate common name using up to 64 characters required The common name cannot include any spaces and is case sensitive The defaul...

Страница 406: ...nt er C Select Administrator mode For details about selecting Administrator mode in Web Image Monitor see p 164 Access in the Administrator Mode D Click Configuration then click Security and then clic...

Страница 407: ...the server certificate The application procedure depends on the certificate authority For details contact the certificate authority When applying use the data created with Web Image Monitor By using...

Страница 408: ...ate authority A Open a Web browser B Enter http printer s address in the address bar to access the print er C Select Administrator mode For details about selecting Administrator mode in Web Image Moni...

Страница 409: ...ficate store location with the certificate authority Installing the Certificate Using SmartDeviceMonitor for Client If the Security Alert dialog box appears when accessing the printer using IPP to cre...

Страница 410: ...on appears under Certificate store G Click Next H Click Finish I Click OK The certificate is installed When you create or change an IPP port using SmartDeviceMonitor for Cli ent enter http machine s a...

Страница 411: ...tions by Auto Run requires administrator permission To install a printer driver by Auto Run log on using an account that has administrator per mission A Quit all applications currently running B Inser...

Страница 412: ...folder For PageMaker 6 0 default installation The directory is C PM6 RSRC PPD4 For PageMaker 6 5 default installation The directory is C PM65 RSRC USENGLISH PPD4 The USENGLISH may vary depending on y...

Страница 413: ...d Server MetaFrame 1 8 SP3 FR1 SP3 SP4 MetaFrame XP 1 0 SP1 SP2 SP3 FR1 FR2 FR3 MetaFrame Presentation Server 3 0 Windows 2003 Server MetaFrame XP 1 0 FR3 MetaFrame Presentation Server 3 0 Supported P...

Страница 414: ...e server We strongly recommend testing this function in your network environment before using it for your work The settings for optional equipment will not be stored in the server after the equipment...

Страница 415: ...replication you can distribute printer drivers across all servers in a server farm We strongly recommend testing this function in your network environment before using it for your work If the printer...

Страница 416: ...vate only registered computers can use this print er via the Bluetooth interface unit Check the operation mode settings using Web Image Monitor or telnet For details about using Web Image Monitor see...

Страница 417: ...fy merge publish distribute sublicense and or sell copies of the Software and to permit persons to whom the Software is furnished to do so subject to the following conditions The above copyright notic...

Страница 418: ...s software developed by the NetBSD Foundation Inc and its contributors D Neither the name of The NetBSD Foundation nor the names of its contributors may be used to endorse or promote products derived...

Страница 419: ...ity of California Law rence Berkeley Laboratory and its contributors This product includes software developed by Christos Zoulas This product includes software developed by Christopher G Demetriou for...

Страница 420: ...anty of MERCHANTABILITY or FIT NESS FOR A PARTICULAR PURPOSE See the GNU General Public License for more details You should have received a copy of the GNU General Public License along with this progr...

Страница 421: ...this printer 12 Print Area 13 Loading Paper 15 Loading Paper in Tray 1 and the optional paper feed unit 15 Loading Paper in the Bypass Tray 20 Switching between Paper Trays 26 Replacing Consumables an...

Страница 422: ...on 71 Troubleshooting Error Status Messages on the Control Panel 74 Printer Does Not Print 83 Checking the port connection 84 Other Printing Problems 87 Additional Troubleshooting 93 Removing Misfed P...

Страница 423: ...ows operating systems are as follows Microsoft Windows 95 operating system Microsoft Windows 98 operating system Microsoft Windows Millennium Edition Windows Me The product names of Windows 2000 are a...

Страница 424: ...this sym bol Be sure to read the instructions all of which are described in the Safety In formation section The statements above are notes for your safety If this instruction is not followed paper mig...

Страница 425: ...h pa per size Input Paper Sizes Metric version In this manual On the display Paper feed direction K Feed direction A4 210 x 297 8 1 2 x 11 Short edge feed direction Feed direction Size mm Bypass Tray...

Страница 426: ...stom size setting using the control panel The following sizes are supported Bypass Tray approximately 90 216 mm in width and 148 356 mm in length The size is not supported Input Paper Sizes Inch versi...

Страница 427: ...e setting using the control panel The following sizes are supported Bypass Tray approximately 3 55 8 50 inches in width and 5 83 14 01 inches in length A5 K 5 83 8 26 A6 K 4 13 5 63 Legal LG K 81 2 14...

Страница 428: ...to be set Check that the top of the stack is not higher than the limit mark inside the tray Supported paper weight Maximum number of sheets plain paper Tray 1 Paper Feed Unit Tray 2 Tray 3 60 2 104 7...

Страница 429: ...er should always be stored properly Improperly stored paper might result in poor print quality paper misfeeds or printer damage Recommendations are as follows Avoid storing paper in humid areas Avoid...

Страница 430: ...Printer driver setup Click Thick1 or Thick2 in the Type list Enabled paper feeding tray Bypass Tray Thick Paper 1 30 Thick Paper 2 10 Make sure paper is not stacked higher than the paper guides inside...

Страница 431: ...ter overhead projector to project OHP transparencies Printer setup Press Paper Input menu Paper Type and then Glossy Paper on the control panel Printer driver setup Click Glossy in the Type list Enabl...

Страница 432: ...lue or base paper is exposed Paper with clips or staples Do not use the following envelopes Envelopes with multiple flaps Envelopes with a peel off adhesive strip Envelopes with windows or clasps Addi...

Страница 433: ...r Be sure to set the print margins correctly by the application Paper A Print area B Feed direction C Approx 5 mm 0 2 inches D Approx 5 mm 0 2 inches The print area may vary depending on the paper siz...

Страница 434: ...Paper and Other Media 14 C Approx 5 mm 0 2 inches D Approx 5 mm 0 2 inches The print area may vary depending on the paper size printer language and printer driver settings...

Страница 435: ...e used for the optional paper feed unit Make sure paper is not stacked above the limit mark inside the tray Misfeeds might occur Do not put different types of paper in a single paper tray A Pull the p...

Страница 436: ...oad C Adjust the side guides to the paper size you want to load D Load paper print side up in the paper tray Make sure the top of the stack is not higher than the limit mark inside the tray To avoid m...

Страница 437: ...paper tray is not fully inserted Make sure it is fully inserted Changing paper size of the paper tray A Pull the paper tray out of the printer until it stops Lift it slightly and then pull it fully o...

Страница 438: ...Paper and Other Media 18 B Remove the paper C Press Push and then adjust the rear guide to the paper size you are using D Adjust the side guides to the paper size you want to load...

Страница 439: ...e tray F Slide the paper tray fully into the printer Specifying a paper type for Tray 1 and the optional paper feed unit Improve printer performance by selecting the optimum paper type for the tray Yo...

Страница 440: ...Tray 3 appears depending on how many units are installed The paper type selection menu appears E Press the U or T key to display the target paper tray and then press the Enter key After about two sec...

Страница 441: ...using the control panel or the printer driver Make sure the settings do not conflict Conflicting settings can cause paper jams or loss of print quality Load paper print side down and in the short edg...

Страница 442: ...eds fan the paper before loading it onto the paper tray E Set the paper size using the control panel Press the Menu key The Menu screen appears F Press the U or T key to display Paper Input and then p...

Страница 443: ...mm in width see p 23 Specifying custom size paper for the Bypass Tray For control panel settings when using thick paper OHP transparencies or post cards see p 25 Specifying a paper type for the Bypas...

Страница 444: ...isplay Custom Size and then press the Enter key E Press the U or T key to set the horizontal value and then press the Enter key By pressing the key the value increases or decreases by 0 01 inch By pre...

Страница 445: ...ick Paper 2 Glossy Paper Be sure to select the paper type when you load labels thick paper or OHP transparencies in the bypass tray The paper type selected using the printer driver overrides that sele...

Страница 446: ...label paper Cardstock Transparency OHP transparency Thick Paper 2 165 199 g m2 Thin Paper Plain Dup Back reverse side of plain paper Thick1 Dup Back reverse side of thick paper Switching between Paper...

Страница 447: ...ress the U or T key to display Tray Priority and then press the Enter key The paper tray selection menu appears D Press the U or T key to select the tray type you want to use and then press the Enter...

Страница 448: ...e If you dispose of the used toner cartridges yourself dispose of them according to local regulations Do not store toner used toner or toner containers in a place with an open flame The toner might ig...

Страница 449: ...mode setting to Black and White using the printer driver If black toner runs out you cannot print in black and white or color until the black toner cartridge is replaced A Open the upper left cover of...

Страница 450: ...dge from side to side about 10 times Do not open the shutter at the bottom of the toner cartridge Toner may leak The illustration uses the black cartridge as an example E Check the toner color and loc...

Страница 451: ...ow Do not install and remove toner cartridges unless necessary Excessive handling results in toner leakage All four cartridges are installed using the same procedure G Close the printer s upper left c...

Страница 452: ...f its the bag Do not incinerate spilled toner or used toner Toner dust is flammable and might ignite when exposed to an open flame Disposal should take place at an authorized dealer or an appropriate...

Страница 453: ...mables and Maintenance Kit 33 D Unlock the waste toner bottle by sliding the green arrow to the position shown Do not lock the removed waste toner bottle Toner may leak E Remove the used waste toner b...

Страница 454: ...r bottle in the position shown in the illustration G Lock the waste toner bottle by sliding the green arrow to the position shown Be sure to lock the waste toner bottle to prevent toner from leaking i...

Страница 455: ...to conductor units yellow cyan and magenta are supplied as a single item Exposure to light reduces photo conductor unit performance Replace the unit as quickly as possible Do not pull out the photo co...

Страница 456: ...ables and Maintenance Kit 36 Photo Conductor Unit Color A Turn off the power and then unplug the power cable B Open the right cover C Pull out the green levers on the left and right that are securing...

Страница 457: ...acing Consumables and Maintenance Kit 37 D Lift the inner cover until it stays up E Remove the photo conductor unit F Pinch the green lever to unlock the unit G Pull out the photo conductor unit caref...

Страница 458: ...unlock the unit I Pull out the photo conductor unit carefully until it stops J Pinch the green part to release the unit K Pull out the photo conductor unit carefully Be sure to hold the unit with both...

Страница 459: ...to the photo conductor unit The cap is no longer needed and can be disposed of N Remove the tape from around Photo Conductor Unit by peeling it down ward and then remove the unit s top cover Do not r...

Страница 460: ...nit A Photo Conductor Unit Black B Photo Conductor Unit Color P Align the green arrow at the tip of the photo conductor unit with the rail inside the printer Make sure the green arrow fits securely to...

Страница 461: ...mables and Maintenance Kit 41 Photo Conductor Unit Black Photo Conductor Unit Color Q Push the front of the photo conductor unit carefully in sliding the unit from its cover until it stops Photo Condu...

Страница 462: ...Photo Conductor Unit Color If the photo conductor unit is not correctly installed print quality will be lost For example certain colors may not print R Lower the inner cover slowly S Push the left an...

Страница 463: ...lug in the power cable and then turn on the power The printer starts calibration Wait until it stops The following message ap pears on the display Wait until Ready appears on the display panel Do not...

Страница 464: ...led parts hot surface could result in burns The fusing unit gets very hot When installing a new fusing unit turn off the printer and wait about 30 minutes Then you can install the new fusing unit Hand...

Страница 465: ...the fusing unit The procedure is complete only when the maintenance set ting is made A Turn off the power and then unplug the power cable After power off wait 30 minutes for the fusing unit to cool be...

Страница 466: ...D Push the green release buttons on the left and right outwards to unlock the fusing unit E Remove the fusing unit carefully F Take the new fusing unit from out from its box G Place the unit as shown...

Страница 467: ...lacing Consumables and Maintenance Kit 47 H Carefully push in the fusing unit until it clicks into position and then check that the unit is locked I Push in the connector J Open the transfer roller co...

Страница 468: ...t in the direction of the arrow and then remove the transfer roller L Take out the new transfer roller Do not touch the roller part M Hold the green part as shown and then insert the transfer roller i...

Страница 469: ...ng the control panel When Replace Fusing Unit Appears on the Display A If the following message appears on the control panel hold down the Escape key for at least five seconds The message disappears a...

Страница 470: ...y to display Maint Reset and then press the Enter key D Press the U or T key to display Fusing Unit and then press the Enter key The following message appears E Press the Enter key Wait a few seconds...

Страница 471: ...ms Transfer Belt Be sure to make the maintenance setting using the control panel after replac ing the transfer belt The procedure is complete only when the maintenance setting is made A Turn off the p...

Страница 472: ...e Kit 52 B Open printer s right cover C Remove the waste toner bottle See p 32 Replacing the Waste Toner Bottle D Pull out the green levers on the left and right that are securing the inner cover E Li...

Страница 473: ...sumables and Maintenance Kit 53 F Unlock the waste toner bottle by sliding the green arrow to the position shown Do not lock the removed waste toner bottle Toner may leak G Remove the waste toner bott...

Страница 474: ...s Do not remove the screws I Pinch the both screws and then carefully pull out the transfer belt slow ly until it stops J Raise the green cover hold the transfer belt as shown and then remove the tran...

Страница 475: ...5 L Holding the transfer belt as shown carefully slide the transfer belt into the printer M Close the green cover and then push it in until it stops N Tighten the green screws on the left and right by...

Страница 476: ...aste toner bottle in the position shown in the illustration P Lock the waste toner bottle by sliding the green arrow to the position shown Be sure to lock the waste toner bottle to prevent toner from...

Страница 477: ...t cover T Turn on the power U Make the setting using the control panel When Replace Transfer Belt Appears on the Display A If the following message appears on the control panel hold down the Escape ke...

Страница 478: ...then press the Enter key C Press the U or T key to display Maint Reset and then press the Enter key D Press the U or T key to display Transfer Belt and then press the Enter key The following message...

Страница 479: ...t the plug from the wall outlet at least once a year Clean away any dust and grime from the plug and outlet before reconnecting Accu mulated dust and grime pose a fire hazard Do not remove any covers...

Страница 480: ...ss the U or T key to display Maintenance and then press the Enter key The maintenance menu appears C Press the U or T key to display Color Regist and then press the Enter key The check message appears...

Страница 481: ...the Printer 61 Automatic color adjustment takes about 30 seconds A confirmation message appears when complete E Press the Escape key Return to the maintenance menu F Press the Online key The initial s...

Страница 482: ...fter a single operation repeat the cor rection several times as needed Corrections to color gradation will be applied to all user jobs Use the same paper when printing a run of gradation corrections I...

Страница 483: ...print gradation cor rection sheet 1 F Set the gradation correction value of the highlighted part using correc tion 1 For setting K black gradation hold the correction value 0 6 for K of the correction...

Страница 484: ...rrection value for each color is changed to 2 J Check Yes is displayed and press the Enter key to print the correc tion result K Check gradation correction sheet 1 To save the correction values check...

Страница 485: ...lumn for setting the highlight part and the Sample 2 column for setting the middle part Similarly there are two gradation correction sheets Gradation correction sheet 1 for setting the highlight part...

Страница 486: ...n value setting sheet over the color sample of gradation correction 1 of the Color Calibration Sample Sheet and search for a corrected color closest to that of the color sample and then set its correc...

Страница 487: ...currently set correction value is printed in red B M magenta correction values Adjust the printed color when only magenta toner is used The currently set correction value is printed in red C C cyan Y...

Страница 488: ...ess the Enter key D Press the U or T key to display Reset and then press the Enter key A confirmation message is displayed E Press the Enter key A message indicating the gradation correction value has...

Страница 489: ...driv er whenever possible Changing the image density setting can result in deterioration of color bal ance We recommend you leave the image density at its factory default set ting A Press the Menu ke...

Страница 490: ...the image density of the Image Density Adjusting Card is equal to the den sity shown below the frame select as the image density setting F Press the U or T key to select the color you want to adjust...

Страница 491: ...ey The Menu screen appears B Press the U or T key to display Maintenance and then press the Enter key The maintenance menu appears C Press the U or T key to display Registration and then press the Ent...

Страница 492: ...tting adjust the margins of the test sheet so that they are equal in size G Press the U or T key to display Adjustment and then press the Enter key H Press the U or T key to display the parameter to b...

Страница 493: ...e negative direction A Print Area B Feed Direction Pressing the U or T key makes the value increase or decrease by 1 0 mm steps J Press the Enter key The display returns to the print area Adjustment m...

Страница 494: ...28 Replacing the Ton er Cartridge Add Toner Yellow The printer is out of toner Yel low Replace the toner cartridge Yellow See p 28 Replacing the Ton er Cartridge Add Toner XXX XXX The printer is out...

Страница 495: ...to On Make the change after setting DHCP to Off Energy Save Mode In Energy Save Mode level 2 No action required Error Enter 10 or 26 characters An ID with an invalid number of digits was entered for t...

Страница 496: ...owing steps E Execute the utility tool for IEEE 1394 interface board that is stored in the follow ing path in the CD ROM labeled Printer Drivers and Utilities UTILITY 1394 For details about using the...

Страница 497: ...f and then on Re move and re install the IEEE 1284 interface board correct ly If the message appears again contact your sales or service representative Hardware Problem Printer font Problems with the...

Страница 498: ...g the control panel is not correct Enter the correct password using the control panel Load Correct Size Paper Press to continue The paper size set in the indi cated tray differs from the set ting made...

Страница 499: ...ve the misfed paper See p 96 When Remove Misfeed A Internal Path Ap pears Remove Misfeed Y Paper Tray There is a misfeed in the input tray or the printer is not feed ing paper Remove the misfed paper...

Страница 500: ...ste toner bot tle See p 32 Replacing the Waste Toner Bottle Reset Fusing Unit correctly There is no fusing unit or the fusing unit is not installed cor rectly Set the fusing unit correctly Reset Paper...

Страница 501: ...the SSID Supply order failed Supply order has failed The use is required to reset the job Toner is almost empty Black The printer is almost out of ton er Black Prepare to replace the toner cartridge B...

Страница 502: ...ooting 82 Waiting The printer is waiting for the next data to print Wait a while Warming up The printer is warming up and not ready Wait until the printer signals Ready Messages Description Recommende...

Страница 503: ...en it securely as well Are you using the correct interface cable The type of interface cable you should use depends on the com puter you use Be sure to use the correct one If the cable is damaged or w...

Страница 504: ...achine you want to use appears in the 3Com Bluetooth Connection Manager B Make sure Bluetooth Serial Client COMx appears under Cli ent Ports in the 3Com Bluetooth Connection Manager C Restart computer...

Страница 505: ...lick Printers B Click to select the icon of the printer Next on the File menu click Prop erties C Click the Port tab D Check the Print to the following port box to confirm that the correct port is sel...

Страница 506: ...to the following port s box to confirm that the correct port is selected Windows NT 4 0 A Click Start point to Settings and then click Printers B Click to select the icon of the printer After that on...

Страница 507: ...per and Other Media Supported by This Printer Paper jams occur frequently Number of paper set in the tray exceeds the limit Confirm that the top of the stack is not higher than the limit mark inside t...

Страница 508: ...Paper is too thin See p 5 Paper and Other Media Supported by This Printer There may be a gap between the rear guide and the paper or between the side guides and the paper in the paper tray Make sure...

Страница 509: ...nction to reduce the image and then print See the printer driver Help The color of the printout is differ ent from the color on the com puter s display The colors made using color toner are different...

Страница 510: ...PCU or Replace Color PCU appears on the display replace the photo conductor unit See p 35 Replacing the Photo Conductor Unit Condensation may have collected If rapid change in temper ature or humidity...

Страница 511: ...eplacing the Photo Conductor Unit The backs of printed sheets are blemished When removing a jammed sheet the inside of the printer may have become dirtied Print several sheets until they come out clea...

Страница 512: ...Image Monitor For PDF Change PW see the PDF Menu Software Guide For Web Image Monitor see Help PDF files not allowed to be printed by the PDF file security setting cannot be printed As a result of pri...

Страница 513: ...he settings of the SMTP server in E mail For details about the settings see Web Image Monitor Help When the power is turned off before the e mail is transmitted the e mail will not be received Check t...

Страница 514: ...d e mail stopped ar riving If an Alert notification e mail set with the earlier notification level arrives later e mail will not be sent even if the notifica tion level is changed after When no date i...

Страница 515: ...Misfed paper may be covered in toner Be careful not to get toner on your hands or clothes Toner on prints made after removing misfed paper may be loose inadequate ly fused Make a few test prints until...

Страница 516: ...t is extended If the bypass tray is extended the front cover does not open B Carefully remove any misfed paper If misfed paper is difficult to move or stuck proceed to the next step Do not pull forcef...

Страница 517: ...Removing Misfed Paper 97 C Pull part A in the direction of the arrow and then open the cover D Remove any misfed paper E Close the cover...

Страница 518: ...Removing Misfed Paper 98 F Close the front cover carefully...

Страница 519: ...e front cover release button Close the bypass tray if it is extended If the bypass tray is extended the front cover does not open B Pull out levers B1 on the left and right The inside of this machine...

Страница 520: ...emove any misfed paper If misfed paper is difficult to move or stuck proceed to the next step Do not pull forcefully on stuck or jammed paper D Pull part B2 toward the front and then open the guide bo...

Страница 521: ...Removing Misfed Paper 101 F Return the guide board G Return levers B1 on the left and right H Close the front cover carefully...

Страница 522: ...g Misfed Paper 102 When Remove Misfeed Y Paper Tray Appears A Pull out the tray Do not pull the tray out forcefully If you do the tray might fall and cause an injury B Remove any misfed paper Tray 1 T...

Страница 523: ...n occur if the paper tray is not fully inserted Make sure it is fully inserted D Open the front cover by pushing the front cover release button and then close it to reset the misfeed condition This pr...

Страница 524: ...on Close the bypass tray if it is extended If the bypass tray is extended the front cover does not open B Pull the lever marked PULL on the duplex unit and then pull up the duplex unit until it stops...

Страница 525: ...Removing Misfed Paper 105 C Remove any misfed paper D Close the front cover carefully...

Страница 526: ...talled remove them When moving the machine each person should hold the handles that are located on opposite sides and then lift it slowly Lifting it carelessly or drop ping it may cause an injury When...

Страница 527: ...you removed options reinstall them See Setup Guide for installing options Be sure to move the printer horizontally To prevent toner from scattering move the printer slowly If the optional paper feed u...

Страница 528: ...roblem contact the store where they were purchased When you first use this printer use the four toner cartridges packaged with the printer Numbers of pages that can be printed using the toner cartridg...

Страница 529: ...If the photo conductor unit is not changed when necessary the quality of print ing is not guaranteed We recommend keeping a stock of photo conductor units or purchasing one soon Photo conductor unit c...

Страница 530: ...Appendix 110 If the transfer unit is not changed when necessary the quality of printing is not guaranteed We recommend keeping a stock of transfer unit or purchasing one soon...

Страница 531: ...aximum 21 pages per minute A4K 1 1 Printing speed may vary depending on the setting up environment Resolution 1200 1200 dpi RPCS PostScript 3 PCL 6 1200 600 dpi RPCS PostScript 3 PCL 6 600 600 dpi RPC...

Страница 532: ...rdance with ISO7779 are actual val ues 2 Measured at the position of a bystander Memory Standard 128 MB up to 512 MB with the optional Memory Unit Interface Standard Ethernet 10 100Base TX Optional Pa...

Страница 533: ...10 TrueTypefonts and 1 Bitmap font PostScript 3 136 fonts Type 2 24 Type 14 112 Options Paper Feed Unit Type 3000 Paper size A4K B5K Letter 81 2 11 inches K Legal 81 2 14 inches K Dimensions W D H 41...

Страница 534: ...ype 1 and PostScript Type 2 To download them use Printer Utility for Mac User Account Enhance Unit Type E Capacity 128 KB Store User Code up to 500 users Memory Unit Type D 128MB Memory Unit Type E 25...

Страница 535: ...802 11b Wireless LAN Protocol TCP IP NetBEUI IPX SPX AppleTalk SmartDeviceMonitor and Web Image Monitor are supported Data Transfer Speed Auto select from below speed 1 Mbps 2 Mbps 5 5 Mbps 11 Mbps F...

Страница 536: ...e Unit Type 3245 Supported Profiles SPP Serial Port Profile HCRP Hardcopy Cable Replacement Profile BIP Basic Imaging Profile Frequency Range 2 GHz ISM band Data Transmission Speed 732 kbps The transm...

Отзывы: