background image

Using the Envelope Lever

• The inside of the machine becomes very hot. Do not touch the parts with a " " label (means hot

surface). Touching a part with a " " label (means hot surface) could result in a burn.

• The fusing unit becomes very hot. When installing the new fusing unit, turn off the printer and wait

about an hour. After that, install the new fusing unit. Not waiting for the unit to cool down can result
in a burn.

1.

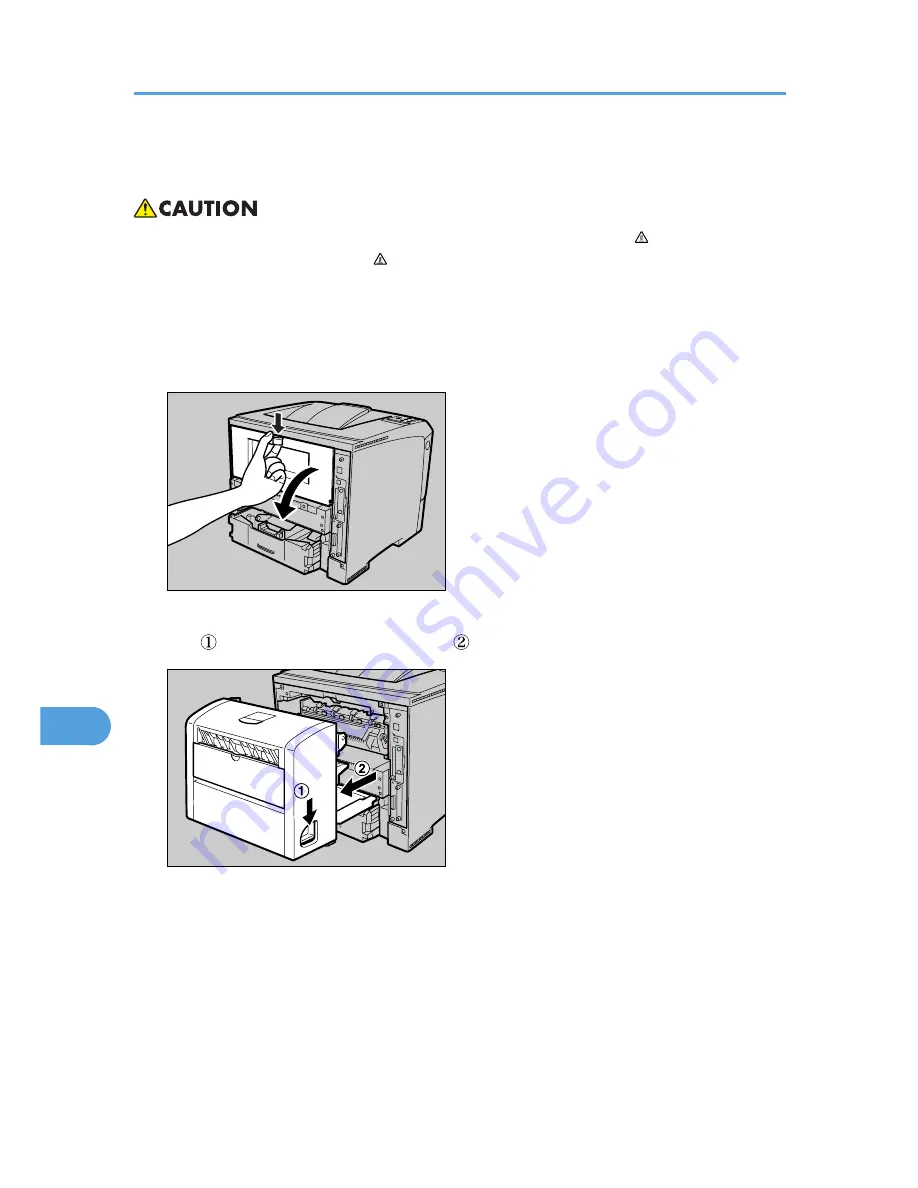
Open the rear cover.

AUB225S

2.

If the optional duplex unit is attached, push down the lever on the right side of the duplex
unit ( ), and then pull it out until it stops ( ).

AUB318S

9. Troubleshooting

164

9

Summary of Contents for LP1136n

Page 1: ... device safe for office EDP use The ma chine contains 6 2 milliwatt 770 795 nanometer wavelength AlGaAs laser di odes Safety precautions and interlock mechanisms have been designed to prevent any possible laser beam exposure to the operator Important Contents of this manual are subject to change without prior notice In no event will the company be liable for direct indirect special incidental or c...

Page 2: ...rtain items consult with your legal advisor Notes Two kinds of size notation are employed in this manual With this machine refer to the inch version For good print quality the supplier recommends that you use genuine toner maintenance kits and parts from the supplier The supplier shall not be responsible for any damage or expense that might re sult from the use of consumables toner maintenance kit...

Page 3: ...lled toner or used toner Toner dust is flammable and might ignite when exposed to an open flame Do not take apart or attempt any modifications to this machine There is a risk of fire electric shock explosion or loss of sight If the ma chine has laser systems there is a risk of serious eye damage Do not handle the power cord or plug with wet hands Doing so might cause an electrical shock Keep the m...

Page 4: ...s inhaled gargle with plenty of water and move into a fresh air environment Consult a doctor if necessary If your skin comes into contact with toner or used toner wash the affected area thoroughly with soap and water If toner or used toner gets into your eyes flush immediately with large amounts of water Consult a doctor if necessary If toner or used toner is swallowed dilute by drinking a large a...

Page 5: ...n hour Components inside the machine become very hot and can cause a burn if touched Do not touch the inside of the controller board compartment It may cause a machine malfunction or a burn Before moving the machine unplug the power cord from the wall outlet If the cord is unplugged abruptly it could become damaged Damaged plugs or cords can cause an electrical or fire hazard When lifting the mach...

Page 6: ...ontrol panel may emit steam during printing Our products are engineered to meet the highest standards of quality and functionality When purchasing expendable supplies we recommend using only those specified by an authorized dealer Important Rating voltage of the connector for options Max DC 24 V Voltage must not fluctuate more than 10 ...

Page 7: ...k when exposed to open flames The inside of this printer becomes very hot Do not touch parts with this label indicating a hot surface Touching these parts will result in burns The inside of this printer becomes very hot Do not touch parts with this label indicating a hot surface Touching these parts will result in burns The inside of this printer becomes very hot Do not touch parts with this label...

Page 8: ...NERGY STAR Office Equipment Program The ENERGY STAR Office Equipment Program encourages energy conservation by promot ing energy efficient computers and other office equipment The program backs the development and dissemination of products that feature energy saving functions It is an open program in which manufacturers participate voluntarily Targeted products are computers monitors printers facs...

Page 9: ...lation If this equipment does cause harmful interference to radio or television reception which can be deter mined by turning the equipment off and on the user is encouraged to try to cor rect the interference by one more of the following measures Reorient or relocate the receiving antenna Increase the separation between the equipment and receiver Connect the equipment into an outlet on a circuit ...

Page 10: ...e with ferrite core must be used for RF interference suppression Pour empêcher que cet appareil cause du brouillage au service faisant l objet d une licence il doit être utilisé à l intérieur et devrait être placé loin des fenêtres afin de fournir un écran de blindage maximal Si le matériel ou son antenne d émission est installé à l extérieur il doit faire l objet d une licence Note to users in Ca...

Page 11: ...se du brouillage au service faisant l objet d une licence il doit être utilisé à l intérieur et devrait être placé loin des fenêtres afin de fournir un écran de blindage maximal Si le matériel ou son antenne d émission est installé à l extérieur il doit faire l objet d une licence ...

Page 12: ...12 Copyright 2006 Printed in China EN USA G176 8607 ...

Page 13: ... Correction 36 ppm model printer 36 ppm model printer Standby 44 dB A 42 dB A Sound Pressure level Mainframe only Error Correction 36 ppm model printer 36 ppm model printer Standby 38 dB A 36 dB A Power Consumption P 190 Specifications in Hardware Guide 120V P 8 ENERGY STAR Program in Safety Information Energy Saver Error Correction With Options 7 W 10 W G176 8861 Printed in China Copyright 2007 ...

Page 14: ......

Page 15: ... 6 000 pages But the actual number of pages will vary depending on the paper type size contents and settings Toner Cartridge consumable is not covered by war ranty However if there is a problem contact the dealer where you purchased the printer Toner cartridge mouths may become dirty during quality inspection Open the front cover by pushing the front cover release button 7 5 Remove the fixing mate...

Page 16: ... several loud noises This is due to the fusing unit ini tializing and is perfectly normal Turn on the printer power AUB114S After the printer warms up the ready message appears on the panel display Press the Menu key 7 5 Press the or key to display Language and then press the Enter key Press the or key to select the language and then press the Enter key The following message appears on the panel d...

Page 17: ...and then press the Enter key The following message appears on the panel display Press the Enter key In a short time the test printing will start If you cannot complete the test printing correctly check if an error message appeared on the panel display For more information on error messages see Troubleshooting in the Hardware Guide Ethernet Configuration Make the following network settings accordin...

Page 18: ...ers and software easily from the CD ROM labeled Printer Drivers and Utili ties Click Quick Install in the window of the CD ROM to install PCL and RPCS printer drivers To install the PostScript 3 printer driver click the PostScript 3 Printer Driver button For more information about the PostScript 3 printer driver see Software Guide When the TCP IP protocol is used SmartDevice Moni tor for Client wi...

Page 19: ...intenance Kit Cleaning the Printer Adjusting the Printer Troubleshooting Removing Misfed Paper Appendix 1 2 3 4 5 6 7 Read this manual carefully before you use this machine and keep it handy for future reference For safe and correct use be sure to read the Safety Information before using the machine Hardware Guide Operating Instructions ...

Page 20: ...nager are registered trademarks of Adobe Systems Incorporated PCL is a registered trademark of Hewlett Packard Company Apple AppleTalk EtherTalk Macintosh Mac OS and True Type are trademarks of Apple Computer Inc registered in the U S and other countries IPS PRINT Printer Language Emulation Copyright 1999 2000 Oak Technology Inc All rights reserved NetWare is a registered trademark of Novell Inc O...

Page 21: ...ing the controller board 20 Attaching Paper Feed Unit TK1030 22 Attaching Envelope Feeder Type 400 25 Attaching Hard Disk Drive Type 2650 27 Attaching Memory Unit Type C 128MB 256MB SDRAM Module 29 Attaching IEEE 802 11b Interface Unit 33 Attaching Gigabit Ethernet Board Type A 37 Attaching Optional Cards 40 Attaching AD1000 Duplex Unit 42 3 Connecting the Printer Network Connection 47 Reading the...

Page 22: ...ng Paper 78 Types of Paper and Other Media 78 Paper Not Supported by this Printer 82 Print Area 83 Loading Paper 85 Loading Paper in Tray 1 and the Optional Paper Feed Unit 85 Loading Paper in the Bypass Tray 94 Loading Envelopes 100 Switching Between Paper Trays 105 6 Replacing Consumables and Maintenance Kit Replacing the Toner Cartridge Print Cartridge 107 Replacing the Maintenance Kit 112 Befo...

Page 23: ...aper Misfeeds Occur Frequently 158 The printed image is different from the image on the computer 159 When Printer is Not Functioning Properly 161 Additional Troubleshooting 162 Using the Envelope Lever 164 10 Removing Misfed Paper Removing Misfed Paper 167 When Remove Misfeed Paper Tray Appears 167 When Remove Misfeed Internal Path Appears 169 When Remove Misfeed Paper Exit Cover Appears 171 When ...

Page 24: ...Options 192 INDEX 197 4 ...

Page 25: ...50S Do not incinerate toner or toner containers Toner dust may cause flashback when exposed to open flames The inside of this printer becomes very hot Do not touch parts with this label indicating a hot surface Touching these parts will result in burns The inside of this printer becomes very hot Do not touch parts with this label indicating a hot surface Touching these parts will result in burns 5...

Page 26: ...The inside of this printer becomes very hot Do not touch parts with this label indicating a hot surface Touching these parts will result in burns 6 ...

Page 27: ...nstallation Guide Contains procedures for removing the printer from its box connecting it to a computer and installing its driver Hardware Guide This manual Contains information about paper and procedures such as installing options replacing consumables responding to error messages and resolving jams Software Guide Contain procedures for using this machine in a network environment utilizing the so...

Page 28: ... read these notes They can be found in the Safety Information Indicates points to pay attention to when using the machine and explanations of likely causes of paper misfeeds damage to originals or loss of data Be sure to read these explanations Indicates supplementary explanations of the machine s functions and instructions on resolving user errors This symbol is located at the end of sections It ...

Page 29: ... the printer for the specified models This explains about the 220 240 V model printer Read if you purchase this model This explains about the 120 V model printer Read if you purchase this model You can identify the printer s model by checking the label on its inside as shown AUB067S 9 ...

Page 30: ...ck Read manuals If you want to read manuals from CD ROM click Read HTML Manuals or Read PDF Manuals 5 Follow the instructions on the screen to complete the installation 6 Click Finish when the installation is completed 7 Click Exit Auto Run may not work under certain operating system setting If this is the case copy all data on the CD ROM root directory to your hard disk drive and then launch Setu...

Page 31: ...tray to print onto thick paper OHP transparencies adhesive labels envelopes as well as plain paper When printing on custom paper size printer driver settings are required Up to 100 sheets of plain paper 80 g m2 20 lb can be loaded See p 75 Paper and Other Media Supported by This Printer and p 85 Loading Paper 4 Control Panel Contains keys for the printer operation and display that shows the printe...

Page 32: ...d to feed one sheet of paper at a time Clean the friction pad when more than one sheet of paper is fed into the printer Also replace the friction pad when the message Replace Maintenance Kit appears 13 Paper Tray Cover Prevents paper inside the tray from getting dirty 14 Power Port Connect the power cable to this port and the other end of the cable to the outlet 15 Rear Cover Remove this cover to ...

Page 33: ...f it becomes dirty clean it See p 129 Cleaning the Printer 5 Transfer Roller Cover Open this cover when replacing a transfer roller 6 Transfer Roller When Replace Maintenance Kit appears on the display replace this roller 7 Fusing Unit Lock Levers Lift these levers when replacing the fusing unit 8 Fusing Unit Fuses the image onto paper When Replace Maintenance Kit appears on the display replace th...

Page 34: ...r also appears on the display 4 Data In indicator Blinks while the printer is receiving data from a computer Is on if there is data to be printed 5 Online key Press this key to switch the printer between online and offline 6 Job Reset key When the printer is online press this key to cancel any ongoing print jobs See Canceling a Print job Software Guide 7 Form Feed key If the printer is offline pre...

Page 35: ...on on the display 10 Enter key Press this key to execute menu items selected on the display Press this key to clear some errors 11 keys Press keys to increase or decrease values on the display when making settings Keep the key pressed to quicken scrolling and increase or decrease values on the display in units of 10 Control Panel 15 1 ...

Page 36: ...1 Guide to the Printer 16 1 ...

Page 37: ...ly it could become damaged Damaged plugs or cables can cause an electrical or fire hazard When lifting the machine use the grips on both sides The machine could break or cause an injury if dropped The voltage rating of the connector for options is 24 V DC or less Option List The following is a list of options for this printer Paper Feed Unit TK1030 Envelope Feeder Type 400 AD1000 Duplex Unit Memor...

Page 38: ... Install the module to the SDRAM module slot on the controller board There are three types of memory unit 128 MB and 256 MB 7 Install the IEEE 802 11b interface unit or the Gigabit Ethernet board Install one of these options into the vacant expansion slot on the left of the controller board The followings can be installed IEEE 802 11b Interface Unit Gigabit Ethernet Board Type A Do not install mor...

Page 39: ...by removing the rear cover of the printer See p 42 Attaching AD1000 Duplex Unit Up to two Paper Feed Units TK1030 can be attached The upper optional paper feed unit is displayed with Tray 2 and the lower unit is displayed with Tray 3 on the display The Envelope Feeder is a tray that slides into the optional paper feed unit Without the optional paper feed unit the Envelope Feeder cannot be used You...

Page 40: ...ce Unit See p 37 Attaching Gigabit Ethernet Board Type A 4 Hard Disk Drive Type 2650 See p 27 Attaching Hard Disk Drive Type 2650 You cannot install following options at the same time IEEE 802 11b Interface Unit Gigabit Ethernet Board Type A Caution when re installing the controller board This section describes handling the controller board when installing options If you slide out the controller b...

Page 41: ... following may occur if the controller board is not properly installed all control panel indicators are lit no control panel indicators is lit the error message appears on the display Available Options 21 2 ...

Page 42: ...ghs about 17 kg 37 5 lb When lifting the machine use the inset grips on both sides Otherwise the printer could break or cause injury if dropped Do not slide out more than one paper tray at a time Fully extending more than one full tray at a time can cause the machine to topple over Check the printer nameplate to confirm the model code Before using the new paper feed unit you must make settings in ...

Page 43: ...the bottom of the printer there are three holes AUB100S AUB200S 5 Attach the interface cable to the printer 6 Plug the printer s power cord back into the wall outlet and then turn on the power After finishing installation you can check whether the paper feed unit is properly installed Print the configuration page from the List Test Print menu If it is installed properly you will see Paper Feed Att...

Page 44: ...om the start If you cannot install it properly even after attempting reinstallation contact your sales or service representative To attach two paper feed units at the same time first stack them one upon the other and then attach them as a single unit Printing the Test Page Quick Installation Guide p 85 Loading Paper p 141 Adjusting Tray Registration 2 Installing Options 24 2 ...

Page 45: ...o optional paper feed units The envelope feeder unit can be used in Tray 2 and Tray 3 The main unit s feed tray Tray 1 cannot be used for this purpose The following explanation uses the example of installing the envelope feeder unit in Tray 2 1 Check the package contains the following Envelope Feeder AUB019S 2 Pull out the optional paper tray Tray 2 of the optional paper feed unit until it stops A...

Page 46: ...per feed until it stops ZKEP340E This unit is a tray that slides into the optional paper feed unit Without the optional paper feed unit this Envelope Feeder cannot be used Keep the removed paper tray with paper in a cool dark place p 85 Loading Paper 2 Installing Options 26 2 ...

Page 47: ...rive Do not subject the hard disk drive to physical shocks Before using the new hard disk drive be sure to make the settings in the printer driver 1 Check the package contains the following Hard Disk Drive ZKDX220J 2 Turn off the power of the printer and then unplug the power cable 3 Remove the two screws and the cover of the hard disk drive mounting bracket AUB215S The removed screws and cover ar...

Page 48: ...heck whether the hard disk drive is properly installed Print the configuration page from the List Test Print menu If it is installed properly you will see Hard Disk Drive for Device Connection on the configuration page If the Hard disk drive is not installed properly repeat the procedure from the start If you cannot install it properly even after reinstallation contact your sales or service repres...

Page 49: ...he memory unit to physical shocks Before using the new memory unit Be sure to make settings in the printer driver Remove the default SDRAM module 64 MB before installing the optional SDRAM module 1 Turn off the power of the printer and then unplug the power cable and interface cable 2 Remove the two screws holding the controller board in place AUB202S The removed screws are required in fastening t...

Page 50: ...S 5 Place the controller board on a flat surface The Memory Unit is installed in the slot shown in the illustration below AUB504S 6 Replacing the default SDRAM module press down the levers on both sides to remove the default module AUB505S 2 Installing Options 30 2 ...

Page 51: ... it clicks AUA024S 8 Match the controller board to the top and bottom rail using the mark and then slide it into the printer slowly until it stops AUB207S 9 Push the handle of the controller board until it clicks AUB208S Attaching Memory Unit Type C 128MB 256MB SDRAM Module 31 2 ...

Page 52: ...r under Total Memory on the configuration page The table below shows the total SDRAM module capacities Standard Extended Total 128 MB 1 128 MB 256 MB 128 MB 1 256 MB 384 MB 1 Value when the default SDRAM module 64 MB is removed If the memory unit is not properly installed repeat this procedure If you cannot install it properly even after reinstallation contact your sales or service representative ...

Page 53: ...hing metal to discharge any static electricity Static electricity can damage the IEEE 802 11b Interface board Do not subject the 802 11b interface unit to physical shocks 1 Check the package contains the following IEEE 802 11b Interface Unit AUB247S 1 Interface Unit 2 Card 3 Antenna 4 Antenna Cap 2 Turn off the power of the printer and then unplug the power cable and the interface cable Attaching ...

Page 54: ...b interface unit Keep it for possible future use 4 Attach the IEEE 802 11b interface unit Insert the end of the IEEE 802 11b interface unit into the slot AUB213S 5 Fasten the IEEE 802 11b interface unit to the controller board with the two screws AUB240S Check the IEEE 802 11b interface unit is connected firmly to be controller board 2 Installing Options 34 2 ...

Page 55: ...he interface unit with the label facing down and the uneven black antenna surface facing up until it stops AUB214S 8 Attach the antenna cap to the card with the side that has both corners of the antenna cap cut out facing the screws AUB241S Use a coin or similar object if the screws do not turn easily Attaching IEEE 802 11b Interface Unit 35 2 ...

Page 56: ...11b interface unit is not installed properly reinstall it following this procedure If you cannot install it properly even after attempting reinstallation contact your sales or service representative You need to make settings with the control panel before using the IEEE 802 11b interface unit For more information see IEEE 802 11b Wireless LAN Configuration Printing the Test Page Quick Installation ...

Page 57: ...t mounted on the board Before handling the Gigabit Ethernet board ground yourself by touching something metal to discharge any static electricity Static electricity can damage the Gigabit Ethernet board Do not subject the Gigabit Ethernet board to physical shocks 1 Check the contents of the box AUB249S 1 Gigabit Ethernet Board 2 Ferrite Core 3 Protective caps one each for the ethernet port and the...

Page 58: ...the two screws and the cover of the Gigabit Ethernet board mounting bracket AUB210S The removed cover is not used when installing the Gigabit Ethernet board Keep it for possible future use 5 Attach the Gigabit Ethernet board to the controller board Insert the end of the Gigabit Ethernet board into the slot AUB238S 2 Installing Options 38 2 ...

Page 59: ...u If it is installed properly you will see Gigabit Ethernet for Device Connection on the configuration page If the Gigabit ethernet board is not installed properly reinstall it following this procedure If you cannot install it properly even after attempting reinstallation contact your sales or service representative You need to make settings with the control panel before using the Gigabit Ethernet...

Page 60: ... optional cards while the printer is in use It may come loose even if pushed only slightly 1 Check the package contains the following AET104S 2 Turn off the power and then unplug the power cable 3 Remove the screw and the cover of the card slot at the back of the printer AUB218S Be sure to keep a screw removed during installation 2 Installing Options 40 2 ...

Page 61: ...ly insert the optional card into the upper slot until the card clicks into the place AUB219S 5 Reattach the cover over the optional card Fasten the screw to secure the cover AUB220S Attaching Optional Cards 41 2 ...

Page 62: ...ached prior to attaching the duplex unit Check the printer nameplate to confirm the model code 1 Check the contents of the box for the following items AD1000 Duplex Unit AUB014S 2 Turn off the power of the printer and then unplug the power cable 3 Remove the adhesive tape and paper AUB221S 2 Installing Options 42 2 ...

Page 63: ...B222S 4 Open the rear cover AUB225S 5 Lower the rear cover until it is horizontal and then pull it away AUB234S Proceed to step 7 if the paper tray cover is not installed Attaching AD1000 Duplex Unit 43 2 ...

Page 64: ...227S After finishing installation you can check whether the duplex unit is properly installed Print the configuration page from the List Test Print menu If it is installed properly you will see Duplex Unit for Connection Equipment on the configuration page If the duplex unit is not installed properly repeat the procedure from the start If you cannot install it properly even after reinstallation co...

Page 65: ...n about adjusting the registration of the trays see Adjusting Tray Registration The rear cover of the printer is not used with the duplex unit attached keep it for possible future use Printing the Test Page Quick Installation Guide p 141 Adjusting Tray Registration Attaching AD1000 Duplex Unit 45 2 ...

Page 66: ...2 Installing Options 46 2 ...

Page 67: ... the optional Gigabit Ethernet board which supports 1000BASE T is available Use shielded Ethernet cable Unshielded cables create electromagnetic interference that could cause malfunctions The Ethernet cable is not supplied with this printer Select your cable according to the network environment 1 Attach the supplied ferrite core at the printer end of the Ethernet cable AUB503S 2 Connect the other ...

Page 68: ... this core making a loop as shown AUB502S 2 Connect the Ethernet cable to the Gigabit Ethernet board AUB500S 3 Connect the other end of the cable to the network such as a hub The printer s Ethernet and USB ports are not available when the Gigabit Ethernet board is attached to the printer Network Connection Software Guide p 37 Attaching Gigabit Ethernet Board Type A 3 Connecting the Printer 48 3 ...

Page 69: ...s off when 10BASE T is being used 2 Green comes on when the printer is properly connected to the network For the Gigabit Ethernet board AUB066S 1 Yellow comes on 100BASE TX is being used 2 Green comes on when 10BASE T is being used 3 Green and yellow lamps come on when 1000BASE T is being used Network Connection 49 3 ...

Page 70: ... port 1 Connect the square shaped connector of the USB2 0 cable to the USB port AUB232S 2 If the Gigabit Ethernet board is attached connect the square shaped connector of the USB2 0 cable to the USB port of the board AUB243S The printer s Ethernet and USB ports are not available when the Gigabit Ethernet board is attached to the printer 3 Connect the opposite end s flat connector to devices such a...

Page 71: ... p 37 Attaching Gigabit Ethernet Board Type A USB Connection 51 3 ...

Page 72: ...ed interface cable Unshielded cables create electromagnetic interference that could cause malfunctions Voltage rating of the computer s parallel port DC 5 V max 1 Turn off the printer and computer 2 Connect the cable to the interface socket of the IEEE 1284 port AUB246S 3 Securely attach the other end of the parallel cable to your computer s parallel port Secure the cable Printing with Parallel Co...

Page 73: ...ttings and their default values These items appear in the Host Interface menu Setting Name Value IPv4 Settings DHCP On IPv4 Address 011 022 033 044 Subnet Mask 000 000 000 000 Gateway Address 000 000 000 000 IPv6 Settings Stateless sett Active Frame Type NW Auto Select Active Protocol IPv4 Active IPv6 Not Active NetWare Active SMB Active AppleTalk Active Ethernet Speed Auto Select LAN Type Etherne...

Page 74: ...the or key to display Active Protocol and then press the Enter key 5 Press the or key to set the network protocol and then press the Enter key 6 Press the or key to display Active or Not Active and then press the Enter key Set other protocols you need to set in the same way Select Not Active for unused protocols Enable IPv4 to use the Pure IPv4 environment of NetWare 5 5 1 NetWare 6 6 5 4 Configur...

Page 75: ...ess and then press the Enter key Press the or key to enter the left most entry field of the address After entering the left field press the Enter key and then you can enter the next field After completing to enter in the all fields press the Enter key Do not set 011 022 033 044 as the IP address 11 If you use IPv4 use this method of assigning IPv4 address to assign subnet mask and gateway address ...

Page 76: ...v4 Address Subnet Mask Gateway Address Consult your network administrator for information about making network settings 1 Press the Menu key AUB051S The Menu screen appears 2 Press the or key to display Host Interface and then press the Enter key 3 Press the or key to display Network Setup and then press the Enter key 4 Press the or key to display IPv4 Settings and then press the Enter key 4 Confi...

Page 77: ...Guide Making Network Settings for Using NetWare If you use NetWare select the frame type for NetWare Select one of the items below if necessary Auto Select Default Ethernet II Ethernet 802 2 Ethernet 802 3 Ethernet SNAP Usually use the default setting Auto Select When you first select Auto Select the frame type detected by the printer is adopted If your network can use more than two frame types th...

Page 78: ...work Setup and then press the Enter key 4 Press the or key to display Frame Type NW and then press the Enter key 5 Press the or key to select the frame type and then press the Enter key 6 Press the Online key The initial screen appears 7 Print a configuration page to confirm the settings made Printing the Test Page Quick Installation Guide 4 Configuration 58 4 ...

Page 79: ...t 10 Mbps half duplex 10 Mbps full duplex 100 Mbps half duplex 100 Mbps full duplex auto negotiation auto selection Connection cannot be established if the Ethernet speed does not match your network s transmission speed The auto negotiation mechanism allows two interfaces to automatically determine an optimum Ethernet speed as soon as they are connected We recommend you select Auto Select 1 Press ...

Page 80: ...or key to select the ethernet speed and then press the Enter key 6 Press the Online key The initial screen appears 7 Print a configuration page to confirm the settings made If Ethernet and wireless LAN IEEE 802 11b are both connected select which interface you want to use under LAN Type For details about printing the configuration page see Printing the Test Page Quick Installation Guide Printing t...

Page 81: ...e To use IEEE 802 11b Wireless LAN set as the followings using the control panel press the Menu key and then select Host Interface Network Setup LAN Type and then IEEE 802 11b Also settheIPv4Address SubnetMask GatewayAddress DHCP FrameType NW andActiveProtocol under the Network Setup menu For details about setting items see p 53 Ethernet Configuration The 802 11b interface unit cannot be used simu...

Page 82: ...b card for which the SSID Network Name setting is not necessary select Ad hoc The transmission mode of IEEE 802 11b can also be set using a Web browser For details see Web browser and Configuring the Network Interface Board Software Guide 6 If 802 11 Ad hoc or Ad hoc is selected for Comm Mode set the channel to use for transmission Confirm the network administrator for the channel to use 7 In the ...

Page 83: ... setSSIDtousefortransmission Consult your network administrator for the SSID to use 1 In the IEEE 802 11b menu press the or key to display SSID and then press the Enter key If an SSID has been set you can check the SSID setting 2 Press the or key to display Enter ID and then press the Enter key 3 Press the or key to enter characters and then press the Enter key The number of characters you have en...

Page 84: ...work Interface Board Software Guide WEP key can also be set using a Web browser For details see Web Image Monitor Help For details about printing the configuration page see Printing the Test Page Quick Installation Guide Configuring the Network Interface Board Software Guide Printing the Test Page Quick Installation Guide Web Image Monitor Help 4 Configuration 64 4 ...

Page 85: ...enu screen appears 2 Press the or key to display Host Interface and then press the Enter key 3 Press the or key to display IEEE 802 11b and then press the Enter key 4 Press the or key to display Security Method and then press the Enter key 5 Press the or key to display WEP and then press the Enter key When activating the WEP Setting you will need to enter the WEP key If you have not entered the ke...

Page 86: ...ted to 10 or 26 for hexadecimal and 5 or 13 for ASCII For ASCII character strings each uppercase and lowercase letter is recognized respectively 8 Press the Online key The initial screen appears 9 Print a configuration page to confirm the settings made In the case of using a WEP key on a network activate the WEP setting to be used for communication along with WEP Confirm the network administrator ...

Page 87: ...ay Host Interface and then press the Enter key 3 Press the or key to display IEEE 802 11b and then press the Enter key 4 Press the or key to display Security Method and then press the Enter key 5 Press the or key to display WPA and then press the Enter key 6 Press the or key to display Encrypt Meth and then press the Enter key Setting Security Method of Wireless LAN 67 4 ...

Page 88: ...thod and then press the Enter key Authentication settings are as follows WPA PSK Performs authentication using an encryption key a Pre Shared Key that is shared by the access point and client Enter the Pre Shared Key using between 8 and 63 ASCII characters Select PSK Entry using the or key in the WPA menu and then enter the characters WPA WPA uses CA certificates and a RADIUS server to provide sec...

Page 89: ...10 Press the Online key The initial screen appears 11 Print a configuration page to confirm the settings made Printing the Test Page Quick Installation Guide Setting Security Method of Wireless LAN 69 4 ...

Page 90: ...rtificate and or a Device Certificate EAP TLS PEAP Phase 2 is for TLS only To set WPA 802 1X you must enable SSL To set WPA 802 1X you must use Web Image Monitor Protection Using Encryption Software Guide Using Web Image Monitor Software Guide Installing a Site Certificate 1 Access the authentication server and obtain the CA Certificate Methods of obtaining certificates differ according to the ope...

Page 91: ...mation page and then click OK 8 Updating appears Wait for about 2 minutes and then click OK 9 Click Details shown in the Device Certificate window as the memo pad icon for Requesting 10 Select all and then copy the entire Text for Requested Certificate text that is displayed in the Certificate Status window 11 Access the certificate authority server and then obtain the CA Signified Certificate usi...

Page 92: ...inter s address in the address bar of a Web browser 3 Enter your login user name and password and then click Login For details about the login user name and password consult your administrator 4 Click Configuration and then click Wireless LAN Settings in Interface 5 Select Infrastructure Mode in Communication Mode 6 Enter the alphanumeric characters a z A Z or 0 9 in SSID according to the access p...

Page 93: ... in Server ID PEAP Click Change in Password and then enter the password set in the RADIUS server Click Change on Phase 2 User Name and then enter the user name set in the RADIUS server Select MSCHAPv2 or TLS in Phase 2 Method When you select TLS Select the client certificate you want to use in WPA Client Certificate Make the following settings according to the operating system you are using Select...

Page 94: ...4 Configuration 74 4 ...

Page 95: ...ful of the paper feed direction The direction is determined for each paper size Input Paper Sizes Tray 1 Metric version Inch version A4 B5 JIS A5 81 2 14 Legal 81 2 11 Letter 51 2 81 2 The following sizes are supported but not indicated on the tray dial You should set the tray dial to and select the paper size with the control panel Metric version Inch version A5 51 2 81 2 81 4 13 Folio 81 2 13 Fo...

Page 96: ...et with the control panel There is no dial on the tray Metric version Inch version A4 B5 JIS A5 A6 81 2 14 Legal 81 2 11 Letter 51 2 81 2 71 4 101 2 Executive 81 4 13 Folio 81 2 13 Foolscap 8 13 F GL Com 10 Env C5 Env C6 Env DL Env Monarch Env 7 68 101 2 16K Bypass Tray supports custom size paper approximately 64 216 mm 2 52 8 50 inches in width and 139 7 432 mm 5 50 17 01 inches in length Set as ...

Page 97: ...5 Loading Paper Check that the top of the stack is not higher than the limit mark inside the tray Paper Size Supported by Both Side Printing The following paper sizes can be printed on both sides Metric version Inch version A4 B5 JIS A5 81 2 14 Legal 81 2 11 Letter 51 2 81 2 8 13 F GL 81 2 13 Foolscap 81 4 13 Folio 7 68 101 2 16K The envelope feeder unit requires the installation of the optional p...

Page 98: ... used For more information about recommended paper contact your sales or service representative Do not use paper that has already been printed onto by other printers Storing Paper Paper should always be stored properly Improperly stored paper might result in poor print quality paper misfeeds or printer damage Recommendations are as follows Avoid storing paper in humid areas Avoid exposing paper to...

Page 99: ...r setup Make the following settings using the control panel Press the Menu key select Paper Input and then select Letterhead for the selected tray s paper type Printer driver setup Click Letterhead in the Paper type list Both sided printing Possible Thick Paper Paper thickness 130 162 g m2 8 43 lb Printer setup Make the following settings using the control panel Press the Menu key select Paper Inp...

Page 100: ...onal cautions Print speed for OHP transparencies is slower than for plain paper Depending on the setting made for mode switching the printer goes into standby mode 30 or 40 seconds after receiving a job We recommend you use a 4000 ANSI lumen or brighter overhead projector to project OHP transparencies When printing on OHP transparencies that have a print side load them with the print side facing u...

Page 101: ...ing a pencil or ruler across them Some kinds of envelope might cause misfeeds wrinkles or print poorly Print quality on envelopes may be uneven if parts of an envelope have differing thicknesses Print one or two envelopes to check print quality The following can occur when printing on envelopes creased long edges smudged backs blurred print If envelopes are printed over with solid black white stre...

Page 102: ... by this printer Paper meant for an ink jet printer Bent folded or creased paper Curled or twisted paper Torn paper Wrinkled paper Damp paper Paper that is dry enough to emit static electricity Paper that has already been printed onto except a preprinted letterhead paper Malfunctions are especially likely when using paper printed on by other than a laser printer e g monochrome and color copiers in...

Page 103: ... stuck together damaged in any way with stamps attached with windows holes perforations cutouts or embossing with metal clasps string ties or metal folding bars designed to be interlocked with nicked edges or bent corners with rough wrinkled or laid finishes with any exposed adhesive when the flap is in the sealed or closed position Print Area Thefollowingshowstheprintareaforthisprinter Besuretose...

Page 104: ... vary depending on the paper size printer language and printer driver settings Envelope AUB040S 1 Print area 2 Feed direction 3 Approx 10 mm 0 39 inches 4 Approx 15 mm 0 59 inches The print area may vary depending on the paper size printer language and printer driver settings 5 Paper and Other Media 84 5 ...

Page 105: ...er feed unit Make sure paper is not stacked above the limit mark inside the tray Misfeeds might occur Do not put different types of paper in a single paper tray Up to 500 sheets of paper can be loaded in the paper feed unit This means a maximum of 1 500 sheets can be simultaneously loaded when two additional paper feed units are installed Confirm that paper fits under the rear guide Do not slide t...

Page 106: ...nt side of the tray and then pull it out of the printer AUB109S 3 Fan the paper before loading paper in the paper tray AUB042S 4 Load paper into the tray with the print side down AUB110S 5 Paper and Other Media 86 5 ...

Page 107: ...t are not indicated on the paper size dial set the dial to In this case you should set the paper size using the control panel Confirm that the catches return to their original positions securely If they are not locked securely paper misfeeds might occur To avoid damage pinch the paper guides when moving them Confirm that the top of the stack is not higher than the limit mark inside the tray Confir...

Page 108: ...tch the size and feed direction of paper in the paper tray AUB250S 2 Lift the front side of the tray and then pull it out of the printer AUB109S 3 If you load paper larger than A4 you should extend the tray as follows 4 Slide the catches inwards to unlock the tray AUB251S 5 Paper and Other Media 88 5 ...

Page 109: ...5 Slide the tray until it stops AUB252S 6 Return the catches to their original positions AUB253S 7 Adjust the rear and side guides to the paper size you want to load AUB254S Loading Paper 89 5 ...

Page 110: ...then remove the paper tray cover in the order shown in the illustration AUB236S 10 Lift the front side of the tray and then place it into the printer Carefully slide it into the printer until it stops AUB111S You cannot load paper smaller than A4 if the tray is extended In this case return the tray to its standard length 5 Paper and Other Media 90 5 ...

Page 111: ...nu key AUB051S The Menu screen appears 2 Press the or key to display Paper Input and then press the Enter key 3 Press the or key to display Tray Paper Size and then press the Enter key 4 Press the or key to display the target paper tray and then press the Enter key 5 Press the or key to display the loaded paper size and then press the Enter key After about two seconds the display returns to the me...

Page 112: ...be loaded in each type of the paper trays Tray 1 139 7 216 mm 5 5 8 5 in in width and 139 7 356 mm 5 5 14 01 in in length Optional Paper Feed Unit Tray 2 Tray 3 139 7 216 mm 5 5 8 5 in in width and 160 356 mm 6 3 14 01 in in length The printer cannot print from applications that do not support custom size paper 1 Press the Menu key AUB051S The Menu screen appears 2 Press the or key to display Pape...

Page 113: ...appears Specifying a paper type for Tray 1 and the optional paper feed unit Improve printer performance by selecting the optimum paper type for the tray You can select from the following paper types Plain Paper Recycled Paper Special Paper Color Paper Letterhead Preprinted Thick Paper You can select custom paper type settings made using Web Image Monitor Be sure to set a paper type using the contr...

Page 114: ...e tray and then press the Enter key 5 Press the or key to select the paper type and then press the Enter key 6 Press the Online key The initial screen appears The following paper types cannot be printed on both sides Special Paper Color Paper Preprinted Thick Paper Loading Paper in the Bypass Tray Shuffle the paper before loading the stack onto the tray so multiple sheets are not fed in together 5...

Page 115: ...or 81 2 11 length or longer must be loaded one at a time Support the paper by handsoitfeedsinproperly Additionally sincepaperfeedingandimagequalitymaydifferdepending on paper thickness and width check print results in advance using paper you intend to print on 1 Press the mark in the center of the Bypass Tray AUB255S 2 Open the Bypass Tray AUB256S 3 Slide the side guides outward and load paper unt...

Page 116: ...operly unless it is cut at right angles If you load B5 or larger slide out the bypass tray extension AUB258S Specifying standard size paper for the bypass tray This describes how to load standard size paper into the bypass tray 1 Set the paper size using the control panel Press the Menu key AUB051S 5 Paper and Other Media 96 5 ...

Page 117: ...g on paper type Make sure paper is not stacked above the paper guides inside the bypass tray Specifying custom size paper for the bypass tray When loading custom size or special paper specify the paper size using both the control panel and printer driver Paper sizes between 139 7 432 mm 5 50 17 00 in in length and 64 216 mm 2 52 8 50 in in width can be loaded in the bypass tray However the size ra...

Page 118: ...and then press the Enter key 5 Press the or key to enter the horizontal value and then press the Enter key By pressing the or key the value increases or decreases by 0 1 mm 0 01 inch By pressing and holding the or key the value varies by 1 mm 0 1 inch You can set the horizontal value in the following range 64 216 mm 2 52 8 50 inches 6 Press the or key to enter the vertical value and then press the...

Page 119: ...nsparency OHP transparency Envelope Preprinted Thick Paper You can select custom paper type settings made using Web Image Monitor Be sure to select the paper type when you load thick paper envelopes or OHP transparencies in the bypass tray The paper type selected using the printer driver overrides that selected using the control panel Be sure to set a paper type using the control panel of the prin...

Page 120: ...en appears The following paper types cannot be printed on both sides Special Paper Color Paper Transparency OHP transparency Envelope Preprinted Thick Paper Loading Envelopes As there are many kinds of envelopes be sure to check if those to be used are supported by this printer p 25 Attaching Envelope Feeder Type 400 p 78 Types of Paper and Other Media Loading envelopes onto the bypass tray Confir...

Page 121: ...ection Press the Menu key AUB051S The Menu screen appears 4 Press the or key to display Paper Input and then press the Enter key 5 Check Bypass Size appears and then press the Enter key 6 Press the or key to select the envelope type and then press the Enter key 7 Press the Online key The initial screen appears Confirm that the top of the stack is not higher than the limit mark on the side guides L...

Page 122: ...ay 2 and Tray 3 using the control panel However you cannot load envelopes until the optional envelope feeder unit is installed With the optional envelope feeder unit you can load up to 60 envelopes at the same time Confirm that the envelope flaps are securely folded down and that there is no air inside the envelopes Do not slide the paper tray in with force If you do the front and side guides migh...

Page 123: ...the rear guide and then slide it toward the back ZGDY260E 4 Push the bottom plate down until it locks into place ZDDP360E 5 Load envelopes into the envelope feeder unit with the print side down and the flap on the left as shown in the illustration ZDDP380E Loading Paper 103 5 ...

Page 124: ...he edge of the envelope stack ZGDY370E 7 Pinch the rear guide and then slide it along the edge of the envelope stack ZGDY390E 8 Lift the front of the tray and then slide it carefully into the printer until it stops ZKEP340E 5 Paper and Other Media 104 5 ...

Page 125: ...The initial screen appears Confirm that the top of the stack is not higher than the limit mark on the side guides Confirm that the envelopes fit under the side guides Do not push the stack of envelopes with too much force Keep the removed paper tray with paper in a cool and dry place p 78 Types of Paper and Other Media Switching Between Paper Trays When paper of the same size is loaded in both the...

Page 126: ...u key AUB051S The Menu screen appears 2 Press the or key to display Paper Input and then press the Enter key 3 Press the or key to display Tray Priority and then press the Enter key 4 Press the or key to select the tray type you want to use and then press the Enter key 5 Press the Online key The initial screen appears 5 Paper and Other Media 106 5 ...

Page 127: ...of them according to local regulations If toner or used toner is swallowed dilute by drinking a large amount of water Consult a doctor if necessary Avoid getting toner on your clothes or skin when removing a paper jam or replacing toner If your skin comes into contact with toner wash the affected area thoroughly with soap and water If toner gets on your clothing wash with cold water Hot water will...

Page 128: ... job and printing environment conditions Toner cartridges may need to be changed sooner than indicated above due to deterioration over the period of use If the following problems occur even with toner still remaining the fusing part of the toner cartridge is deteriorated over the period of use Prepare a new toner cartridge Areas of printout are missing The print out image is missing or partially b...

Page 129: ... Lift the front side of the toner cartridge and then pull it out of the printer AUB103S 3 Be sure to put the toner cartridge on a stable flat surface 4 Wipe around the metallic registration roller by turning with a soft damp cloth AUB300S 5 Take the new toner cartridge from the box Replacing the Toner Cartridge Print Cartridge 109 6 ...

Page 130: ...ile holding the cartridge with one hand as shown in the illustration AFE007S 7 Hold the grips of the cartridge and then insert it into the printer until it stops AUB106S 8 Push down the toner cartridge to settle it in appropriate position AUB105S 6 Replacing Consumables and Maintenance Kit 110 6 ...

Page 131: ...er failure Please cooperate with the Toner cartridge Recycling Program whereby are collected used toner cartridges For details consult with the store where the printer was purchased or with a sales or service representative Do not close the front cover with force If you cannot close the cover easily pull out the toner cartridge from the printer and insert it again After that close the front cover ...

Page 132: ...esult in burns When to replace the Maintenance Kit Replace Maintenance Kit The maintenance kit contains parts for maintaining the printer Replace the maintenance kit if the following message appears on the display Before Replacing Replace all the parts included in Maintenance Kit at the same time Replace them according to the following procedure 1 Turn off the power and then unplug the power cable...

Page 133: ...eplace all the friction pads in the tray The following procedure shows how to replace the tray s friction pad Tray 1 and the other are for the paper feed unit s Tray 2 3 1 Pull out the paper tray until it stops AUB108S 2 Lift the front side of the tray and then pull it out of the printer AUB109S Replacing the Maintenance Kit 113 6 ...

Page 134: ...tion pad while releasing the catches 5 Return the paper tray to its original position and then remove the friction pad from the tray AUB302S 6 Insert the new friction pad in the paper tray Attach the central projection of the new friction pad to the spring and then align the projection of both sides of the friction pad with the holes of the paper tray Then push the friction pad as shown in the ill...

Page 135: ...are installed The friction pad spring may come off Be careful not to lose the friction pad spring The catches that lock the friction pad are located at the very back Replacing the Transfer Roller Do not insert the roller on the back of the socket Doing so can damage the printer Insert the metallic part of the roller on the socket If you insert the sponge part of the roller the roller might be dama...

Page 136: ...ds with toner from the transfer roller wear the gloves included in the Maintenance Kit 4 Hold the lock levers and then pull them AUB304S 5 Hold the green parts of the roller on both sides and remove the roller from the printer as shown in the illustration AUB305S 6 Replacing Consumables and Maintenance Kit 116 6 ...

Page 137: ... to the left AUB306S 7 Push down the lock levers on both ends of the printer as shown in the illustration until they click into place AUB307S 8 Take the gloves off 9 Hold the grips of the toner cartridge push it into the printer until it stops AUB106S Replacing the Maintenance Kit 117 6 ...

Page 138: ... feed unit s The following procedure shows how to replace the paper feed rollers of the printer and the optional paper feed units When lifting the machine use the inset grips on both sides Otherwise the printer could break or cause injury if dropped When lifting the paper feed unit hold the bottom of it and then lift it slowly Lifting it carelessly or dropping it may cause an injury Always move th...

Page 139: ...r to scatter 1 Lift the paper tray slightly and then pull it out until it stops AUB108S 2 Lift the front side of the tray and then pull it out of the printer AUB109S 3 If the optional duplex unit is attached push down the lever on the right side of the duplex unit and then pull it out until it stops AUB318S Replacing the Maintenance Kit 119 6 ...

Page 140: ...uplex unit out of the printer AUB319S 5 Move the printer to the edge of a sturdy and stable table or desk AUB308S 6 Slide the green lock lever to the left and then remove the paper feed roller AUB309S 6 Replacing Consumables and Maintenance Kit 120 6 ...

Page 141: ...ure the new roller rotates smoothly 8 If the printer is equipped with the optional paper feed unit s follow the same procedure to replace its paper feed roller If you installed two paper feed units also replace both their paper feed rollers 9 Place paper in the removed paper trays Lift the front of the tray and then slide it carefully into the printer until it stops AUB111S Replacing the Maintenan...

Page 142: ...onalpaperfeedunit donotmovetheprinterandtheunittogether because they are not securely attached p 185 Moving and Transporting the Printer Replacing the Fusing Unit The fusing unit becomes very hot When installing a new fusing unit turn off the printer and wait at least an hour before replacing the old fusing unit Not allowing the unit to cool may result in burns 6 Replacing Consumables and Maintena...

Page 143: ... rear cover until it is horizontal and then pull it away AUB234S 3 If the optional duplex unit is attached push down the lever on the right side of the duplex unit and then pull it out until it stops AUB318S Replacing the Maintenance Kit 123 6 ...

Page 144: ...vers and then pull the duplex unit out of the printer AUB319S 5 Lift the lock levers of the fusing unit as shown in the illustration AUB311Sz 6 Pull the fusing unit out AUB312S 6 Replacing Consumables and Maintenance Kit 124 6 ...

Page 145: ...the pins on both sides of the new fusing unit AUB313S 8 Push the new fusing unit into the printer AUB314S 9 Push the lock levers of the fusing unit down until they click AUB315S Replacing the Maintenance Kit 125 6 ...

Page 146: ... with the grooves in the printer s interior AUB316S 11 Close the rear cover AUB317S 12 When the optional duplex unit was removed push in the duplex unit along the rails in the back of the printer AUB226S 6 Replacing Consumables and Maintenance Kit 126 6 ...

Page 147: ...curely push the duplex unit into the printer AUB227S 14 Print a configuration page to confirm that the printer works properly Print the Test Page Quick Installation Guide Replacing the Maintenance Kit 127 6 ...

Page 148: ...6 Replacing Consumables and Maintenance Kit 128 6 ...

Page 149: ...us eye damage When removing misfed paper do not touch the fusing unit because it could be very hot Clean the printer periodically to maintain fine printing Dry wipe the exterior with a soft cloth If dry wiping is not enough wipe with a soft wet cloth that is wrung out well If you still cannot remove the stain or grime use a neutral detergent and then wipe over with a well wrung wet cloth dry wipe ...

Page 150: ...ganic solvent such as thinner or benzine Do not slide the paper tray in with force If you do the front and side guides might move 1 Pull out the paper tray until it stops AUB108S 2 Lift the front side of the tray and then pull it out of the printer AUB109S 3 Place the tray on a flat surface When there is paper in the tray remove paper 7 Cleaning the Printer 130 7 ...

Page 151: ... print side up Carefully slide the paper tray into the printer until it stops AUB111S If misfeeds or multi feeds of paper occur after cleaning the friction pad contact your sales or service representative Follow the same procedure to clean the friction pad of the optional paper feed unit and the envelope feeder unit Cleaning the Friction Pad 131 7 ...

Page 152: ...damaging the cord and causing a fire or an electric shock If the printer is equipped with the optional paper feed unit do not move the printer and unit together as they are not securely attached When lifting the printer confirm that the optional paper feed unit is not attached to the printer Do not use chemical cleaner or organic solvent such as thinner or benzine Do not slide the paper tray in wi...

Page 153: ...e table or desk AUB308S Do not put the printer on an unstable or tilted surface 6 Slide the green lock lever to the left so that the paper feed roller can be released AUB309S 7 Wipe the rubber part of the roller with a soft damp cloth Then wipe it with a dry cloth to remove the water Cleaning the Paper Feed Roller 133 7 ...

Page 154: ...sition AUB310S Check the green lock lever secures the roller correctly by making sure the new roller rotates smoothly 9 Move the printer to the place where it was placed Carefully slide the paper tray into the printer until it stops AUB111S Follow the same procedure to clean the paper feed roller of the optional paper feed unit 7 Cleaning the Printer 134 7 ...

Page 155: ...abeled indicating a hot surface Touching these parts will result in burns Clean the registration roller if dots caused by specks of paper stuck to the roller appear on printed OHP transparencies Do not hold the toner cartridge upside down or stand it vertically Do not put the toner cartridge on an unstable or tilted surface Do not use chemical cleaners or organic solvents such as thinners or benzi...

Page 156: ...holding the grips of the cartridge AUB103S 4 Wipe around the metallic Registration roller by turning with a soft damp cloth AUB300S 5 Holding the grips of the toner cartridge push it into the printer until it stops AUB106S 7 Cleaning the Printer 136 7 ...

Page 157: ... position AUB105S 7 Close the front cover AUB107S Carefully close the front cover If you cannot close the cover easily pull the toner cartridge out of the printer and insert it again After that close the front cover again Cleaning the Registration Roller 137 7 ...

Page 158: ...7 Cleaning the Printer 138 7 ...

Page 159: ...rom the application or the printer driver whenever possible 1 Press the Menu key AUB051S The Menu screen appears 2 Press the or key to display Maintenance and then press the Enter key 3 Press the or key to display Image Density and then press the Enter key 4 Press the or key to specify the image density and then press the Enter key You can specify the image density in the range of 3 to 3 5 Press t...

Page 160: ...onditions Selecting 3 from the control panel is highly recommended You can adjust the image density in seven steps from 3 to 3 Increasing the value makes the printouts darker and decreasing the value makes the printouts lighter 8 Adjusting the Printer 140 8 ...

Page 161: ...ful in some cases 1 Press the Menu key AUB051S The Menu screen appears 2 Press the or key to display Maintenance and then press the Enter key 3 Press the or key to display Registration and then press the Enter key 4 Press the or key to display Prt Test Sheet and then press the Enter key 5 Press the or key to select the tray you want to adjust and then press the Enter key Print the test sheet to pr...

Page 162: ...tion menu press the or key to select Adjustment and then press the Enter key 8 Press the or key to select the parameter you want to adjust and then press the Enter key 9 Press the or key to set the registration value mm and then press the Enter key Increase the value to shift the print area in the positive direction and decrease to shift in the negative direction TS3X001N 8 Adjusting the Printer 1...

Page 163: ...or decrease by 1 0 mm steps 10 Press the Enter key The display returns to the print area Adjustment menu 11 Print the test sheet to confirm the adjustment result 12 Press the Online key The initial screen appears Adjusting Tray Registration 143 8 ...

Page 164: ...y to display Maintenance and then press the Enter key 3 Press the or key to display Curl Prevention and then press the Enter key 4 Press the or key to set On or Off and then press the Enter key Wait for two seconds The display returns to the Maintenance menu 5 Press the Online key The initial screen appears 8 Adjusting the Printer 144 8 ...

Page 165: ...ntrol panel Warming up The printer is warming up or toner is being supplied Wait until Ready appears on the display Resetting Job The machine is resetting the print job Wait until Ready appears on the display Setting change in process The machine is changing settings Wait a while Suspending All jobs in the machine are suspended Wait a while Hex Dump Mode Inthehexdumpmode themachinereceivesdatainhe...

Page 166: ...paper type setting Change the paper type via the paper type setting menu on the control panel or execute Form Feed by pressing the Form Feed key or cancel the job Load the indicated tray with the correct paper or change the paper type size using the dial or using the Paper Input menu on the control panel Alternatively select another tray by pressing the Form Feed key or cancel the job DHCP assigne...

Page 167: ... I F The printer identified a parallel interface error Check the correct interface cable being used Turn the power off and then on If the message appears again contact your sales or service representative Hardware Problem Printer font The printer identified a printer font file error It is necessary to replace the printer font module Hardware Problem USB The printer identified a USB I F Board error...

Page 168: ...ter key See p 85 Loading Paper Load Paper Tray or Form Feed No paper remaining in the indicated tray Load the indicated tray with the paper or select another tray using the Form Feed key or cancel the job Menu Protected Cannot change The control panel has been digitally locked and settings cannot be changed This alert message is displayed for 3 seconds before returning to the previous display scre...

Page 169: ... remove jammed paper See p 167 Removing Misfed Paper Remove Misfeed Paper Tray Pull out Tray Paper is jammed in the specified input paper tray Remove paper from the input paper tray and then reload paper Then open the front cover and then close it again so the error message disappears See p 167 Removing Misfed Paper Remove Misfeed Paper Exit Cover Open Paper Exit Cover Paper is jammed under the pa...

Page 170: ... not installed Set the toner cartridge correctly If the cartridge is installed close the front cover and turn the power switch to off and to on If the message appears again contact your sales or service representative See p 107 Replacing the Toner Cartridge Print Cartridge Reset Tray or Form Feed The indicated paper input tray is not set correctly or is not set Set the indicated paper input tray c...

Page 171: ...Supply order failed Call for supply order has failed Contact your sales or service representative Error Status Messages on the Control Panel 151 9 ...

Page 172: ... long beep Job completed A Printer Document Server Features job has finished Five long beeps Soft alert The screen is changing back to the initial screen after the printer came out of the energy saving mode or was reset Five short beeps repeated five time Strong alert Printer requires user attention Paper might have jammed or toner might need replenishing Users cannot mute the printer s beep alert...

Page 173: ...tion Guide Is the interface cable connected securely to the printer and the computer Connect the interface cable securely If it has a fastener fasten it securely as well Are you using the correct interface cable The type of interface cable you should use depends on the computer you use Be sure to use the correct one If the cable is damaged or worn replace it with a new one See p 189 Specifications...

Page 174: ...nt to Settings and then click Printers 2 Click to select the icon of the printer Next on the File menu click Properties 3 Click the Details tab 4 Check the Print to the following port box to confirm that the correct port is selected Due to the termination of support for Windows 95 98 by Microsoft the supplier does not guarantee any problem change occur For Windows 2000 1 On the Start menu point to...

Page 175: ... Printers and Other Hardware 3 Click Printers and Faxes 4 Click to select the icon of the printer Next on the File menu click Properties 5 Click the Port tab 6 Check the Print to the following port s box to confirm that the correct port is selected Printer Does Not Print 155 9 ...

Page 176: ...ot pattern does not print Change the Dithering setting in the printer driver s dialog box See the printer driver Help Solid lines are printed as broken lines Change the Dithering setting in the printer driver s dialog box See the printer driver Help The print out image is missing or partially blurred Paper is damp Use paper that has been stored properly See p 78 Storing Paper Toner is almost deple...

Page 177: ... size e g A4 document on B5 paper the back of the next printed sheet may be dirtied If rubbed with your finger it smears out The setting of the paper may not be correct For example although thick paper is used the setting for thick paper may not be set Check the paper settings of this printer See p 78 Types of Paper and Other Media Check the paper settings of the printer driver See the printer dri...

Page 178: ...rly See p 75 Paper and Other Media Supported by This Printer When loading paper separate paper from each other Multiple pages are fed at once There may be a gap between the guides and the paper in the paper tray Make sure there are no gaps See p 85 Loading Paper Paper is either too thick or too thin See p 75 Paper and Other Media Supported by This Printer Paper has already been printed on See p 75...

Page 179: ...mage is printed in the wrong orientation Set the correct orientation under the PCL Menu with the control panel See Making Printer Settings Using the Control Panel Software Guide Confirm that the setting of orientation has been set in the application you use Set the correct paper size and feed direction that matches tray settings on the RPCS printer driver Images are cut off or excess pages are pri...

Page 180: ...error occurred in the PostScript printer driver when printing with PCL or the PostScript printer driver You can print using the procedure below Set Memory Usage in the System menu to Font Priority on the control panel Return the setting to Font Priority after you have finished printing If the setting is left as Font Priority continuous printing speed may decrease two sided printing may be canceled...

Page 181: ...To resume from the Energy Saver mode the printer has to warm up and this takes time until printing starts To disable the Energy Saver mode select Off for Energy Saver in the System menu Changing the paper feed direction may sometimes reduce the time to resume printing It takes too much time to complete the print job Photographs and other data intensive pages take a long time for the printer to pro...

Page 182: ...ail is transmitted the e mail will not be received Check the e mail address set for the destination Confirm the printer s operation history using the Web Image Monitor s System Log menu in Network If the e mail was sent but not received the destination may be incorrect Also check the information concerning error mail from the e mail server The setting for Notify by Email on the System Menu was cha...

Page 183: ... the SNTP server Refer to the Web Image Monitor s Help to the settings Printing using IEEE 802 11b wireless LAN is slow When using the optional IEEE 802 11b board do the following Transmit fewer print jobs Make sure no other IEEE 802 11b wireless LAN or Bluetooth devices are in use Interference may occur with the IEEE 802 11b wireless LAN interface board Such interference may affect the transmissi...

Page 184: ...ing unit becomes very hot When installing the new fusing unit turn off the printer and wait about an hour After that install the new fusing unit Not waiting for the unit to cool down can result in a burn 1 Open the rear cover AUB225S 2 If the optional duplex unit is attached push down the lever on the right side of the duplex unit and then pull it out until it stops AUB318S 9 Troubleshooting 164 9...

Page 185: ...the duplex unit out of the printer AUB319S 4 Use the envelope lever Lowering the envelope lever increases roller pressure AUB036S Keep the envelope lever lowered when printing normally 5 Close the rear cover AUB317S Using the Envelope Lever 165 9 ...

Page 186: ...6 When the optional duplex unit was removed push in the duplex unit along the rail in the back of the printer AUB226S 7 Securely push the duplex unit into the printer AUB227S 9 Troubleshooting 166 9 ...

Page 187: ...careful not to get toner on your hands or clothes Toner on prints made after removing misfed paper may be loose inadequately fused Make a few test prints until smudges no longer appear Do not forcefully remove misfed paper it will tear Torn pieces remaining inside the printer will cause further misfeeds and possibly damage the printer More than one misfed area might be indicated In this case check...

Page 188: ...s AUB413S 3 Open the front cover by pushing the front cover release button and then close it to reset the misfeed condition AUB415S You can apply this procedure for both the paper tray and the optional paper feed unit To reset the misfeed condition open and close the front cover then the indicator will be off 10 Removing Misfed Paper 168 10 ...

Page 189: ...s Tray be sure to remove all the paper from the Bypass Tray and close it before opening the front cover Be sure to put the toner cartridge on a stable flat surface Do not hold the toner cartridge upside down or stand it vertically 1 Open the front cover by pushing the front cover release button AUB101S 2 Lift the front side of the toner cartridge and then pull it out of the printer AUB103S Removin...

Page 190: ...reful not to get toner dust on your hands or clothes AUB401S 4 Hold the grips of the toner cartridge and then push it into the printer until it stops AUB106S 5 Push down the toner cartridge to settle it in appropriate position AUB105S 10 Removing Misfed Paper 170 10 ...

Page 191: ...e printer Be sure to put the toner cartridge on a stable flat surface Do not hold the toner cartridge upside down or stand it vertically If paper is fed from the Bypass Tray be sure to remove all the paper from the Bypass Tray and close it before opening the front cover Removing misfed paper from the internal path 1 Open the front cover by pushing the front cover release button AUB101S Removing Mi...

Page 192: ...of the printer AUB103S 3 Pull out the misfed paper by holding both sides of paper Be careful not to get toner dust on your hands or clothes AUB401S 4 Hold the grips of the toner cartridge push it into the printer until it stops AUB106S 10 Removing Misfed Paper 172 10 ...

Page 193: ...ate position AUB105S 6 Close the front cover AUB107S Removing misfed paper from the exit cover 1 Open the paper exit cover Place your finger under the indentation in the exit cover raise it and pull it backward to open it AUB402S Removing Misfed Paper 173 10 ...

Page 194: ...2 Remove the misfed paper AUB403S 3 Close the paper exit cover until it clicks AUB404S 4 Open the front cover by pushing the front cover release button AUB101S 10 Removing Misfed Paper 174 10 ...

Page 195: ...yed check the inside of the fusing unit and remove any paper inside Turn off the power and wait for about an hour before turning it back on Do not touch the metal part of the fusing unit It becomes very hot Touching it could result in a burn 1 Open the paper exit cover Place your finger under the indentation in the exit cover raise it and pull it backward to open it AUB402S Removing Misfed Paper 1...

Page 196: ...2 Remove the misfed paper AUB403S 3 Open the rear cover AUB225S 4 Lower the rear cover until it is horizontal and then pull it away AUB234S 10 Removing Misfed Paper 176 10 ...

Page 197: ... right side of the duplex unit and then pull it out until it stops AUB318S 6 Push the under board levers and then pull the duplex unit out of the printer AUB319S 7 Lift the lock levers of the fusing unit as shown in the illustration AUB311Sz Removing Misfed Paper 177 10 ...

Page 198: ...8 Pull the fusing unit out AUB312S 9 Hold the tab and then remove the misfed paper AUB405S 10 Push the fusing unit until it stops AUB314S 10 Removing Misfed Paper 178 10 ...

Page 199: ...until they click AUB315S Proceed to step 13 if the optional duplex unit is installed 12 Position the rear cover horizontally and align it with the grooves in the printer s interior AUB316S 13 Close the rear cover AUB317S Removing Misfed Paper 179 10 ...

Page 200: ...ved push in the duplex unit along the rail in the back of the printer AUB226S 15 Securely push the duplex unit into the printer AUB227S 16 Close the paper exit cover until it clicks AUB404S 17 Turn the power on 10 Removing Misfed Paper 180 10 ...

Page 201: ...er may cause paper to tear and leave scraps of paper in the duplex unit This might cause a misfeed and damage the printer Removing misfed paper inside the cover 1 Open the rear cover of the duplex unit AUB406S 2 Remove the misfed paper AUB407S Removing Misfed Paper 181 10 ...

Page 202: ...3 Close the rear cover of the duplex unit AUB408S 4 Lift the lever open the cover of the duplex unit AUB409S 5 Remove the misfed paper AUB410S 10 Removing Misfed Paper 182 10 ...

Page 203: ...ot be able to remove it by pulling the duplex unit out In this case pull the paper tray out and remove the paper 1 Push down the lever on the right side of the duplex unit and then pull it out until it stops AUB226S 2 Lift the guide board inside the duplex unit and remove the misfed paper AUB412S Removing Misfed Paper 183 10 ...

Page 204: ...the error message appears again the misfed paper might be left in the printer Confirm that any tornpaperscrapsarenotintheinsideoftheprinter Formoreinformation see WhenRemoveMisfeed Internal Path Appears p 169 When Remove Misfeed Internal Path Appears 10 Removing Misfed Paper 184 10 ...

Page 205: ... optional paper feed unit is installed remove it from the printer and then move them separately The printer weighs approximately 17 kg 37 5 lb Moving the Printer When lifting the machine use the inset grips on both sides Otherwise the printer could break or cause an injury if dropped Before moving the machine unplug the power cord from the wall outlet If the cord is unplugged abruptly it could bec...

Page 206: ...inter and then move it horizontally to the place where you want to install it AUB100S 4 If you removed options move them separately and reinstall them Be sure to move the printer horizontally To prevent toner from scattering move the printer slowly 11 Appendix 186 11 ...

Page 207: ...ged when necessary printing will become impossible We recommend keeping a stock of cartridges or purchasing them soon The actual number of printable pages varies depending on the image volume and density number of pages to be printed at a time paper type and paper size used and environmental conditions such as temperature and humidity Toner cartridges may need to be changed sooner than indicated a...

Page 208: ...ad 3 90 000 pages The actual number of printable pages varies depending on the image volume and density number of pages to be printed at a time paper type and paper size used and environmental conditions such as temperature and humidity Themaintenancekit consumables arenotcoveredbywarranty However ifthereisproblem contact the store where they were purchased 11 Appendix 188 11 ...

Page 209: ...ution 1 200 600 dpi RPCS PostScript 3 PCL 6 600 600 dpi RPCS PostScript 3 PCL 5e 6 300 300 dpi RPCS PostScript 3 PCL 5e Paper size See p 75 Paper and Other Media Supported by This Printer Paper Weight See p 75 Paper and Other Media Supported by This Printer Media Type See p 78 Types of Paper and Other Media Paper Output Capacity Standard 250 sheets 80 g m2 20 lb Paper Input Capacity Standard Paper...

Page 210: ...r Media Power Source 220 240 V 4 3 A or more 50 60 Hz 120 V 8 A or more 60 Hz Power Consumption Mainframe With full options Printing 970 W or less 990 W or less Energy Saver 4 5 W or less 9 W or less Mainframe With full options Printing 930 W or less 960 W or less Energy Saver 4 5 W or less 7 W or less Dimensions Width Depth Height Printer only Bypass Tray not extended 388 mm 15 2 450 mm 17 7 345 ...

Page 211: ...in frame only 2 31 ppm model printer 36 ppm model printer Stand by 36 dB A 38 dB A During Printing 59 dB A 61 dB A 1 The preceding measurements made in accordance with ISO7779 are actual values 2 Measured at the position of a bystander Memory Standard 192 MB up to 384 MB with the optional Memory Unit Interface Standard Ethernet 10 100Base TX USB2 0 It requires a USB computer port and cable that su...

Page 212: ...inting on sheets with a width of 170 mm or smaller may decrease the printing speed depending on the temperature control of the fusing unit Options Paper Feed Unit TK1030 Dimensions W D H 388 486 155 mm 15 3 19 1 5 3 inches Without pins on the unit Paper size See p 75 Paper and Other Media Supported by This Printer Paper weight 60 130 g m2 17 34 lb Specifications are subject to change without notic...

Page 213: ...0 GB Specifications Spooling print data to collate Storing Spooling Sample Print Locked Print Hold Print Stored Print data Storing PostScript fonts Storing log data YoucaninstallPostScriptfontswiththisoptionalharddiskdrive WithMacOS typesoffontssupported are PostScript Type 1 and PostScript Type 2 To download them use Printer Utility for Mac Memory Unit Type C 128MB 256MB Module Type SO DIMM Small...

Page 214: ...Hz 1 13 channels Transmittable Distance 1 Mbps 400 m 1 2 Mbps 270 m 1 5 5 Mbps 200 m 1 11 Mbps 140 m 1 1 These figures are a guideline for outdoor use In general the transmittable distance indoors is 10 100 m depending on the environment Transmission Mode ad hoc mode and infrastructure mode SmartDeviceMonitor and Web Image Monitor are supported IEEE 802 11b Interface Unit Type I This unit is for t...

Page 215: ... distance indoors is 10 100 m depending on the environment Transmission Mode ad hoc mode and infrastructure mode SmartDeviceMonitor and Web Image Monitor are supported Gigabit Ethernet Board Type A Interface Connector Ethernet 10Base T 100Base TX 1000Base T USB 2 0 It requires a USB computer port and cable that support USB 2 0 Data Transmission Speed Ethernet 1000 Mbps 100 Mbps 10 Mbps USB 480 Mbp...

Page 216: ...11 Appendix 196 11 ...

Page 217: ...nter Network Connection 47 Parallel Connection 52 USB Connection 50 Consumables 187 Custom Size 92 D Device Certificate 71 DHCP 56 Duplex Unit 17 42 193 E Envelope Feeder 17 25 102 192 Envelope Lever 164 Envelopes 80 Error 145 Ethernet 47 53 Ethernet Port 47 Ethernet Speed 59 F Friction Pad 113 130 188 Fusing Unit 122 188 G Gigabit Ethernet Board 17 37 47 195 Guide to the Printer Control Panel 14 ...

Page 218: ...intenance Kit 112 Friction Pad 113 Fusing Unit 122 Paper Feed Roller 118 Transfer Roller 115 Replacing the Toner Cartridge 107 S Security Method of Wireless LAN 65 Site Certificate 70 Specifications 189 Specifying a paper type Bypass Tray 99 Optional Paper Feed Unit 93 Tray 1 93 Specifying custom size paper Bypass Tray 97 Optional Paper Feed Unit 92 Tray 1 92 Specifying standard size paper Bypass ...

Page 219: ...MEMO 199 ...

Page 220: ...MEMO 200 GB GB EN USA G176 ...

Page 221: ...Copyright 2006 ...

Page 222: ...Hardware Guide Model No MLP31n MLP36n P7031n P7035n LP131n LP136n Aficio SP 4100N Aficio SP 4110N G176 8602 EN USA ...

Page 223: ... Panel Monitoring and Configuring the Printer Using a Printer Server Special Operations under Windows Mac OS Configuration Appendix 1 2 3 4 5 6 7 Read this manual carefully before you use this machine and keep it handy for future reference For safe and correct use be sure to read the Safety Information before using the machine Software Guide Operating Instructions ...

Page 224: ...nager are registered trademarks of Adobe Systems Incorporated PCL is a registered trademark of Hewlett Packard Company Apple AppleTalk EtherTalk Macintosh Mac OS and True Type are trademarks of Apple Computer Inc registered in the U S and other countries IPS PRINT Printer Language Emulation Copyright 1999 2000 Oak Technology Inc All rights reserved NetWare is a registered trademark of Novell Inc O...

Page 225: ...stScript 3 Printer Driver Windows 2000 IPP 29 Installing the PostScript 3 Printer Driver Windows XP Windows Server 2003 2003 R2 TCP IP 30 Installing the PostScript 3 Printer Driver Windows XP Windows Server 2003 2003 R2 IPP 31 Changing the Port Settings for SmartDeviceMonitor for Client 33 Using the Standard TCP IP Port 35 Installing the PCL or RPCS Printer Driver 35 Installing the PostScript 3 Pr...

Page 226: ...the PostScript 3 Printer Driver Windows XP Windows Server 2003 2003 R2 59 Having Problems Installing the Printer Driver from the CD ROM 60 Making Option Settings for the Printer 62 Conditions for Bidirectional Communication 62 If Bidirectional Communication is Disabled 63 Memory Capacity and Paper Size 64 2 Setting Up the Printer Driver PCL Accessing the Printer Properties 67 Windows 95 98 Me Acce...

Page 227: ...opy Control 94 Using Data security for copying 94 Using Mask type 95 Important Notice 97 Sample Print 98 Printing the First Set 99 Printing the Remaining Sets 99 Deleting Sample Print Files 101 Locked Print 102 Sending a Locked Print File 102 Printing a Locked Print File 103 Deleting Locked Print Files 104 Hold Print 106 Hold Print Job to the Printer 106 Printing a Hold Print File 107 Deleting Hol...

Page 228: ... 130 Printing Using Registered Paper Types 131 5 Making Printer Settings Using the Control Panel Menu Chart 133 Paper Input Menu 139 Changing the Paper Input Menu 139 Paper Input Menu Parameters 140 List Test Print Menu 143 Printing a Configuration Page 143 Interpreting the Configuration Page 143 List Test Print Menu Parameters 145 Maintenance Menu 146 Changing the Maintenance Menu 146 Maintenance...

Page 229: ...onitor Help 175 Using SmartDeviceMonitor for Admin 177 Installing SmartDeviceMonitor for Admin 178 Changing the Network Interface Board Configuration 179 Locking the Menus on the Printer s Control Panel 180 Changing the Paper Type 180 Managing User Information 181 Setting Applicable Functions to New Users 183 Configuring the Energy Saver Mode 183 Setting a Password 184 Checking the Printer Status ...

Page 230: ...nd E mail 193 Remote Maintenance by telnet 197 Using telnet 197 access 198 autonet 199 bonjour rendezvous 199 devicename 201 dhcp 201 diprint 203 dns 203 domainname 205 help 206 hostname 206 ifconfig 206 info 208 ipp 208 ipv6 209 lpr 209 netware 209 passwd 211 pathmtu 211 prnlog 211 route 212 set 213 show 216 slp 216 smb 216 snmp 217 sntp 220 6 ...

Page 231: ...formation 248 7 Using a Printer Server Preparing Printer Server 257 Printing notification via SmartDeviceMonitor for Client 257 Using NetWare 259 Setting Up as a Print Server NetWare 3 x 260 Setting Up as a Print Server NetWare 4 x 5 5 1 6 6 5 261 Using Pure IP in the NetWare 5 5 1 or 6 6 5 Environment 262 Setting Up as a Remote Printer NetWare 3 x 264 Setting Up as a Remote Printer NetWare 4 x 5 ...

Page 232: ...PD Files 280 Setting Up PPD Files 280 Setting Up Options 281 Using USB Interface 281 Using Bonjour Rendezvous 282 Changing to EtherTalk 282 Configuring the Printer 284 Using PostScript 3 285 Job Type 285 User Code 296 Paper Size 296 Fit to Paper 296 Paper Source Paper Feed 297 Resolution 297 Orientation Override 297 Duplex Printing 297 Toner Saving 298 Collate 298 Paper Type 299 Image Smoothing 29...

Page 233: ...tting the SSL TLS Encryption Mode 319 SNMPv3 Encryption 319 Cautions to Take When Using in a network 321 Connecting a Dial up Router to a Network 321 Using DHCP 321 Configuring the WINS Server 323 Using the Dynamic DNS Function 324 Installing Font Manager 2000 327 Using Adobe PageMaker Version 6 0 6 5 or 7 0 328 When Using Windows Terminal Service MetaFrame 329 Operating Environment 329 Supported ...

Page 234: ...stallation Guide Contains procedures for removing the printer from its box connecting it to a computer and installing its driver Hardware Guide Contains information about paper and procedures such as installing options replacing consumables responding to error messages and resolving jams Software Guide This manual Contains procedures for using this machine in a network environment utilizing the so...

Page 235: ...t does not involve personal injury when you misuse the machine without following the instructions under this symbol Be sure to read the instructions all of which are described in the Safety Information section The statements above are notes for your safety If this instruction is not followed paper might be misfed originals might be damaged or data might be lost Be sure to read this This symbol ind...

Page 236: ... the printer for the specified models This explains about the 220 240 V model printer Read if you purchase this model This explains about the 120 V model printer Read if you purchase this model You can identify the printer s model by checking the label on its inside as shown AUB067S 12 ...

Page 237: ...er error occur A message describing the cause of the error also appears on the display 4 Data In indicator Blinks while the printer is receiving data from a computer Is on if there is data to be printed 5 Online key Press this key to switch the printer between online and offline 6 Job Reset key When the printer is online press this key to cancel any ongoing print jobs See p 116 Canceling a Print J...

Page 238: ... condition on the display 10 Enter key Press this key to execute menu items selected on the display Press this key to clear some errors 11 keys Press keys to increase or decrease values on the display when making settings Keep the key pressed to quicken scrolling and increase or decrease values on the display in units of 10 14 ...

Page 239: ...rs in the License Agreement dialog box 5 After reading the agreement click I accept the agreement and then click Next 6 Select the printer model you want to use in the Select Printer dialog box For network connection via TCP IP select the printer whose IP address is displayed in Connect To For parallel connection select the printer whose printer port is displayed in Connect To 7 Click Install The ...

Page 240: ... the printer driver from the supplier s web site when using under Windows NT 4 0 Quick Install is not available unless bidirectional communication between the printer and computer is enabled via parallel connection p 62 Making Option Settings for the Printer p 51 Installing the Printer Driver Using USB 1 Preparing for Printing 16 1 ...

Page 241: ...Available ports are determined based on the combination of Windows operating system version and connection method used SmartDeviceMonitor for Client TCP IP IPP SmartDeviceMonitor for Client TCP IP IPP Standard TCP IP LPR SmartDeviceMonitor for Client TCP IP IPP Standard TCP IP LPR SmartDeviceMonitor for Client TCP IP IPP LPR Windows 95 98 Me Windows XP Server 2003 2003 R2 Windows NT 4 0 Windows 20...

Page 242: ...nection Method Available Ports Ethernet IEEE 802 11b SmartDeviceMonitor for Client port Standard TCP IP port LPR port Windows NT 4 0 Connection Method Available Ports Ethernet IEEE 802 11b SmartDeviceMonitor for Client port LPR port p 21 Using the SmartDeviceMonitor Port p 35 Using the Standard TCP IP Port p 39 Using the LPR Port Using as a network printer This printer can be used as the Windows n...

Page 243: ...he printer driver for each type of network printer p 43 Using as the Windows Network Printer p 48 Using as the NetWare Print Server Remote Printer Local Connection Local connections can be established via parallel and USB connections Windows operating system version determines the available connection methods Windows 95 Parallel connection Windows 98 Parallel connection Windows Me USB and Parallel...

Page 244: ...R2 USB and Parallel connections Windows NT 4 0 Parallel connection See the explanation of how to install the printer driver for each method of connection p 51 Installing the Printer Driver Using USB p 56 Printing with Parallel Connection 1 Preparing for Printing 20 1 ...

Page 245: ... The DeskTopBinder Lite Setup dialog appears and then click Next 6 The software license agreement appears in the License Agreement dialog box After reading through its contents click Yes 7 Click Full install or Custom Install Full install installs all required applications DeskTopBinder Lite and SmartDeviceMonitor for Client Custom Install installs selected applications 8 Follow the instructions o...

Page 246: ...elect the printer model you want to use The printer name can be changed in the Change settings for Printer Name box 9 Double click the printer name to display the printer settings Thedetailsshownin Comment Driver and Port varydependingontheoperatingsystem printer model and port 10 Click Port and then click Add 11 Click SmartDeviceMonitor and then click OK 12 Click TCP IP and then click Search A li...

Page 247: ...lready installed If there is you cannot install the printer driver using Auto Run If you still want to install the printer driver install using Add Printer p 60 Having Problems Installing the Printer Driver from the CD ROM Installing the PCL or RPCS Printer Driver IPP To install printer driver under Windows 2000 XP Professional and Windows Server 2003 2003 R2 you must have an account that has Mana...

Page 248: ...13 Enter a name for identifying the printer in IPP Port Name Use a name different from the one of any existing port If a name is not specified here the address entered in the Printer URL box becomes the IPP port name 14 Click Detailed Settings to make necessary settings and then click OK For information about the settings see SmartDeviceMonitor for Client Help 15 Click OK 16 Check that the port of...

Page 249: ...ault interface language is English 4 Click PostScript 3 Printer Driver Add Printer Wizard starts 5 Click Next 6 Click Local printer and then click Next A dialog box for selecting the printer manufacturer and model name appears 7 Select the name of the printer whose driver you want to install and then click Next 8 In the Available ports box click Printer Port and then click Next 9 Change the printe...

Page 250: ... User Code can be set after the printer driver installation For information about User Code see the printer driver Help Installing the PostScript 3 Printer Driver Windows 95 98 Me IPP IPv6 cannot be used under Windows 95 98 Me 1 Quit all applications currently running 2 Insert the CD ROM into the CD ROM drive The installer starts 3 Select an interface language and then click OK The default interfa...

Page 251: ...nter s address 17 Enter a name for identifying the printer in IPP Port Name Use a name different from the one of any existing port If a name is not specified here the address entered in the Printer URL box becomes the IPP port name 18 Click Detailed Settings to make necessary settings For information about the settings see SmartDeviceMonitor for Client Help 19 Click OK 20 Check that the selected p...

Page 252: ...ck TCP IP and then click Search A list of printers using TCP IP appears 10 Select the printer you want to use and then click OK Only printers that respond to a broadcast from the computer appear To use a printer not listed here click Specify Address and then enter the IPv4 address or host name of the printer 11 Check that the name of the printer whose driver you want to install is selected and the...

Page 253: ...iver Add Printer Wizard starts 5 Click Next 6 Click Local printer and then click Next If the Automatically detect and install Plug and Play Printer check box is selected clear it 7 Click Create a new port 8 Click SmartDeviceMonitor and then click Next 9 Click IPP 10 In the Printer URL box enter http printer s address printer as the printer s address If the server authentification is issued to enab...

Page 254: ...Setup exe on the CD ROM root directory The printer driver with the selected language will be installed The English printer driver is installed when the following language is selected Cestina Magyar Polski Portugues Suomi A User Code can be set after the printer driver installation For information about User Code see the printer driver Help Installing the PostScript 3 Printer Driver Windows XP Wind...

Page 255: ...t 13 Specify whether or not to share the printer and then click Next 14 Specify whether or not to print a test page and then click Next 15 Click Finish The printer driver installation starts Auto Run may not work with certain operating system settings If this happens launch Setup exe on the CD ROM root directory The printer driver with the selected language will be installed The English printer dr...

Page 256: ...ttp 192 168 15 16 printer https 192 168 15 16 printer You can enter http printer s address ipp as the printer s address 11 Enter a name for identifying the printer in IPP Port Name Use a name different from the one of any existing port If a name is not specified here the address entered in the Printer URL box becomes the IPP port name 12 Detailed Settings to make necessary settings and then click ...

Page 257: ...k Printers 2 In the Printers window click the icon of the printer you want to use On the File menu click Properties 3 Click the Details tab and then click Port Settings The Port Settings dialog box appears For Windows 2000 and Windows NT 4 0 1 On the Start menu point to Settings and then click Printers 2 In the Printers window click the icon of the printer you want to use On the File menu click Pr...

Page 258: ...Start SmartDeviceMonitor for Client and then right click the SmartDeviceMonitor for Client icon on the task tray 3 Point to Properties and then click Extended Features Settings 4 Select the Set Recovery Parallel Printing for each port check box 5 Click OK to close the Extended Features Settings dialog box 6 For information about these settings see SmartDeviceMonitor for Client Help 1 Preparing for...

Page 259: ...t 6 Select a printer driver you want to use in the Select Program dialog box You can select several printer drivers 7 Click Next 8 Select the printer model you want to use The printer name can be changed in the Change settings for Printer Name box 9 Double click the printer name to display the printer settings Thedetailsshownin Comment Driver and Port varydependingontheoperatingsystem printer mode...

Page 260: ...lation is complete A message appears if there is a newer version of the printer driver already installed If there is you cannot install the printer driver using Auto Run If you still want to install the printer driver use Add Printer p 60 Having Problems Installing the Printer Driver from the CD ROM Installing the PostScript 3 Printer Driver Windows 2000 Installing this printer driver requires Adm...

Page 261: ...and then Click Next 15 Specify whether or not to print a test page and then click Next 16 Click Finish The printer driver installation starts Auto Run may not work with certain operating system settings If this happens launch Setup exe on the CD ROM root directory The printer driver with the selected language will be installed The English printer driver is installed when the following language is ...

Page 262: ...lick Next 12 Click Finish in the Add Standard TCP IP Printer Port Wizard dialog box 13 Check that the name of the printer whose driver you want to install is selected and then click Next 14 Change the printer name if you want and then click Next Select the Yes check box to configure the printer as default 15 Specify whether or not to share the printer and then Click Next 16 Specify whether or not ...

Page 263: ...ent click I accept the agreement and then click Next 6 Select a printer driver you want to use in the Select Program dialog box You can select several printer drivers 7 Select the printer model you want to use The printer name can be changed in the Change settings for Printer Name box 8 Double click the printer name to display the printer settings Thedetailsshownin Comment Driver and Port varydepe...

Page 264: ... Installing the Printer Driver from the CD ROM Installing the PostScript 3 Printer Driver Windows 2000 Installing this printer driver requires Administrators permission Log on using an account that has Administrators permission In an IPv6 environment you cannot use the LPR Port Use the SmartDeviceMonitor port 1 Quit all applications currently running 2 Insert the CD ROM into the CD ROM drive The i...

Page 265: ...tugues Suomi A User Code can be set after the printer driver installation For information about User Code see the printer driver Help Installing the PostScript 3 Printer Driver Windows XP Windows Server 2003 2003 R2 Installing this printer driver requires Administrators permission Log on using an account that has Administrators permission In an IPv6 environment you cannot use the LPR Port Use the ...

Page 266: ...nfigure the printer as default 13 Click Next 14 Specify whether or not to print a test page and then click Next 15 Click Finish The printer driver installation starts Auto Run may not work with certain operating system settings If this happens launch Setup exe on the CD ROM root directory The printer driver with the selected language will be installed The English printer driver is installed when t...

Page 267: ...nting cannot be used from the client SmartDeviceMonitor s notification functions are not available if you are using a Windows XP or Windows Server 2000 print server 1 Quit all applications currently running 2 Insert the CD ROM into the CD ROM drive The installer starts 3 Select an interface language and then click OK The default interface language is English 4 Click PCL RPCS Printer Drivers 5 The ...

Page 268: ... Restart the computer to complete installation Auto Run may not work with certain operating system settings If this happens launch Setup exe on the CD ROM root directory To stop installation of the selected software click Cancel before installation is complete A message appears if there is a newer version of the printer driver already installed If there is you cannot install the printer driver usi...

Page 269: ...root directory The printer driver with the selected language will be installed The English printer driver is installed when the following language is selected Cestina Magyar Polski Portugues Suomi A User Code can be set after the printer driver installation For information about User Code see the printer driver Help Installing the PostScript 3 Printer Driver Windows 2000 Installing a printer drive...

Page 270: ...will be installed The English printer driver is installed when the following language is selected Cestina Magyar Polski Portugues Suomi A User Code can be set after the printer driver installation For information about User Code see the printer driver Help Installing the PostScript 3 Printer Driver Windows XP Windows Server 2003 2003 R2 Installing this printer driver requires Administrators permis...

Page 271: ...k Next 10 The printer driver installation starts 11 Click Next Select the Yes check box to configure the printer as default 12 Click Finish Restart the computer to complete installation Auto Run may not work with certain operating system settings If this happens launch Setup exe on the CD ROM root directory The printer driver with the selected language will be installed The English printer driver ...

Page 272: ...ed in the example Operating system Windows 98 NetWare version 4 1 File server name CAREE Queue name R QUEUE 1 Insert the CD ROM into the CD ROM drive The installer starts 2 Select an interface language and then click OK The default interface language is English 3 Click PCL RPCS Printer Drivers 4 The software license agreement appears in the License Agreement dialog box After reading the agreement ...

Page 273: ...e Printers window open the printer properties Under Windows XP or Windows Server 2003 2003 R2 open the printer properties from the Printers and Faxes window 20 On the Printer Settings tab clear the Form Feed and Enable Banner check boxes Under Windows 2000 XP Windows Server 2003 2003 R2 or Windows NT 4 0 click the NetWare setting tab Do not select these check boxes since they are automatically sel...

Page 274: ...Under Windows 2000 XP Windows Server 2003 2003 R2 or Windows NT 4 0 clear the Form feed check box on the NetWare Settings tab in the printer properties dialog box Banner Page Do not use NetWare to configure a banner page Follow the procedure below to disable banner pages according to the operating system used Under Windows 95 98 Me clear the Enable banner check box on the Printer Settings tab in t...

Page 275: ...the supplier s Web site Save it where you can locate it easily 2 Check that the power of the printer is off 3 Connect the printer and computer using the USB cable Connect the USB cable firmly 4 Turn on the power of the printer The Plug and Play is enabled and Found New Hardware Wizard appears If USB Printing Support is already installed on the computer proceed to Step 10 5 In the Found New Hardwar...

Page 276: ...5E WIN9X_ME Language DISK1 PCL 6 D DRIVERS PCL6 WIN9X_ME Language DISK1 PostScript 3 D DRIVERS PS WIN9X_ME Language DISK1 15 Check the location and then click Next Add Printer Wizard starts 16 Click Finish Installation is complete If installation is successful the icon of the printer connected to the USB001 port is added to the Printers window The number after USB varies depending on the number of...

Page 277: ...New Hardware Wizard display click Search for a suitable driver for my device recommended and then click Next 5 Select the Specify location check box and then click Next 6 Insert the CD ROM into the CD ROM drive When Auto Run starts click Exit 7 Specify the location where the source files of the printer driver is stored If the CD ROM drive is D the source files of the printer driver are stored in t...

Page 278: ...ter to install it from the CD ROM provided 1 Check that the power of the printer is off 2 Connect the printer and computer using the USB cable Connect the USB cable firmly 3 Turn on the power of the printer Found New Hardware Wizard starts and USB Printing Support is installed automatically 4 IntheFoundNewHardwareWizarddisplay click Searchforasuitabledriverformydevice recommended and then click Ne...

Page 279: ...tically Turn off the power of the printer reconnect the USB cable and then turn it on again Windows has already configured the USB settings Open Windows Device Manager and then under Universal Serial Bus controllers remove any conflicting devices Conflicting devices have a or icon by them Take care not to accidentally remove required devices For details see Windows Help When using Windows 2000 XP ...

Page 280: ... Drivers 5 The software license agreement appears in the License Agreement dialog box After reading the agreement click I accept the agreement and then click Next 6 Select a printer driver you want to use in the Select Program dialog box You can select several printer drivers 7 Click Next 8 Select the printer models you want to use The printer name can be changed in the Change settings for Printer...

Page 281: ...Wizard starts 5 Click Next 6 Click Local Printer and then click Next A dialog box for selecting the printer manufacturer and model name appears 7 Select the name of the printer whose driver you want to install and then click Next 8 In the Available ports box click LPT Printer Port and then click Next 9 Change the printer name if you want and then click Next Select the Yes check box to configure th...

Page 282: ...he printer whose driver you want to install and then click Next 9 Change the printer name if you want and then click Next Select the Yes check box to configure the printer as default 10 Select whether or not to share the printer and then click Next 11 Specify whether or not to print a test page and then click Next 12 Click Finish The printer driver installation starts 13 Restart the computer to co...

Page 283: ...facturer and model name appears 8 Select the name of the printer whose driver you want to install and then click Next 9 Change the printer name if you want and then click Next Select the Yes check box to configure the printer as default 10 Select whether or not to share the printer and then click Next 11 Specify whether or not to print a test page and then click Next 12 Click Finish The printer dr...

Page 284: ...port settings Refer to the port description for the procedure For Windows XP Professional and Windows Server 2003 2003 R2 1 On the Start menu click Printers and Faxes 2 Click Add a printer 3 Follow the instructions in Add Printer Wizard If the printer driver is on a CD ROM the location of the RPCS printer driver is DRIVERS RPCS WIN2K_XP If the installer starts click Cancel to quit 4 Change the por...

Page 285: ...e interface For details about how to find an available port see Confirming the Connection Method p 17 Confirming the Connection Method p 21 Using the SmartDeviceMonitor Port p 35 Using the Standard TCP IP Port p 39 Using the LPR Port Having Problems Installing the Printer Driver from the CD ROM 61 1 ...

Page 286: ...following conditions must be met When connected with parallel cables The computer must support bidirectional communication The printer must support bidirectional communication The interface cable must support bidirectional communication The printer must be connected to the computer using the standard parallel cables and parallel connectors Under Windows 2000 Enable bidirectional support must be se...

Page 287: ... Administrators or Power Users group member 1 On the Start menu point to Settings and then click Printers The Printers window appears 2 Click the icon of the printer you want to use 3 On the File menu click Properties 4 Click the Change Accessories tab If options in the Change Accessories tab are disabled bidirectional connection is enabled In this case no change is necessary for option settings I...

Page 288: ...e the default SDRAM module 64 MB before installing the optional SDRAM module Font Priority Only single sided printing 600 600 dpi 192 256 384 MB A4 B5 JIS A5 Letter Legal and maximum custom sized paper can be printed on Only single sided printing 1200 600 dpi 192 256 384 MB A4 B5 JIS A5 Letter Legal and maximum custom sized paper can be printed on Duplex printing 600 600 dpi 192 256 384 MB A4 B5 J...

Page 289: ...ting 1200 600 dpi 192 MB B5 JIS and A5 sized paper can be printed on Complex images might fail to print out properly on A4 Letter and Legal sized paper 256 MB B5 JIS and A5 sized paper can be printed on Complex images might fail to print out properly on A4 Letter and Legal sized paper 384 MB A4 B5 JIS A5 and Letter sized paper can be printed on Complex images might fail to print out properly on Le...

Page 290: ...1 Preparing for Printing 66 1 ...

Page 291: ...e menu click Properties 4 Make the necessary settings and then click OK With some applications the printer driver settings are not used and the application s own default settings are applied For details about settings see the printer driver Help Making Printer Settings from an Application You can make printer settings for a specific application To make printer settings for a specific application o...

Page 292: ...operties Making Printer Default Settings The Printer Properties To change the printer default settings including option configuration settings log on using an account that has Manage Printers permission Members of the Administrators and Power Users groups have Manage Printers permission by default You cannot change the printer default settings for each user Settings made in the Printer Properties ...

Page 293: ...nces dialog box from that application The following explains how to make settings for the WordPad application provided with Windows 2000 1 On the File menu click Print The Print dialog box appears 2 Select the printer you want to use in the Select Printer list 3 Make the necessary settings and then click Print to start printing The procedure to open the Printing Preferences dialog box may vary dep...

Page 294: ... necessary settings and then click OK Settings you make here are used as the default settings for all applications Do not make a setting for Form to Tray Assignment For details about settings see the printer driver Help Making Printer Default Settings Printing Preferences You cannot change the printer default settings for each user Settings made in the Printer Properties dialog box are applied to ...

Page 295: ... in the Print dialog box of an application Settings made here are used as defaults when printing from this application For details about settings see the printer driver Help Windows NT 4 0 Accessing the Printer Properties This describes how to launch printer driver s properties Making Printer Default Settings The Printer Properties To change the printer default settings including option configurat...

Page 296: ... 2 Click the icon of the printer you want to use 3 On the File menu click Document Defaults The Default dialog box appears 4 Make the necessary settings and then click OK Settings you make here are used as the default settings for all applications For details about settings see the printer driver Help Making Printer Settings from an Application You can make printer settings for a specific applicat...

Page 297: ...ot used and the application s own default settings are applied Any settings you make in the following procedure are valid for the current application only General users can change the properties displayed in the Print dialog box of an application Settings made here are used as defaults when printing from this application For details about settings see the printer driver Help PCL Accessing the Prin...

Page 298: ...ake the printer default settings open the Printer Properties dialog box from the Printers window You cannot change the printer default settings for each user Settings made in the Printer Properties dialog box are applied to all users 1 On the Start menu point to Settings and then click Printers The Printers window appears 2 Click the icon of the printer you want to use 3 On the File menu click Pro...

Page 299: ...ngs are applied Any settings you make in the following procedure are valid for the current application only General users can change the properties displayed in the Print dialog box of an application Settings made here are used as defaults when printing from this application For details about settings see the printer driver Help Windows 2000 Accessing the Printer Properties This describes how to l...

Page 300: ...ttings and then click Printers The Printers window appears 2 Click the icon of the printer you want to use 3 On the File menu click Printing Preferences The Printing Preferences dialog box appears 4 Make the necessary settings and then click OK Settings you make here are used as the default settings for all applications For details about settings see the printer driver Help Making Printer Settings...

Page 301: ...g an account that has Manage Printers permission Members of the Administrators and Power Users groups have Manage Printers permission by default You cannot change the printer default settings for each user Settings made in the Printer Properties dialog box are applied to all users 1 On the Start menu click Printers and Faxes The Printers and Faxes window appears 2 Click the icon of the printer you...

Page 302: ...ting Preferences dialog box from that application The following explains how to make settings for the WordPad application provided with Windows XP 1 On the File menu click Print The Print dialog box appears 2 Select the printer you want to use in the Select Printer list 3 Make the necessary settings and then click Print to start printing The procedure to open the Printing Preferences dialog box ma...

Page 303: ...OK the Printer Properties dialog box appears 4 Make the necessary settings and then click OK Settings you make here are used as the default settings for all applications Do not make a setting for Form to Tray Assignment For details about settings see the printer driver Help Making Printer Default Settings Default To change the printer default settings including option configuration settings log on...

Page 304: ...en click Properties The Printer Properties dialog box appears 3 Make the necessary settings and then click OK 4 Click OK to start printing The procedure to open the Printer Properties dialog box may vary depending on the application For details see the manuals provided with the application you use With some applications the printer driver settings are not used and the application s own default set...

Page 305: ...ke the necessary settings and then click OK With some applications the printer driver settings are not used and the application s own default settings are applied For details about settings see the printer driver Help Making Printer Settings from an Application You can make printer settings for a specific application To make printer settings for a specific application open the Printer Properties d...

Page 306: ...g Printer Default Settings The Printer Properties To change the printer default settings including option configuration settings log on using an account that has Manage Printers permission Members of the Administrators and Power Users groups have Manage Printers permission by default You cannot change the printer default settings for each user Settings made in the Printer Properties dialog box are...

Page 307: ...nces dialog box from that application The following explains how to make settings for the WordPad application provided with Windows 2000 1 On the File menu click Print The Print dialog box appears 2 Select the printer you want to use in the Select Printer list 3 Make the necessary settings and then click Print to start printing The procedure to open the Printing Preferences dialog box may vary dep...

Page 308: ... necessary settings and then click OK Settings you make here are used as the default settings for all applications Do not make a setting for Form to Tray Assignment For details about settings see the printer driver Help Making Printer Default Settings Printing Preferences You cannot change the printer default settings for each user Settings made in the Printer Properties dialog box are applied to ...

Page 309: ...dialog box of an application Settings made here are used as defaults when printing from this application For details about settings see the printer driver Help Windows NT 4 0 Accessing the Printer Properties This describes how to launch printer driver s properties Making Printer Default Settings The Printer Properties To change the printer default settings including option configuration settings l...

Page 310: ... 2 Click the icon of the printer you want to use 3 On the File menu click Document Defaults The Default dialog box appears 4 Make the necessary settings and then click OK Settings you make here are used as the default settings for all applications For details about settings see the printer driver Help Making Printer Settings from an Application You can make printer settings for a specific applicat...

Page 311: ...ting Making Paper Settings from an Application 1 Open the file you want to print 2 On the File menu click Page Setup 3 Check that the printer you want to use is displayed in Printer and then select the paper size you want to use in Paper Under Mac OS X select the paper size in Paper Size If the printer you want to use is not displayed in Printer select the printer you want to use 4 Configure the s...

Page 312: ...2 Setting Up the Printer Driver 88 2 ...

Page 313: ...High Compression PDF files may not be printed Paper size errors may occur when printing on custom size paper Printing Method The following procedures explain the two methods of direct PDF printing using DeskTopBinder Lite or by entering commands Using DeskTopBinder Lite Installing DeskTopBinder Lite 1 Quit all applications currently running 2 Insert the CD ROM into the CD ROM drive The installer s...

Page 314: ...irect Print check box at the center and then click OK The Properties screen closes and the PDF Direct Print icon is added to the palette The Function palette contains buttons for functions that are already configured throughDeskTopBinder Liteenhancement Usingthesebuttons youcanprintWindowsfiles previewprintouts convertimages and register scanners for documents without having to open DeskTopBinder ...

Page 315: ...u want to output to make it reverse video and then click OK 7 The PDF Direct Print Properties screen opens Enter the password for the PDF file you want to print in the PDF Password field at the bottom right of the screen and then click OK The password protected PDF file is printed Before printing a password protected PDF file perform one of the following Enter the PDF password in the PDF Direct Pr...

Page 316: ...PDF direct printing mode if this check box is selected 9 Orientation Specify the original s orientation 10 Number of copies Specify the number of copies to print 11 Collate Use to sort prints 12 Range Specify the print area on each page 13 Resolution Specify a print resolution 14 PDF Password If the PDF file is password protected enter the password in this field Otherwise the file cannot be printe...

Page 317: ... p 269 Printing Files Directly from Windows Printing a PDF File Directly 93 3 ...

Page 318: ...ing Preferences window 2 Click Add Change Custom Settings 3 Select the Unauthorized copy check box 4 Click Control Settings 5 A confirmation message appears Click OK The Unauthorized Copy Control window appears For details see the printer driver Help Using Data security for copying You can embed a pattern by setting it in the printer driver Setting Data security for copying in the printer driver S...

Page 319: ... The Copy Data Security unit is required when copying or storing a document protected by gray overprint Only the RPCS printer driver is supported You cannot partially embed a pattern and text in a document Use 182 257 mm 71 4 101 2 in or larger paper Use ordinary or recycled paper of at least 70 whiteness Duplex printing may interfere with this function as a result of text and patterns being visib...

Page 320: ...iers multifunction machines 3 The pattern and text you have set appear clearly Only the RPCS printer driver is supported You cannot partially embed patterns and text strings in a document To make the embedded pattern clear set the character size at least 50 pt preferably 70 to 80 pt and character angle to between 30 and 40 degrees Printing with background patterns and text may be slower than norma...

Page 321: ...nce of the print patterns and the performance of Unauthorized Copy Control may vary depending on the quality of paper used and the printer model and settings The supplier takes no responsibility for any damages sustained in connection with use of or inability to make use of Unauthorized Copy Control print patterns Unauthorized Copy Control 97 3 ...

Page 322: ... option make sure it is not selected before sending a print job By default Sample Print jobs are automatically collated by the printer driver If a collate option is selected from the application s Print dialog box more prints than intended may be produced If the first set of the Sample Print files is not as you expected and you do not want to print remaining sets delete the Sample Print file using...

Page 323: ...ox on the Job Log tab 4 Click Details and then enter a User ID in the User ID box This is used to identify the user The user ID can be entered using up to eight alphanumeric a z A Z 0 9 characters 5 Execute a command to print Make sure to set more than two copies The Sample Print job is sent to the printer and the first set is printed Printing the Remaining Sets Printing a selected Sample Print fi...

Page 324: ... the or key to display the user ID you want to print and then press the Enter key 5 The number of documents selected for printing is displayed Check the number and if it is correct press the Enter key 6 Enter the number of sets you want to print using the or keys You can enter up to 999 sets If the number of sets to be printed is not specified one less set than the smallest number specified on the...

Page 325: ... to delete is displayed and then press the Enter key The Deleted message appears Then the file selection screen reappears 6 Press the Online key The initial screen appears Deleting all Sample Print files 1 Press the Menu key The Menu screen appears 2 Press the or key to display Sample Print and then press the Enter key 3 Press the or key to display Del All Files and then press the Enter key The us...

Page 326: ...he printer stored documents remain However the Auto Del Temp or Auto Del Stored settings are applied first If the application has a collate option make sure it is not selected before sending a print job Locked Print jobs are automatically collated by the printer driver as default If a collate option is selected in the application print dialog box more sets than intended may be printed After the Lo...

Page 327: ...ard disk Printing a Locked Print File Printing a selected Locked Print file only 1 Press the Menu key The Menu screen appears 2 Press the or key to display Locked Print and then press the Enter key 3 Press the or key to display Print One File and then press the Enter key The file name and the time when the job was stored appear 4 Press the or key to display the file you want to print and then pres...

Page 328: ...nfirmation screen The printer prints documents that correspond to the entered password To print documents that do not correspond to the entered password repeat the procedure and specify the appropriate password 7 Check the file you want to print is displayed and then press the Enter key The To print press ESC 1 4 times message appears Then the file selection screen reappears 8 Press the Online key...

Page 329: ...les and then press the Enter key The user ID when the job was stored appear 4 Press the or key to display the user ID you want to delete and then press the Enter key The password screen appears To cancel deleting a Locked Print file press the Escape key 5 Enter the password using the or key and then press the Enter key If you forget your password ask your administrator for help The printer deletes...

Page 330: ...collate option is selected from the application s Print dialog box more prints than intended may be produced Hold Print files printed or deleted using Web Image Monitor after you select Hold Print using the control panel will appear on the display panel However an error message will appear if you try to print or delete those Hold Print files If stored files have similar and long file names recogni...

Page 331: ...racters You can also set a file name 5 Execute a command to print Make sure to set more than two copies The Hold Print job is sent to the printer Printing a Hold Print File Printing a selected Hold Print file only Applications with their own drivers such as PageMaker do not support this function 1 Press the Menu key The Menu screen appears 2 Press the or to display key Hold Print and then press th...

Page 332: ...To print press ESC 1 4 times message appears Then the file selection screen reappears 7 Press the Online key The initial screen appears When printing is completed the stored file is deleted To stop printing after printing has started press the Job Reset key The file is deleted For details about setting printer drivers see the printer driver Help You can also print or delete a Hold Print file from ...

Page 333: ...screen appears 2 Press the or key to display Hold Print and then press the Enter key 3 Press the or key to display Del All Files and then press the Enter key The user ID when the job was stored appear 4 Press the or key to display the user ID you want to delete and then press the Enter key To cancel deleting a Hold Print file press the Escape key 5 The number of documents selected for deletion is ...

Page 334: ... If the application has a collate option make sure it is not selected before sending a print job By default Stored Print jobs are automatically collated by the printer driver If a collate option is selected from the application s Print dialog box more prints than intended may be produced Stored Print files deleted using Web Image Monitor after you select Stored Print using the control panel will a...

Page 335: ...rint it later using the control panel Store and Normal Print or Stored and Print Prints the file at once and also stores the file in the printer For details about configuring the printer drivers see the relevant Help files 4 Click Details and then enter a User ID in the User ID box You can also set a password The same password must be entered when printing or deleting You can set a file name 5 Exe...

Page 336: ...Menu screen appears 2 Press the or key to display Stored Print and then press the Enter key 3 Press the or key to display Print All File and then press the Enter key The user ID when the job was stored appear 4 Press the or key to display the user ID you want to print and then press the Enter key 5 The number of documents selected for printing is displayed Check the number and if it is correct pre...

Page 337: ...s see Web Image Monitor Help p 149 System Menu Deleting Stored Print Files Deleting a selected Stored Print file only 1 Press the Menu key The Menu screen appears 2 Press the or key to display Stored Print and then press the Enter key 3 Press the or key to display Delete One File and then press the Enter key The file name and the time when the job was stored appear 4 Press the or key to display th...

Page 338: ...r the password to delete If you forget your password ask your administrator for help 5 The number of documents selected for deletion is displayed Check the number and if it is correct press the Enter key The Deleted message appears Then the file selection screen reappears 6 Press the Online key The initial screen appears If a password is assigned to the file the password screen appears Enter the p...

Page 339: ...gs you can change the tray by canceling the settings Duplex Print p 149 System Menu Printing from a Selected Tray If the printer does not have a tray for the selected paper size or paper type or if the selected paper loaded in the printer has run out a caution message appears If this message appears do the following procedure 1 Press the Form Feed key and then select the paper tray on the screen 2...

Page 340: ...luding the current job using the or key It is also possible to annul the cancellation Printing resumes if you select Resume Print and then press the Enter key 4 Press the Enter key A confirmation message appears Printing resumes if you press the Escape key after the message appears 5 Press the Enter key The job is canceled When the cancellation procedure is complete a message appears A print job t...

Page 341: ... multiple computers be careful not to accidentally cancel other users print jobs If the print job you want to cancel is being printed 1 Check if the print job you want to cancel is currently being printed While the print job may not be being printed the printer is receiving data if the Data In indicator is lit or blinking 2 Press the Job Reset key The Job Reset screen appears 3 Select the current ...

Page 342: ...the desktop A window appears showing all print jobs that are currently queuing to be printed Check the current status of the job you want to cancel Under Mac OS X start Print Center 2 Select the name of the job you want to cancel 3 Click the pause icon and then click the trash icon When this printer is used as a network printer other users print jobs cannot be canceled from a client computer 3 Oth...

Page 343: ...e errors reaches 30 You can check any of these print jobs for error log information Sample Print Locked Print Hold Print Stored Print If the main power switch is turned off the log is deleted 1 Press the Menu key The Menu screen appears 2 Press the or key to display the print type you want to check and then press the Enter key 3 Press the or key to display Error File s and then press the Enter key...

Page 344: ...put can be assembled as sets in sequential order If Auto Continue occurs on the first set Collate will be canceled If forced printing occurs on the first set Collate will be canceled When setting Collate in the printer driver settings make sure that a collate option is not selected in the application s print settings If a collate option is selected printing will not be as intended For details abou...

Page 345: ...rved for spool printing is about 1 GB Up to 150 jobs can be spool printed at a time When Spool Printing is on the size of a single print job cannot exceed 500 MB When receiving jobs from multiple computers the printer can spool a maximum of ten lpr jobs and only one diprint ipp ftp sftp or smb job If the printer s spooling capacity is exceeded newer jobs cannot be printed You must wait before send...

Page 346: ...itor appears 3 Click Login The window for entering the login user name and password appears 4 Enter the login user name and password and then click Login Contact your administrator for information about the settings 5 In the menu area click Job A submenu will appear 6 On the Printer menu click Spool Printing A list of spooled jobs appears 7 To delete a job select the check box of the job you want ...

Page 347: ... body of the paper Cover sheet Prints the first page of the document on the sheet for the cover page Print on one side Prints on one side of the cover sheet only even when duplex printing is selected AEV016S Print on both sides Prints on both sides of the cover sheet when duplex printing is selected Cover sheet printed on both sides AEV017S Cover sheet printed on one side AEV032S Blank When printi...

Page 348: ...ray body paper will be delivered from a tray that contains paper set in portrait orientation Therefore if the cover paper is set to landscape orientation the orientation of the cover and body paper will be different For printing methods see the printer driver Help 3 Other Print Operations 124 3 ...

Page 349: ...fed alternately from two trays This function is available only if two or more paper trays are installed on the machine When duplex or cover printing is set you cannot insert slip sheets Inserting a slip sheet between each page Print AEV019S Blank AEU023S Inserting a slip sheet between OHP transparencies Print AEV020S Blank Slip Sheets 125 3 ...

Page 350: ...sbeensetasthepaperfeedtrayforthebodypaper thepaperwillbedelivered from a tray containing paper in orientation Therefore when the cover paper has been set to orientation the orientation of the output cover paper and body paper will be different The same paper feed tray cannot be set for the main paper and slip sheets 3 Other Print Operations 126 3 ...

Page 351: ...the paper type name correctly if it is registered using an unsupported language the control panel might not display the paper type name correctly if it is registered using non alphanumeric characters i e other than a z A Z or 0 9 and the machine s logs do not record names of user paper types The example below explains setting a custom size paper under the name Invoice A and feeding it from a bypas...

Page 352: ...aper type then proceed with the printing When Paper type is set to Invoice A Plain paper that is suitable for Invoice A is selected automatically Registering a descriptive name makes selecting a paper type from the Paper type list easier For details about this procedure see p 131 Printing Using Registered Paper Types You can register up to eight user paper types 4 Using Paper Types that have Uniqu...

Page 353: ...er your login user name and password and then click Login For details about the login user name and password consult your administrator 5 In the menu area click Configuration 6 On the Device Settings click User Paper Type and then change the settings as necessary The screen for selecting User Paper Type appears 7 Make changes to the following settings Paper Name Enter a descriptive name for easier...

Page 354: ...e and then select the registered paper type The example below is for printing invoices The registered paper type Invoice A is displayed as Invoice A Custom x on this screen Select Invoice A Custom x for User Paper Type Make the appropriate changes to other settings as required 5 Click OK 6 Click Logout 7 Quit Web Image Monitor For details about loading paper see Loading Paper Hardware Guide For de...

Page 355: ...hat the printer driver might not display the paper type name correctly if it is registered using an unsupported language the control panel might not display the paper type name correctly if it is registered using non alphanumeric characters i e other than a z A Z or 0 9 and the machine s logs do not record names of user paper types 1 Select your application s print command 2 On the tab in the prop...

Page 356: ...4 Using Paper Types that have Unique Names 132 4 ...

Page 357: ... included in each menu Sample Print Menu Print One File Print All Files Delete One File Del All Files Error File s This menu appears only if the optional hard disk is installed Locked Print Same as the Sample Print menu Hold Print Same as the Sample Print menu Stored Print Same as the Sample Print menu Paper Input Menu Bypass Size Tray Paper Size Paper Type Duplex Setting 133 5 ...

Page 358: ...List Test Print Menu Multiple Lists Config Page Error Log Network Summary Menu List PCL Config Page PS Config Page PDF Config Page Hex Dump Maintenance Menu Image Density Registration Curl Prevention Del All Temp Del All Stored HD Format Date Time 5 Making Printer Settings Using the Control Panel 134 5 ...

Page 359: ... is installed WL LAN Signal and WL LAN Defaults appear when the optional IEEE 802 11b interface unit is installed System Menu Prt Err Report Auto Continue Memory Overflow Copies Printer Lang Sub Paper Size Page Size Edge Edge Print Def Print Lang Duplex Blank Pages Rotate 180 Deg Energy Saver Auto Reset Time Auto Del Temp Menu Chart 135 5 ...

Page 360: ...optional hard disk is installed RAM Disk will not appear when the optional hard disk is installed Host Interface Menu I O Buffer I O Timeout Network Setup IEEE 802 11b Fixed USB Port Network Setup appears when the optional Ethernet interface unit or IEEE 802 11b interface unit is installed IEEE 802 11b appears when the optional IEEE 802 11b interface unit is installed 5 Making Printer Settings Usi...

Page 361: ... Form Lines Font Source Font Number Point Size Font Pitch Symbol Set Courier Font Ext A4 Width Append CR to LF Resolution PS Menu Menu Data Format Resolution PDF Menu Menu PDF Change PW PDF Group PW Resolution Menu Chart 137 5 ...

Page 362: ...Language Menu English German French Italian Dutch Swedish Norwegian Danish Spanish Finnish Portuguese Czech Polish Hungarian 5 Making Printer Settings Using the Control Panel 138 5 ...

Page 363: ... to select and then press the Enter key 5 Press the or key to display On and then press the Enter key Wait two seconds The Aut Tray Select screen appears 6 Press the Online key The initial screen appears Tray Priority Follow the procedure below to change the tray priority 1 Press the Menu key The Menu screen appears 2 Press the or key to display Paper Input and then press the Enter key 3 Press the...

Page 364: ...2 51 2 81 2 Vert 51 2 81 2 Horiz 41 8 91 2 37 8 71 2 A4 210 297 A5 148 210 Vert A5 148 210 Horiz A6 105 148 B5 JIS 182 257 C5 Env 162 229 C6 Env 114 162 DL Env 110 220 16K 195 267 Custom Size Default A4 210 297 Default 81 2 11 JIS stands for Japanese Industrial Standard Tray Paper Size Tray 1 You can specify the paper size for Tray 1 A5 148 210 Horiz 81 2 13 81 4 13 8 13 51 2 81 2 Horiz 16K 195 26...

Page 365: ...ight not be proper Tray 2 Tray 3 Plain Paper Recycled Paper Special Paper Color Paper Letterhead Envelope Preprinted Thick Paper Custom Type 1 8 Default Plain Paper For details about the type of paper loaded in each tray see Hardware Guide Be sure to set a paper type using the control panel If you do not set it the printing result might not be proper Bypass Tray Plain Paper Recycled Paper Special ...

Page 366: ...appear on the display panel You can select multiple trays If you need to have a tray locked you must select the tray using both printer driver and control panel Tray Priority You can set a tray to be checked first when Aut Tray Select is selected from the printer driver The tray selected here is used when no tray is selected for a print job Default Tray 1 Only installed trays appear on the display...

Page 367: ...he or key to display Config Page and then press the Enter key The configuration page is printed The List Test Print menu screen returns on completion of printing 4 Press the Online key The initial screen appears Interpreting the Configuration Page System Reference Printer ID The serial number assigned to the board by its manufacturer is displayed Pages Printed The total number of pages printed by ...

Page 368: ...lled are displayed Paper Input Settings made on the Paper Input menu are displayed p 139 Paper Input Menu Maintenance Settings made on the Maintenance menu are displayed p 146 Maintenance Menu System Settings made on the System menu are displayed p 149 System Menu PCL Menu Settings made on the PCL Menu are displayed p 163 PCL Menu PS Menu Settings made on the PS Menu are displayed p 166 PS Menu PD...

Page 369: ...the List Test Print menu Multiple Lists You can print the configuration page error log and network summary Config Page You can print the current configuration of the printer Error Log You can print an error report Network Summary You can print the network device status Menu List You can print a menu list showing all available menus PCL Config Page You can print the current configuration and instal...

Page 370: ...ey 3 Press the or key to display HD Format and then press the Enter key 4 Read the HD format confirmation message and then press the Enter key The hard disk unit is formatted and the message appears 5 Press the Enter key The HD Format screen appears 6 Press the Online key The initial screen appears Attaching Hard Disk Drive Type 2650 Hardware Guide Maintenance Menu Parameters This section explains...

Page 371: ...You can control the fuser temperature to prevent paper from curling On Off Default Off Use this mode only when paper misfeed occurs frequently during duplex printing Del All Temp This appears on the menu only when the hard disk is installed Use this function to delete all temporarily saved documents Sample Print Locked Print and Hold Print data at once Del All Stored This appears on the menu only ...

Page 372: ...b interface unit is installed Panel Key Sound You can select whether or not to sound the beeper when the control panel is pressed On Off Default On Panel Tone Hardware Guide Warm Up Beeper You can select whether or not to sound the beeper when the warming up is completed On Off Default On 5 Making Printer Settings Using the Control Panel 148 5 ...

Page 373: ...Energy Saver and then press the Enter key 4 Press the or key to display E Saver Timer and then press the Enter key 5 Press the or key to select the lead time needed to switch to the Energy Saver mode 6 Press the Enter key Wait two seconds The Energy Saver screen appears 7 Press the Online key The initial screen appears System Menu parameters This section explains about parameters that can be set o...

Page 374: ...You can specify the number of pages to print This setting is disabled if the number of pages to print is specified by command or the printer driver 1 999 Printer Lang You can specify the printer language Auto Detect PCL PS PDF Default Auto Detect Sub Paper Size You can select Off or Auto to enable the Sub Paper Size function When you select Auto the printer uses an alternative paper size if the cu...

Page 375: ...JIS 182 257 C5 Env 162 229 C6 Env 114 162 DL Env 110 220 16K 195 267 Custom Size Default A4 210 297 Default 81 2 11 The initial paper size is applied when the paper size is not specified in the print data Edge Edge Print You can print on the complete area of a sheet leaving no border on any edge Off On Default Off Def Print Lang You can specify the initial printer language if the printer cannot de...

Page 376: ...n specify the number of minutes Energy Saver mode is applied E Saver On Off You can specify whether or not to switch Energy Saver On Off Default On When the printer switches to Energy Saver mode the Power indicator is unlit but the Online indicator remains lit E Saver Timer You can select the lead time needed to switch to the Energy Saver mode The Energy Saver mode reduces electric power consumpti...

Page 377: ...led Specify whether to automatically delete temporarily saved documents Sample Print Locked Print and Hold Print data such as sample print documents or confidential documents Also specify the time period to elapse before deletion Auto Delete On Off Default Off Hours to Delete 1 to 200 hours by 1 hour Default 8 hours Auto Del Stored This appears on the menu only when the hard disk is installed Spec...

Page 378: ...riority or Frame Priority Font Priority Frame Priority Default Frame Priority Unit of Measure You can specify the unit of measurement in mm or inch for the custom paper size mm inch Default value is destination dependant Edge Smoothing On Off Default On Toner Saving Off On Default Off 5 Making Printer Settings Using the Control Panel 154 5 ...

Page 379: ...n the different paper size or type is specified from the driver you can specify which setting is given priority to machine setting or command Machine Driver Command Default Driver Command Appear only at network standard model Auto Tray SW Specify the printer to change printing to the suitable tray when printer driver specifies different paper size or type from the current tray Off On Default Off R...

Page 380: ...or less For details about the optional SDRAM module see Hardware Guide Attaching Memory Unit Type C 128MB 256MB SDRAM Module Hardware Guide Auto Email Ntfy You can specify whether or not to send an error message to a preset e mail address when an error occurs in the printer On Off Default On After changing the setting turn off the power of the printer briefly and then turn it on again Web Image Mo...

Page 381: ...ress the or key to select the lead time needed to end a printing operation and then press the Enter key Wait two seconds The I O Timeout menu appears 5 Press the Online key The initial screen appears Host Interface Menu Parameters This section explains parameters that can be set on the Host Interface menu I O Buffer You can select the size of I O Buffer Normally it is not necessary to change this ...

Page 382: ...our administrator for information about the network configuration Default 0 0 0 0 Subnet Mask You can specify the subnet mask When DHCP is set to on the subnet mask cannot be changed To change it set DHCP to off Contact your administrator for information about the network configuration Default 0 0 0 0 Gateway Address You can specify the gateway address When DHCP is set to on the gateway address ca...

Page 383: ...I Ethernet 802 2 Ethernet 802 3 Ethernet SNAP Default Auto Select Active Protocol You can select the effective protocol IPv4 Active Not Active Default Active IPv6 Active Not Active Default Not Active NetWare Active Not Active Default Active SMB Active Not Active Default Active AppleTalk Host Interface Menu 159 5 ...

Page 384: ... 11b interface unit is installed Ethernet IEEE 802 11b Default Ethernet IEEE 802 11b You can make settings for wireless LAN This menu appears only when the optional 802 11b interface unit is installed Comm Mode You can select the transmission mode for IEEE 802 11b 802 11 Ad hoc Infrastructure Ad hoc Default 802 11 Ad hoc Comm Mode can also be set using a Web Image Monitor For details see Web Image...

Page 385: ... 32 bytes An SSID is set automatically to the nearest access point if no SSID has been set If no SSID has been set for the 802 11 ad hoc mode an SSID is set automatically and the same SSID is used for the 802 11 ad hoc mode and the infrastructure mode If blank is specified in SSID for 802 11b adhoc mode or adhoc mode ASSID appears An SSID can also be set using Web Image Monitor For details see Web...

Page 386: ...A PSK From 8 to 63 ASCII characters can be entered WPA When selecting this method obtain a certificate using Web Image Monitor WPA2 PSK Same as WPA PSK 8 to 63 ASCII characters can be entered WPA2 A supplemental specification of WPA Fully compatible with IEEE802 11i PSK Entry 8 to 63 characters can be entered Default None The WEP key can also be set using Web Image Monitor For details see Web Imag...

Page 387: ... key 4 Press the or key to select the orientation and then press the Enter key Wait two seconds The Orientation screen appears 5 Press the Online key The initial screen appears PCL Menu Parameters This section explains about parameters that can be set on the PCL menu Orientation You can select the page orientation Portrait Landscape Default Portrait Form Lines You can specify the number of lines p...

Page 388: ...nts Default 12 00 points This setting is effective only for a variable space font Font Pitch You can specify the number of characters per inch you want to use for the default font between 0 44 and 99 99 in 0 01 increments Default 10 00 pitch This setting is effective only for fixed space fonts Symbol Set You can specify the character set for the default font Available sets are as follows Roman 8 I...

Page 389: ...4 sheets reducing side margin width Off On Default Off Append CR to LF You can specify whether or not to append a CR code to each LF code to print text data clearly Off On Default Off Resolution You can specify the print resolution in dots per inch 300 dpi 600 dpi Default 600 dpi PCL Menu 165 5 ...

Page 390: ...ars PS Menu Parameters This section explains about parameters that can be set on the Postscript menu Data Format You can select the data format Binary Data TBCP This setting is effective when using a parallel USB or EtherTalk connection When you use a parallel or USB connection the print job is canceled if binary data is sent from the printer driver When you use an Ethernet connection the print jo...

Page 391: ...Resolution You can select the resolution 300dpi 600dpi Fast 600dpi Std Default 600dpi Fast PS Menu 167 5 ...

Page 392: ...F menu PDF Change PW You can specify the password for the PDF file executing PDF Direct Print If you do not set a PDF password this menu does not appear The password can be set using Web Image Monitor but must be sent through the network For increased security use this menu on the control panel to set the password directly PDF Group PW You can set a group password specified using DeskTopBinder Lit...

Page 393: ... Default no password set Resolution You can select the resolution for the PDF file executing PDF Direct Print 300dpi 600dpi Fast 600dpi Std Default 600dpi Fast PDF Menu 169 5 ...

Page 394: ...3 Press the or key to select the language and then press the Enter key Wait two seconds The Language menu screen appears 4 Press the Online key The initial screen appears Language Menu Parameters You can select the language you use Available languages are as follows English German French Italian Dutch Swedish Norwegian Danish Spanish Finnish Portuguese Czech Polish Hungarian Default English 5 Maki...

Page 395: ... Address Book Making printer settings Making e mail notification settings Making network protocol settings Making security settings Configuring the printer To perform the operations from Web Image Monitor TCP IP is required After the printer is configured to use TCP IP operations from Web Image Monitor become available Recommended Web browser Windows Internet Explorer 5 5 SP2 or higher Firefox 1 0...

Page 396: ...er using the printer s URL cannot be established SSL setting must be enabled on this printer For details consult your administrator When using the SSL encryption protocol enter https printer s address Internet Explorer must beinstalledonyourcomputer Usethemostrecentavailableversion WerecommendInternetExplorer 6 0 or later When you are using Firefox fonts and colors may be different or tables may b...

Page 397: ... of the item selected in the menu area Machine information in the display area is not automatically updated Click Refresh at the upper right in the display area to update the machine information Click the Web browser s Refresh button to refresh the entire browser screen For details the printer s host name has been registered on the DNS or WINS server see Cautions to Take When Using in a Network p ...

Page 398: ...you to display list of Sample Print Locked Print Hold Print and Stored Print jobs Appear only when the optional hard disk is installed 3 Job Display all print files 4 Configuration Display current printer and network settings Administrator Mode In the administrator mode you can configure various printer settings 1 2 4 3 6 7 5 AUB902S 1 Home The Status Device Info and Counter tab are displayed Deta...

Page 399: ...itor in the administrator mode 1 On Top Page click Login The dialog box for entering the user name and password appears 2 Enter your login user name and password and then click Login For details about the login user name and password consult your administrator Displaying Web Image Monitor Help When using Help for the first time clicking either Help in the header area or the icon marked in the disp...

Page 400: ...he location of the decompressed file Linking the URL of the Help File to the Help Button You can link the URL of the help file on a computer or Web server to the Help button 1 Log on to Web Image Monitor in the administrator mode 2 In the menu area click Configuration 3 Click Webpage 4 In the URL box enter the URL of the help file For example if you saved the file to a Web server and the URL of th...

Page 401: ...P IP IPX SPX NetWare NetWare Client32 for Windows 95 IntraNetWare Client for Windows 95 Novell Client for Windows 95 98 Me Windows 2000 TCP IP IPX SPX NetWare Novell Client for Windows NT 2000 XP Windows Server 2003 2003 R2 TCP IP IPX SPX Windows XP TCP IP IPX SPX Novell Client for Windows NT 2000 XP Windows NT 4 0 TCP IP IPX SPX Client Service for NetWare NetWare Client32 for Windows NT IntraNetW...

Page 402: ...the same time When there are multiple printers to manage you can create groups and classify the printers to facilitate management You can customize printer status according to groups and send status notification e mail to a computer Installing SmartDeviceMonitor for Admin Follow the procedure below to install SmartDeviceMonitor for Admin 1 Quit all applications currently running 2 Insert the CD RO...

Page 403: ...to Search Device and then click IPv4 IPX SPX or IPv4 SNMPv3 A list of printers using the selected protocol appears Select the protocol of the printer whose configuration you want to change If you are using IPv4 SNMPv3 enter the user authentication 3 In the list select a printer whose configuration you want to change 4 On the Tools menu click NIB Setup Tool A Web browser opens and the dialog box fo...

Page 404: ...ck Login For details about the user name and password consult your administrator The System page of Web Image Monitor appears 6 Select Level 1 or Level 2 on Protect Printer Display Panel in General Settings 7 Click OK 8 Click Logout 9 Quit Web Image Monitor 10 Quit SmartDeviceMonitor for Admin For details about setting items see Help in the Device Settings on Configuration page Changing the Paper ...

Page 405: ... information using SmartDeviceMonitor for Admin Prints jobs can be managed and functions restricted by user codes Starting User Management Tool Follow the procedure below to start User Management Tool 1 Start SmartDeviceMonitor for Admin 2 On the Group menu point to Search Device and then click IPv4 IPX SPX or IPv4 SNMPv3 A list of printers using the selected protocol appears Select the protocol o...

Page 406: ...mation tab of User Management Tool 3 On the File menu click Export User Statistics List 4 Specify the save location and file name and then click Save 5 Click Exit on the File menu to quit User Management Tool Resetting the number of pages printed to 0 Follow the procedure below to reset the number of pages printed under each user code to 0 1 Start SmartDeviceMonitor for Admin 2 Click the User Coun...

Page 407: ...onitor for Admin 2 Click the Access Control List tab of User Management Tool 3 On the Edit menu click Add New User 4 Enter the user code and user name 5 Select the check box of the functions applicable to the new user If the check boxes are unavailable there is no restriction to use that function For details see SmartDeviceMonitor for Admin Help 6 Click OK The new user is added 7 On the Edit menu ...

Page 408: ...re below to set a password 1 Start SmartDeviceMonitor for Admin 2 On the Group menu point to Search Device and then click IPv4 IPX SPX or IPv4 SNMPv3 A list of printers using the selected protocol appears Select the protocol of the printer whose configuration you want to change If you are using IPv4 SNMPv3 enter the user authentication 3 In the list select a printer whose configuration you want to...

Page 409: ...ox see SmartDeviceMonitor for Admin Help Changing Names and Comments Follow the procedure below to change the names and comments of the printer 1 Start SmartDeviceMonitor for Admin 2 On the Group menu point to Search Device and then click IPv4 IPX SPX or IPv4 SNMPv3 A list of printers using the selected protocol appears Select the protocol of the printer whose configuration you want to change The ...

Page 410: ...6 Click Configuration 7 Click System on the Device Settings area and then change the settings 8 Click OK In the Device Name box enter a device name on the printer using up to 31 characters In the Comment box enter a comment on the printer using up to 31 characters 9 Quit Web Image Monitor 10 Quit SmartDeviceMonitor for Admin 6 Monitoring and Configuring the Printer 186 6 ...

Page 411: ...e Tools menu A Web browser opens and the dialog box for entering the login user name and password for the Web Image Monitor administrator appears 4 Enter the login user name and password and then click Login For details about the login user name and password consult your administrator Spool Printing Job List appears in the Web Image Monitor To delete the Spool Printing Job select the document you ...

Page 412: ... task tray using the SmartDeviceMonitor for Client icon select the Displayed on Task Bar check box 3 Click OK The dialog box closes and the configured printer is monitored For details about status icons see SmartDeviceMonitor for Client Help Checking the Printer Status Follow the procedure below to check printer status using SmartDeviceMonitor for Client 1 Start SmartDeviceMonitor for Client 2 For...

Page 413: ...went wrong send the print job again Printjobssentfromanothercomputerdonotappearintheprintqueuewindow regardlessofprotocol If various users send print jobs using SmartDeviceMonitor for Client to network printers the printing order might not be the same as that in which the jobs were sent An IP address cannot be used for the IPP port name because the IP address is used for the SmartDeviceMonitor for...

Page 414: ...Replace Cleaning Web Soon File Storage Memory Full Soon Log Error 1 Open a Web browser and then enter http printer s address in the address bar Top Page of Web Image Monitor appears When setting SSL a protocol for encrypted communication under environment which server authentification is issued enter https printer s address 2 Click Login on Top Page of Web Image Monitor The window for entering the...

Page 415: ...ouseon demand e mail notification 7 Click OK Auto E mail Notification 1 In the menu area click Configuration and then click Auto E mail Notification in Device Settings The dialog box for making notification settings appears 2 Make the following settings Items in the Notification Message column You can set this according to your needs for example the printer s location service representative contac...

Page 416: ...r SMTP Authentication Specify SMTP authentication When mail is sent to the SMTP server authentication is performed using the SMTP AUTH protocol by prompting the mail originator to enter the user name and password This prevents illegal use of the SMTP server 1 In the menu area click Configuration and then click E mail in Device Settings 2 Make the following settings SMTP Authentication Enable or di...

Page 417: ...uration tasks in Web Image Monitor 1 In the menu area click Configuration and then click E mail in Device Settings 2 Make the following settings E mail Notification E mail Address Enter the address using alphanumeric characters Receive E mail Notification Specify whether to use on demand e mail notification E mail Notification User Name Enter the administrator s user name as the mail originator na...

Page 418: ...ject field coding examples Coding example Action devicestatus request sysconfig format text lang en The device s system configuration information will be sent in an English text format devicestatus request sysconfig The device s system configuration information will be sent in a preset format and language Parameters Parameter Meaning Default request Information to be obtained Mandatory format Mail...

Page 419: ...information supply Device status information status Parameters specifying the mail format Mail format Parameter Text text HTML html XML xml HTML and XML can be selected for subject field but output is text only Parameters specifying the language for mail body Language for mail body Parameter English en French fr German de Italian it Spanish es Dutch nl Danish da Finnish fi Norwegian no Printer Sta...

Page 420: ...Language for mail body Parameter Portuguese pt Swedish sv Czech cs Polish pl Hungarian hu 6 Monitoring and Configuring the Printer 196 6 ...

Page 421: ...assword Contact your administrator for information about the settings 3 Enter a command 4 Quit telnet msh logout The configuration message about saving the changes appears 5 Enter yes to save the changes and then press the OK key If you do not want to save the changes enter no and then press the OK key To make further changes enter return at the command line and then press the OK key If the messag...

Page 422: ...01 DB8 200 IPv6 access mask Configuration msh access mask6 base address prefixlen represents a target number between 1 and 5 Up to five access ranges can be registered and selected Example to specify accessible IPv6 addresses to 2001 DB8 32 msh access 1 mask6 2001 DB8 32 Access control initialization msh access flush Usethe flush commandtorestorethedefaultsettingssothatallaccessrangesbecome 0 0 0 ...

Page 423: ...y msh autonet priority Interface priority configuration msh autonet priority interface_name You can give interface s AutoNet parameter priority Priority settings are available when multiple interfaces are installed wlan can be specified only when the IEEE 802 11b interface unit is installed Interface name Interface configured ether Ethernet interface wlan IEEE 802 11b interface If an interface is ...

Page 424: ... lpr 0 99 ipp msh bonjour ipp 0 99 You can specify the order of priority for diprint lpr and ipp Smaller numbers indicate higher priority IP TTL setting msh bonjour ipttl 1 255 You can specify the IP TTL the number of routers a packet can pass through The default is 255 Resetting the computer name and location information You can reset the computer name and location information msh bonjour clear c...

Page 425: ...configured ether Ethernet interface wlan IEEE 802 11b interface Selecting the IPP port number msh bonjour ippport ipp ssl Appears when SSL is enabled If the ipp is selected the port number is set to 631 If the ssl is selected the port number is set to 443 devicename Use the devicename command to display and change the printer name View settings msh devicename Printer name configuration msh devicen...

Page 426: ...msh dhcp priority interface_name You can select which interface has DHCP parameter priority Priority settings are available when multiple interfaces are installed DNS server address selection msh dhcp dnsaddr dhcp static Specify whether to obtain the DNS server address from the DHCP server or use the address set by a user To obtain the DNS server address from the DHCP server specify dhcp To use th...

Page 427: ...imeout 30 65535 You can specify the timeout interval to use when the printer is expecting data from the network The default is 300 seconds Specifying the number of concurrent connections msh diprint conn multi single The above command specifies the number of concurrent diprint connections Specify multi for multiple connections or single for a single connection The default is multi dns Use the dns ...

Page 428: ...he dynamic DNS function active or inactive on means active and off means inactive wlan can be specified only when the IEEE 802 11b interface unit is installed Interface name Interface configured ether Ethernet interface wlan IEEE 802 11b interface Specifying the record overlap operation msh dns overlap update add You can specify operations performed when records overlap update To delete old record...

Page 429: ...hours The default is 24 hours domainname Use the domainname command to display or configure the domain name settings You can configure the Ethernet interface or IEEE 802 11b interface View settings The following command displays the current domain name msh domainname Interface domain configuration msh domainname interface_name Setting the Domain Name msh domainname interface_name name domain name ...

Page 430: ...ter name using up to 63 alphanumeric characters You cannot use a printer name starting with RNP or rnp The Ethernet interface and IEEE 802 11b interface will have the same printer name wlan can be specified only when the IEEE 802 11b interface unit is installed Interface name Interface configured ether Ethernet interface wlan IEEE 802 11b interface Initializing the printer name for each interface ...

Page 431: ...00 64 Netmask configuration msh ifconfig interface_name netmask address The following explains how to configure a subnet mask 255 255 255 0 on Ethernet interface msh ifconfig ether netmask 255 255 255 0 Broadcast address configuration msh ifconfig interface_name broadcast address Changing the Interface msh ifconfig interface up You can specify either the Ethernet interface or IEEE 802 11b interfac...

Page 432: ...int job The time can be entered between 30 to 65535 seconds msh ipp timeout 30 65535 IPP user authorization configuration Use IPP user authorization to restrict users to print with IPP The default is off msh ipp auth basic digest off User authorization settings are basic and digest Use off to remove a user s authorization If user authorization is specified register a user name You can register up ...

Page 433: ... the lpr command to view and configure LPR settings View Setting msh lpr Checking host name when deleting the job msh lpr chkhost on off If on is selected you can delete print jobs only from the IP address of the host that sent the print job If LPR is disabled you can also delete print jobs sent from the IP addresses other than that of the host netware Use the netware command to configure the NetW...

Page 434: ...context character string SAP interval msh netware sap_interval Setting login mode for file server msh netware login server Setting login mode for NDS tree msh netware login tree Setting login mode for NDS tree name msh netware tree NDS name File transfer protocol msh netware trans ipv4pri ipxpri ipv4 ipx If you do not specify the protocol the current setting is displayed Protocol Set Protocol ipv4...

Page 435: ... case sensitive For example R is not the same as r pathmtu Use the pathmtu command to display and configure the PathMTU Discovery service function View Setting msh pathmtu Enabling disabling the PathMTU Discovery service msh pathmtu on off The default is on If the MTU size of the sent data is larger than the router s MTU the router will declare it impassable and communication fails If this happens...

Page 436: ...nabling disabling Specified IPv4 Destination msh route active host net destination on off You can turn the specified destination on or off Host becomes the default setting Adding IPv4 Routing Table msh route add host net destination gateway Adds a host or network route to destination and a gateway address to gateway in the table Specify the IPv4 address to destination and gateway Host becomes the ...

Page 437: ...refixlen on off Route initialization msh route flush The maximum number of IPv4 routing tables is 16 The maximum number of IPv6 routing tables is 2 Set a gateway address when communicating with devices on an external network The same gateway address is shared by all interfaces Prefixlen is a number between 1 and 128 set Use the set command to set the protocol information display active or inactive...

Page 438: ...t msh set ssdp msh set ssh msh set sftp msh set sftp6 Configuration Enter up enable protocol and enter down to disable protocol You can set the protocol to active or inactive msh set ipv4 up down If you disable IPv4 you cannot use remote access after logging off If you did this by mistake you can use the control panel to enable remote access via IPv4 Disabling IPv4 also disables lpr ftp rsh diprin...

Page 439: ... set rsh up down msh set rsh6 up down msh set diprint up down msh set diprint6 up down msh set web up down msh set snmp up down msh set ssl up down msh set ssl6 up down If Secured Sockets Layer SSL an encryption protocol function is not available for the printer you cannot use the function by enabling it msh set nrs up down msh set rfu up down msh set rfu6 up down msh set ipp up down msh set ipp6 ...

Page 440: ... A search is executed only within a local segment If the router does not support multicast the settings are not available even if the TTL value is increased The acceptable TTL value is between 1 and 255 smb Use the smb command to configure or delete the computer or workgroup name for SMB Computer Name settings msh smb comp computer name Set computer name using up to 15 characters Names beginning w...

Page 441: ...nmp Default access settings 1 is as follows Community name public IPv4 address 0 0 0 0 IPv6 address IPX address 00000000 000000000000 Access type read only Effective Protocol IPv4 IPv6 IPX Default access settings 2 is as follows Community name admin IPv4 address 0 0 0 0 IPv6 address IPX address 00000000 000000000000 Access type read write Effective Protocol IPv4 IPv6 IPX If p is added you can view...

Page 442: ...rite read and write trap user is notified of trapmessages Protocol configuration msh snmp ipv4 ipv6 ipx on off Use the following command to set protocols active or inactive If you set a protocol inactive all access settings for that protocol are disabled Specify ipv4 for IPv4 ipv6 for IPv6 or ipx for IPX SPX on means active and off means inactive All protocols cannot be turned off concurrently Con...

Page 443: ... Deleting sysLocation msh snmp clear location sysContact setting msh snmp contact Deleting sysContact msh snmp clear contact SNMP v1v2 function configuration msh snmp v1v2 on off Specify on to enable and off to disable SNMP v3 function configuration msh snmp v3 on off Specify on to enable and off to disable SNMP TRAP configuration msh snmp trap v1 v2 v3 on off Specify on to enable and off to disab...

Page 444: ...Time Protocol SNTP Use the sntp command to change SNTP settings View settings msh sntp NTP server address configuration You can specify the IP address of the NTP server msh sntp server IP_address Interval configuration msh sntp interval polling_time You can specify the interval at which the printer synchronizes with the operator specified NTP server The default is 60 minutes The interval can be en...

Page 445: ...sable it Resetting Job spool setting msh spoolsw clear job on off When the printer power is cut during job spooling this determines whether to reprint the spooled job Protocol configuration msh spoolsw diprint on off msh spoolsw lpr on off msh spoolsw ipp on off msh spoolsw smb on off msh spoolsw ftp on off msh spoolsw sftp on off You can specify the settings for diprint lpr ipp smb and sftp ssdp ...

Page 446: ...t is 300 SSH SFTP communication login timeout setting msh ssh logintimeout 0 65535 The default is 300 Setting an open key for SSH SFTP msh ssh genkey 512 768 1024 character string Create an open key for SSH SFTP communication Usable characters are ASCII 0x20 0x7e 32 bytes other than 0 The default key length is 1024 and the character string is blank Deleting open key for ssh sftp communication msh ...

Page 447: ... configuration Msh upnp url string Enter the URL string in the character string web Use the web command to display and configure parameters on Web Image Monitor View Settings msh web URL Configuration You can set URLs linked by clicking URL on Web Image Monitor msh web url http The URL or IP address you want to register Specify 1 or 2 for x as the number corresponding to the URL Up to two URLs can...

Page 448: ... msh web help http Help URL or IP address help Deleting Help URL msh web clear help wiconfig Use the wiconfig command to make settings for IEEE 802 11b View settings msh wiconfig View IEEE 802 11b settings msh wiconfig cardinfo If IEEE 802 11b is not working correctly its information is not displayed Configuration msh wiconfig parameter Parameter Value configured mode ap adhoc 802 11adhoc You can ...

Page 449: ...EP youcanuse 26 digit hexadecimals Up to four WEP keys can be registered Specify the number to be registered with val When a WEP is specified by key the WEP specified by key phrase is overwritten To use this function set the same key number and WEP key for all ports that transmit data to each other Put 0x on the front of WEP key You can omit the numbers with val The key number is set to 1 when mak...

Page 450: ... shared shared key authorized rate rate auto 11m 5 5m 2m 1m You can set the IEEE 802 11b transmitting speed The speed you specify here is the speed at which data is sent You can receive data at any speed auto automatically set default 11m 11 Mbps fixed 5 5m 5 5 Mbps fixed 2m 2 Mbps fixed 1m 1 Mbps fixed security none wep wpa You can specify the security mode none No encryption default S wep WEP en...

Page 451: ...ou select EAP TTLS you can select chap mschap mschapv2 pap or md5 If you select PEAP you can select mschapv2 or tls username character string You can specify the login user name for the Radius server Usable characters ASCII 0x20 0x7e 31 bytes other than The default is blank username2 character string You can specify the phase 2 username for EAP TTLS PEAP phase 2 authentication Usablecharacters ASC...

Page 452: ...WINS server settings Viewing settings msh wins If the IPv4 address obtained from DHCP differs from the WINS IPv4 address the DHCP address is the valid address Configuration msh wins interface_name on off on means active and off means inactive Be sure to specify the interface wlan can be specified only when the IEEE 802 11b interface unit is installed Interface name Interface configured ether Ether...

Page 453: ...u can specify the NBT scope ID msh wins interface_name scope scope ID The scope ID can be entered using up to 31 alphanumeric characters Be sure to specify the interface wlan can be specified only when the IEEE 802 11b interface unit is installed Interface name Interface configured ether Ethernet interface wlan IEEE 802 11b interface Remote Maintenance by telnet 229 6 ...

Page 454: ...angetMIBinformationusingthesecommunity names Start SNMP Setup Tool Windows 95 98 Me Windows 2000 Windows NT 4 0 Click the Start button Point to SmartDeviceMonitor for Admin on the Programs menu Click SNMP Setup Tool Windows XP Click the Start button Point to SmartDeviceMonitor for Admin on the All Programs menu Click SNMP Setup Tool Supported MIBs SNMPv1 v2 MIB II PrinterMIB HostResourceMIB RicohP...

Page 455: ...b is reset Canceling Job The job is being reset Configuring Setting is being changed Cooling Down Fusing Unit Fusing unit is cooling down Cover Open Duplex Unit The cover of the duplex unit is open Cover Open Front Cover The front cover is open Empty Black Toner The black toner cartridge is almost empty Energy Saver Mode The printer is in Energy Saver Mode Error An error has occurred Error DIMM Va...

Page 456: ...r that is not recommended is set In Use Input Tray Other functions is using the input tray Jobs Suspended All jobs are suspended Loading Toner Toner is being supplied Low Black Toner The black toner cartridge is not set correctly or toner is almost running out Low Toner The black toner cartridge is not set correctly or toner is almost running out Malfunction Duplex Unit There is a problem with dup...

Page 457: ... The duplex feed unit is not correctly set Not Detected Duplex Unit The duplex unit is not correctly set Not Detected Fusing Unit The fusing unit is not correctly set Not Detected Input Tray The paper feed tray is not correctly set Not Detected Tray 1 Tray 1 is not correctly set Not Detected Tray 2 Tray 2 is not correctly set Not Detected Tray 3 Tray 3 is not correctly set Not Detected WasteToner ...

Page 458: ...arger Kit It is time to replace the charger kit Replace Cleaning Web It is time to replace the Cleaning Web Replace Fusing Unit It is time to replace the fusing unit Replace Int Transfer Unit It is time to replace the transfer unit Replace Transfer Cleaning Unit It is time to replace the transfer cleaning unit SD Card Authentication failed SD card authentication failed Skipped due to Error Skipped...

Page 459: ...e configuration page For details about printing a configuration page see List Test Print Menu p 143 List Test Print Menu Printer Configuration You can check the printer configuration using telnet This section explains the checking procedure for input output tray and printer language UNIX Use the info command and rsh rcp ftp and sftp parameters mshell Use the info command Input Tray Item Descriptio...

Page 460: ...rs Printer Language Item Description No ID number of the printer language used by the printer Name Name of the printer language used in the printer Version Version of the printer language For details about UNIX commands and parameters see UNIX Supplement For details about mshell info commands see Remote Maintenance by telnet p 197 Remote Maintenance by telnet 6 Monitoring and Configuring the Print...

Page 461: ...g to be transferred to the printer Owner Print request user name Job Print request number Files The name of the document Total Size The size of the data spooled The default is 0 bytes For details about UNIX commands and parameters see UNIX Supplement For details about mshell info commands see Remote Maintenance by telnet p 197 Remote Maintenance by telnet Print Log Information This is a record of ...

Page 462: ...rintrequest was canceled possibly due to the printing application Not applicable to the ftp or rprinter command Time Time the print requested was received Time of print request reception User ID Printer driver configured User ID Appears when the print request ID is specified JobName Name of the document for printing Appears when the print request ID is specified For details about UNIX commands and...

Page 463: ...command Item Description Common Mode Protocol Up Down Protocol Settings AppleTalk IPv4 IPv6 NetWare SMB SCSI print Device Up Down Device Settings Parallel USB Ethernet interface Syslog priority NVRAM version Device name Comment Location Contact Soft switch AppleTalk AppleTalk Settings Understanding the Displayed Information 239 6 ...

Page 464: ...tem Description Mode Net Object Type Zone TCP IP Mode IPv4 Mode IPv6 ftp lpr rsh telnet diprint web http ftpc snmp ipp autonet Bonjour ssl nrs rfu nbt ssdp 6 Monitoring and Configuring the Printer 240 6 ...

Page 465: ...way IPv6 Stateless Manual Gateway EncapType Host name DNS Domain Access Control Access Control Settings IPv4 Access Entry X X can be set between 1 and 5 IPv6 Access Entry X X can be set between 1 and 5 Time server Time Settings Time Zone Understanding the Displayed Information 241 6 ...

Page 466: ...ome page Home page URL2 Home page link name2 Help page URL NetWare EncapType RPRINTER number Print server name File server name Context name Switch Mode NDS Bindery Packet negotiation Login Mode Print job timeout Protocol SAP interval time NDS Tree Name Transfer Protocol 6 Monitoring and Configuring the Printer 242 6 ...

Page 467: ...Workgroup name Computer name Comment Share name 1 Protocol SCSI print Bidi IEEE 802 11b IEEE 802 11b Settings Host name Communication Mode SSID Channel range Channel TX Rate Security WEP Authentication WEP Encryption key number Understanding the Displayed Information 243 6 ...

Page 468: ... Key User name Domain name EAP Type Password Phase 2 user name Phase 2 Method TTLS Phase 2 Method PEAP Server cert Intermediate CA Server ID DNS DNS Settings IPv4 Server X X can be set between 1 and 3 Select IPv4 DNS Server IPv6 Server X X can be set between 1 and 3 6 Monitoring and Configuring the Printer 244 6 ...

Page 469: ...n WINS WINS Settings ether Primary WINS Secondary WINS wlan Primary WINS Secondary WINS SSDP SSDP Settings Ad_Mode UUID Profile TTL UPnP UPnP Settings URL Bonjour Bonjour Rendezvous Settings Computer Name cname Understanding the Displayed Information 245 6 ...

Page 470: ...ty diprint Priority lpr Priority ipp IP TTL LinkLocal Route for Multi I F IPP Port SNMP SNMP Settings SMNPv1v2 SMNPv3 protocol v1Trap v2Trap v3Trap SNMPv1v2 Remote Setting SNMPv3 Privacy ssh ssh Settings Compression Port Timeout 6 Monitoring and Configuring the Printer 246 6 ...

Page 471: ...IPv4 AuthFree Entry X X can be set between 1 and 5 IPv6 AuthFree Entry X X can be set between 1 and 5 Parallel USB LPR Iprm check host lpr prnerrchk Certificate Verification Shell mode Remote maintenance tool mode Understanding the Displayed Information 247 6 ...

Page 472: ...same account name as the administrator account account is unavailable The authentication password is not set up Useraccountisdisabled Thiscouldbebecausethe authentication password is not set and only the encryption account is set account is unavailable encryption is impossible Encryption is not possible and account is disabled This could be because Security option is not installed Encryption passw...

Page 473: ...D of the access point connected to when in infrastructure mode centrod is disabled Communication via parallel connections unavailable because centrod is disabled in the security mode Enable centrod in the security mode Cannot create service connection In the remote printer mode Connection to the file server has not been established The number of file server users may have exceeded the maximum capa...

Page 474: ...iguration Current Interface Speed xxxMbps Speed of the network 10Mbps 100 Mbps or 1Gbps Current IP address currentIP address Current IPv4 address Current IPX address IPX address Current IPX address DHCP lease time expired DHCP lease time has expired The printer tries to discover the DHCP server again The IP address until now becomes invalid DHCP server not found The DHCP server was not found Make ...

Page 475: ...terface started with IP IP address IP address IPv4 or IPv4 address has been set for the interface and is operating Interface Subnet overlap The same IP address IPv4 or IPv6 address and the subnet mask is used with other device IPP cancel job permission denied The printer could not authenticate the name of the user attempting to cancel a job IPP job canceled jobid d The spooled job was canceled due...

Page 476: ...ork interface board is required Contact your sales or service representative Printqueue printqueuename cannotbeserviced by printer 0 print server name In the print server mode The print queue cannot be established Make sure that print queue exists on the specified file server Print server print servername has no printer In the print server mode The printer is not assigned to the print server Using...

Page 477: ...failed to get smtp server ip address The SMTP server IP address could not be obtained This could be because The specified DNS server could not be found No connection to the network has been established The specified DNS server could not be found An incorrect DNS server is specified The specified SMTP server IP address could not be found in the DNS server SMTPC failed to connect smtp server timeout...

Page 478: ...erver other than the SMTP server has been specified or the specified SMTP server port number is incorrect Check the DNS Server s IP address and SMTP server s IP address or the SMTP server name and SMTP port number or the SMTP server s SMTP port number or the network connection and configuration SMTPC username or password wasn t correct response code information Connection to the SMTP server failed...

Page 479: ... WINS server address There was no response from the WINS server Check the correct WINS server address is entered Alternatively check the WINS server is functioning properly WINS wrong scopeID Scope ID An invalid scope ID was used Use a valid scope ID wpa authentication Failed WPA authentication failed Check the WPA configuration wpa authentication started WPA authentication has started wpa IEEE802...

Page 480: ...ls about UNIX commands and parameters see UNIX Supplement For details about syslog command see Remote Remote Maintenance by telnet p 197 Remote Maintenance by telnet 6 Monitoring and Configuring the Printer 256 6 ...

Page 481: ... 2003 R2 Printers and Faxes window appears 2 Click the icon of the printer you want to use On the File menu click Properties The printer properties appear 3 On the Sharing tab click Shared as 4 To share the printer with users using a different version of Windows click Additional Drivers If you have installed an alternative driver by selecting Shared as during the printer driver installation this s...

Page 482: ... the beginning after the spooler pauses briefly When the expansion function is not used the function is automatically set as available If you log on using an account that does not have Administrator privileges the client may not be notified Setting a Client 1 On the Start menu point to Program DeskTopBinder SmartDeviceMonitor for Client and then click Extended Features Settings A dialog box for se...

Page 483: ... NetWare 4 Starting the print server This procedure assumes an environment is already prepared for normal NetWare running the printing service setting The procedure is explained with the following example settings File server s name CAREE Print server s name PSERV Printer s name R PRN Queue name R QUEUE Using SmartDeviceMonitor for Admin To use the printer in a NetWare environment use SmartDeviceM...

Page 484: ...er is searched for This item is mandatory Use up to 47 characters NDS Tree To enable NDS mode enter the name of the NDS tree you want to log on to Use up to 32 alphanumeric characters NDS Context Name To enable NDS mode enter the print server context Use up to 127 characters Operation Mode Specify whether to use the interface board as a print server or a remote printer Remote Printer No This item ...

Page 485: ...in NetWare 4 x NetWare 5 5 1 or NetWare 6 0 set it to the NDS mode When using NetWare 5 5 1 or NetWare 6 0 set the printer as a print server 1 Start Web Image Monitor 2 Click Login A dialog box for entering the login user name and password appears 3 Enter the login user name and password and then click Login For details about the login user name and password consult your administrator 4 In the lef...

Page 486: ... Configuration is now complete Wait several minutes before restarting Web Image Monitor 6 Click Logout To check that the configuration is made correctly enter the following from the command prompt F NLIST USER A B If the printer works as configured the name of the print server appears as a connected user If you cannot identify the printer you want to configure check the printer name with the confi...

Page 487: ...and then click Create 12 Click Assignments and then click Add in the Assignments area 13 In the Available objects box click the queue you and then click OK 14 Click Configuration click Parallel in the Printer type list and then click Communication 15 Click Manual load in the Communication type area and then click OK 16 Check the settings and then click OK 17 Select a context specified using NIB Se...

Page 488: ...se the printer as a remote printer under NetWare 3 x Setting up using PCONSOLE 1 Enter PCONSOLE from the command prompt F PCONSOLE 2 Create a print queue When using the existing print queue go to the procedure for creating a printer 3 From the Available Options menu select Print Queue Information and then press the Enter key 4 Press Insert key and then enter a print queue name 5 Press Esc key to r...

Page 489: ...structions on the screen to make other necessary settings Following these steps check that the queues are assigned 21 Press the Esc key until Exit appears and then select Yes to exit PCONSOLE 22 Start the print server by entering the following from the console of the NetWare server If the print server is in operation quit and restart it To quit CAREE unload pserver To start CAREE load pserver prin...

Page 490: ... which the print queue is created and then click OK 7 Check the settings and then click Create 8 Set up the network connection to a printer Select the object in which the printer is located and then click Create on the Object menu 9 In the Class of new object box click Printer and then click OK For NetWare 5 click Printer Non NDPS 10 In the Printer name box enter the printer name 11 Select the Def...

Page 491: ... print server by entering the following from the console of the NetWare server If the print server is in operation quit and restart it To exit CAREE unload pserver To start CAREE load pserver print_server_name 25 Enter the printer server name as the context name and then press the OK key 26 Select the printer name on the context menu and then press the OK key Setting up using Web Image Monitor 1 S...

Page 492: ...7 Using a Printer Server 268 7 ...

Page 493: ...sses TCP IP of the printer is set as default 2 Install a TCP IP in Windows to set up the network environment Consult the administrator for the local setting information 3 To print under Windows 2000 XP Windows Server 2003 2003 R2 or Windows NT 4 0 install Printing service for UNIX as the network application To print under Windows NT 4 0 install Microsoft TCP IP printing as the network application ...

Page 494: ...ws 95 98 Me 1 Copy WINDOWS HOSTS SAM to the same directory and name it HOSTS with no extension 2 Open the WINDOWS HOSTS file created using memo pad files for instance 3 Add an IP address and host name to the hosts file using the following format 192 168 15 16 host NP 192 168 15 16 is the IPv4 address host is the printer s host name and NP is replaced by comments Insert a space or tab between 192 1...

Page 495: ...nds using the command prompt window The location of the command prompts varies depending on operating systems Windows 95 98 Start Programs MS DOS Prompt Windows Me Start Programs Accessories MS DOS Prompt Windows 2000 Start Programs Accessories Command Prompt Windows XP Windows Server 2003 2003 R2 Start All Programs Accessories Command Prompt Windows NT 4 0 Start Programs Command Prompt Match the ...

Page 496: ...an be used as wild cards When printing a binary file add the b option When using a printer with the host name host to print a PostScript file named file 1 or file 2 located in the C PRINT directory the command line is as follows c rcp b C PRINT file1 C PRINT file2 host filetype RPS ftp Use the put or mput command according to the number of files to be printed When one file is printed ftp put pass ...

Page 497: ...ile 1 in the C PRINT directory and printing file 1 and file 2 ftp put C PRINT file1 filetype RPS ftp mput C PRINT file1 C PRINT file2 5 Quit ftp ftp bye _ and cannot be used for filenames File names will be read as option strings For mput command option can not be defined For mput command and can be used as wild cards in file names When printing a binary file in ASCII mode print may not come out c...

Page 498: ...8 Special Operations under Windows 274 8 ...

Page 499: ...cessary to install a printer driver and PostScript Printer Description PPD files to print from a Mac OS Follow the procedure below to install a printer driver and a PPD file into a Mac OS using Mac OS 8 6 and higher PostScript 3 Printer Driver 1 Insert the CD ROM into the CD ROM drive 2 Double click the CD ROM drive icon 3 Double click the Mac OS 8 and 9 folder 4 Double click the PS Driver folder ...

Page 500: ...nd the Adobe PS icon appears at the left of the printer name in the list Using USB Interface To use a printer connected by USB create a desktop printer icon Make sure that printers are connected to the USB before performing the following procedure USB can be used only with Mac OS 9 2 2 1 Double click Desktop Printer Utility in the AdobePS Components folder 2 Click AdobePS in With click Printer USB...

Page 501: ...me of the PPD file displayed in the dialog box Installing Adobe Type Manager Quit all applications currently running before installation Install ATM after you restart the computer 1 Insert the CD ROM into the CD ROM drive 2 Double click the CD ROM drive con 3 Double click the Mac OS 8 and 9 folder 4 Double click the ATM folder 5 Double click the ATM 4 6 2 installer icon 6 Follow the instructions o...

Page 502: ...ystem Folder 8 A confirmation message appears 9 Click OK The fonts are installed 10 Restart the Mac OS Changing to EtherTalk Follow the procedure below to configure to a Mac OS to use EtherTalk 1 Open Control Panel and then double click the AppleTalk icon 2 On the Connect via pop up menu click Ethernet 3 If you change zones select a name on the OK pop up menu 4 Close the AppleTalk control panel 5 ...

Page 503: ... For information about installing applications required for EtherTalk see the Mac OS manuals Mac OS 279 9 ...

Page 504: ...a PPD file to print from Mac OS X You need an administrator name and a password phrase For details consult your administrator 1 Insert the CD ROM into the CD ROM drive 2 Double click the CD ROM drive icon 3 Double click the Mac OS X folder 4 Double click the MacOSX PPD Installer folder 5 Double click the installer icon 6 Follow the instructions on the screen Setting Up PPD Files 1 Start Printer Se...

Page 505: ...he option you want to select is not displayed PPD files may not be set up correctly To complete the setup check the name of the PPD file displayed in the dialog box Using USB Interface Follow the procedure below to setup USB connection USB2 0 can be used only with Mac OS X 10 3 3 or higher 1 Start Printer Setup Utility 2 Click Add Mac OS X 10 4 or later Click a printer that has USB indicated in th...

Page 506: ...en click Add Under Mac OS X 10 4 or later Installable Options window appears Select the option you want to set up and then select an appropriate setting for it and then Continue 4 Quit Printer Setup Utility When printing with a Rendezvous connection to a Macintosh computer printer language does not changeautomatically Usethecontrolpanelonthisprintertochangeprinterlanguageto AutoDetect or PS before...

Page 507: ...6 When the settings are made click Apply Now 7 Quit System Preference For information about installing applications required for EtherTalk see the Mac OS manuals Mac OS X 283 9 ...

Page 508: ...Configuring the Printer Use the control panel to enable AppleTalk The default is active 9 Mac OS Configuration 284 9 ...

Page 509: ...The User ID can contain up to eight alphanumeric a z A Z 0 9 characters Entering the User ID helps you distinguish your print job from others Locked Print Use this function to save documents in the printer memory with a password and then edit and print them as you want The User ID can contain to eight alphanumeric a z A Z 0 9 characters The Password must be 4 8 digits Entering the User ID helps yo...

Page 510: ...use this function To use this function the optional hard disk must be installed on the printer The number of pages the printer can save varies depending on the contents of the print images At most the printer can save 100 jobs or 1 000 pages for Sample Print Locked Print Hold Print and Stored Print Sample Print files will not appear on the display panel if they have already been executed or delete...

Page 511: ...ollowing steps to print the remaining sets If you want to delete a saved job see Deleting a Sample Print File 7 Press the Menu key The Menu screen appears 8 Press the or key to display Sample Print and then press the Enter key 9 Press the or key to display Print One File and then press the Enter key The file name and the time when the job was stored appear 10 Press the or key to display the file y...

Page 512: ...e or key to confirm deleting all files and then press the Enter key To cancel deleting a Sample Print file press the Escape key 5 Press the Enter key 6 Press the Online key The initial screen appears Using Locked Print You need Mac OS X v10 2 or higher to use this function To use this function the optional hard disk must be installed on the printer The number of pages the printer can save varies d...

Page 513: ...sword in the Password box The user ID associates the user with his her jobs 5 After making the necessary settings click Print The document file is saved in the printer To print the document perform the following steps To delete the document see Delete a Locked Print File 6 Press the Menu key The Menu screen appears 7 Press the or key to display Locked Print and then press the Enter key 8 Press the...

Page 514: ...and then press the Enter key If you forget your password ask your administrator for help 6 Press Check the file you want to delete is displayed and then press the Enter key The selected file is deleted 7 Press the Online key The initial screen appears Deleting all Locked Print files 1 Press the Menu key The Menu screen appears 2 Press the or key to display Locked Print and then press the Enter key...

Page 515: ... still appear on the display panel However an error message will appear if you try to print or delete those Hold Print files If the application has a collate option make sure that it is not selected before sending a print job By default Hold print jobs are automatically collated by the printer driver If the collate option is selected in the application print dialog box more prints than intended ma...

Page 516: ...ile is deleted To stop printing after printing has started press the Job Reset key The file is deleted For details about setting printer drivers see the printer driver Help You can also print or delete a Hold Print file from Web Image Monitor For details see Web Image Monitor Help Deleting a selected Hold Print file only 1 Press the Menu key The Menu screen appears 2 Press the or key to display Ho...

Page 517: ...t files printed or deleted using Web Image Monitor after you have selected Stored Print using the control panel will still appear on the display panel However an error message will appear if you try to print or delete those Stored Print files If the application has a collate option make sure that it is not selected before sending a print job By default Storedprintjobsareautomaticallycollatedbythep...

Page 518: ...ress the or key to display Print One File and then press the Enter key The file name and the time when the job was stored appear To cancel printing press the Escape key 9 Press the or key to display the file you want to print and then press the Enter key If you set a password in the printer driver a password confirmation screen appears Enter the password 10 Press the Enter key The To print press E...

Page 519: ...ssword ask your administrator for help 5 Press the Enter key 6 Press the Online key The initial screen appears Deleting all Stored Print files 1 Press the Menu key The Menu screen appears 2 Press the or key to display Stored Print and then press the Enter key 3 Press the or key to display Del All Files and then press the Enter key The user ID and the time when the job was stored appear 4 Press the...

Page 520: ...he following table shows the tabs or menus where you can select this function Mac OS Paper on the Page Attributes tab in the Page Setup dialog box Mac OS X Paper Size in the Page Setup dialog box Fit to Paper When the size of the document and paper size differ set whether or not to print according to paper size Mac OS Fit to Paper on Printer Specific Options in the print dialog box Prompt User Pri...

Page 521: ...nter Specific Options in the print dialog box Mac OS X Resolution on the Features x tab on Printer Features in the print dialog box Orientation Override Use this to set the paper orientation The following table shows the tabs or menus where you can select this function Mac OS Orientation Override on Printer Specific Options in the print dialog box Mac OS X Orientation Override on the Feature Sets ...

Page 522: ...to the long edge when bound along the long edge Flip on Short Edge Prints so you can open it to the short edge when bound along the short edge Toner Saving Use this function to reduce the amount of toner used when printing The following table shows the tabs or menus where you can select this function Mac OS Print Mode on Printer Specific Options in the print dialog box Mac OS X Print Mode on the F...

Page 523: ...ature Sets x tab on Printer Feature in the printer dialog box Paper Type Use this to select the paper type The following table shows the tabs or menus where you can select this function Mac OS Paper Type on Printer Specific Options in the print dialog box Mac OS X Paper Type on the Feature Set x tab on Printer Features in the print dialog box Image Smoothing Use this to select the image smoothing ...

Page 524: ...t Dithering Use this function to set the Image Rendering mode The following table shows the tabs or menus where you can select this function Mac OS Dithering on Printer Specific Options in the print dialog box Mac OS X Dithering on the Feature Set x tab on Printer Features in the print dialog box You can select the following items Auto Use this setting to configure the best dithering method automa...

Page 525: ...e CD ROM into the CD ROM drive The CD ROM icon appears 2 Double click the CD ROM icon The contents of the CD ROM appear 3 Double click the Mac OS 8 and 9 icon to open it Under Mac OS X double click the Mac OS X folder 4 Double click the PS Utility folder on the CD ROM and then drag the Printer Utility for Mac file and then drop it into the Macintosh hard disk 5 Drag the CD ROM icon and drop it int...

Page 526: ...ect a name from Available Network Zones Click Choose Printer on the Printer Utility for Mac menu if you want to change the printer 4 Select the printer you want to use Printer Utility for Mac will take a few seconds to start 5 Click Choose Printer Utility for Mac Functions Downloading PS Fonts You can download the PS fonts to the printer memory or hard disk drive The following procedure to downloa...

Page 527: ...lick OK 7 Click Cancel Some fonts cannot be downloaded Before downloading read the documentation about the fonts you want to use Displaying Printer Fonts You can display the available fonts currently downloaded to the printer Fonts in the printer memory and hard disk drive can be displayed 1 Select Display Printer s Fonts on the File menu A dialog box appears 2 Select Printer s memory or Printer s...

Page 528: ... data on the printer hard disk drive is deleted Before initializing be sure to check the data on the hard disk drive Do not turn off the power switch until initializing is completed otherwise the hard disk drive might be damaged 1 Select Initialize Printer s Disk on the File menu The confirmation message appears To cancel initialization click Cancel 2 Click Execute Initializing starts 3 When the c...

Page 529: ...several printers have the same name a digit appears next to the printer name in Chooser You can enter up to 31 digits and letters Do not use symbols for example Mac OS 1 On the File menu click Rename Printer 2 In the New Name filed enter a new name 3 Click Rename The printer name is changed 4 Click OK 5 On the Apple menu click Chooser 6 Click the AdobePS icon 7 Select the printer whose name you ch...

Page 530: ...ory will be deleted If the printer restarts all the printer settings return to the defaults Downloading PostScript Files You can download a Postscript file to the printer 1 Select Download PostScript File on the Utility menu 2 Select the file name to download click the file name and then click Open 3 Type the log file name and then click Save The selected file is downloaded Errors are recorded in ...

Page 531: ...n click Change A confirmation message appears 3 Click Continue A confirmation message appears 4 Click OK 5 On the Printer Utility for Mac menu click Choose Printer 6 In the Available Network Zones list select the zone you changed 7 In the Available Printers list select the model of printer in use and then click Choose Displaying the Printer Status You can display and confirm the current status of ...

Page 532: ...tility menu Open the editing screen The Dialogue Console menu bar appears 2 Type the PostScript command in the editor screen To edit a PostScript file select Open on the File menu to open it You can search or replace a character string by using the Search menu 3 After editing the PostScript file select Download Top Window on Console menu to start printing The PostScript file is sent to the printer...

Page 533: ...e their network print status DeskTopBinder SmartDeviceMonitor for Client Help Viewing the contents of the CD ROM 1 Insert the CD ROM into the CD ROM drive The installer starts 2 Click Browse This CD ROM Explorer starts and displays the contents of the CD ROM Printer Drivers for This Printer Printing requires installing a printer driver appropriate to your operating system The following drivers are...

Page 534: ...ipt printer drivers and PPD files are included on the CD ROM labeled Printer Drivers and Utilities For Mac OS version 8 6 or higher is required Mac OS X Classic environment is supported PPD files PPD files are included on the CD ROM provided with this printer PPD files allow the printer driver to enable specific printer functions SmartDeviceMonitor for Admin SmartDeviceMonitor for Admin is an appl...

Page 535: ...ce for NetWare provided with Windows NT Novell Client provided with Windows 2000 or Windows NT Available functions SmartDeviceMonitor for Admin has the following functions to check printer supplies such as paper or toner results of print jobs executed from the computer ForinformationaboutusingSmartDeviceMonitorforAdmin seeSmartDeviceMonitorforAdminHelp DeskTopBinder SmartDeviceMonitor for Client S...

Page 536: ...vided with Windows Server 2003 2003 R2 IPX SPX provided with Windows Server 2003 2003 R2 NetWare Client provided with Windows Server 2003 2003 R2 Novell Client provided with Windows Server 2003 2003 R2 Windows NT 4 0 TCP IP provided with Windows NT IPX SPX provided with Windows NT Client Service for NetWare provided with Windows NT Novell Client provided with Windows 2000 or Windows NT Available f...

Page 537: ...conditions such as when Recovery printing is performed Display the log of printed files and the current status of the files being printed To perform Recovery or Parallel printing the same options that are installed on the original printer must be installed on the other printers also Printers that lack a required option cannot be used for Recovery or Parallel printing To perform Recovery or Paralle...

Page 538: ...analysis and tampering you can install a server certificate in the printer negotiate a secure connection and encrypt transmitted data You must install one of the following memory options to perform encryption the hard disk the data storage card SSL SSL Secure Sockets Layer Secure Sockets Layer AQC899S 1 To access the printer from a user s computer request for the SSL server certificate and public ...

Page 539: ...the server certificate using Web Image Monitor 2 Enabling SSL Enable the SSL TLS setting using Web Image Monitor Configuration flow certificate issued by a certificate authority 1 Creating the server certificate Create the server certificate using Web Image Monitor The application procedure after creating the certificate depends on the certificate authority Follow the procedure specified by the ce...

Page 540: ...tificate for the printer has been installed 8 Quite Web Image Monitor Click Delete to delete the server certificate from the printer For details about the displayed items and selectable items see Web Image Monitor Help Creating the Server Certificate Certificate Issued by a Certificate Authority Create the server certificate using Web Image Monitor This section explains the use of a certificate is...

Page 541: ...ge Monitor This section explains the use of a certificate issued by a certificate authority as the server certificate Enter the server certificate contents issued by the certificate authority 1 Log on to Web Image Monitor in the administrator mode 2 In the left area click Configuration and then click Device Certificate in Security The Device Certificate page appears 3 Click Install 4 Enter the con...

Page 542: ...ngtheprinterusingtheWebImageMonitororIPP starttheCertificateImportWizard and install a certificate 1 When the Security Alert dialog box appears click View Certificate The Certificate dialog box appears To be able to respond to inquiries from users about such problems as expiry of the certificate check the contents of the certificate 2 On the General tab click Install Certificate Certificate Import...

Page 543: ... according to the setting Setting the SSL TLS Encryption Mode This can be specified by the administrator After installing the server certificate specify the SSL TLS encrypted communication mode By making this setting you can change the security level Specify the SSL TLS encrypted communication mode using Web Image Monitor 1 Log on to Web Image Monitor in the administrator mode 2 Click Configuratio...

Page 544: ...ation area in the SNMPv3 area and then click OK 5 Quit Web Image Monitor To use SmartDeviceMonitor for Admin for encrypting the data for specifying settings you need to specify the administrator s Encryption Password setting and Encryption Key in SNMP Authentication Information in SmartDeviceMonitor for Admin in addition to specifying Permit SNMPv3 Communication on the printer If administrator s E...

Page 545: ...ration page see p 143 List Test Print Menu For details about configuring the printer if the router cannot be configured see the instructions below Configuring the printer with NetWare 1 Following the setup method described earlier in this manual configure the file server 2 Set the frame type for NetWare environment For details about selecting a frame type see p 157 Host Interface Menu Configuring ...

Page 546: ...face priority When there are static IPv4 addresses and addresses assigned by DHCP IPv4 Address and subnet mask if a static IPv4 address is the same as an address assigned by DHCP or the static subnet mask address and the subnet mask address assigned by DHCP overlap the printer uses the static IPv4 address interface The interface with the DHCP setting is set by default Gateway Address operates usin...

Page 547: ...icate with devices that do not have the AutoNet function However this printer can communicate with Macintosh computers running Mac OS X 10 2 3 or higher p 143 List Test Print Menu p 197 Remote Maintenance by telnet Configuring the WINS Server The printer can be configured to register its NetBIOS name with a WINS server when the power is turned on This enables the NetBIOS name of the printer to be ...

Page 548: ...etes records A record and PTR record managed by the DNS server When a DNS server is part of the network environment to which this printer a DNS client is connected records can be dynamically updated using this function Updating Updating procedure varies depending on whether the printer IP address is static or acquired by DHCP When the dynamic DNS function is not used records managed by the DNS ser...

Page 549: ... operation For static IP setting Microsoft DNS servers with standard Windows 2000 Server Windows Server 2003 2003 R2 features BIND 8 2 3 or higher For DHCP setup when the printer updates the A record Microsoft DNS servers with standard Windows 2000 Server Windows Server 2003 2003 R2 features BIND 8 2 3 or higher For DHCP setup when the DHCP server updates records Microsoft DNS servers with standar...

Page 550: ...or higher versions Windows Server 2003 2003 R2 features ISC DHCP 3 0 or higher DHCP server with standard NetWare 5 features Setting the dynamic DNS function Make settings with telnet using the dns command For details see p 197 Remote Maintenance by telnet 10 Appendix 326 10 ...

Page 551: ...quires administrator permission To install a printer driver by Auto Run log on using an account that has administrator permission 1 Quit all applications currently running 2 Insert the CD ROM into the CD ROM drive The installer starts 3 Click Font Manager 2000 4 Follow the instructions on the screen Installing Font Manager 2000 327 10 ...

Page 552: ... PageMaker 6 0 default installation The directory is C PM6 RSRC PPD4 For PageMaker 6 5 default installation The directory is C PM65 RSRC USENGLISH PPD4 The USENGLISH may vary depending on your language selection For PageMaker 7 0 default installation The directory is C PM7 RSRC USENGLISH PPD4 The USENGLISH may vary depending on your language selection If the driver is not set correctly after copyi...

Page 553: ... SP1 SP2 SP3 SP4 FR1 FR2 FR3 MetaFrame Presentation Server 3 0 Citrix Presentation Server 4 0 Windows Server 2003 2003 R2 MetaFrame XP 1 0 FR3 MetaFrame Presentation Server 3 0 Citrix Presentation Server 4 0 Supported Printer Drivers When Windows Terminal Service is operating PCL printer drivers PostScript 3 RPCS drivers Some RPCS printer driver functions do not work if Windows Terminal Service is...

Page 554: ...equipment will not be stored in the server after the equipment is disconnected The settings for optional equipment will be restored to its defaults each time the client computer logs on to the server When printing a large number of bitmap images or using the server in a WAN environment over dial up lines such as ISDN printing may not be possible or errors may occur depending on data transfer rates...

Page 555: ... If the printer drivers are not properly copied install them directly onto each server When Using Windows Terminal Service MetaFrame 331 10 ...

Page 556: ... distribute sublicense and or sell copies of the Software and to permit persons to whom the Software is furnished to do so subject to the following conditions The above copyright notice and this permission notice shall be included in all copies or substantial portions of the Software THE SOFTWARE IS PROVIDED AS IS WITHOUT WARRANTY OF ANY KIND EXPRESS OR IMPLIED INCLUDING BUT NOT LIMITED TO THE WAR...

Page 557: ... of its contributors may be used to endorse or promote products derived from this software without specific prior written permission THIS SOFTWARE IS PROVIDED BY THE NETBSD FOUNDATION INC AND CONTRIBUTORS AS IS AND ANY EXPRESS OR IMPLIED WARRANTIES INCLUDING BUT NOT LIMITED TO THE IMPLIED WARRANTIES OF MERCHANTABILITY AND FITNESS FOR A PARTICULAR PURPOSE ARE DISCLAIMED IN NO EVENT SHALL THE FOUNDA...

Page 558: ...re developed by Jonathan Stone for the NetBSD Project This product includes software developed by Winning Strategies Inc This product includes software developed by Frank van der Linden for the NetBSD Project This product includes software developed for the NetBSD Project by Frank van der Linden This product includes software developed for the NetBSD Project by Jason R Thorpe The software was deve...

Page 559: ...ty protocol software from RSA Security Inc RSA is a registered trademark and BSAFE is a registered trademark of RSA Security Inc in the United States and or other countries RSA Security Inc All rights reserved Copyright Information about Installed Applications 335 10 ...

Page 560: ...10 Appendix 336 10 ...

Page 561: ...3 DeskTopBinder 15 21 89 311 devicename 201 DHCP 201 321 Dial up Router 321 diprint 203 Display 13 Displaying the Printer Status 307 dns 203 DNS 324 domainname 205 Downloading PostScript Files 306 Downloading PS Fonts 302 Duplex Printing 297 Dynamic DNS 324 E E Mail Notification 190 Encrypted Communication Mode 319 Energy Saver Mode 183 Energy Saver Timer 149 Enter key 13 Error Log 119 Escape key ...

Page 562: ...ry Usage 64 Menu Chart 133 Menu key 13 Message List 248 MetaFrame 329 MIB 230 Monitoring Printers 188 N NetBSD 332 NetWare 48 49 209 259 321 NetWare 3 x 260 264 NetWare 4 x 261 266 NetWare 5 5 1 261 262 266 NetWare 6 6 5 261 262 266 Network Connection 17 Network Interface Board Configuration 239 O On demand E mail 193 On demand E mail Notification 191 Online key 13 Option Settings 62 Orientation O...

Page 563: ...tting Up as a Remote Printer 260 261 262 264 266 Setting Up for Printing 81 87 Setting Up Options 276 281 Setting Up PPD Files 276 280 show 216 Slip Sheets 125 slp 216 SmartDeviceMonitor for Admin 177 179 180 181 183 184 185 187 310 SmartDeviceMonitor for Client 21 188 257 311 SmartDeviceMonitor Port 17 21 smb 216 snmp 217 SNMP 230 SNMPv3 Encryption 319 sntp 220 Software and Utilities 309 Spool Pr...

Page 564: ... SmartDeviceMonitor Port 21 Using the Standard TCP IP Port 35 Using USB Interface 276 281 W web 223 Web Image Monitor 121 127 171 323 Web Image Monitor Help 175 Windows 2000 28 29 36 40 45 53 58 68 75 82 Windows 95 98 Me 25 26 44 51 57 67 74 81 Windows NT 4 0 71 78 85 Windows Server 2003 2003 R2 30 31 37 41 46 54 59 69 77 83 Windows XP 30 31 37 41 46 54 59 69 77 83 wins 228 WINS Server 321 323 340...

Page 565: ...Copyright 2006 ...

Page 566: ...Software Guide Model No MLP31n MLP36n P7031n P7035n LP131n LP136n Aficio SP 4100N Aficio SP 4110N G176 8605 EN USA ...

Page 567: ...ent information leak age and unauthorized operations by others You will be prompted to enter your login password when performing the fol lowing operations Logging in to Administrator mode in Web Image Monitor Starting User Management Tool of SmartDeviceMonitor for Admin Connecting to the printer via telnet To use the default account enter admin as the user name and leave the pass word blank You ca...

Page 568: ...ation and tam pering administrator menus which are not normally displayed are provided for administrators This printer comes with the following administrator menus Administrator menus under Maintenance Netwrk Security Key Repeat Menu Protect List Print Lock Ppr Size Errors File Locking Unlock Files Remote Service Note The File Locking and Unlock Files menus are displayed when the op tional hard di...

Page 569: ...s C Press the U or T key to display Maintenance and then press the q Enter key D Press the U or T key to check the administrator menus including Net wrk Security Menu Protect and List Print Lock are displayed You can now display the administrator menus and make any necessary changes to the settings E Press the Online key after completing all the required settings The initial screen appears prevent...

Page 570: ...al changes Level 1 You can preserve settings for the Maintenance Page Size Host Interface PCL Menu PS Menu PDF Menu and Language menus Level 2 You can preserve settings for the Paper Input Maintenance Multiple Lists System Prt Err Report Host Interface PCL Menu PS Menu PDF Menu and Language menus Off Operation of menu items is unrestricted Note Default Off List Print Lock You can restrict the list...

Page 571: ...ters the wrong password 10 times the file is automatically locked On Off Note Default Off Unlock Files You can unlock a file that was locked due to a user entering a wrong pass word 10 times Log Transfer You can turn off the log transfer function The default is off Note Optional software is required for this function Remote Service You can prohibit the communication with Remote Service Prohibit Do...

Page 572: ...eed You can specify the USB communication speed Full Speed You can set the communication speed of USB to USB1 1 Auto Select Note Default Auto Select The settings you apply here take effect on the USB interface that comes with an optional Gigabit Ethernet unit ...

Page 573: ...7 MEMO ...

Page 574: ...8 Copyright 2006 Printed in China EN USA G176 8615 ...

Reviews: