454
Maintaining Your Printer
Removing the Transfer Unit
1
Push the tabs on both sides of the transfer unit inward, and then lift it out of the printer.
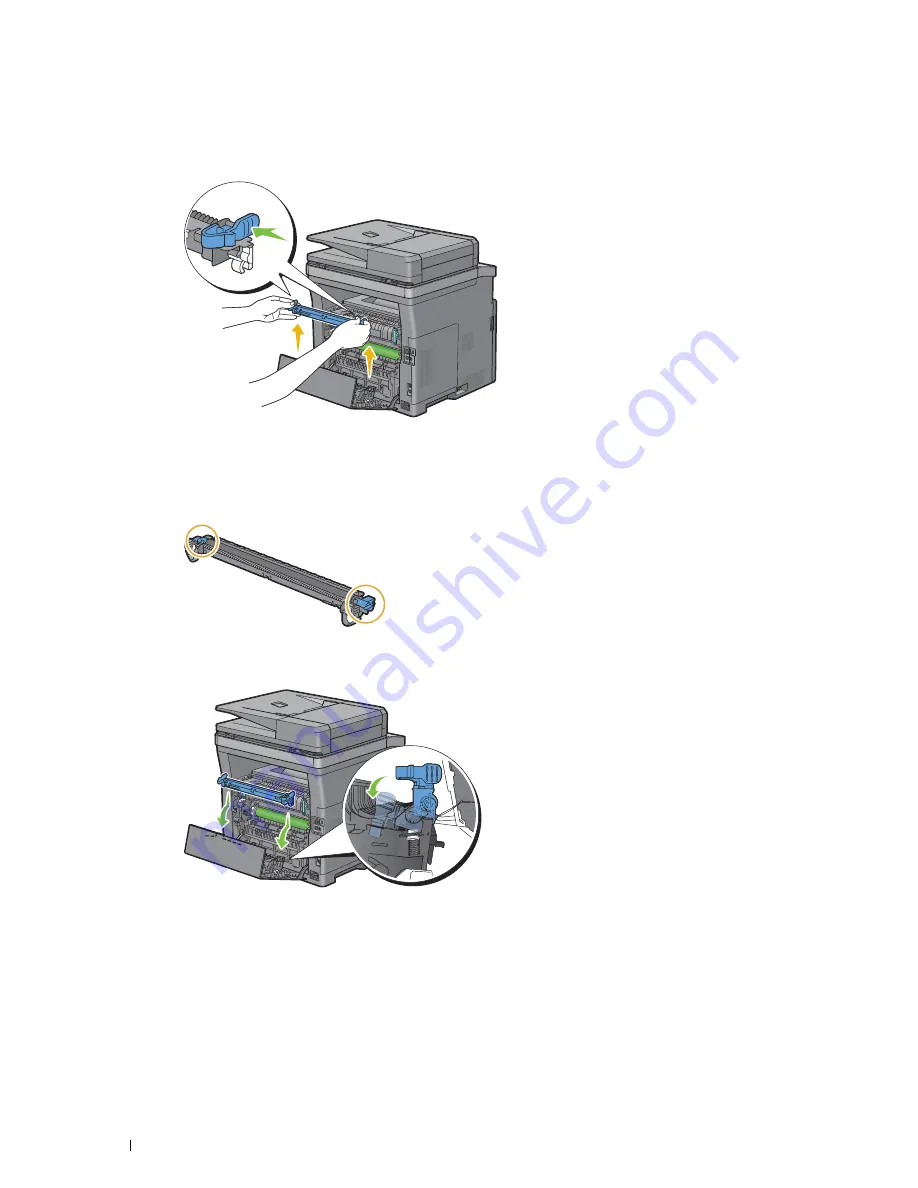
Installing a Transfer Unit
1
Unpack a new transfer unit.
2
Hold the transfer unit by both its ends.
3
Put the receptacles (white) on both ends of the transfer unit to the short bars near the arrow marks of the duplexer.
And tilt the transfer unit toward the rear cover.
Summary of Contents for H815dw
Page 2: ......
Page 24: ...24 Contents Template Last Updated 2 7 2007 ...
Page 26: ...26 ...
Page 30: ...30 Notes Cautions and Warnings ...
Page 38: ...38 Product Features ...
Page 44: ...44 About the Printer ...
Page 46: ...46 ...
Page 48: ...48 Overview of the Printer Setup ...
Page 86: ...86 Loading Paper ...
Page 100: ...100 Installing Printer Drivers on Windows Computers ...
Page 104: ...104 Installing Printer Drivers on Macintosh Computers ...
Page 114: ...114 ...
Page 180: ...180 Dell Printer Configuration Web Tool ...
Page 282: ...282 ...
Page 316: ...316 Copying ...
Page 344: ...344 Scanning For Apple Macintosh Password for Scanner Enter the password ...
Page 380: ...380 Dell Document Hub ...
Page 386: ...386 ...
Page 404: ...404 Understanding Your Printer Software ...
Page 424: ...424 Using Digital Certificates ...
Page 434: ...434 Understanding Printer Messages ...
Page 440: ...440 Specifications ...
Page 441: ...441 Maintaining Your Printer 31 Maintaining Your Printer 443 32 Clearing Jams 469 ...
Page 442: ...442 ...
Page 468: ...468 Maintaining Your Printer ...
Page 476: ...476 Clearing Jams 8 Insert the MPF into the printer 9 Close the rear cover ...
Page 499: ...499 Troubleshooting 33 Troubleshooting Guide 501 ...
Page 500: ...500 ...
Page 530: ...530 Troubleshooting Guide ...
Page 531: ...531 Appendix Appendix 533 ...
Page 532: ...532 ...


