background image

Using Takenote™

184

 TPI-PRO/DVI (Total Presentation Interface)

To change the color of the pointer, select a color from the Pen Option Menu Bar (see the 

Pen Options Menu 

Bar

section on page 189).

Using the Save Tool

The Save tool (FIG. 106) allows you to capture and save screen images from the TakeNote session. 

Capturing and Saving the Screen Image

Press the 

Save 

button to capture the current screen image, including all visible annotations, and save the 

captured image to either a USB stick or to the TPI-PRO/DVI’s internal disk drive.

By default, the TPI-PRO/DVI is configured to save captured TakeNote screen images to a USB stick inserted 
into any of the USB (Type A) Input ports.

To save captured TakeNote screen images to a USB stick:

1.

Insert a USB stick into any of the USB (Type A) Input ports on the TPI-PRO/DVI. (see th

Wiring and 

Device Connections

section on page 15).

The TPI-PRO/DVI automatically detects the first USB stick to be inserted into any of the USB (Type A) 
Input ports (two available on the front panel, two more available on the rear panel - refer to FIG. 4 and 
FIG. 5 on page 15).

2.

Press the 

Save

 button on the Main TakeNote Menu Bar. This action will cause the screen to refresh.

3.

Once the screen has refreshed, the captured screen image has been saved to the USB Stick.



Images are saved as JPG files.



Images are named according to the TakeNote session name, followed by a timestamp of the time 
and date the image was saved.

Changing the Storage Location For Captured TakeNote Screen Images

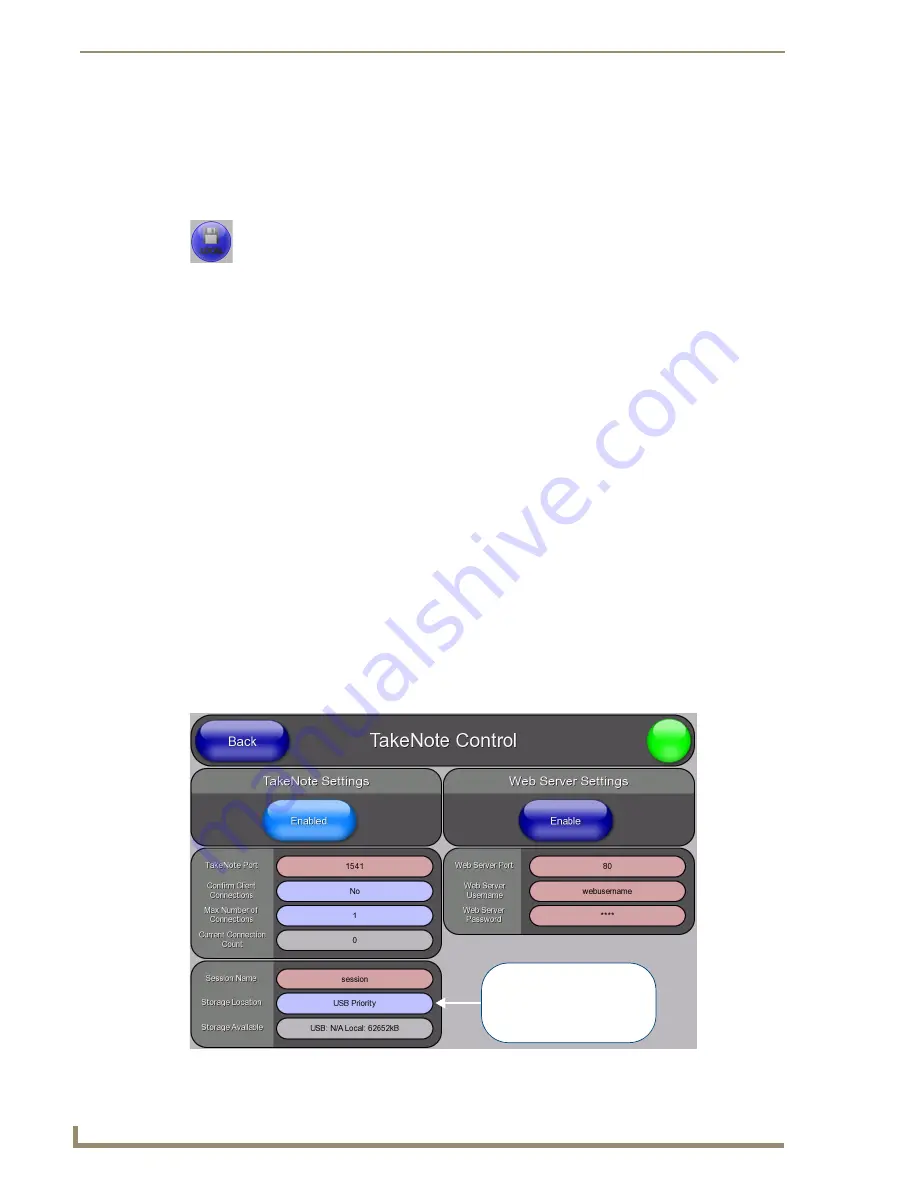
The screen image will be saved according to the settings specified in the TakeNote Control (Protected Setup) 
page:

1.

Open the 

TakeNote Control

 page (FIG. 98):

FIG. 106  

Save Tool

FIG. 107  

TakeNote Control page

Press to cycle through the 
Storage Location options:

  USB Priority (default)
  Local Disk
  disabled

Summary of Contents for TPI-PRO-4

Page 1: ...Operation Reference Guide Presentation Interfaces TPI PRO Total Presentation Interface TPI PRO 2 TPI PRO 4 Last Revised 10 20 2011 ...

Page 2: ...rked on the outside of each box The RMA is valid for a 30 day period After the 30 day period the RMA will be cancelled Any shipments received not consistent with the RMA or after the RMA is cancelled will be refused AMX is not responsible for products returned without a valid RMA number AMX is not liable for any damages caused by its products or for the failure of its products to perform This incl...

Page 3: ...e Connections 9 Overview 9 Front Panel Components 9 Rear Panel Components 9 Connections Overview 10 Front Panel Connectors 11 USB Type A Input ports 11 SERIAL Port 11 Rear Panel Connectors 12 VIDEO VGA Inputs 12 VGA Outputs 12 SOURCE KEYBOARD MOUSE USB Type B Device Ports 1 4 13 USB Type A Input ports 14 ETHERNET 10 100 RJ 45 Port 14 TOUCH INPUT DB 9 Port 15 AUDIO OUT Connector 16 12VDC PWR Power ...

Page 4: ...TPI PRO DVI Communication Settings 31 Assigning a Device Number to the TPI PRO DVI 32 Setting the Serial Port Baud Rate 33 Configuring the Master Connection Settings 34 Configuring TPI PRO DVI IP Settings 36 Configuring a DHCP Address 36 Configuring a Static IP Address 37 Choosing the Master Connection Mode 38 Master Connection Mode Options 38 Configuring the Ethernet Connection on the NetLinx Mas...

Page 5: ...he Page 71 G4 Image Caching 71 Enabling Image Cache 72 Clearing the Image Cache 73 Checking Image Cache Status 73 Protected Setup Other Settings Password Settings Page 73 Protected Setup Tools 74 Protected Setup Tools Panel Connection Logs Page 74 Protected Setup Tools Panel Statistics Page 75 Protected Setup Tools Connection Utility Page 76 Using the Connection Utility 76 Protected Setup TakeNote...

Page 6: ...8 PPN 88 PPT 88 PPX 88 PSE 89 PSP 89 PST 89 PAGE 89 PPOF 90 PPOG 90 PPON 90 Button Commands With Embedded Codes 91 BMF 91 Button Commands 93 ANI 93 APF 94 BAT 94 BAU 94 BCB 95 BCF 95 BCT 95 BDO 96 BFB 96 BIM 96 BLN 97 BMC 97 BMF 98 BMI 98 BML 98 BMP 98 BNC 99 BNN 99 BNT 99 BOP 99 BOR 100 BOS 100 BPP 100 BRD 101 BSF 101 BSM 101 ...

Page 7: ... FON 103 GDI 104 GIV 104 GLH 104 GLL 104 GRD 105 GRU 105 GSC 105 GSN 106 ICO 106 JSB 107 JSI 107 JST 108 MBT 108 MDC 108 SHO 108 SKT 109 SLT 109 TEC 111 TEF 111 TOP 111 TXT 112 UNI 112 Button Query Commands 113 BCB 114 BCF 114 BCT 115 BMP 115 BOP 116 BRD 116 BWW 117 FON 117 ICO 118 JSB 118 JSI 119 JST 119 TEC 120 TEF 120 TXT 121 ...

Page 8: ...BRT 123 DBEEP 124 EKP 124 ORES 124 PKEYP 125 PKP 125 SETUP 125 SLEEP 125 SOU 126 TKP 126 TPAGEOFF 126 TPAGEON 126 VKB 126 TPO 127 TPS 127 WAKE 127 Input Commands 128 CAL 128 KPS 128 MPS 128 PPS 129 SLT 130 VKS 131 Embedded Codes 132 Panel Setup Commands 133 MUT 133 PWD 133 PWD 133 VOL 133 Listbox Commands 134 Data List Commands 134 LDN 134 LDA 134 LDR 135 LDC 135 LDD 135 LDT 136 ...

Page 9: ...F Embedded Codes 141 RMF 141 RSR 141 Escape Sequences 142 DV 142 SY 142 IP 142 HN 142 MC 142 ID 142 PX 142 PY 142 ST 142 AC 142 AP 142 CC 142 CP 142 LC 142 LP 142 BX 142 BY 142 BN 142 TakeNote Commands 143 TAKENOTE ENABLE 143 TAKENOTE DISABLE 143 TAKENOTESERVER ENABLE 143 TAKENOTESERVER DISABLE 143 TNA AUTOEXPOSE 143 TNA AUTOHIDE 143 TNA CANVASCOLOR 143 TNA CLEAR 143 TNA FLUSH 144 TNA HIDE 144 TNA...

Page 10: ... 147 TNB SAVE 147 TNB TEXTSIZE 148 TNB TOOLTYPE 148 TNB UNDO 148 TNC 148 TNF 148 TNH PageName 148 TNS PageName 148 TNA AUTOEXPOSE 149 TNA AUTOHIDE 149 TNA CANVASCOLOR 149 TNA PENCOLOR 149 TNA PENOPACITY 149 TNA PENSTYLE 149 TNA PENWIDTH 149 TNA SESSION 149 TNA TEXTSIZE 150 TNA TOOLTYPE 150 TNB CANVASCOLOR 150 TNB PENCOLOR 150 TNB PENOPACITY 150 TNB PENSTYLE 150 Programming Button Properties 151 Te...

Page 11: ... the NetLinx Master to Control the TPI PRO DVI 168 Using Takenote 171 Overview 171 Enabling TakeNote on the TPI PRO DVI 171 Starting a TakeNote Session 171 TakeNote Menu Bar 172 Drawing Annotation Tools 173 Undo Redo Last Action 173 Drawing a Freehand Curved Line 173 Drawing a Straight Line 173 Drawing a Rectangle 173 Drawing an Oval 173 Using the Select Object Tool 174 Moving a TakeNote Annotatio...

Page 12: ...eNote Web Application User Interface 185 Menu Bar 185 Thumbnail Images 186 Toolbar 186 Previewing Captured TakeNote Image Files 187 Downloading Captured TakeNote Image Files To a Local Directory 187 Printing Captured TakeNote Image Files 189 Deleting Captured TakeNote Image Files 189 Supported Input and Output Modes 191 Overview 191 Supported Input Modes 191 Supported Input Modes DVI and RGB 191 S...

Page 13: ...Table of Contents xi TPI PRO Total Presentation Interface URL Resources 198 Special Escape Sequences 199 Troubleshooting 201 Overview 201 ...

Page 14: ...xii TPI PRO Total Presentation Interface Table of Contents ...

Page 15: ...t The TPI PRO is available in two versions The TPI PRO 4 FG2275 104 supports up to four video RGB inputs The TPI PRO 2 FG2275 102 supports up to two video RGB inputs Both TPI PROs support high resolution inputs outputs Inputs 2 or 4 Accepts S Video Composite Component up to 1080p and VGA up to 1920x1200 Inputs can be scaled to fit into independent windows or viewed full screen Outputs 2 VGA up to ...

Page 16: ... the unit is on and all internal power supplies are operating normally Constant Yellow Power to the unit is within nominal voltage limits between 10VDC and 19VDC approximately and the unit has been turned off by pressing the power switch for more than two seconds Flashing Yellow Power to the unit is within nominal voltage limits between 10VDC and 19VDC approximately but one or more of the internal...

Page 17: ...4 graphics external windowed video graphics inputs and annotation graphics G4 graphics can be turned off under program control 1 connector for the public view non touch monitor which displays only the video feeds G4 graphics external windowed video graphics inputs and annotation graphics G4 graphics can be turned off under program control Both outputs use the same resolution settings Each output c...

Page 18: ...nection Refer to the Configuring the Ethernet Connection on the NetLinx Master section on page 47 for more information There are several methods of TPI PRO communication and programming available DHCP Refer to the Configuring a DHCP Address section on page 44 for more information Static IP Refer to the Configuring a Static IP Address section on page 45 URL Refer to the NetLinx Master IP Address UR...

Page 19: ...ace above and below the unit Placing the unit low in the rack using vented spacer panels and keeping other heat generating equipment away from the unit can also be beneficial Depending on the rack enclosure and the surrounding air temperature it may also be necessary to incorporate rack fans to increase air flow across the bottom of the unit The TPI PRO occupies one rack unit in a standard 19 equi...

Page 20: ...le wires to the TPI PRO Refer to the Rear Panel Connectors section on page 12 for wiring diagrams and pinout descriptions FIG 2 Rack Mounting the TPI PRO Mounting Bracket Mounting screws Mounting holes front 2 per side 2 per side Mounting screws 2 per side Mounting holes 2 per side Mounting Bracket ...

Page 21: ... lists the pinout configuration for HD 15 connector to Component RGB or Composite connectors FIG 3 VIDEO VGA Inputs Input Adapter Cables Name Description Length FG CC HD15M RCAM3 HD 15 to 3x Male RCA Connectors 6 1 828m FG10 2170 03 CC HD15M HD15M HD 15 Male to HD 15 Male Connector 6 1 828m FG10 2170 01 CC HD15M SVIDM HD 15 Male to S Video Male Connector 6 1 828m FG10 2170 04 VGA IN to Component R...

Page 22: ...or to S Video connectors corresponding to the CC HD15M SVIDM HD 15 Male to S Video Male Connector FG10 2170 04 VGA IN to S Video Pinouts VGA Pin VGA Signal S Video Signal S Video Connector Pin 1 Red 2 Green Luminance Y 3 3 Blue Chrominance C 4 4 N C 5 GND 6 RAGND 7 GAGND Luminance Y Return 1 8 BAGND Chrominance C Return 2 9 5VDC 10 SAGND 11 N A 12 DDC_SDA 13 HSYNC 14 VSYNC 15 DDC_SDL ...

Page 23: ...er switch LED Status LED 2 USB Type A Input 1 4 LEDs Serial Configuration port Input ports Button RESOLUTION Button TOUCH Button CALIBRATE Button SETUP FIG 4 shows the TPI PRO 4 with four Input LEDs which correspond to VIDEO VGA Inputs 1 4 on the rear panel The TPI PRO 2 has two Input LEDs corresponding to VIDEO VGA Inputs 1 2 FIG 5 Rear Panel Components TPI PRO 4 shown RS 232 Touch Input port Aud...

Page 24: ...Touch Input connectors are provided on the front panel for ease of access INPUT 4 Video input from PC 4 INPUT 3 Video input from PC 3 INPUT 2 Video input from PC 2 INPUT 1 Video input from PC 1 TOUCH INPUT DB 9 connector allows you to connect one Serial controlled touch device i e RS232 Touch Screen OUTPUT 2 video output to display device 2 OUTPUT 1 video output to display device 1 Only one touch ...

Page 25: ...tionality they are provided on both sides of the TPI PRO for ease of access see FIG 12 on page 14 SERIAL Port The SERIAL DB 9 port can be used for direct Serial RS 232 configuration FIG 8 See the Terminal Telnet Commands section on page 165 for a listing of supported Terminal Telnet commands FIG 7 Front Panel USB Type A Input Ports 2 USB Type A Input ports Touch input devices can consist of any co...

Page 26: ...ectors FIG 10 You can connect the VGA source equipment HD 15 male connector from the touch device to the VGA OUT HD 15 high density connector female on the rear panel of the TPI PRO The output devices display video from source input devices routing through the TPI PRO FIG 9 VIDEO VGA Inputs Input Adapter Cables Name Description Length FG CC HD15M RCAM3 HD 15 to 3x Male RCA Connectors 6 1 828m FG10...

Page 27: ...evice port 2 has pass through control of the input device connected to VIDEO VGA Input 2 3 The PC connected to USB Device port 3 has pass through control of the input device connected to VIDEO VGA Input 3 TPI PRO 4 only VGA OUT HD 15 Connector Pinouts Pin Signal Function 1 Red Red signals 2 Green Green signals 3 Blue Blue signals 4 N C Monitor ID bit 2 5 GND Signal Ground 6 RAGND Red analog ground...

Page 28: ...Port The ETHERNET 10 100 RJ 45 port provides 10 100 Mbps communication with the NetLinx Master via ICSP protocol FIG 13 The Ethernet port automatically negotiates the connection speed 10 Mbps or 100 Mbps and whether to use half duplex or full duplex mode FIG 14 describes the blink activity for the ETHERNET 10 100 Base T RJ 45 connector LEDs FIG 12 Rear Panel USB Type A Input Ports 2 USB Type A Inp...

Page 29: ... RS 232 serial connectivity for a touch input device that requires a serial connection FIG 16 The following table lists the TOUCH INPUT connector pinouts ETHERNET 10 100 RJ 45 Port Pinouts and Signals Pin Signals Connections Pairing Color 1 TX 1 1 1 2 Orange White 2 TX 2 2 Orange 3 RX 3 3 3 6 Green White 4 no connection 4 4 Blue 5 no connection 5 5 4 5 Blue White 6 RX 6 6 Green 7 no connection 7 7...

Page 30: ...s TOUCH INPUT DB 9 Connector Pinouts and Signals Pin Signal Function 1 N A Not used 2 RXD Receive data 3 TXD Transmit data 4 DTR Data terminal ready 5 GND Signal ground 6 DSR Data set ready 7 RTS Request to send 8 CTS Clear to send 9 N A Not used FIG 17 AUDIO OUT Connector Supported WAV MP3 Audio Sample Rates 48000Hz 44100Hz 32000Hz 24000Hz 22050Hz 16000Hz 12000Hz 11025Hz 8000Hz FIG 18 AUDIO OUT p...

Page 31: ...FG423 40 not included is recommended to accommodate all possible configurations and respective power draws FIG 19 12VDC PWR Power Connector 12VDC PWR Power Connector The TPI PRO will power ON when the power supply is connected Once power is applied use the Power button to toggle the unit off and on Do not connect power to the TPI PRO until wiring is complete These units should only have one source...

Page 32: ...B USB connectors on the TPI PRO rear panel only are used to provide communication between the TPI PRO and the PC FIG 22 Notes on USB Connections Do not use a USB hub to connect multiple USB devices to the TPI PRO Removing and reconnecting USB devices from the TPI PRO may result in a loss of connectivity If this occurs reset the TPI PRO to allow the devices to re establish connectivity When disconn...

Page 33: ...ions for the TPI PRO For detailed pinout descriptions for each connector on the TPI PRO refer to the Rear Panel Connectors section on page 12 FIG 23 System Diagram document camera DVD player Apple notebook Laptop PC NXA ENET24 NI 700 TPI display screen projector projection screen document camera DVD player Laptop PC NXA ENET24 NI 700 TPI PRO display screen projector projection screen Laptop PC ...

Page 34: ...s touch input connector to the TOUCH INPUT DB9 connector on the TPI PRO Refer to the TOUCH INPUT DB 9 Port section on page 15 for a description of the TOUCH INPUT connector pinouts For touch monitors with USB touch connectors use a USB cable to connect the touch monitor s touch input connector to the KEYBOARD MOUSE USB Type A connector on the TPI PRO 3 Connect the touch monitor s video output conn...

Page 35: ... of the Type A USB ports on the front or rear of the TPI PRO 3 Connect a USB cable from a USB port on the PC to one of the Type B USB ports on the rear of the TPI PRO labelled SOURCE KEYBOARD MOUSE 4 Connect a video output on the PC to the VIDEO VGA Input connector on the rear of the TPI PRO that corresponds to the Type B USB port to which the PC is connected For example If the PC is connected to ...

Page 36: ... through a computer you must establish pass thru control Pass thru control allows the TPI PRO to act as a control bridge between a PC and a touch monitor The touch monitor control option is available only if a Video Fill has been applied to the panel page in the TPDesign4 Touch Panel Design software application With the panel page open in TPDesign4 1 Select the States tab of the Properties Control...

Page 37: ...touch monitor for touch and mouse pass thru control of a PC 1 Discharge any acquired static electricity by touching a grounded metal object disconnect the incoming power connector from the rear of the TPI PRO 2 Connect a USB mouse to one of the Type A USB ports on the front or rear of the TPI PRO 3 Connect a USB cable from a USB port on the PC to one of the Type B USB ports on the rear of the TPI ...

Page 38: ...ut Resolution section on page 34 10 Setup the touch drivers for the connected touch monitor by using the procedures in the Setting the Touch Drivers Serial Touch Monitors Only section on page 35 11 If necessary use the panel s video adjust buttons to align the incoming video signal to fit into the available screen area Initially positioning the incoming video can reduce the necessity of later adju...

Page 39: ...n page 71 for descriptions of the options available via the Protected Setup Pages Before You Start The TPI PRO DVI has been factory setup with specific touch panel pages The first splash screen that appears indicates the TPI PRO DVI is receiving power loading firmware and preparing to display the default touch panel page When the panel is ready the AMX Splash Screen is replaced by the Initial Pane...

Page 40: ...xel resolution and refresh rate set on the connected touch monitor 1 Press the RESOLUTION pushbutton to open the Resolution Setup page FIG 30 2 Press the RESOLUTION button again to cycle through the available output resolution settings Every consecutive button push cycles the output resolution to the next highest setting Double push the RESOLUTION button to return to the previous setting Go to htt...

Page 41: ...y applies to serial touch monitors as USB monitors are automatically detected The touch drivers are set when you connect the TPI PRO DVI to a touch monitor The default Touch Input Driver is EloTouch If you are using a non touch monitor set the Touch Input Driver to NullTouch 1 Press the TOUCH pushbutton on the front panel to open the Panel Information page FIG 31 2 Press the front panel TOUCH butt...

Page 42: ...n page and select a different touch driver Calibrating the TPI PRO DVI Using a USB Input 1 Connect a USB cable from a touch monitor to one of the Type A USB ports on the front or back of the TPI PRO DVI 2 Press the POWER button on the front panel to reboot the TPI PRO DVI and allow the unit to detect the new hardware 3 Press the CALIBRATE button on the front panel see FIG 29 on page 33 to open the...

Page 43: ...to calibrate the touch monitor using the newly selected touch driver 4 Press the crosshairs on the Calibration page to set the calibration points on the monitor 5 After the Calibration Successful message appears press anywhere to return to the Setup page If the calibration fails return to the Protected Setup page and select another touch input driver It is recommended that you calibrate the TPI PR...

Page 44: ...he reboot process You can also use a mouse to press the on screen Reboot button 9 Upon start up press anywhere on the screen to return to the Protected Setup page and begin defining the communication properties Other Configuration Pages For instructions on using the TPI PRO DVI Configuration pages to configure communication options for the TPI PRO DVI and establish communication between the TPI PR...

Page 45: ...unications between the TPI PRO DVI and NetLinx Master FIG 34 FIG 33 Setup Pushbutton front panel FIG 34 Setup page Press to open the Setup page Connection Status Red Connection Status icon indicates Green Connection Status icon with LOCK no connection to a Master Yellow Connection Status icon indicates an unreliable network connection active communication to an encrypted Green Connection Status ic...

Page 46: ...rotected a Use the on screen keypad to enter the default password 1988 b Press Done to close the keypad FIG 36 3 Enter a Device Number value for the TPI PRO DVI FIG 36 a Press the red Device ID field to open the keypad b Enter a Device Number value for the TPI PRO DVI c Press Done to assign the device number close the keypad The default value is 10001 Range 1 32000 When using multiple TPI PRO DVIs...

Page 47: ... 37 The default Serial Baud Rate is 115200 FIG 36 Protected Setup page with Keypad 2275 Changes made in the Setup pages are not incorporated until the TPI PRO DVI is rebooted See the Rebooting the TPI PRO DVI section on page 54 for details FIG 37 Protected Setup page Serial Port Baud Rate Changes made in the Setup pages are not incorporated until the TPI PRO DVI is rebooted See the Rebooting the T...

Page 48: ... from ww amx com This program assists in developing a System Number Master IP URL and Master Port number Refer to the NetLinx Studio online help for details 2 Obtain the System Number Master IP URL and Master Port Number for the Target NetLinx Master from NetLinx Studio This information must be specific for the system used with this TPI PRO DVI a In NetLinx Studio select Settings Master Communicat...

Page 49: ...x Master 3 Press the System Settings button on the Protected Setup page see FIG 36 to open the System Settings page FIG 41 4 Set the Master Connection settings to match those of the target NetLinx Master 5 Press the Back button to return to the Protected Setup page 6 Reboot the TPI PRO DVI see the Rebooting the TPI PRO DVI section on page 54 FIG 40 NetLinx Studio TCP IP Settings dialog FIG 41 Syst...

Page 50: ...utton until the choice cycles to DHCP 3 Press Host Name button to open an on screen Keyboard and enter an alpha numeric string for the Host Name If the Host Name is left blank it will automatically resort to the default localhost Press Done to close the on screen Keyboard 4 Press the Back button to return to the Protected Setup page 5 Reboot the TPI PRO DVI see the Rebooting the TPI PRO DVI sectio...

Page 51: ...ame optional If the Host Name is left blank it will automatically resort to the default localhost Press Done to close the keyboard 6 Press the Primary DNS button to open an on screen keypad and enter the Primary DNS address provided by your System Administrator Press Done to close the keypad 7 Repeat this process for the Secondary DNS field 8 Press the Domain button to open an on screen keyboard a...

Page 52: ... to it and the Master acts as a Client AUTO default setting is used to instruct the TPI PRO DVI to search for a Master that uses the same System Number assigned within the Master Connection section and resides on the same Subnet as itself AUTO should only be used in systems with a single NetLinx Master on the network NDP UDP uses multicasting to allow devices to discover each other The devices mus...

Page 53: ...onnection Verify the yellow LED on the Master s Ethernet port is blinking indicating active communication 3 Open the System Settings page on the TPI PRO DVI a Press the SETUP pushbutton on the front panel to access the Setup page b Press the Protected Setup button to access the Protected Setup page using the on screen keypad to enter the password default 1988 c Press the System Settings button to ...

Page 54: ...be obtained from the Networking Addresses dialog in NetLinx Studio a In NetLinx Studio select Diagnostics Network Addresses to open the Network Addresses dialog FIG 47 b Click Get IP Information to retrieve IP information from the NetLinx Master 3 Click Done to accept the new value and return to the System Configuration page 4 Press the Back button to open the Protected Setup page 5 Reboot the TPI...

Page 55: ...Setup Protected Setup System Settings and note the newly obtained IP Address information in the IP Settings section 5 Press Mode until the option cycles to Listen 6 Press the Back button to open the Protected Setup page 7 In NetLinx Studio select Diagnostics URL Listing to open the URL Listing dialog FIG 48 8 Enter the System and Device number for the NetLinx Master associated with your TPI PRO DV...

Page 56: ...ettings page for AUTO connection mode 3 Press the Back button to open the Protected Setup page 4 Reboot the TPI PRO DVI see the Rebooting the TPI PRO DVI section on page 54 5 Press the SETUP pushbutton on the front panel to open the Setup page and confirm there is an active connection NetLinx Master Ethernet IP Address NDP UDP Mode In NDP UDP mode a connection is established via the NetLinx Master...

Page 57: ...Control Page initial view Select this option to show hide the Online Device Tree showing all devices currently connected to this Master Click to Login only required if Master Security and HTTP Access security options are enabled on the target Master System Device info System read only indicates the name of the System currently connected Device click the down arrow to select from a list of all devi...

Page 58: ...anage NetLinx tab This tab displays a list of NetLinx devices connected to the Master and indicates device status for each FIG 52 FIG 51 Manage System System Number FIG 52 System Manage NetLinx tab These tabs provide access to the various System Management features default view Manage System ...

Page 59: ...Linx Device Details Column Description System Displays the System value being used by the listed NetLinx Master Device Displays the assigned device value of the listed unit This Device entry applies to both the Master and those NDP capable devices currently connected to that Master Device Type Displays a description of the target Master or connected device and its current firmware version Example ...

Page 60: ...DVI Changes made in the Setup pages are not incorporated until the TPI PRO DVI is rebooted Press the Reboot button on the Protected Setup page to reboot the TPI PRO DVI and incorporate all changes FIG 53 FIG 53 Protected Setup page Reboot Panel button Press to reboot the TPI PRO DVI incorporate changes ...

Page 61: ... 54 to access the Resolution Setup Page FIG 55 The options on this page allow you to adjust the TPI PRO DVI s output resolution refresh rate setting FIG 54 Configuration Pushbuttons front panel Press to open the Resolution Setup page Press to open the Panel Information page Press to open the Calibration page Press to open the Setup page including Touch Input Driver setting information In order to ...

Page 62: ...properties of the TPI PRO DVI read only FIG 56 Panel Information Page Panel Information Page Back Saves the changes and returns to the previously active touch panel page Connection Status icon This visual display of the connection status allows the user to have a current update of the TPI PRO DVI s connection status regardless of what page is currently active A Lock only appears on the icon if the...

Page 63: ...TPI PRO DVI is 1920 pixels Screen Height Displays the pixel height sent by the TPI PRO DVI to the display The maximum available screen height on a TPI PRO DVI is 1200 pixels Screen Refresh Rate Displays the refresh rate sent to the display Screen Rotation Displays the degree of rotation applied to the on screen image Power Up Page Displays the touch panel page set to display when the TPI PRO DVI i...

Page 64: ...e connected to the TPI PRO DVI Alternatively the Calibrate Page can be accessed via options on the Protected Setup Page see Protected Setup Page section on page 71 FIG 58 Setup Page Setup Page Exit Saves any setting changes made on the page to disk and returns you to the Main touch panel page Connection Status icon The icon in the upper right hand corner provides a visual indication of the connect...

Page 65: ... video signals Refer to the Setup Video Settings Page section on page 64 Connection Status This read only area indicates the TPI PRO DVI s connection status the encryption status of the NetLinx Master the connection type and the System to which this TPI PRO DVI is connected Display Timeout Sets the length of time in minutes the TPI PRO DVI can remain idle before activating sleep mode When the devi...

Page 66: ...resentation Interface Setup Protected Setup Page Press the Protected Setup button on the Setup Page see FIG 58 on page 58 to access the main Protected Setup Page FIG 59 Refer to the Protected Setup Page section on page 71 FIG 59 Setup Protected Setup Page ...

Page 67: ... of the connection status allows the user to have a current update of the TPI PRO DVI s connection status regardless of what page is currently active A Lock only appears on the icon if the TPI PRO DVI has established a connection with a currently secured target Master requiring a username and password Note This option is included on all Setup pages for convenience File Name Displays the name of th...

Page 68: ...flect the new information The only way to modify a TPI PRO DVI s time without altering the Master is to use NetLinx Code Setup Project Information Page Cont Revision Date Displays the last revision date for the project Last Save Date Displays the last date the project was saved Blink Rate Displays the feedback blink rate 10th of second Job Comments Displays any comments associated to the job These...

Page 69: ...ser with both UP DN arrow buttons to alter the Master s calendar date and time The blue circle indicates which field is currently selected Year range 2000 2037 Month range 1 12 Day range 1 31 Hour range 1 24 24 hour military Minute range 0 59 Second range 0 59 FIG 62 Setup Audio Settings Page Setup Audio Settings Page Master Volume This section allows you to adjust the current sound level on the u...

Page 70: ...led at the rear of the TPI PRO DVI Input N The Input type Composite S Video Computer VGA Component YPrPb or DVI must be set for each input The options presented on this page differ according to the Input type selected If you have selected VGA or Component as the Input Type the Video Settings Page contains the options shown in FIG 63 Setup Audio Settings Page Cont Default Panel Sounds Sets the unit...

Page 71: ...e TPI PRO DVI only When using a DVI source set the input to DVI before attaching the DVI cable to the TPI PRO DVI If a DVI source is attached before setting the input to DVI you may need to reboot the source for it to recognize the DVI input description information required by the DVI standard Resolution Press to open the Input Resolution Popup Page to adjust the TPI PRO DVI s Input Resolution set...

Page 72: ...t corresponds to the Input that you want to adjust 2 Press Input to cycle through the available Input Type options Setup Video Settings Page Cont Incoming Video Signal Window The video signal on the TPI PRO DVI Input that corresponds to the open tab is displayed in this video button Input 1 is displayed on the Slot 1 tab Input 2 is displayed on the Slot 2 tab etc Press inside the Incoming Video Si...

Page 73: ...connected to the Red connector on the DVI to 3RCA Male adaptor cable Composite 2 Corresponds to a signal connected to the Green connector on the DVI to 3RCA Male adaptor cable Composite 3 Corresponds to a signal connected to the Blue connector on the DVI to 3RCA Male adaptor cable When using a DVI source set the input to DVI before attaching the DVI cable to the TPI PRO DVI If a DVI source is atta...

Page 74: ...ition Use the UP DN buttons to alter the horizontal position of the incoming signal This option only appears if you select Computer VGA or Component YPrPb as the input type Range 0 255 Default 128 H Size Use the UP DN buttons to alter the horizontal size of the incoming signal This option only appears if you select Computer VGA or Component YPrPb as the input type Range 0 255 Default 128 V Positio...

Page 75: ...on this page to select a known input resolution use the Up Down arrows to adjust When the slider is set all the way to the left it selects auto and the TPI PRO DVI automatically sets the input resolution Press Done to save the Input resolution setting and close the Input Resolution popup page The same functionality can be achieved via the resolution option of the SLT command see page 138 The input...

Page 76: ...TPI PRO DVI Configuration Pages 70 TPI PRO DVI Total Presentation Interface ...

Page 77: ...blished a connection with a currently secured target Master requiring a username and password Note This option is included on all Protected Setup pages for convenience Protected Setup Page Navigation Buttons The navigation buttons displayed along the left of the Protected Setup Page provide access to several additional protected configuration pages System Settings Press to access the System Settin...

Page 78: ...ity Page section on page 84 for details TakeNote Press to access the TakeNote Control page where you can enable or disable the TakeNote Annotation Application Refer to the Using Takenote section on page 179 for details Device ID Number Opens a keypad that is used to set and display the current device number Name Opens an on screen keyboard used to set and display the current device name Note that ...

Page 79: ...ection The Yes option is enabled after a 5 second delay press Yes to proceed Remove User Pages press to remove all TPD4 touch panel pages currently loaded on the TPI PRO DVI including the pre installed AMX Demo pages Pressing this button launches the Confirmation dialog which prompts you to confirm your selection The Yes option is enabled after a 5 second delay press Yes to proceed Reboot Panel Pr...

Page 80: ... DHCP or Static communication modes DHCP Dynamic Host Configuration Protocol assigns IP Addresses from client stations logging onto a TCP IP network via a DHCP server Static IP is a permanent IP Address that is assigned to a node in a TCP IP network Default DHCP IP Address Sets the IP Address assigned to the TPI PRO DVI Subnet Mask Sets a subnetwork address to the TPI PRO DVI Subnetwork mask is th...

Page 81: ...nd wireless communication Type Cycles between the different connection modes URL Listen Auto NDP UDP and URL UDP URL In this mode enter the IP Address or DNS Name of the NetLinx Master as well as the Master Port Number and Username Password if required The System Number field is read only because the TPI PRO DVI obtains this information from the communicating Master Listen In this mode add the TPI...

Page 82: ... wrong touch driver is selected prior to the calibration process press any of the front panel pushbuttons to exit the Calibration page and select a different touch driver Press the crosshairs to calibrate the panel When the calibration is complete the Calibrate page closes returning to the last open Configuration page Refer to the Calibrating the TPI PRO DVI section on page 36 for details FIG 71 C...

Page 83: ... to that target device the client can control the TPI PRO DVI remotely The TPI PRO DVI supports up to four G4 Web Control users simultaneously connected to the TPI PRO DVI FIG 72 Protected Setup G4 Web Control Page Protected Setup G4 Web Control Page G4 Web Control Settings Enable Enabled The Enable Enabled button toggles between the two G4 Web Control activation set tings Enable deactivates the G...

Page 84: ...lays a G4 icon alongside the link to the Web Control Name given to this TPI PRO DVI Web Control Password Allows you to enter the G4 Authentication session password associated for VNC web access of this TPI PRO DVI Web Control Port Allows you to enter the port value that the VNC Web Server runs on Default 5900 Max Number of Connections Allows you view and set the maximum number of users up to four ...

Page 85: ... Note that since static images are already stored on Flash they are never moved to the Flash cache so Flash caching applies only to dynamic images Images in Flash cache are moved back to RAM cache the next time they are viewed As the Flash cache approaches its maximum size the least recently used items may be discarded to make room for new items While RAM cache is always enabled Flash memory can b...

Page 86: ... The percentage of image requests static and dynamic satisfied by accessing the cache 100 of cache hits of cache hits of cache misses of cache hits the number of times an image was requested that the image was found in the cache If your hit rate is low you may want to consider enabling Flash cache of cache misses the number of times an image was requested that the image could not be found in the c...

Page 87: ...IG 75 The options in the Password Settings page allow you to assign passwords for the panel pages The maximum amount of flash that can be allocated for caching is 75 of available flash FIG 75 Protected Setup Other Settings Password Settings Page Protected Setup Other Settings Password Settings Page Panel Passwords Accesses the alphanumeric values associated to particular password sets PASSWORD 1 2...

Page 88: ...nnection Logs Page Select Panel Logs from the Tools slider see FIG 76 to access the Panel Connection Logs Page FIG 77 The Panel Connection Logs page allows you to view and track the connection history of the panel FIG 76 Protected Setup Tools Slider FIG 77 Protected Setup Tools Panel Connection Logs Page Protected Setup Tools Panel Connection Logs Page Connection Logs A history of all connections ...

Page 89: ...cessed The total ICSP messages processed by the panel Dropped The total ICSP messages dropped by the panel Last 15 Minutes Received The total ICSP messages received by the panel in the last 15 minutes Processed The total ICSP messages processed by the panel in the last 15 minutes Dropped The total ICSP messages dropped by the panel in the last 15 minutes Blink Messages The master sends this messag...

Page 90: ...t your wireless network and changes within the utility Connection Information indicates the IP of the connected master and the IP of your panel Connection Statistics show the current quality of the panel connection 4 Push Close when you are done using the Connection Utility FIG 79 Protected Setup Tools Connection Utility Page Connection Utility Page Connection Information Master IP Displays the IP...

Page 91: ...tton FIG 80 Protected Setup TakeNote Control Page Protected Setup TakeNote Control Page Takenote Settings Enable Enabled The Enable Enabled button toggles between the two TakeNote activation settings Enable deactivates the TakeNote feature on the TPI PRO DVI Enabled activates the TakeNote feature on the TPI PRO DVI Default Disabled TakeNote Port Press within this field to invoke the on screen Take...

Page 92: ...and Device Connections section on page 15 If a USB stick is not present images will be saved to the internal local disk Local Disk This setting saves the image to the TPI PRO DVI s internal hard drive disabled This option disables the Save feature Note Refer to the Capturing and Saving the Screen Image section on page 184 for details on saving captured TakeNote screen images Storage Available This...

Page 93: ...firmware Verify the NetLinx Studio program being used is version 2 8 or higher and TPD4 is version 2 11 or higher Channel Range 1 4000 Button push and Feedback per address port Variable Text range 1 4000 per address port Button States Range 1 256 0 All states for General buttons 1 Off state and 2 On state Level Range 1 600 Default level value 0 255 can be set up to 1 65535 Address port Range 1 100...

Page 94: ...urple 48 0 95 14 Yellow 191 191 0 60 Very Light Magenta 255 0 255 15 Medium Yellow 159 159 0 61 Light Magenta 223 0 223 16 Dark Yellow 127 127 0 62 Magenta 191 0 191 17 Very Dark Yellow 95 95 0 63 Medium Magenta 159 0 159 18 Very Light Lime 128 255 0 64 Dark Magenta 127 0 127 19 Light Lime 112 223 0 65 Very Dark Magenta 95 0 95 20 Lime 96 191 0 66 Very Light Pink 255 0 128 21 Medium Lime 80 159 0 ...

Page 95: ...26 22 Arial 14 5 Courier New 32 23 Arial 16 6 Courier New 18 24 Arial 18 7 Courier New 26 25 Arial 20 8 Courier New 34 26 Arial 24 9 AMX Bold 14 27 Arial 36 10 AMX Bold 20 28 Arial Bold 10 11 AMX Bold 36 29 Arial Bold 8 Variable Fonts start at 32 You must import fonts into a TPDesign4 project file The font ID numbers are assigned by TPDesign4 These values are also listed in the Generate Programmer...

Page 96: ...p Rounded 155 35 Custom Frame 114 Menu Top Rounded 165 36 Diamond 15 115 Menu Top Rounded 175 37 Diamond 25 116 Menu Top Rounded 185 38 Diamond 35 117 Menu Top Rounded 195 39 Diamond 45 118 Menu Right Rounded 15 40 Diamond 55 119 Menu Right Rounded 25 41 Diamond 65 120 Menu Right Rounded 35 42 Diamond 75 121 Menu Right Rounded 45 43 Diamond 85 122 Menu Right Rounded 55 44 Diamond 95 123 Menu Right...

Page 97: ...e Soft Drop Shadow 2 Medium Drop Shadow 2 with Outline Soft Drop Shadow 3 Medium Drop Shadow 3 with Outline Soft Drop Shadow 4 Medium Drop Shadow 4 with Outline Soft Drop Shadow 5 Medium Drop Shadow 5 with Outline Soft Drop Shadow 6 Medium Drop Shadow 6 with Outline Soft Drop Shadow 7 Medium Drop Shadow 7 with Outline Soft Drop Shadow 8 Medium Drop Shadow 8 with Outline Medium Drop Shadow 1 Hard D...

Page 98: ... a single command Button States range allow the user to target 1 or more states of a variable text button with a single command Character is used for the through notation and character is used for the And notation to specify the variable text address range and Button States range Example SEND_COMMAND D P S JSB 500 504 510 515 1 2 1 JSB Set picture alignment 500 504 510 515 For variable text range ...

Page 99: ...Panel APG Popup1 Group1 Adds the pop up page Popup1 to the pop up group Group1 CPG Clear all pop up pages from specified pop up group Syntax CPG popup group Variable popup group 1 50 ASCII characters Name of the pop up group Example SEND_COMMAND Panel CPG Group1 Clears all pop up pages from the pop up group Group1 DPG Delete a specific pop up page from specified pop up group if it exists Syntax DP...

Page 100: ...coordinate Variable popup page name 1 50 ASCII characters Name of the page on which the pop up is displayed Example SEND_COMMAND Panel PHP Popup1 75 0 Sets the Popup1 hide effect x coordinate value to 75 and the y coordinate value to 0 PHT Set the hide effect time for the specified pop up page Syntax PHT popup page name hide effect time Variables popup page name 1 50 ASCII characters Name of the p...

Page 101: ...y the current page is used see example 2 Toggling refers to the activating deactivating On Off of a pop up page This command works in the same way as the Toggle Popup command in TPDesign4 Syntax PPG popup page name page name Variable popup page name 1 50 ASCII characters Name of the pop up page page name 1 50 ASCII characters Name of the page on which the pop up is displayed Example SEND_COMMAND P...

Page 102: ...t re draw it This command works in the same way as the Show Popup command in TPDesign4 Note If the page name is empty the current page is used see example 2 Syntax PPN popup page name page name Variables popup page name 1 50 ASCII characters Name of the pop up page page name 1 50 ASCII characters Name of the page on which the pop up is displayed Example SEND_COMMAND Panel PPN Popup1 Main Activates...

Page 103: ...the location at which the effect will begin at Syntax PSP popup page name x coordinate y coordinate Variable popup page name 1 50 ASCII characters Name of the page on which the pop up is displayed Example SEND_COMMAND Panel PSP Popup1 100 0 Sets the Popup1 show effect x coordinate value to 100 and the y coordinate value to 0 PST Set the show effect time for the specified pop up page Syntax PST pop...

Page 104: ...This command works in the same way as the Toggle Popup command in TPDesign4 Syntax PPOG popup page name page name Variables popup page name 1 50 ASCII characters Name of the pop up page page name 1 50 ASCII characters Name of the page on which the pop up is displayed Example SEND_COMMAND Panel PPOG Popup1 Main Toggles the pop up page Popup1 on the Main page from one state to another On Off Example...

Page 105: ...t the Border Style number DO 1 5 1 5 1 5 1 5 1 5 Set the draw order Listed bottom to top F font 1 8 10 11 20 29 32 xx Set Font Font ID s generated in TPD4 F font 01 08 10 11 20 29 32 xx Set Font Font ID s generated in TPD4 MI mask image Set the mask image See BIM T text Set Text using ASCII characters empty is clear P bitmap Set Picture Bitmap filename empty is clear I icon 1 9900 0 clear Set Icon...

Page 106: ...raph slider color Bargraph slider color Joystick cursor color GI bargraph invert Bargraph invert 0 1 2 3 See GIV GU bargraph ramp up Bargraph ramp up time 1 10 sec GD bargraph ramp down Bargraph ramp down time 1 10 sec GG bargraph drag increment Bargraph drag increment relative bargraph See GDI VI 1 or 0 Set Video Video ON 1 OFF 0 OT feedback type Feedback Type None Channel Invert On Always On Mom...

Page 107: ...put mask Set input mask of a text area VL 0 1 Logon logoff computer control VN network name Set the network connection name VP password Set the Network connection password Example SEND_COMMAND D P S BMF 500 1 B10 CF Red CB Blue CT Black Ptest png Set button OFF state Border Fill Color Border Color Text Color and Bitmap A device must first be defined in the NetLinx programming language with values ...

Page 108: ...gns button address 400 to a standard page flip with page name Main Page BAT Append non unicode text Syntax BAT vt addr range button states range new text Variables variable text address range 1 4000 button states range 1 256 for multi state buttons 0 All states for General buttons 1 Off state and 2 On state new text 1 50 ASCII characters Example SEND_COMMAND Panel BAT 520 1 Enter City Appends the ...

Page 109: ...address range 1 4000 button states range 1 256 for multi state buttons 0 All states for General buttons 1 Off state and 2 On state color value Refer to the RGB Triplets and Names for Basic 88 Colors section on page 88 for more information Example SEND_COMMAND Panel BCF 500 504 510 515 1 12 SEND_COMMAND Panel BCF 500 504 510 515 1 Yellow SEND_COMMAND Panel BCF 500 504 510 515 1 F4EC0A63 SEND_COMMAN...

Page 110: ...er from bottom to top to Border Fill Text Icon and Image Example 2 SEND_COMMAND Panel BDO 1 0 12345 Sets all states of a button back to its default drawing order BFB Set the feedback type of the button This command only works on General type buttons Syntax BFB vt addr range feedback type Variables variable text address range 1 4000 feedback type None Channel Invert On Always on Momentary and Blink...

Page 111: ...copied as a separate command The codes section represents what attributes will be copied All codes are 2 character pairs that can be separated by comma space percent or just ran together Syntax BMC vt addr range button states range source port source address source state codes Variables variable text address range 1 4000 button states range 1 256 for multi state buttons 0 All states for General bu...

Page 112: ...nge 1 256 for multi state buttons 0 All states for General buttons 1 Off state and 2 On state mask image Graphic file used Example SEND_COMMAND Panel BMI 530 1 2 newMac png Sets the button with variable text 530 ON OFF state mask image to newmac png BML Set the maximum length of the text area button If this value is set to zero 0 there is no max length The maximum length available is 2000 Note Thi...

Page 113: ...xt address range 1 4000 network port 1 65535 Example SEND_COMMAND Panel BNT 973 5000 Sets the TakeNote button network port to 5000 BOP Set the button opacity The button opacity can be specified as a decimal between 0 255 where zero 0 is invisible and 255 is opaque or as a HEX code as used in the color commands by preceding the HEX code with the sign In this case 00 becomes invisible and FF becomes...

Page 114: ...urrent slot selected Note This is an optional parameter and ONLY passes data to the PC Syntax BOS vt addr range button states range slot number touch pass through optional Variables variable text address range 1 4000 button states range 1 256 for multi state buttons 0 All states for General buttons 1 Off state and 2 On state slot number 0 No Video Fill Video Off 1 4 Video Fill Video On touch pass ...

Page 115: ...ultiple buttons Only one variable text address can be in focus at a time Syntax BSF vt addr selection value Variables variable text address 1 4000 selection value unselect 0 and select 1 Example SEND_COMMAND Panel BSF 500 1 Sets the focus to the text area of the button BSM Submit text for text area buttons This command causes the text areas to send their text as strings to the NetLinx Master Synta...

Page 116: ...x BVP vt addr range network password Variables variable text address range 1 4000 network password 1 50 ASCII characters Example SEND_COMMAND Panel BVP 500 PCLOCK Sets the password to PCLOCK for the specific PC control button BVT Set the computer control network port for the specified address Syntax BVT vt addr range network port Variables variable text address range 1 4000 network port 1 65535 Ex...

Page 117: ...us page ENA Enable or disable buttons with a set variable text range Syntax ENA vt addr range command value Variables variable text address range 1 4000 command value 0 disable 1 enable Example SEND_COMMAND Panel ENA 500 504 510 515 0 Disables button pushes on buttons with variable text range 500 504 510 515 FON Set a font to a specific Font ID value for those buttons with a defined address range ...

Page 118: ...axis to invert Variables variable text address range 1 4000 joystick axis to invert 0 3 For a bargraph 1 Invert 0 Non Invert Example SEND_COMMAND Panel GIV 500 3 Inverts the joystick axis origin to the bottom right corner GLH Change the bargraph upper limit Syntax GLH vt addr range bargraph hi Variables variable text address range 1 4000 bargraph limit range 0 65535 bargraph upper limit range Exam...

Page 119: ... vt addr range bargraph ramp up time Variable variable text address range 1 4000 bargraph ramp up time in 1 10th of a second intervals Example SEND_COMMAND Panel GRU 500 100 Changes the bargraph ramp up time to 10 seconds GSC Change the bargraph slider color or joystick cursor color Note You can also assign the color by color index name and R G B value RRGGBB or RRGGBBAA Syntax GSC vt addr range c...

Page 120: ...me to Ball ICO Set the icon to a button Syntax ICO vt addr range button states range icon index Variable variable text address range 1 4000 button states range 1 256 for multi state buttons 0 All states for General buttons 1 Off state and 2 On state icon index range 0 9900 a value of 0 is clear Example SEND_COMMAND Panel ICO 500 504 510 515 1 2 1 Sets the icon for On and Off states for buttons wit...

Page 121: ...ment to upper left corner for those buttons with variable text ranges of 500 504 510 515 JSI Set icon alignment using a numeric keypad layout for those buttons with a defined address range The alignment of 0 is followed by left top The left and top coordinates are relative to the upper left corner of the button Syntax JSI vt addr range button states range new icon alignment Variables variable text...

Page 122: ... 504 510 515 1 2 1 Sets the text alignment to the upper left corner for those buttons with variable text ranges of 500 504 510 515 MBT Set the Mouse Button mode On for the virtual PC Syntax MBT pass data Variable pass data 0 None 1 Left 2 Right 3 Middle Example SEND COMMAND Panel MBT 1 Sets the mouse button mode to Left Mouse Click MDC Turn On the Mouse double click feature for the virtual PC Synt...

Page 123: ...es slot number 1 4 each of these options corresponds to an input position slot command see list below Input Set input type for a slot Input type Composite comp1 comp2 comp3 Svideo Component RGB or DVI Syntax input input type input svideo component comp1 comp2 comp3 rgb dvi Note DVI input is only available on TPI PRO DVI Example SEND_COMMAND TP SLT 1 input component Switches input 1 to detect compo...

Page 124: ... the event will be in the following format SLT slot number 1 4 resolution detected resolution string Example SEND_COMMAND TP SLT 1 resolution Queries input 1 for the current input resolution Panel will respond with a DATA Command event Command data will vary depending on input type and detected resolution For composite and svideo NTSC PAL No Signal Detected For component RGB and DVI Horz x Vert Re...

Page 125: ...e 1 4000 button states range 1 256 for multi state buttons 0 All states for General buttons 1 Off state and 2 On state color value Refer to the RGB Triplets and Names for Basic 88 Colors section on page 88 for more information Example SEND_COMMAND Panel TEC 500 504 510 515 1 2 12 Sets the text effect color to Very Light Yellow on buttons with variable text 500 504 and 510 515 TEF Set the text effe...

Page 126: ...ode text For the UNI command UN and BMF command the Unicode text is sent as ASCII HEX nibbles Syntax UNI vt addr range button states range unicode text Variables variable text address range 1 4000 button states range 1 256 for multi state buttons 0 All states for General buttons 1 Off state and 2 On state unicode text Unicode HEX value Example SEND_COMMAND Panel UNI 500 1 0041 Sets the button s un...

Page 127: ... CUSTOM_EVENT TP 529 1012 ON state Fill Color CUSTOM_EVENT TP 529 1013 ON state Text Color CUSTOM_EVENT TP 529 1014 Border Name CUSTOM_EVENT TP 529 1015 Opacity Send_String 0 ButtonGet Id ITOA CUSTOM ID Type ITOA CUSTOM TYPE Send_String 0 Flag ITOA CUSTOM FLAG Send_String 0 VALUE1 ITOA CUSTOM VALUE1 Send_String 0 VALUE2 ITOA CUSTOM VALUE2 Send_String 0 VALUE3 ITOA CUSTOM VALUE3 Send_String 0 TEXT ...

Page 128: ... color information The result sent to the Master would be ButtonGet Id 529 Type 1011 Flag 0 VALUE1 1 VALUE2 9 VALUE3 0 TEXT 222222FF TEXT LENGTH 9 BCF Get the current fill color Syntax BCF vt addr range button states range Variables variable text address range 1 4000 button states range 1 256 for multi state buttons 0 All states for General buttons 1 Off state and 2 On state custom event type 1012...

Page 129: ... text color information The result sent to Master would be ButtonGet Id 529 Type 1013 Flag 0 VALUE1 1 VALUE2 9 VALUE3 0 TEXT FFFFFEFF TEXT LENGTH 9 BMP Get the current bitmap name Syntax BMP vt addr range button states range Variables variable text address range 1 4000 button states range 1 256 for multi state buttons 0 All states for General buttons 1 Off state and 2 On state custom event type 10...

Page 130: ...ent to the Master would be ButtonGet Id 529 Type 1015 Flag 0 VALUE1 1 VALUE2 200 VALUE3 0 TEXT TEXT LENGTH 0 BRD Get the current border name Syntax BRD vt addr range button states range Variables variable text address range 1 4000 button states range 1 256 for multi state buttons 0 All states for General buttons 1 Off state and 2 On state custom event type 1014 Flag Zero Value1 Button state number...

Page 131: ...OFF state word wrap flag status information The result sent to the Master would be ButtonGet Id 529 Type 1010 Flag 0 VALUE1 1 VALUE2 1 VALUE3 0 TEXT TEXT LENGTH 0 FON Get the current font index Syntax FON vt addr range button states range Variables variable text address range 1 4000 button states range 1 256 for multi state buttons 0 All states for General buttons 1 Off state and 2 On state custom...

Page 132: ...index information The result sent to the Master would be ButtonGet Id 529 Type 1003 Flag 0 VALUE1 2 VALUE2 12 VALUE3 0 TEXT TEXT LENGTH 0 JSB Get the current bitmap justification Syntax JSB vt addr range button states range Variables variable text address range 1 4000 button states range 1 256 for multi state buttons 0 All states for General buttons 1 Off state and 2 On state custom event type 100...

Page 133: ...n justification information The result sent to the Master would be ButtonGet Id 529 Type 1006 Flag 0 VALUE1 1 VALUE2 6 VALUE3 0 TEXT TEXT LENGTH 0 JST Get the current text justification Syntax JST vt addr range button states range Variables variable text address range 1 4000 button states range 1 256 for multi state buttons 0 All states for General buttons 1 Off state and 2 On state custom event t...

Page 134: ... color information The result sent to the Master would be ButtonGet Id 529 Type 1009 Flag 0 VALUE1 1 VALUE2 9 VALUE3 0 TEXT 5088F2AE TEXT LENGTH 9 TEF Get the current text effect name Syntax TEF vt addr range button states range Variables variable text address range 1 4000 button states range 1 256 for multi state buttons 0 All states for General buttons 1 Off state and 2 On state custom event typ...

Page 135: ...1 Off state and 2 On state optional index This is used if a string was too long to get back in one command The reply will start at this index custom event type 1001 Flag Zero Value1 Button state number Value2 Actual length of string Value3 Index Text Text from the button Text length Button text length Example SEND COMMAND Panel TXT 529 1 Gets the button OFF state text information The result sent t...

Page 136: ...ard string is set to null on power up and is stored until power is lost The Prompt Text is optional Syntax AKB initial text prompt text Variables initial text 1 50 ASCII characters prompt text 1 50 ASCII characters Example SEND COMMAND Panel AKB Texas Enter State Pops up the Keyboard and initializes the text string Texas with prompt text Enter State AKEYB Pop up the keyboard icon and initializes t...

Page 137: ...CII characters Example SEND COMMAND Panel AKP 12345678 ENTER PASSWORD Pops up the Keypad and initializes the text string 12345678 with prompt text ENTER PASSWORD AKR Remove the Keyboard Keypad Remove keyboard or keypad that was displayed using AKEYB AKEYP PKEYP AKB AKP PKP EKP or TKP commands Syntax AKR Example SEND COMMAND Panel AKR Removes the Keyboard Keypad BEEP Output a beep Syntax BEEP Examp...

Page 138: ...0x600 72 800 600 75 ORES 800x600 75 848 480 60 ORES 848x480 60 1024 768 60 ORES 1024x768 60 1024 768 70 ORES 1024x768 70 1024 768 75 ORES 1024x768 75 1280 720 60 VESA ORES 1280x720 60 VESA 1280 768 60 ORES 1280x768 60 1280 800 60 ORES 1280x800 60 1280 1024 60 default ORES 1280x1024 60 1280 1024 75 ORES 1280x1024 75 1360 768 60 ORES 1360x768 60 1440 900 60 ORES 1440x900 60 1680 1050 60 ORES 1680x10...

Page 139: ...splays a instead of the numbers typed The Prompt Text is optional Syntax PKEYP initial text Variables initial text 1 50 ASCII characters Example SEND COMMAND Panel PKEYP 123456789 Pops up the Keypad and initializes the text string 123456789 in PKP Present a private keypad Pops up the keypad icon and initializes the text string to that specified Keypad displays a instead of the numbers typed The Pr...

Page 140: ...pt text 1 50 ASCII characters Example SEND COMMAND Panel TKP 999 222 1211 Enter Phone Number Pops up the Keypad and initializes the text string 999 222 1211 with prompt text Enter Phone Number TPAGEOFF Turn off page tracking Syntax TPAGEOFF Example SEND COMMAND Panel TPAGEOFF Turns off page tracking TPAGEON Turn on page tracking This command turns on page tracking whereby when the page or pop ups ...

Page 141: ... a video window the lower the opacity needs to be set for the layers A single layer of graphics has show that an opacity value of 250 or lower is sufficient to correct the problem TPS Selects Serial Touch data pass through Syntax SEND_COMMAND DEV TPS pass data Variables pass data 0 Disables the touch pass thru feature from the rear touch serial port through the front panel config serial port 1 Ena...

Page 142: ...d as a string to master Example SEND_COMMAND Panel KPS 2 Sets the keyboard pass thru via the Input 2 USB port Note The functionality of the MPS and KPS commands can be emulated using a USB Keyboard plugged into the TPI PRO DVI by using the following keystroke combinations Keystroke Combo Equivalent Command CTLR ALT KEYBOARD0 MPS 0 and KPS 0 CTLR ALT KEYBOARD1 MPS 1 and KPS 1 CTLR ALT KEYBOARD2 MPS...

Page 143: ...ax SEND_COMMAND DEV PPS pass data Variables pass data 0 Pass data to G4 application default 1 Pass data to device on port 1 2 Pass data to device on port 2 3 Pass data to device on port 3 4 Pass data to device on port 4 5 Pass data to master Mouse buttons passed as a custom event Keyboard passed as a string 6 Pass data to master Mouse buttons and movements passed as a custom event Keyboard passed ...

Page 144: ...etect component input signals SEND_COMMAND TP SLT 3 input rgb Switches input 3 to detect RGB input signals Resolution Set input resolution detection to manual or auto Valid choices are auto or specify manual resolution Valid for only Component or RGB input types Syntax resolution resolution auto or horizontal x vertical refresh description Default is auto See the Supported Input Modes section on p...

Page 145: ...f the panel The DATA TEXT of the event will be in the following format SLT slot number 1 4 resolution detected resolution string Example SEND_COMMAND TP SLT 1 resolution Queries input 1 for the current input resolution Panel will respond with a DATA Command event Command data will vary depending on input type and detected resolution For composite and svideo NTSC PAL No Signal Detected For componen...

Page 146: ...ft key down 131 83 F1 132 84 F2 133 85 F3 134 86 F4 135 87 F5 136 88 F6 137 89 F7 138 8A F8 139 8B F9 140 8C F10 141 8D F11 142 8E F12 143 8F Num Lock 144 90 Caps Lock 145 91 Insert 146 92 Delete 147 93 Home 148 94 End 149 95 Page Up 150 96 Page Down 151 97 Scroll Lock 152 98 Pause 153 99 Break 154 9A Print Screen 155 9B SYSRQ 156 9C Tab 157 9D Windows 158 9E Menu 159 9F Up Arrow 160 A0 Down Arrow...

Page 147: ...panel s master volume to mute PWD Set the page flip password PWD sets the level 1 password only Syntax PWD page flip password Variables page flip password 1 50 ASCII characters Example SEND COMMAND Panel PWD Main Sets the page flip password to Main PWD Set the page flip password Password level is required and must be 1 4 Syntax PWD password level page flip password Variables password level 1 4 pag...

Page 148: ...ermined by available memory which is affected by things like how many lists are defined and how many items will be added for each list Data List Commands The TPI PRO DVI supports the following Data List Commands Data List Commands LDN Creates a new data list It is up to the program to make sure the list address and name are unique Syntax LDN list port list address column count list name Variables ...

Page 149: ...R list address uniflag primary data Variables list address address where data resides uniflag indicates unicode 0 No unicode 1 Uses unicode primary data the key data column The information in this column provides each row with its uniqueness Example SEND_COMMAND Device LDR 1 0 Entry5 Removes the text row with primary data Entry5 from an existing data list at address 1 LDC Clears all rows in a give...

Page 150: ... data in a single column field Modifies the data in a single column field This can be used to load a data list that has long text fields Syntax SEND_COMMAND DEV LDL list address column uniflag primary data data column Variables list address address where data resides column the starting column number first column is 1 uniflag indicates unicode 0 No unicode 1 Uses unicode primary data the key data ...

Page 151: ...umn to zero or data to none makes the filtered ordering the same as sorted ordering Update must be called for changes to take effect Syntax SEND_COMMAND DEV LVF view address uniflag column search data Variables view address the address of the view definition uniflag indicates unicode 0 No unicode 1 Uses unicode column the starting column number first column is 1 search data the data on which to fi...

Page 152: ... is the reverse bit 0x0002 which reverses the list whatever order it is currently in When used on a sorted list it results in a reverse sort When used on a reverse sorted list it results in a forward sorted list In most cases the reverse bit should not be used alone but should be used in combination with the sort bit 0x0003 such that it always results in a reverse sorted list Possible values for t...

Page 153: ...Example SEND_COMMAND Device LVS 3 5 2 1 Sets the column sort order to column 5 first then column 2 and then column 1 The data list is displayed according to the view definitions located at address 3 LVU Update any view currently looking at this list Update any view currently looking at this list Note This must be called after changes to list data Syntax SEND_COMMAND DEV LVU view address Variables ...

Page 154: ...ew resources Adds any and all resource parameters by sending embedded codes and data Since the embedded codes are preceded by a character any character contained in the URL must be escaped with a second character see example The file name field indicated by a F embedded code may contain special escape sequences as shown in the RAF RMF Embedded Codes table below Syntax RAF resource name data Variab...

Page 155: ...the resource Sports_Image file name to test jpg and the path to Lab_Test Images Note that the 5F in the file path is actually encoded as 5F RSR Change the refresh rate for a given resource Syntax RSR resource name refresh rate Variable resource name 1 50 ASCII characters refresh rate Measured in seconds Example SEND_COMMAND Panel RSR Sports_Image 5 Sets the refresh rate to 5 seconds for the given ...

Page 156: ...hose that have pattern matching as part of their filename Neither newest file nor pattern matching apply to HTTP Dynamic Images When set the panel will first pull a list of files matching the given pattern from the specified FTP server and path The timestamps of the items in the list will be compared with the newest one being displayed on the panel This is useful for source devices that place a un...

Page 157: ...R DISABLE Disables the TakeNote server This is the same as pressing the TakeNote Server disable button on the TakeNote Protected Setup page when the server is enabled Syntax SEND_COMMAND DEV TAKENOTESERVER DISABLE TNA AUTOEXPOSE Enables the TakeNote control autoexpose feature When enabled the TakeNote control window is automatically restored when drawing stops Autoexpose is only available when aut...

Page 158: ...r color to Blue ff and setting the pen color to Blue ff may result in slightly different shades of blue on screen This is true for any color used due to the reserved bits in the pen color This command should be sent to the remote TakeNote client DPS and not the TakeNote server PC App and or TPI PRO Syntax SEND_COMMAND DEV TNA PENCOLOR color Variable color The color you want to use for the pen See ...

Page 159: ...nt session to file Syntax SEND_COMMAND DEV TNA SAVE TNA SESSION Renames the current session Spaces and punctuation are allowed but discouraged Syntax SEND_COMMAND DEV TNA SESSION SessionName Variable SessionName the name you want to give to the session Example SEND_COMMAND Panel TNA SESSION Docket123456 TNA TEXT Displays a text string onscreen Maximum length of text is 1000 characters Use n for ca...

Page 160: ...Panel TNA TOOLTYPE polygon 7 TNA UNDO Undoes the previous TakeNote action Syntax SEND_COMMAND DEV TNA UNDO TNB CANVASCOLOR Sets the canvas color Valid values are the textual representation case insensitive or 0 2 Syntax SEND_COMMAND DEV TNB addr CANVASCOLOR canvas Variable addr The address of the device canvas Screen 0 White 1 Black 2 Example SEND_COMMAND Panel TNB 5 CANVASCOLOR White TNB CLEAR Cl...

Page 161: ... hexadecimal RGB code FF0000 Example 1 SEND_COMMAND Panel TNB 5 PENCOLOR Blue Example 2 SEND_COMMAND Panel TNB 5 PENCOLOR 00ff00 Note The color you submit may be adjusted internally for opacity If you submit a PENCOLOR request of white or FFFFFF you may not get the same value back however it will be close TNB PENOPACITY Sets the opacity of the pen This also sets the color picker opacity level for ...

Page 162: ...tax SEND_COMMAND DEV TNB addr TEXTSIZE size Variable addr The address of the device size The font size Valid range is 12 96 Example SEND_COMMAND Panel TNB 5 TEXTSIZE 50 TNB TOOLTYPE Sets the tool type for drawing Some of the commands are simple aliases for convenience For instance diamond is the same as polygon 4 Syntax SEND_COMMAND DEV TNB addr TOOLTYPE tool num sides Variable addr The address of...

Page 163: ...agename Variable pagename The page on which you want to show the TakeNote icon TNA commands control the local TakeNote client client server same physical box while TNB commands control the remote TakeNote clients TNB commands should be sent to the client DPS and NOT the TakeNote server TakeNote Query Commands TNA AUTOEXPOSE Queries the status of the TakeNote control autoexpose feature Syntax SEND_...

Page 164: ... pen style Syntax SEND_COMMAND DEV TNA PENSTYLE Example Response Custom Event ID 1 Type 1500 Flag 1 Value1 0 2 Text solid 0 dotted 1 dashed 2 TNA PENWIDTH Queries the current pen width Syntax SEND_COMMAND DEV TNA PENWIDTH Example response Custom Event ID 1 Type 1500 Flag 3 Value1 1 50 Text PenWidth TNA SESSION Queries the name of the current session Syntax SEND_COMMAND DEV TNA SESSION TNA TEXTSIZE...

Page 165: ...y of the pen Syntax SEND_COMMAND DEV TNB addr PENOPACITY Example SEND_COMMAND Panel TNB 5 PENOPACITY Example Response Custom Event ID 1 Type 1500 Flag 5 Value1 75 Text PenOpacity TNB PENSTYLE Queries the current pen style Syntax SEND_COMMAND DEV TNA addr PENSTYLE Example SEND_COMMAND Panel TNB 5 PENSTYLE Example Response Custom Event ID 1 Type 1500 Flag 1 Value1 0 2 Text solid 0 dotted 1 dashed 2 ...

Page 166: ...ont TNB TOOLTYPE Queries the current tool type Syntax SEND_COMMAND DEV TNB addr TOOLTYPE Example SEND_COMMAND Panel TNB 5 TOOLTYPE Example response Custom Event ID 1 Type 1500 Flag 6 Value1 8 Text Polygon Bargraph Text Code Inputs Code Bargraph Multi State Bargraph P Display the current percentage of the bargraph derived from the Adjusted Level Value as it falls between the Range Values Display th...

Page 167: ... what characters in an input mask will define what characters are allowed in any given position Example Format Display P 32 A out of R 32 out of 100 A of 0 R 32 of 0 100 V of L H 532 of 500 600 Force you to use correct type of characters i e numbers vs characters Limit the number of characters in a text area Suggest proper format with fixed characters Right to Left Required or Optional Change Forc...

Page 168: ...at after a user hits any of these keys proceed to the next text area input box Input Mask Operations Input Mask Operators change the behavior of the filed in the following way The number of the above characters used determines the length of the input masking box Example 0000 requires an entry requires digits to be used and allows only 4 characters to be entered used BIM Sets the input mask for the...

Page 169: ...lue Example 1 If you type 125 into a field accepting 0 100 then the values displayed will be 1 12 25 Example 2 If the max for the filed was 20 then the values displayed will be 1 12 5 When data overflows from a numerical field the overflow value is added to the previous field on the chain if the overflow character was specified In the above example if the overflow flag was set the first example wi...

Page 170: ...e the default port for http is 80 An alternative port could be specified as http www amx com 8080 company info home asp Special Escape Sequences The system has only a limited knowledge of URL formats in that it transparently passes the URL information onto the server for translation A user can then pass any parameters to the server side programs such as CGI scripts or active server pages However t...

Page 171: ...messages show mem Display the memory usage for all memory types requires msg on setup Display setup page on panel get cache enable Get the state of the image cache flash backup get cache expire Get current expiration time for image cache entries get cache size Get flash cache maximum size get cache Display all image cache parameters toggle cache enable Toggle the state of the image cache flash bac...

Page 172: ...Terminal Telnet Commands 166 TPI PRO DVI Total Presentation Interface ...

Page 173: ...n manual for detailed setup procedures Select the correct resolution touch drivers and calibrate the TPI PRO DVI see the Calibrating the TPI PRO DVI section on page 36 Configure your TPI PRO DVI for direct communication see the Configuring TPI PRO DVI IP Settings section on page 44 for details regarding Ethernet communication Verify that the TPI PRO DVI is powered and connected to the NetLinx Mast...

Page 174: ...2 In NetLinx Studio open the Master Communication Settings dialog FIG 82 3 Click Communications Settings to open the Communications Settings dialog FIG 83 4 Under Platform Selection select NetLinx Master 5 Click on Authentication Required if the Master is secured then enter a valid Username and Password 6 Under Transport Connection Option select TCP IP 7 Click Edit Settings to open the TCP IP Sett...

Page 175: ...f Addresses and click Edit to alter it s properties via the Edit TCP IP Properties dialog FIG 86 9 Click OK to close all open dialogs and save your settings 10 When the Master Communication Settings dialog is closed after changing settings NetLinx Studio prompts you with the following warning dialog FIG 87 FIG 84 NetLinx Studio TCP IP Settings dialog FIG 85 NetLinx Studio New TCP IP Setting dialog...

Page 176: ...rom the Master and apply the new settings 11 Open the Reboot the Master Controller dialog Tools Reboot the Master Controller and click Reboot to reboot the NetLinx Master and incorporate any changes FIG 88 12 When the dialog box replies with Reboot of system complete press Done 13 Click the OnLine Tree tab in the Workspace window to view the devices on the System The default System value is 1 one ...

Page 177: ...c Press the System Settings button to open the System Settings page FIG 89 2 Press the Master IP URL button to open the on screen keyboard and enter the Master s IP address or URL This information can be obtained from the Networking Addresses dialog in NetLinx Studio a In NetLinx Studio select Diagnostics Network Addresses to open the Network Addresses dialog FIG 90 b Click Get IP Information to r...

Page 178: ...TPI PRO DVI appears in the OnLine Tree tab of the Workspace window FIG 91 Click on the Display button to open the Online Tree context menu and select Refresh System to refresh the device tree The default System value is 1 The default TPI PRO DVI device number is 10001 2 Download the appropriate firmware KIT file to your PC 3 In NetLinx Studio select Tools Firmware Transfers Send to NetLinx Device ...

Page 179: ... Online Tree d Click Reboot Device to force the TPI PRO DVI to reboot after the firmware update process is complete e Click Send The file transfer progress is indicated in the Progress area of this dialog 4 Click Close after the TPI PRO DVI reboots FIG 92 Send to NetLinx Device dialog box showing TPI PRO DVI firmware update via IP Device number and System number must match the values listed in the...

Page 180: ...Upgrading Firmware 174 TPI PRO DVI Total Presentation Interface ...

Page 181: ...x Master s IP Address and System Number have been properly entered into the Master Connection section of the System Settings page see the Configuring the Master Connection Settings section on page 42 1 Open the G4 Web Control page FIG 93 a Press the front panel SETUP pushbutton to open the Setup page b Press Protected Setup to open the Protected Setup page This page is password protected Use the o...

Page 182: ... you begin Verify your NetLinx Master has the latest firmware KIT file loaded Set the Master s IP Address via NetLinx Studio version 2 8 or higher 1 Launch your web browser and enter the IP address of the target NetLinx Master into the Address field 2 Press the Enter key on your keyboard to begin the communication process between the Master and your PC Initially the Master Security option is disab...

Page 183: ...trol application contains the necessary Active X and VNC client applications necessary to properly view and control the unit s pages from your computer 7 Click on the G4 Touch Panel link associated with the target panel see FIG 94 This invokes a secondary browser window 8 In the Connection Details dialog box FIG 96 enter the VNC Server IP Address FIG 94 Manage WebControl Connections page indicatin...

Page 184: ... password to the TPI PRO DVI and begin the session A confirmation message appears stating Please wait Initial screen loading The secondary window becomes populated with the same G4 page being displayed on the target G4 panel A small circle appears within the on screen G4 panel page and corresponds to the location of the mouse cursor A left mouse click on the computer displayed panel page equates t...

Page 185: ...2 Enabling TakeNote on the TPI PRO DVI The TakeNote feature of the TPI PRO DVI must be enabled before TakeNote can be used 1 Open the TakeNote Control page FIG 98 a Press the front panel SETUP pushbutton to open the Setup page b Press Protected Setup to open the Protected Setup page This page is password protected Use the on screen keypad to enter the default password 1988 Press Done to close the ...

Page 186: ...0 TakeNote Menu Bar detailed view Press to access the TakeNote menu bar Clear all annotations from every client Undo last annotation Redo last annotation Draw freehand curved line Draw straight line Draw a rectangle Draw an oval Select Object tool Save Delete selected object Name this annotation session click to open an on screen keyboard Access the Shape Menu Bar Click and drag to adjust the font...

Page 187: ...on page 189 for details Drawing a Rectangle 1 Select the Rectangle tool from the TakeNote Menu Bar see FIG 100 on page 180 2 Using touch the mouse or other pointing device draw as desired The rectangle is drawn on screen using the current Pen settings as set in the Pen Menu Bar Refer to the Pen Options Menu Bar section on page 189 for details Drawing an Oval 1 Select the Oval tool from the TakeNot...

Page 188: ...cted to move or delete using the Select Object tool Use the Select Object tool to select any annotation object Line Shape or Text on the screen FIG 103 Once selected the object can be moved or deleted see below FIG 102 Drawing annotations examples Curved Line Straight Lines Rectangles Ovals All lines shapes and text annotations are treated as Objects in TakeNote Once they are on screen each line c...

Page 189: ...FIG 104 Using the Pointer Select the Pointer tool to place a pointer on the screen in the form of a colored dot that can be moved on screen via the pointing device i e the mouse The pointer is displayed only when the primary select button on the pointing device is enabled i e the left mouse button is clicked or the touchscreen is touched This allows you to point to specific areas on screen without...

Page 190: ...the TPI PRO DVI see the Wiring and Device Connections section on page 15 The TPI PRO DVI automatically detects the first USB stick to be inserted into any of the USB Type A Input ports two available on the front panel two more available on the rear panel refer to FIG 4 and FIG 5 on page 15 2 Press the Save button on the Main TakeNote Menu Bar This action will cause the screen to refresh 3 Once the...

Page 191: ... Menu Bar see FIG 100 on page 180 to access the Shape Menu Bar shown in FIG 108 Drawing a Shape Select one of the shape icons triangle diamond or hexagon then click and drag to draw the selected shape Triangles The triangle tool draws isosceles triangles with a straight line at the bottom relative to the cursor position FIG 109 FIG 108 TakeNote Shape Menu Bar FIG 109 Drawing Triangles Draw a trian...

Page 192: ...s in the Pen Options Menu Bar to set the color of each shape before adding it to the screen Use the Rectangle tool see FIG 101 on page 181 to draw squares and rectangles FIG 111 Drawing Hexagons FIG 112 Adding Push Pin Icons FIG 113 Adding Arrow Icons Click and drag to define the shape of the Hexagon Use the color options in the Pen Options Menu Bar to set the color of each shape before adding it ...

Page 193: ...reate and edit text annotations To type press on each letter or symbol button and click Done when finished Arrow and Push Pin icons are drawn using the color that is currently selected in the Pen Options Menu Bar To place different colors of icons select the Push Pin or Arrow icon tool then open the Pen Options Menu Bar This allows you to change the color of the icons before placing each one on th...

Page 194: ... 2 Set the text Color and Opacity using the options in the Pen Options Menu Bar refer to the Pen Options Menu Bar section on page 189 3 Press the Keyboard button to open the TakeNote Text Keyboard see FIG 115 on page 187 4 Press the character buttons on the on screen keyboard The entered text is displayed in the Text Window of the Keyboard 5 When finished entering the text that you want to appear ...

Page 195: ...nd shapes For example if you have selected Dotted as the line Type Yellow as the line Color 10 as the line Width and Opacity set to 50 then all lines including the lines used to draw shapes will be yellow dotted lines with a width of 10 and opacity of 50 until these attributes are changed The Color and Opacity settings also apply to Text annotations FIG 117 Pen Options Menu Bar Draw a solid line D...

Page 196: ...ar Press the Canvas button on the TakeNote Menu Bar to access the Canvas Options Menu Bar FIG 118 The options in this menu apply to the super imposed drawing layer used by TakeNote for annotations White Press to use a white canvas overlay Black Press to use a black canvas overlay Screen Press to use a totally transparent overlay default setting In this case the canvas is invisible Working With Opa...

Page 197: ...in the system generated file names applied to all saved screen images See the Using the Save Tool section on page 184 for details Hiding TakeNote You can temporarily hide the TakeNote Menu Bar TakeNote annotations or both Hiding TakeNote removes the TakeNote display from the screen but does not delete any annotations Hiding the TakeNote Menu Bar To hide the TakeNote Menu Bar while continuing to di...

Page 198: ...Web Server is enabled in the TakeNote Control page as shown in FIG 122 2 From a PC connected to the LAN on which the TPI PRO DVI resides FIG 121 TakeNote Menu Bar and annotations hidden Click the TakeNote icon to hide the Menu Bar as well as all annotations Click the TakeNote icon again to show the Menu Bar and all annotations By default the TPI PRO DVI is configured to save captured TakeNote scre...

Page 199: ...e Menu Refresh Select to refresh the image list Image Menu Download Image This option allows you to download selected the image to a local directory The application will prompt you for a target directory for the file Print Image This option allows you to print the selected image Open Image In New Window This option opens the selected image in a new window or tab in your browser Display Image Infor...

Page 200: ...ut This option opens the About AMX TakeNote dialog containing version and copyright information on the application AMX Website This option opens the AMX Website www amx com in a new window or tab in your browser FIG 124 Thumbnail Images AMX TakeNote Toolbar Download With an image selected press the Download button to download the image to a local directory The application will prompt you for a tar...

Page 201: ... the image list 2 In the Thumbnail Images window select a file that you want to save to a local directory on your PC or LAN 3 Press the Download button FIG 126 Alternatively select Image Download Image from the Menu Bar 4 The application prompts you to specify a target directory for the image JPG file FIG 127 FIG 125 Preview Image Hold the mouse cursor over the preview image to invoke a Image Info...

Page 202: ...nterface 5 Select a target directory and click Save 6 The application notifies you that the file has been saved FIG 128 7 Click Close to return to the main application window FIG 127 Select Location for Download dialog FIG 128 Download Image File dialog ...

Page 203: ... Deleting Captured TakeNote Image Files 1 Launch the AMX TakeNote Web application If the application is already open select File Refresh to refresh the image list 2 In the Thumbnail Images window place a check in the checkbox of each image file that you want to permanently delete from the TPI PRO DVI s local disk FIG 130 3 Press the Delete button FIG 126 Alternatively select Image Delete Image fro...

Page 204: ... action before deleting any files via the Delete Selected Images dialog FIG 132 5 Click Yes to proceed 6 The application notifies you that the selected file s have been deleted FIG 133 7 Click Close to return to the main application window FIG 132 Delete Selected Images dialog FIG 133 Delete Images dialog ...

Page 205: ...0 VESA CVT 720x576 50 576p CEA 861 1360x768 60 VESA DMT 800x500 60 VESA CVT 1400x1050 60 VESA CVT 800x600 56 VESA DMT 1400x1050 60 rb VESA CVTR 800x600 60 VESA DMT 1400x1050 75 VESA CVT 800x600 72 VESA DMT 1440x900 60 VESA CVT 800x600 75 VESA DMT 1440x900 60 rb VESA CVTR 800x600 85 VESA DMT 1440x900 75 VESA CVT 848x477 60 VESA CVT 1440x900 85 VESA CVT 848x480 60 VESA DMT 1600x1200 60 VESA DMT 848x...

Page 206: ...M 1920x1080 50 SMPTE 295M 1920x1080 60 SMPTE 274M Supported Output Modes Resolution Standard Command 640x480 60 VESA DMT ORES 640x480 60 640x480 72 VESA DMT ORES 640x480 72 640x480 75 VESA DMT ORES 640x480 75 800x600 60 VESA DMT ORES 800x600 60 800x600 72 VESA DMT ORES 800x600 72 800x600 75 VESA DMT ORES 800x600 75 848x480 60 VESA DMT ORES 848x480 60 1024x768 60 VESA DMT ORES 1024x768 60 1024x768 ...

Page 207: ...ngs Standard output modes for TPI PRO DVI only Resolution Standard Command 720x480 60 CEA861 ORES 720x480 60 CEA 720x576 50 CEA861 ORES 720x576 50 CEA 1280x720 50 CEA861 ORES 1280x720 50 CEA 1280x720 60 CEA861 ORES 1280x720 60 CEA 1920x1080 50 CEA861 ORES 1920x1080 50 CEA 1920x1080 60 CEA861 ORES 1920x1080 60 CEA Extended CEA refresh rates are recommended for DVI outputs and may not work reliably ...

Page 208: ...Supported Input and Output Modes 202 TPI PRO DVI Total Presentation Interface ...

Page 209: ...raph Text Code Inputs Code Bargraph Multi State Bargraph P Display the current percentage of the bargraph derived from the Adjusted Level Value as it falls between the Range Values Display the current percentage of the bargraph derived from the Adjusted Level Value as it falls between the Range Values V Raw Level Value Raw Level Value L Range Low Value Range Low Value H Range High Value Range High...

Page 210: ...a text area Suggest proper format with fixed characters Right to Left Required or Optional Change Force a Case Create multiple logical fields Specify range of characters number for each field Limit you to a choice of selections Handle complex input tasks such as names days of the week or months by name Perform complex validation such as Subnet Mask validation Character Types Character Masking Rule...

Page 211: ...e one of the following characters as a literal character precede that character with a back slash Text entry operation using Input Masks A keyboard entry using normal text entry is straightforward However once an input mask is applied the behavior of the keyboard needs to change to accommodate the input mask s requirement When working with masks any literal characters in the mask will be skipped b...

Page 212: ...When entering time in a 12 hour format entry of AM and PM is required Instead of adding AM PM to the input mask specification the AM PM should be handled within the NetLinx code This allows a programmer to show hide and provide discrete feedback for AM and PM Input Mask Output Examples The following are some common input masking examples URL Resources A URL can be broken into several parts For exa...

Page 213: ... it replaces that code with a particular piece of panel button or state information For example http www amx com img asp device DV becomes http www amx com img asp device 10001 Other used escape sequences include Escape Sequences Sequence Panel Information DV Device Number SY System Number IP IP Address HN Host Name MC Mac Address ID Neuron ID PX X Resolution of current panel mode file PY Y Resolu...

Page 214: ...Appendix 208 TPI PRO DVI Total Presentation Interface ...

Page 215: ... available visible space on the panel monitor After completing those tasks use the monitor s video controls to stretch and move the incoming video so that the borders of the desired resolution pattern follow the edges of the screen without disappearing There are normally 60 seconds before the resolution times out but you can press the front panel RESOLUTION button again several time to return to t...

Page 216: ...vice already contains a large enough file subsequent downloads will take up more space than is available and could often corrupt the disk The demo file that typically ships with G4 panels is one such file Solution DO NOT download TPD4 files of large size over the demo pages or any other large TPD4 file First download a small blank one page file to the G4 panel using the Normal Transfer option to s...

Page 217: ...Troubleshooting 203 TPI PRO Total Presentation Interface ...

Page 218: ...registered trademarks of AMX AMX reserves the right to alter specifications without notice at any time It s Your World Take Control 3000 RESEARCH DRIVE RICHARDSON TX 75082 USA 800 222 0193 469 624 8000 469 624 7153 fax 800 932 6993 technical support www amx com ...

Reviews: