


Using CX-Supervisor with OPC Servers SECTION 17 Using CX-Supervisor as an OPC
249
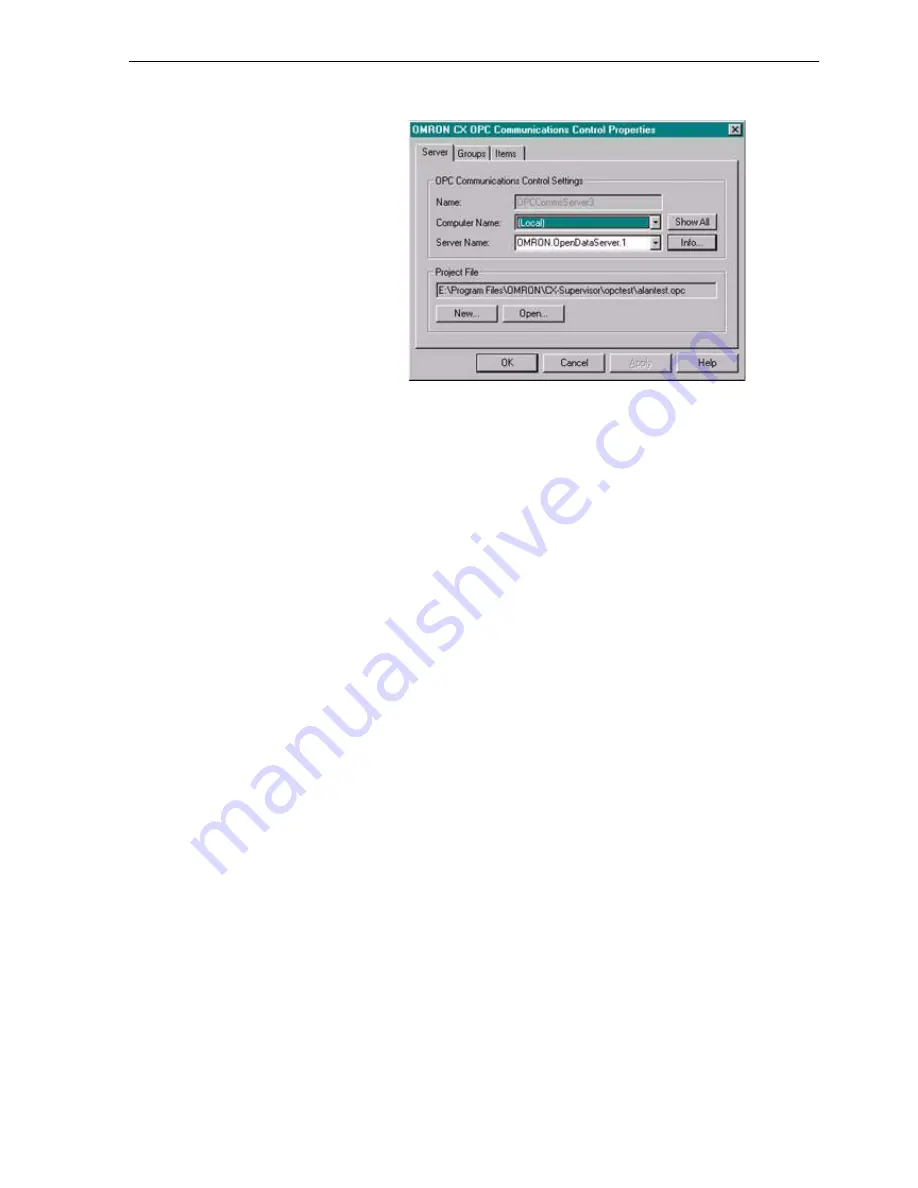
OPC Communication Control Settings
Name: - This is the name of the selected communications control. The
default name for the first control is
OMRONCXOPCCommunicationsControl. For each additional control
added the number increments by one.
Computer Name
: - This shows the system name for the computer with
the OPC server. If the server is on the same computer as CX-Supervisor,
set to '(Local)'. If the OPC server is on a remote computer click the Show
All button and select the correct name from the list. If you cannot identify
the PC in the list contact your system administrator.
Server Name
: - This shows the names of the OPC Version 2 compliant
servers installed on the specified computer. Make your selection from the
drop down list. Clicking the Info button opens the Server Status
Information dialog box for the selected server, check the information is
correct and click the OK button.
Project File
: - This is the name of the current Project file which stores the
setup of the OPC items. If no name is shown or it is incorrect click the New
or Open button as appropriate.
Clicking the Open… button opens the Open Project dialog box from where
you can navigate to the project file you wish to open. If you want to create
a new file click the New… button to open the Create Project dialog box. In
the Create Project dialog box navigate to the directory in which you want
to create your new file and enter your File Name. Select the appropriate
file type (Save as type - i.e. File Name.opc) and click the Save button.
(B) GROUPS TAB
The groups within the selected project file are listed. A Group is made up
of one or more items (data points) that share a common update, rate
enabling them to be controlled as a single entity. For example you could
create any number of groups each containing Items that have the same
update rate.
There is no limit to the number of groups you can have in a Project File
and each group can contain any number or type of Items (data points)
provided they have the same update rate.
Note:
If the server is not shown in the drop down list, the server may not be fully
OPC version 2 compliant. Check the server documentation.
Note:
A Project File name can not be entered from the keyboard. File names
can only be entered by using the New or Open buttons.
Содержание CX-Supervisor
Страница 1: ...CX Supervisor Software Cat No W10E EN 01 User Manual Software Release 3 1...
Страница 3: ...Copyright Notice 2...
Страница 16: ...15...
Страница 17: ...16...
Страница 27: ...Tip of the Day SECTION 1 Graphics Editor 26...
Страница 35: ...CX Supervisor Preferences SECTION 2 Pages 34...
Страница 79: ...Responding to Events SECTION 5 ActiveX Objects 78...
Страница 115: ...Printing the Graphics Library SECTION 7 Graphics Library 114...
Страница 181: ...Data Logging SECTION 11 Data Logging 180...
Страница 201: ...Examples SECTION 12 Databases 200...
Страница 243: ...Performance Monitor SECTION 16 Application Analysis Performance Monitor 242...
Страница 253: ...Using with Omron s CX Server OPC SECTION 17 Using CX Supervisor as an OPC Cli 252...
Страница 259: ...Creating a CX Supervisor Client application SECTION 18 Connecting to a remote CX 258...
Страница 263: ...Adding a Point Linked to a Parameter SECTION 19 Connecting to Omron Industrial 262...
Страница 271: ...Data Logging SECTION 20 Best Practices 270...
Страница 275: ...Configuring a Server PC running Windows NT or 2000 Appendix A Configuring a PC 274...
Страница 277: ...Appendix B Frequently Asked Questions 276...
Страница 296: ...Appendix B Frequently Asked Questions 295...
Страница 297: ...Appendix B Frequently Asked Questions 296...
Страница 298: ...Appendix B Frequently Asked Questions 297...
Страница 299: ...Appendix B Frequently Asked Questions 298...
Страница 333: ...Revision history 332...


