Creating and Editing Control Objects
SECTION 4 Objects
56
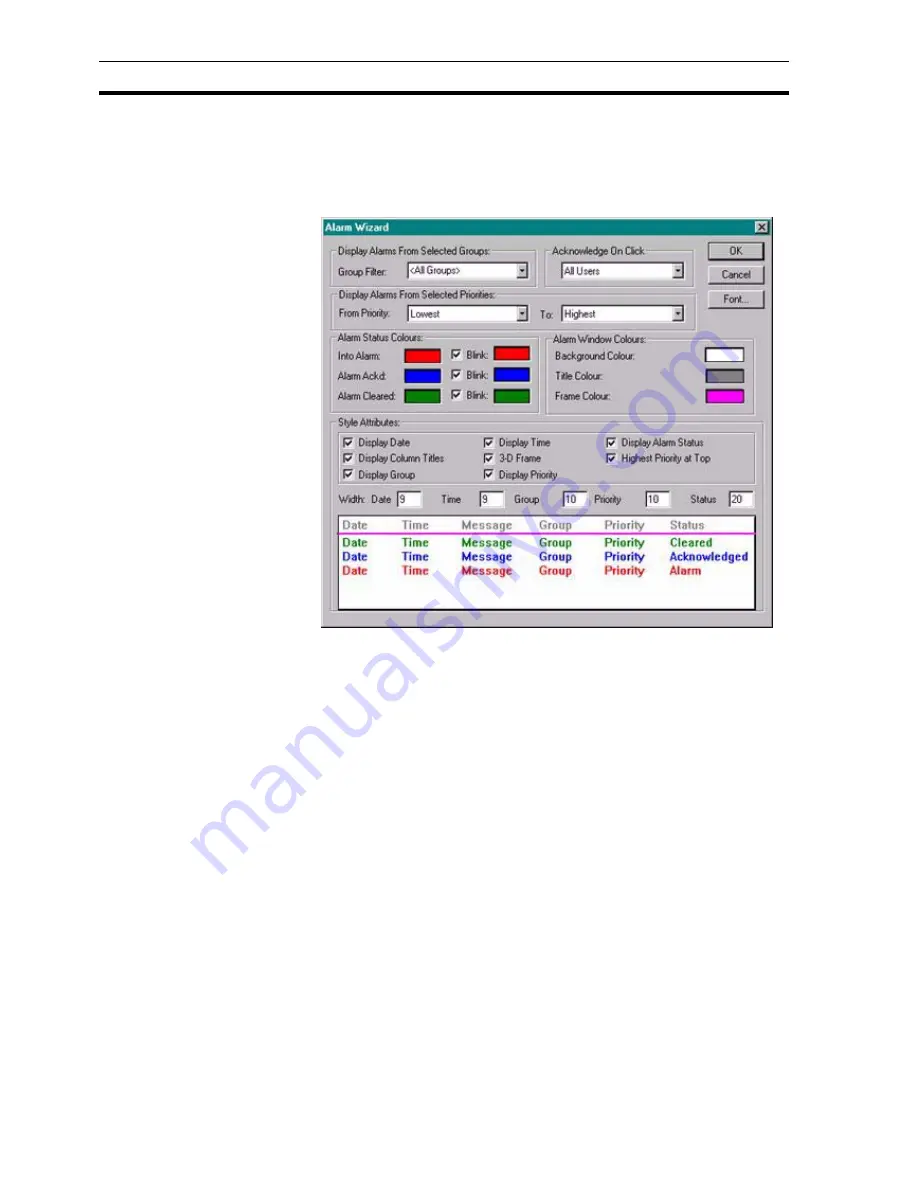
The Alarm object displays alarm messages in runtime. These messages may
be optionally filtered by an alarm group and can be formatted to include the
date, time and status of the alarm. If there are more alarms to view than the
space provided then you can scroll the alarm view.
To edit an Alarm object, double click on it. The Alarm Wizard dialog box opens:
Alarms are defined using the Alarm Editor; refer to chapter 8, Alarms for
information on using the Alarm Editor.
The Alarm Wizard allows entry of the alarm group filter, alarm status colour
codes and various style attributes. The Alarm Wizard presents a preview of
the alarm object, which immediately updates to show the user selections as
they are made.
1, 2, 3…
1. Select the name of the alarm group by which alarm messages are to be
filtered using the
Group
field to display the list of available groups. The
default selection is <All Groups>, which displays all alarm messages.
To display more than one group use the * wildcard character e.g. Group1*
will include all groups starting Group1.
2. From the
Acknowledge On Click
options select the level of security that
is required for acknowledgement. The default is
All Users
.
3. From the
Display Alarms
from
Selected Priorities
, options select the
range of alarms that are to be displayed. The default selections are from
the
Lowest
to the Highest.
Note that the range 'From' must be the same or lower than the range 'To'.
Use the check box 'Highest Priority at Top' to reverse the alarm order.
4. In
Alarm Status Colours
, the colour codes for each of the three alarm
states and blinking colours may be specified by clicking the appropriate
colour box and selecting a new colour from the resultant
Colour
dialog
box.
Содержание CX-Supervisor
Страница 1: ...CX Supervisor Software Cat No W10E EN 01 User Manual Software Release 3 1...
Страница 3: ...Copyright Notice 2...
Страница 16: ...15...
Страница 17: ...16...
Страница 27: ...Tip of the Day SECTION 1 Graphics Editor 26...
Страница 35: ...CX Supervisor Preferences SECTION 2 Pages 34...
Страница 79: ...Responding to Events SECTION 5 ActiveX Objects 78...
Страница 115: ...Printing the Graphics Library SECTION 7 Graphics Library 114...
Страница 181: ...Data Logging SECTION 11 Data Logging 180...
Страница 201: ...Examples SECTION 12 Databases 200...
Страница 243: ...Performance Monitor SECTION 16 Application Analysis Performance Monitor 242...
Страница 253: ...Using with Omron s CX Server OPC SECTION 17 Using CX Supervisor as an OPC Cli 252...
Страница 259: ...Creating a CX Supervisor Client application SECTION 18 Connecting to a remote CX 258...
Страница 263: ...Adding a Point Linked to a Parameter SECTION 19 Connecting to Omron Industrial 262...
Страница 271: ...Data Logging SECTION 20 Best Practices 270...
Страница 275: ...Configuring a Server PC running Windows NT or 2000 Appendix A Configuring a PC 274...
Страница 277: ...Appendix B Frequently Asked Questions 276...
Страница 296: ...Appendix B Frequently Asked Questions 295...
Страница 297: ...Appendix B Frequently Asked Questions 296...
Страница 298: ...Appendix B Frequently Asked Questions 297...
Страница 299: ...Appendix B Frequently Asked Questions 298...
Страница 333: ...Revision history 332...


