Creating a New Alarm
SECTION 8 Alarms
120
An expression based on a point is entered in the Expression: field. The alarm
is raised if the value exposed by the expression increases or decreases at the
speed based on the values of the ROC: field, the T/Base: field, and the
direction based on the Direction: field. The alarm is cleared when the rate-of-
change is less than the critical rate.
For the above example an alarm is raised when the boiler's temperature
increases by 5% or more per minute, and clears when the boiler's temperature
increases by less than 5% per minute.
A point may be inserted into any of the alarm types' Expression: field by either
typing in the point name or by selecting the Browse button, which results in the
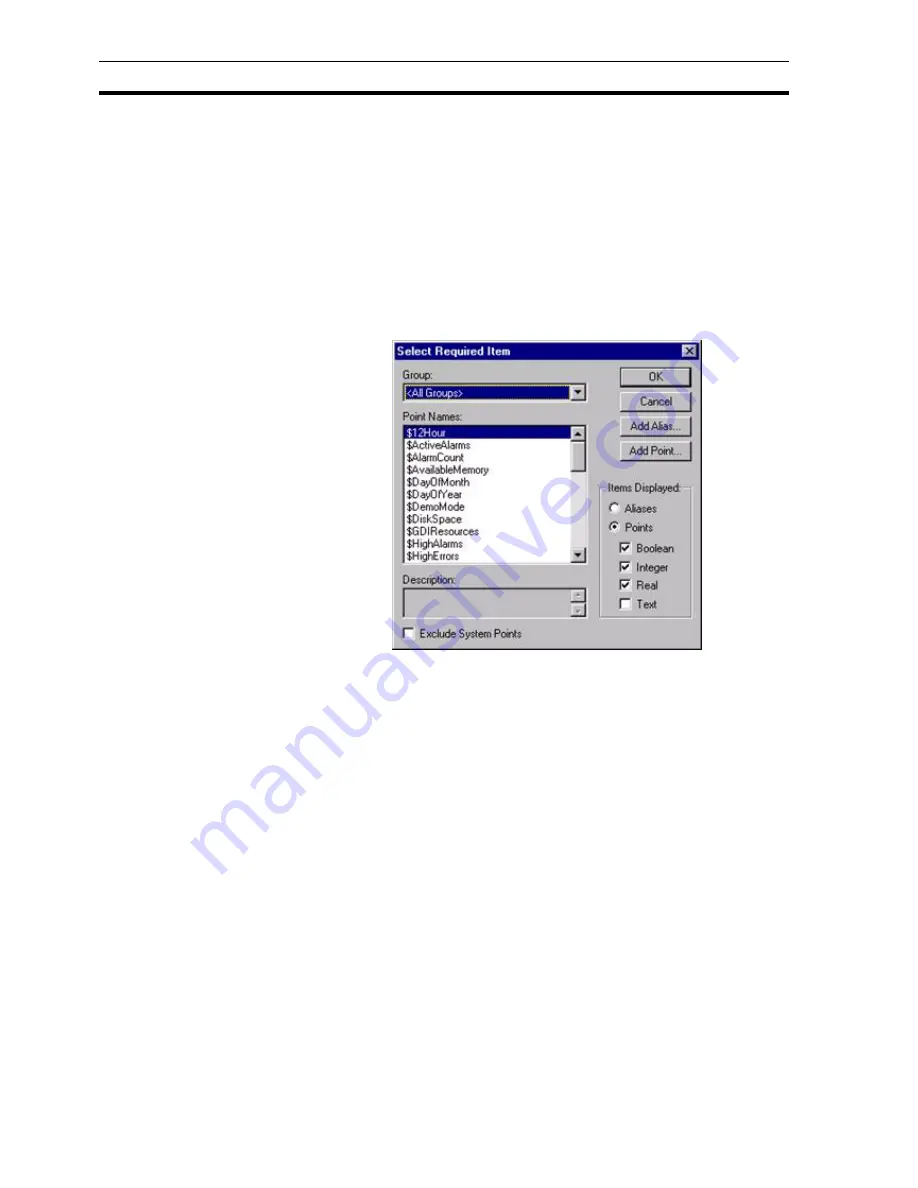
Select Required Item dialog box being displayed, at the position where a point
should be inserted.
Only viable points can be viewed from a Select Required Item dialog box. The
list of items in the Point Names: field can be refined by selecting an option
from the Group: field. Click the OK button to accept the new point or click the
Cancel button to leave the point unchanged. Clicking the Add Point button or
Add Alias button allows a new point or alias to be created prior to association
with the expression. Points are discussed in chapter 3, Points, while
expression syntax is discussed in the CX-Supervisor Script Language
Reference Manual.
8-4-2-2
Alarm Messages
A message pertaining to a raised alarm is entered in the Raised: field. The
content of the field should be descriptive to provide the user with a reasonable
basis for an alarm solution.
The Alarm Editor provides a default raised message. The name of the alarm is
substituted for the # character in the message text when the
OK
button is
clicked. The raised message may be changed at any time simply by entering
the desired message in the text field.
A message associated with the alarm can also be entered in the Normal: field
in the same manner to that above; this message opens once an alarm
condition has been rectified and normal conditions have been resumed.
The Alarm Editor provides a default normal message. The name of the alarm
is substituted for the # character in the message text when the
OK
button is
clicked. The normal message may be changed at any time simply by entering
the desired message in the text field.
Содержание CX-Supervisor
Страница 1: ...CX Supervisor Software Cat No W10E EN 01 User Manual Software Release 3 1...
Страница 3: ...Copyright Notice 2...
Страница 16: ...15...
Страница 17: ...16...
Страница 27: ...Tip of the Day SECTION 1 Graphics Editor 26...
Страница 35: ...CX Supervisor Preferences SECTION 2 Pages 34...
Страница 79: ...Responding to Events SECTION 5 ActiveX Objects 78...
Страница 115: ...Printing the Graphics Library SECTION 7 Graphics Library 114...
Страница 181: ...Data Logging SECTION 11 Data Logging 180...
Страница 201: ...Examples SECTION 12 Databases 200...
Страница 243: ...Performance Monitor SECTION 16 Application Analysis Performance Monitor 242...
Страница 253: ...Using with Omron s CX Server OPC SECTION 17 Using CX Supervisor as an OPC Cli 252...
Страница 259: ...Creating a CX Supervisor Client application SECTION 18 Connecting to a remote CX 258...
Страница 263: ...Adding a Point Linked to a Parameter SECTION 19 Connecting to Omron Industrial 262...
Страница 271: ...Data Logging SECTION 20 Best Practices 270...
Страница 275: ...Configuring a Server PC running Windows NT or 2000 Appendix A Configuring a PC 274...
Страница 277: ...Appendix B Frequently Asked Questions 276...
Страница 296: ...Appendix B Frequently Asked Questions 295...
Страница 297: ...Appendix B Frequently Asked Questions 296...
Страница 298: ...Appendix B Frequently Asked Questions 297...
Страница 299: ...Appendix B Frequently Asked Questions 298...
Страница 333: ...Revision history 332...