3860/80 User’s Manual
11-8
Installing the Print Head
1. Plug the print head connector into the receptacle in the carriage. Make sure it is firmly connected.
2. Place the print head on the carriage.
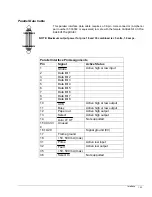
3. Insert the two small locating pegs on the top of the carriage into the two mating holes on the bottom of the
print head.
4. Make sure the black ground wire is under the left-hand screw.
5. Start the print head screws by hand and then use a 5.5 mm hex driver or a Phillips screwdriver to tighten.
6. Reinstall the ribbon cartridge.
7. Replace the top door.
8. Plug the printer into the wall outlet.
9. Turn the printer on and load paper (Press
FF/LOAD
button). If the form is loaded and the fault light stays
on, then press the
CLEAR
button.
10. For Automatic Print Gap Models, go to step 12.
11. For Manual Print Gap, adjust the print gap. See “Print Gap Fine Adjust” in Chapter 2 of the User’s
Manual.
12. Check the flight-time compensation by referring to the section of the document titled “
3860/3870/3880
Models Flight-Time Compensation
”.
PEG
PEG
HOLE
HOLE


