


Program parameter editing
37
Program parameter editing
Synth parameter editing
This section explains how to edit the synthesis parameters that make up an individual timbre.
The following section assumes that you have started by pressing the front panel TIMBRE SELECT [1] button
to select timbre 1 as the object of editing, and that you are in the Program Edit mode.
You must press the [WRITE] button to write the program if you want to save the results of your
editing. If you don’t Write your changes, they will be lost.
Changing the voice assign mode
Here you can set the timbre to play in a monophonic or polyphonic style. Selecting mono will cause other
“mono-related” parameters to appear.
1
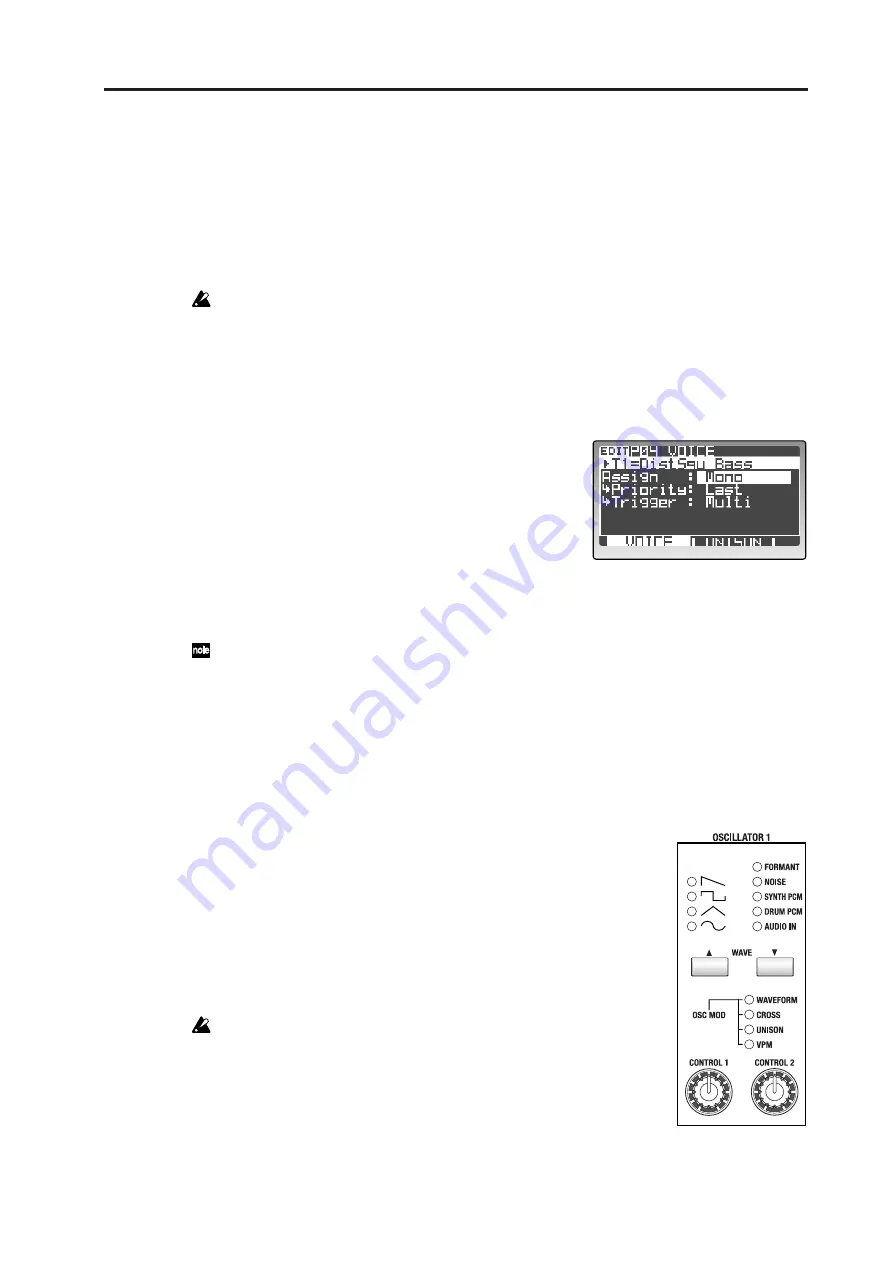
Go to the P04–1: VOICE – VOICE tab page.
2
In “Assign,” specify how the timbre will be sounded.
Choose Poly if you want to be able to play chords, or
Mono if you want to play only single notes.
3
If “Assign” is set to “Mono,” you can also specify
“Priority” and “Trigger.”
“Priority” specifies the key that will be given priority
when you hold down more than one key at a time.
“Trigger” specifies how subsequent notes will be triggered when you play the next note before
releasing the previously played key.
If you want to get a richer sound, use the front panel [UNISON] button to turn on the Unison func-
tion. This function stacks multiple notes together. In the P04–2: VOICE – UNISON tab page you can
specify the number of notes that will be stacked. (
Oscillator settings
Here’s how to set the oscillator parameters that are the basis of the timbre.
Oscillator 1 settings
1
Use the OSCILLATOR 1 WAVE buttons to select the waveform for
oscillator 1.
Use these buttons to step through the waveforms. The LED of the
selected waveform will light. You can choose one of nine different
waveforms, including an external audio input (AUDIO IN).
2
Use the OSCILLATOR 1 [OSC MOD] button to select the type of
modulation being applied to oscillator 1.
The type will switch each time you press the button, and the LED for
the selected modulation type will light. You can choose one of four
modulation types.
If you’ve selected FORMANT, NOISE, SYNTH PCM, DRUM PCM, or
AUDIO IN as the waveform, the only available modulation type will
be WAVEFORM.
3
Use the [CONTROL 1] and [CONTROL 2] knobs to specify the
waveform parameters.
The parameters that are controlled by the [CONTROL 1] knob and
[CONTROL 2] will depend on the waveform and the modulation type
you’ve selected.
For details on the oscillator parameters, refer to p.81 “P06–1: OSC 1.”
Summary of Contents for MMT RADIAS
Page 1: ...2 E Owner s Manual...
Page 6: ...Table of Contents vi...
Page 7: ...Operation Introduction Front and rear panels Setup Quick Start Editing...
Page 78: ...Editing 72...
Page 79: ...Parameter Program parameters Drum parameters Global parameters Effect guide...
Page 150: ...Effect guide 144...
Page 151: ...Appendices...