Korg MMT RADIAS Owner'S Manual Download Page 30

Quick Start

24

Step Sequencer

You can use the two step sequencers to record and play back a phrase or pattern.

This section explains how to play a step sequence and make some simple edits. For details on recording and 
editing, refer to p.50 “Step sequencer recording and editing.”

Playing a program using the step sequencer

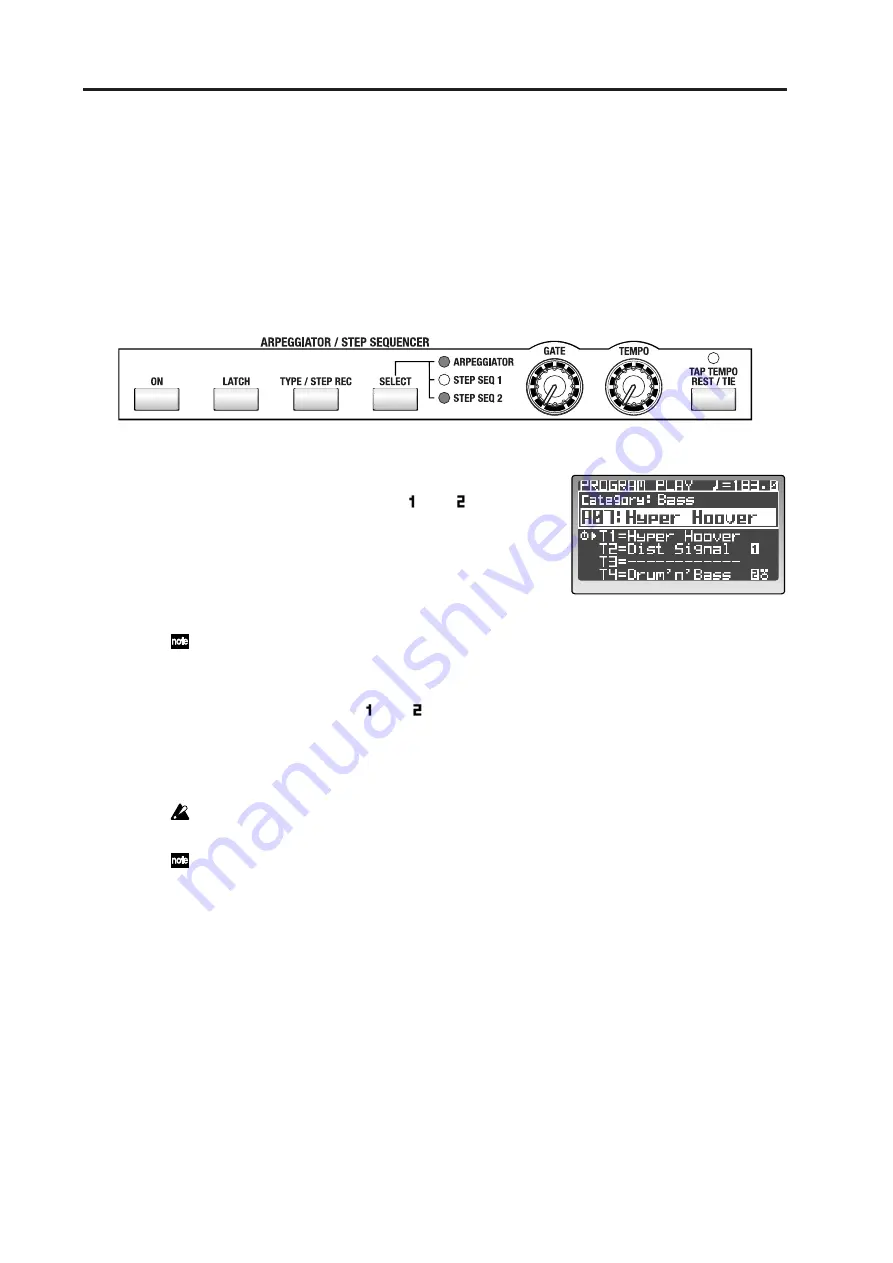
Some of the factory programs already contain sequence data. For this example, we can select and play one 
of these programs.

1

Select a program from the “Arp/Seq” category that 
has a step sequence assigned to one of the timbres.
If a step sequencer is assigned, a “

” or “

” will be 

displayed at the right of the timbre name.

p.21 “Selecting programs by category”

2

If the ARPEGGIATOR/STEP SEQUENCER [ON] but-
ton is not lit, press the [ON] button to make it light.
The button will light when turned on.

If the arpeggiator is assigned to another timbre, the arpeggiator will also be switched on/off at this 
time.

3

Press the TIMBRE SELECT [1]–[4] button of the timbre being played by the step sequencer.
Select a timbre which has “

” or “

” displayed to the right of the timbre name. The selected tim-

bre button will blink.

4

Hold down a key on the keyboard.
The step sequencer will begin playing.

If the step sequencer does not begin playing, try playing other notes of the keyboard. Some pro-
grams may limit the range of notes that triggers the step sequencer.

If you are playing the RADIAS on its own without connecting its dedicated keyboard, you can set 
the 16KEYS [SELECT] button to KEYBOARD, and use the 16KEYS [1]–[16] to make the step se-
quencer play.

Other settings for the step sequencers

In addition to the settings mentioned above, you can link step sequencers 1 and 2, adjust the length of the 
steps, specify the “Run Mode,” transposition, scan zone, resolution, swing, the gate time for each step, ve-
locity and the note numbers that will be played. For details on these parameters, refer to p.50 “Step sequenc-
er recording and editing,” and p.99 “5. Step Sequencer.”

Summary of Contents for MMT RADIAS

Page 1: ...2 E Owner s Manual...

Page 2: ...ckering or moire patterns may be visible Data handling Malfunctions due to incorrect operation may cause the contents of memory to be lost so we recommend that you save important data on an external d...

Page 3: ...settings The explanations are organized by page for each mode Refer to this section when an unfamiliar parameter appears or when you would like to learn more about the functions Appendices This sectio...

Page 4: ...am Play mode 29 Editing in the Program Edit mode 29 Compare function 32 Saving an edited program 32 Loading other timbre sounds The Template function 33 Assigning a name 34 Program parameter editing 3...

Page 5: ...P03 PRELOAD 116 P04 MIDI 116 P05 MIDI DUMP 117 P06 MIDI FILTER 118 P07 MIDI MAP 118 P08 PEDAL SW 119 P09 USER SCALE 120 P10 CATEGORY NAME 120 P11 CALIB A SW 120 P12 CALIB A PEDAL 120 Effect guide 121...

Page 6: ...Table of Contents vi...

Page 7: ...Operation Introduction Front and rear panels Setup Quick Start Editing...

Page 8: ...ant Motion function uses filter banks to analyze the input signal the modulator and records up to seven seconds of formant motion data By using the play back of this recorded formant motion data you c...

Page 9: ...two insert effects for each timbre and one master effect for each program The RADIAS includes 128 editable Insert effect programs and 128 editable Master effect pro grams created using thirty differen...

Page 10: ...an use the front panel knobs and buttons to modify the sound and use the arpeggiator step sequencer and modulation sequencer to embellish your performance You can also use the vocoder in the Program P...

Page 11: ...ollower A drum kit can also be assigned to one of the timbres Synthesizer Timbre 1 Synth Audio In 1 Envelope Follower Synth Synth Drumkit Vocoder EQ EQ EQ EQ I FX1 2 I FX1 2 I FX1 2 I FX1 2 Arpeggiato...

Page 12: ...o the filter FILTER Filter FILTER1 FILTER2 The filter section consists of two multi mode resonant filters The two filters can be routed in series or par allel or even side by side in a one oscillator...

Page 13: ...iator step sequences etc or to an external MIDI clock Tempo Sync effects can be con veniently set as note values Half note quarter note etc Arpeggiator ARPEGGIATOR and Step Sequencer STEP SEQUENCER Ea...

Page 14: ...om each analysis filter is applied to each synthesis filter to modulate the sound pro ducing the impression that the carrier sound is talking the typical vocoder effect You can use the FORMANT SHIFT a...

Page 15: ...y be assigned a drum kit By assigned that timbre to be played by the arpeggiator or one of the step sequences you can create a program that provides a rhythmic accompaniment to your performance p 64 K...

Page 16: ...WAVE buttons These select the waveform for oscillator 1 The LED for the selected waveform will light OSC MOD buttons Selects the modulation type The LED for the selected modulation type will light CON...

Page 17: ...filter used by filter 2 FRMNT SHIFT When editing vocoder settings this ad justs the amount of formant shift 11 FILTER COMMON SELECT button Selects which filter will be affected by adjusting the EG1 I...

Page 18: ...nt we will refer to the cursor button or cursor button PROGRAM button Press this button to enter the Program Play mode DRUM button Press this button to enter the Drum Play mode GLOBAL button Press thi...

Page 19: ...SELECT button which can be set to ARPEGGIATOR STEP SEQ 1 or STEP SEQ 2 If ARPEGGIATOR is select ed pressing this button will scroll through the different arpeggiator types If STEP SEQ 1 or 2 is selec...

Page 20: ...epend on the state of the SELECT button If the SELECT button is set to PROGRAM these but tons will select the program bank or drum kit Drum Play mode If the SELECT button is set to TRIGGER these butto...

Page 21: ...onnect the RADIAS dedicated keyboard to this con nector 6 USB connector Use a USB cable to connect the RADIAS to your com puter via this jack This connection is used to transmit receive MIDI data and...

Page 22: ...UNBAL LINE IN 3 LOW CUT 75Hz 18dB OCT MIC4 BAL OR UNBAL LINE IN 4 LOW CUT 75Hz 18dB OCT MIC5 BAL OR UNBAL LINE IN 5 LOW CUT 75Hz 18dB OCT MIC6 BAL OR UNBAL LINE IN 6 LOW CUT 75Hz 18dB OCT TRIM 10dB 40...

Page 23: ...E the PAGE LED will light and then press the 16KEYS 4 button The display will show the P04 MIDI page 4 Use the cursor buttons to select MIDI Ch and use the PROGRAM VALUE dial to specify the MIDI chann...

Page 24: ...IDI ports refer to the owner s manual for your MIDI interface If you use an external MIDI sequencer or a sequencer program on the computer you ve connected playing the RADIAS keyboard will cause notes...

Page 25: ...ted to the RADIAS When you re ready to turn the power off first turn off the power of the connected equipment and then press the ON STANDBY switch on the RADIAS rear panel to turn off the power Adjust...

Page 26: ...ng p 75 PanelEdit If the arpeggiator is assigned to a timbre an symbol is shown at the right of the timbre name If a step sequencer is assigned to a timbre a symbol step sequencer 1 or symbol step seq...

Page 27: ...the cursor button to move the cursor to the word Category 4 Use the PROGRAM VALUE dial to select a program You ll be able to select only programs that are assigned to that category With the factory s...

Page 28: ...ion and spacing of each note in the arpeggio Assigning the arpeggiator to a sound Here s how to assign the arpeggiator to a specific timbre in a program 1 Select a program where the arpeggiator isn t...

Page 29: ...en 8 Use the TEMPO knob or the TAP TEMPO REST TIE button to adjust the tempo Turn the TEMPO knob toward the right to speed up the tempo or toward the left to slow down the tempo You can set the tempo...

Page 30: ...ill also be switched on off at this time 3 Press the TIMBRE SELECT 1 4 button of the timbre being played by the step sequencer Select a timbre which has or displayed to the right of the timbre name Th...

Page 31: ...e using Mod Sequencing p 21 Selecting programs by category In some programs the modulation sequencer the ar peggiator and both step sequencers may be turned on Therefore you may wish to mute the other...

Page 32: ...If necessary use the appropriate conversion adaptor for the cables you re using 2 Turn on the power of both devices 3 Select a program in the Program Play mode We recommend that you select an initiali...

Page 33: ...his example we re trying to use the vocoder with the con nected mic so select a program that uses the external input How can you tell Choose a vocoder program that does not produce sound when you play...

Page 34: ...to select one of the thirty two drum kits 3 Play the keyboard The drum instrument assigned to each note will sound In the factory set drum kits drum instru ments are assigned to the C2 D 3 keys The d...

Page 35: ...buttons to select the timbre you want to edit The button for the selected timbre will blink A sym bol is shown in front of the timbre name in the display The front panel knobs and buttons and the timb...

Page 36: ...ultiple pages To select a page you can use the PAGE buttons or the 16KEYS 1 16 Press the PAGE or button You will step through the pages or tab pages one at a time If a page contains more than one tab...

Page 37: ...her parameter in this way For example in the P04 1 VOICE VOICE tab page if you change Assign from Poly to Mono the additional parameters Priority and Trigger will appear Changing a value 1 Use the fro...

Page 38: ...Programs can be written while in the Program Play mode or the Program Edit mode drum kits or drum in struments can be written in the Drum Play mode or the Drum Edit mode and global parameters can be w...

Page 39: ...se the PROGRAM VALUE dial to select a timbre In addition to loading one of the timbre you can also load any of the active timbres form any of the programs stored in the RADIAS As you turn the PROGRAM...

Page 40: ...the Write operation after you ve entered a name the name will revert to its prior state For details on writing refer to p 32 Saving an edited program Programs The program name is displayed in the Prog...

Page 41: ...yed you can use the front panel EDIT YES button and the sixteen knobs to edit the program name as follows Hold down the EDIT YES button and turn knobs 1 12 PORTAMENTO TIME LFO2 FREQ to change the firs...

Page 42: ...assign an appro priate category to each program you ll be able to find programs more efficiently p 21 Selecting pro grams by category 1 Go to the Program Edit mode P01 1 NAME PROG tab page 2 Use the c...

Page 43: ...leasing the previously played key If you want to get a richer sound use the front panel UNISON button to turn on the Unison func tion This function stacks multiple notes together In the P04 2 VOICE UN...

Page 44: ...Vintage analog synthesizer players would sometimes set the oscillators a fourth 5 or fifth 7 apart in pitch 4 Use the TUNE knob to adjust the pitch of oscillator 2 You can produce a richer sound by sl...

Page 45: ...filter being used by filter 2 The filter type will change each time you press the button and the LED of the selected filter type will light The filter type will have a major effect on the character of...

Page 46: ...button is set to make EDIT lit If an LED other than EDIT is lit you can t edit the EG or LFO These knobs are used to edit the modulation sequencer data 2 Use the EG 1 DECAY knob to adjust the decay t...

Page 47: ...lay above the C4 note and decrease as you play below it With positive settings the volume will decrease as you play above the C4 note and increase as you play below it Creating time varying change in...

Page 48: ...ies a cyclic change to a parameter This will produce vibrato if ap plied to oscillator pitch a wah effect if applied to filter cutoff and tremolo if applied to amp level LFO2 is internally routed to t...

Page 49: ...ng applied Turn the knob toward the right of center values to apply modulation in the positive direction Turn the knob toward the left of center values to apply modulation in the negative direc tion F...

Page 50: ...ying the sequence data for each step 1 Go to the P12 2 MOD SEQ SEQ1 tab page 2 Use Knob to select Fil1Cut This assigns SEQ1 to the Filter 1 cutoff 3 Press the MOD SEQUENCER ON button The ON button LED...

Page 51: ...ers p 44 SEQ COMMON parameter settings 5 Press the MOD SEQUENCER REC button You will be in the record ready mode The REC button will blink and the 16KEYS 1 16 keys will light sequentially You can t en...

Page 52: ...rogram currently assigned to each of the insert effects and the master effect Press the PAGE button or EXIT NO button to return to the previous screen 2 Press the INSERT FX ON button If the ON button...

Page 53: ...CT button to select ARPEGGIATOR In order to view the Program Edit mode ARPEGGIATOR page the arpeggiator must already be assigned to the selected timbre Editing the parameters 3 Go to the Program Edit...

Page 54: ...urn each step on or off The sixteen keys correspond to sixteen steps A step for which the key is lit will sound and a step for which the key is dark will not sound Each time you press a key that step...

Page 55: ...ge 2 Use Step to specify the step that you want to edit The gate time duration velocity and note number of the specified step are shown below Step 3 Use GateTime to specify the gate time Higher values...

Page 56: ...e recommend that you select an initialized program from the P bank the program whose name is Init Program If you select a program that uses two or more timbres use the TIMBRE SELECT 1 4 buttons to sel...

Page 57: ...ScanTop and ScanBotom For more about settings for starting the sequencer and layered or split keyboard settings refer to p 64 Key Zone settings 10 Use S SeqLink to specify whether the two step sequenc...

Page 58: ...can t specify independent values for each note in a step Nor can individual notes within a step be turned on off 6 Play a chord C4 E4 and G4 on the keyboard When you play the keyboard the correspondin...

Page 59: ...ess If the phrase does not transpose turn the P15 1 STEP SEQ COMN tab page Transpose setting On Editing each step STEP SEQ TRIGGER You can view the locations at which the step sequencer will sound and...

Page 60: ...f three things can happen If the step had origi nally been on then turned off it will retain its original value if it is turned on again If the step had never been on and has no previous assignment th...

Page 61: ...h the step sequencer is assigned is not using a drum kit the C4 note num ber will be assigned 5 Use the cursor to select the note you want to edit and use the PROGRAM VALUE dial to edit it If you sele...

Page 62: ...c Vocoder settings Assigning the vocoder 1 In the Program Play mode select a program We recommend that you select an initialized program from the P bank the program whose name is Init Program 2 Press...

Page 63: ...ifting the filters 4 Use the FILTER1 FC OFFSET knob to adjust the offset of the synthesis filter cutoff frequency You can adjust the shift amount for the carrier filters over a range of 2 steps In con...

Page 64: ...he formant motion data will be reset to its beginning each time you play a note 7 Play a note The vocoder will sound with the formant motion data Recording formant motion data 1 Press the FILTER1 MODU...

Page 65: ...written onto the speci fied number when you execute the Write operation and the data of the number you had been ed iting will revert to the unedited state If you specify the writing destination as som...

Page 66: ...Play mode 1 Selecting Drum instrument In the Drum Play mode use the 16KES 1 16 keys to select drum intrument 2 Selecting pages As in the Program Edit mode use the PAGE buttons and the 16KEYS 1 16 key...

Page 67: ...cted drum instrument is similar to the drum sound you want to create you can simply edit that drum instrument The parameters that make up a drum instrument are the same as for a synth pro gram Refer t...

Page 68: ...If you want to keep these settings you must write them If you don t execute the Write operation your changes will be lost p 32 Saving an edited program Assigning a note number to a drum instrument He...

Page 69: ...drum kit is shown below KitNo 6 Press the EXIT NO button to return to the Program Play mode If you want to keep these settings you must write them If you don t execute the Write operation your change...

Page 70: ...tiple pro grams sounded by a key and split different programs sounded by different keyboard areas Timbre 2 and timbre 3 are layered and timbre 1 and timbres 2 and 3 are split between B3 and C4 The fol...

Page 71: ...o set the key zone for each timbre For this example make the following settings Timbre 1 Bottom C 1 Top B3 Timbre 2 Bottom C4 Top G9 Timbre 3 Bottom C4 Top G9 In addition to using the PROGRAM VALUE di...

Page 72: ...set the MIDI channel for timbre 4 In the Program Play mode you will be playing the MIDI channel of the timbre selected by Timbre Select so we will specify a MIDI channel that is different than the ch...

Page 73: ...MBRE SELECT 1 button to select timbre 1 and go to the Program Edit mode P02 3 COMMON E F tab page 3 Set Source to ExtIn1 4 Input a rhythm pattern or other audio signal from your external device to Ext...

Page 74: ...your changes you must execute the Write operation 1 In the Global mode press the WRITE button The write confirmation screen will appear 2 If you want to write the changes press the WRITE button once...

Page 75: ...s to the preloaded condition When you perform this operation all of the data in the RADIAS will be overwritten by the factory settings Before you proceed make sure that it is OK to do this and back up...

Page 76: ...ncer or arpeggiator will operate in synchroniza tion with the tempo of the external MIDI device p 117 Clock 6 Make MIDI clock settings on your external MIDI device If you set the RADIAS Clock to Inter...

Page 77: ...e following settings on the RADIAS When using the RADIAS Sound Editor software large amounts of data must be transferred be tween the RADIAS and your computer so we recommend that you use a USB connec...

Page 78: ...Editing 72...

Page 79: ...Parameter Program parameters Drum parameters Global parameters Effect guide...

Page 80: ...sixteen knobs The following characters are available For details on entering a name refer to p 35 How to as sign a name P01 2 TIMBRE Timbre Name Here you can specify the name of the timbre selected by...

Page 81: ...seven notes If the Scale Key is C use the C D E F G A and B keys User The scale you created in the Global mode P11 USER SCALE page p 120 P09 1 USER SCALE 3 ScaleKey C B Specifies the tonic key or roo...

Page 82: ...d with out change A setting of 12 shifts the assignments one octave downward and a setting of 12 shifts them one octave upward For example suppose that you have a drum kit that as signs the sixteen dr...

Page 83: ...000 127 Off This specifies the trigger level at which the detected en velope will play the internal sound generator A note on will be sent when the envelope exceeds the specified lev el and a note off...

Page 84: ...effect and sent from the MAIN L MONO and R jacks M63I01 M63I63 M01I63 Sets the balance between the main output sand the indi vidual outputs The sound will be processed through the master effect befor...

Page 85: ...aved in the RADIAS in cluding timbres used in other programs For more about program changes and bank select messages refer to p 146 Program change Bank select 3 PBnd Pitch Bend x o Specifies whether M...

Page 86: ...note before releasing a previously played note This parameter is shown if Assign is set to Mono Single The second and subsequent notes will not retrigger the EG Use this setting if you want to play l...

Page 87: ...ding a slight randomness to the pitch of each note as it is played this lets you simulate the pitch instability and oscillator drift that was characteristic of analog synthesizers Higher settings will...

Page 88: ...greater spread between oscillators giving a richer sound Control2 Phase Unison Phase 000 127 Specifies the phase of each oscillator at note on This will affect the tone of the attack When OSC Mod VPM...

Page 89: ...rumPCM This provides various PCM waveforms such as drum and percussion sounds Control1 Pitch Drum Pitch 63 63 Adjusts the pitch Control2 Wave Sel Wave Select 01 128 Selects the drum PCM waveform The p...

Page 90: ...ency Unison Unison skews the pitch of five oscillators within a single oscillator and outputs them together to create a richer sound This is not to be confused with the unison param eter under voice P...

Page 91: ...ne and Tune to pro duce a spacious sounding detune effect For fuller synth bass sounds set the pitch of oscillator 1 and 2 one octave apart Ring This type of modulation generates frequencies at the su...

Page 92: ...er1 Balance FILTER TYPE LPF24 LPF12 HPF BPF THRU Selects the filter type Intermediate settings will produce a response that is between the two filter types LPF12 12dB oct LPF24 24dB oct LPF Low Pass F...

Page 93: ...e no ef fect Positive settings will cause the cutoff frequency to rise as you play above the C4 key or fall as you play below the C4 key With a setting of 1 0 the change in cutoff frequency will be pr...

Page 94: ...n of the timbre If a drum kit is assigned to the timbre the param eter adjusted by the front panel PAN knob will be the P02 2 COMMON DRUM tab page Pan parameter 3 Drive WS Drive Wave Shape DRIVE WS Of...

Page 95: ...is will have no effect 8 KeyTrack Keyboard Track 63 63 Specifies how keyboard tracking will affect the volume With positive settings the volume will increase as you play upward from the C4 key and dec...

Page 96: ...u play above C4 and longer as you play below C4 Negative values EG time parameters will become shorter as you play be low C4 and longer as you play above C4 8 TimVelInt Decay ReleaseTime Velocity Inte...

Page 97: ...phase of the LFO will be reset at the first note on that occurs when no other keys are being pressed and will continue to affect all the notes played by that timbre in the same way until once again no...

Page 98: ...t The P07 1 FILTER FILTER1 tab page Cutoff param eter will be modulated Filt1Reso The P07 1 FILTER FILTER1 tab page Resonance pa rameter will be modulated Filt2Cut The P07 2 FILTER FILTER2 tab page Cu...

Page 99: ...u should set this parameter to Off or Timbre If this is set to Voice the sequence will be reset each time the arpeggiator generates a note If you set this to Timbre the sequence will be reset each tim...

Page 100: ...e the equalizer settings The equalizer is used to adjust the tonal balance of each timbre for example by bringing out certain frequencies that tend to be buried or reducing other frequencies that are...

Page 101: ...spatial type effect such as reverb to add final touches to the overall sound The output of each timbre is sent through EQ and the in sert effects and then combined and input to the master effect The...

Page 102: ...igned to the timbre ARPEGGIATOR The arpeggiator will be applied to the timbre When you trigger the arpeggiator from the keyboard etc to make it begin operating the timbre will be played by the specifi...

Page 103: ...ting from the note of the lowest pitch 4 Range Octave Range 1 4 octave Specifies the range of the arpeggio in units of one octave 5 Resolutn Resolution 1 32 1 1 Specifies the resolution spacing relati...

Page 104: ...arpeggiator settings from another pro gram p 110 CopyArpStep The valid length the cycle at which steps are re peated for these settings is determined by the P14 1 ARPEGGIATOR COMN tab page Last Step p...

Page 105: ...by the global MIDI channel or by the MIDI channel of the timbre to which the step sequencer is assigned GATE Refer to p 101 GateTime TEMPO Specifies the playback tempo of the step sequencer Higher set...

Page 106: ...the lowest note played in the recorded data 6 GateTime Gate Time Offset GATE 100 100 Specifies an offset to the gate time the duration of each note This adjusts the gate time for each step that is sp...

Page 107: ...e velocity for the note s sounded by each step With a setting of 1 127 the notes will always sound with the specified velocity value With a setting of Key the notes will sound with the velocity of the...

Page 108: ...same as the parameters of step sequencer 1 p 99 P15 1 COMN STEP SEQ1 Common P15 5 TRIG STEP SEQ2 Trigger 1 NoteSel Note Select Trigger Drum01 Drum16 C 1 G9 2 Trigger Step On Off o These are the same...

Page 109: ...t assigned to the global MIDI channel and play it from the keyboard or use a MIDI channel other than the global MIDI channel to enter note on data that will trigger the arpeggiator or step sequencer o...

Page 110: ...l be input source 2 IntBusL R The L R channels mono mixed of the internal bus program output will be input source 2 For details on internal bus routing refer to the di agram of p 5 How a program is st...

Page 111: ...or details refer to p 91 Source SOURCE 5 FcModInt Fc Modulation Intensity FC MOD INT 63 63 Sets the depth of modulation that is applied to FcOff set 6 E F Sens Envelope Follower Sens E F SENS 000 127...

Page 112: ...mode P03 2 TIMBRE OUT tab page to assign the tim bre output to the internal bus p 78 P03 2 OUT Timbre Output 5 GateSens 000 127 Specifies how fast the gate will respond to the input source Decreasing...

Page 113: ...the selected program Use Edit to select InitVOCODER change Sure to Press YES and then press the EDIT YES button InitPROG CopyVOCODER Copies the vocoder settings from another program to the vocoder se...

Page 114: ...eted the template has been saved 5 Press the EXIT NO button You will return to the previous screen NameTemplate Edits the name of a template 1 Use Edit to select NameTemplate 2 Use Dest to select the...

Page 115: ...to the previous screen P16 4 FX Effect Utility These are the effect related utility functions 1 Edit CopyInsFx NameMFxTemp Select the utility function you want to use CopyInsFx Copies an insert effect...

Page 116: ...m Use Edit to select CopyArpStep use Source to select the copy source program change Sure to Press YES and then press the EDIT YES button p 107 CopyVOCODER InitStepSeq Initializes the step sequencer s...

Page 117: ...e a drum kit by assigning drum in struments to separate notes of the keyboard For details on making these assignments refer to p 62 Assigning a note number to a drum instrument 0 Load 01 01 32 16 Tmp0...

Page 118: ...keep the changes you made you must press the WRITE button to write the data If you don t write the data you edited it will be lost p 61 5 Saving a drum kit and drum instru ments WRITE P05 PITCH P05 1...

Page 119: ...then press the EDIT YES button p 107 CopyVOCODER Swap Inst Exchanges drum instrument settings within the current ly selected drum kit Use Edit to select Swap Inst use Source to select the swap source...

Page 120: ...n and MIDI data played on the keyboard or the SELECT 1 16 keys is recorded on an external sequencer and then played back from the external sequencer the way in which the sequence is reset will be dif...

Page 121: ...iting Jump When you turn the knob the parameter value will jump to the value indicated by the knob regardless of the stored value Since this makes it easy to hear the results while editing we recomme...

Page 122: ...ransmit receive system exclusive messages In order to receive performance data on the global MIDI channel you must set the MIDI channel of each timbre to match the global MIDI channel In the Program E...

Page 123: ...al MIDI device refer to the owner s manual for the device you re using 5 MIDI1 P Bend 119 CC 119 6 MIDI2 P Bend 119 CC 119 7 MIDI3 P Bend 119 CC 119 8 MIDI4 P Bend 119 CC 119 9 MIDI5 P Bend 119 CC 119...

Page 124: ...nd received 3 Ctrl Chg Control Change x o Specifies whether control change messages will be transmitted and received x Disable Control change messages will not be transmitted or re ceived o Enable Con...

Page 125: ...trol CC 02 FootPedal The pedal will control the MIDI control change Foot Control CC 04 2 A SwFunc Assignable Switch Function Damper FootSw Selects the function of the pedal switch connected to the ASS...

Page 126: ...Write operation after editing a category name If you fail to do this the name will revert to its unedited state To assign a program to a category use the Pro gram Edit mode P01 1 NAME PROG tab page p...

Page 127: ...l be degraded If the input level is excessive clipping may occur About the delay time TimeRatio For delay effects the actual delay time is determined by multiplying the delay time with the TimeRatio H...

Page 128: ...to St Delay Controlling the effect parame ters You can use the front panel INSERT FX EDIT 1 and EDIT 2 knobs to control insert effect parameters in re altime and the front panel MASTER FX EDIT knob to...

Page 129: ...higher value lower level sounds will be boosted With a higher Sensi tivity the overall volume level is higher To adjust the fi nal volume level use the Output Level parameter Attack 0000 1 0500 0ms Se...

Page 130: ...s the output gain 4 St Filter Stereo Filter This is a stereo filter Dry Wet Dry 99 1 1 99 Wet Sets the balance between the effect and dry sounds Filter Filter Type LPF24 24dB oct LPF18 18dB oct LPF12...

Page 131: ...d value note value relative to the tempo will be one cycle of the LFO For example if this is 1 4 one cycle will occupy one quarter note This parameter will be displayed and can be set if Mod Src is LF...

Page 132: ...e 63 63 When Mod Src is set to Auto this parameter deter mines the sweep curve for auto wah TempoSync LFO Tempo Sync Off On Specifies whether the LFO cycle will synchronize to the tempo set by the TEM...

Page 133: ...s case band 2 is fixed as a peaking type EQ B1 Freq B1 Frequency 20Hz 20 0kHz Sets the center frequency of Band 1 B1 Q 00 5 10 0 Sets the bandwidth of Band 1 B1 Gain 18 0 18 0dB Sets the gain of Band...

Page 134: ...t level 8 CabinetSimltr Cabinet Simulator This simulates the acoustical character of a guitar amp s speaker cabinet Dry Wet Dry 99 1 1 99 Wet Sets the balance between the effect and dry sounds CabiTyp...

Page 135: ...ttings of this value the waveform will change at high gain levels tending to cause distortion Lower settings of this value will produce linear response Phase Normal Inverted Turns phase reversal on of...

Page 136: ...Mod Src is LFO and TempoSync is Off p 125 LFO Freq LFO Frequency Sync Note LFO Sync Note 8 1 1 64 Sets the LFO frequency as a proportion of the tempo set by the TEMPO knob This parameter will be displ...

Page 137: ...the original sound to the first early reflection When used for the master effect this is displayed and can be set only if Room or BritRoom is selected Rev Level Reverb Level only MFX 000 127 Sets the...

Page 138: ...pC High Damp 000 100 Sets the damping amount in the high range Low Damp 000 100 Sets the damping amount in the low range Trim 000 127 Sets the input level Spread 000 127 Sets the width of the stereo i...

Page 139: ...ative to the tempo specified by the TEMPO knob or MIDI clock Feedback 000 127 Sets the feedback amount for the left channel Mod Depth 000 127 Sets the depth of modulation TempoSync LFO Tempo Sync Off...

Page 140: ...the LFO will be reset by note on p 125 Key Sync LFO KeySync InitPhase LFO Init Phase 000 180 Sets the starting location of the waveform This parame ter will be displayed and can be set if KeySync is T...

Page 141: ...ro duced Dry Wet Dry 99 1 1 99 Wet Sets the balance between the effect and dry sounds TempoSync DelayTime Tempo Sync Off On p 132 LCR Delay TempoSync DelayTime Tempo Sync Time Ratio TempoSync Off 000...

Page 142: ...ect and dry sounds Mod Depth Modulation Depth 000 127 Sets the depth of LFO modulation Speed 001 127 Sets the LFO speed 22 St Flanger Stereo Flanger Comb Filter This effect gives a significant swell a...

Page 143: ...the feedback damping amount in the high range when the Type is Flanger 23 St Phaser Stereo Phaser This effect creates a swell by shifting the phase It is very effective on electric piano sounds You c...

Page 144: ...y Sync LFO KeySync InitPhase LFO Init Phase 000 180 Sets the starting location of the waveform This parame ter will be displayed and can be set if Key Sync is On p 125 InitPhase LFO Init Phase LFOSpre...

Page 145: ...a certain amount of high range 26 Pitch Shifter IFX St PitchShift MFX This effect changes the pitch of the input signal You can select from three types Fast quick response Medium and Slow preserves to...

Page 146: ...ting and the TimeRatio setting If TempoSync is Off this is set in msec units The range is 0 500 msec for an insert effect or 0 350 for a master effect If TempoSync is On this is set as a timing resolu...

Page 147: ...ase LFOSpread LFO Spread 180 180 Sets the LFO phase difference between the left and right channels 29 RotarySpkr IFX W size Double Size RotarySpeaker MFX This effect simulates a rotary speaker and obt...

Page 148: ...ce will control the speaker rotation speed H R Bal Horn Rotor Balance Rotor 1 99 99 1 Horn Sets the level balance between the high range horn and low range rotor HornAccel Horn Acceleration 000 127 Ho...

Page 149: ...duces a slow response Env Sens Envelope Sensitivity 000 127 When Mod Src is Auto adjusts the sensitivity of auto operation Env Shape Envelope Shape 63 63 When Mod Src is Auto specifies the sweep curve...

Page 150: ...Effect guide 144...

Page 151: ...Appendices...

Page 152: ...EDIT1 EDIT2 or HI EQ LOW EQ knob is determined by the Program Edit mode P02 1 COMMON PROG tab page Panel Edit setting and by the tim bre that is selected by the front panel TIMBRE SELECT 1 4 buttons...

Page 153: ...channel If a drum kit is assigned to a timbre you cannot switch the timbre to something other than a drum kit If a drum kit is not assigned to a timbre you cannot switch the timbre to a drum kit To sw...

Page 154: ...at the pitch range specified by VibraInt If the minimum value 0 is received no vi brato will apply When you operate the RADIAS modulation wheel modulation depth messages are transmitted on the MIDI ch...

Page 155: ...rrespondence between parameters and NRPN messages refer to the MIDI implementation on the in cluded CD ROM Other control In addition to the arpeggiator and step sequencer pa rameters NRPN messages for...

Page 156: ...entire RADIAS is adjusted when this master volume message is received Master volume does not affect the INDIV OUT signal Master fine tuning F0 7F nn 04 03 vv mm F7 A value of 8192 mm vv 40 00 sets th...

Page 157: ...l CC 25 FILTER Filter Routing CC 26 FILTER1 Filter1 Type Balance CC 27 Filter1 Cutoff CC 74 Filter1 Resonance CC 71 Filter1 EG1 Int CC 79 Filter1 KeyTrack CC 28 FILTER2 Filter2 Type CC 29 Filter2 Cuto...

Page 158: ...river Tools installer 3 The KORG USB MIDI Drive Tools Installer screen will appear Click Next 4 The License agreement will appear Carefully read the contents and if you consent to the terms select I a...

Page 159: ...river for Windows XP 1 From the taskbar select Start All Pro grams KORG KORG USB MIDI Driver Tools Uninstall KORG USB MIDI Device to start up the setup utility Click Next 2 A list of currently install...

Page 160: ...this allows MIDI messages from an external sequencer to be sent to an application on your computer or the RADIAS to be used as a USB MIDI interface To do so choose this port in the MIDI input settings...

Page 161: ...program or global settings Is the Global mode P02 MEMORY page Protect setting OFF p 69 Disabling memory protect p 115 Protect Transpose or velocity curve settings are not transmitted received correct...

Page 162: ...yak B09 Cyber Hydra Synth Hard Cyber Hydra OFF OFF KORG Inc B10 Space Piano Synth Soft Piano Stage Wind FX OFF OFF Richard Devine B11 Warm Pad Strings Pad Soft Pad Glide Sine OFF OFF KORG Inc B12 Hill...

Page 163: ...ocky OFF ON Phill Macdonald F01 Tech Morph 1 Vocoder Carrier Wave Filter Bass 5th Stabber House 99 Timbre 4 OFF Oliver Munyak F02 Dark Moon Arp Seq Moon Bass Copter MoonSquiggle Hat OFF ON David Polic...

Page 164: ...h Hard Slap Brass 1 Slap Brass 2 Slap Brass 3 Slap Brass 4 OFF OFF Phill Macdonald I10 Drama Pad Strings Pad EP Pad Choir Pad 80s OldSkool Timbre 4 OFF Oliver Munyak I11 Phazing Pad Strings Pad Phazin...

Page 165: ...Jerry Kovarsky M02 Electrowerks Arp Seq Synth Line Filter Synth Bass Line Analog 88 Timbre 4 ON Richard Devine M03 Drum Rotator Arp Seq Drum Rotator OFF OFF Martin Richardson M04 BrightSynth Motion Ga...

Page 166: ...LineGating 3 Audio In St AudioIn OFF ON KORG Inc P01 Init Program User InitTimbre1 OFF OFF P02 Init Program User InitTimbre1 OFF OFF P03 Init Program User InitTimbre1 OFF OFF P04 Init Program User Ini...

Page 167: ...Inst 12 B2 Inst 13 C3 Inst 14 C 3 Inst 15 D3 Inst 16 D 3 HH KR55 C Tom SynHi HH 88 O Lektroscrtch Tambourine Crash BPF MicTap Lektroride Inst 1 C2 Inst 2 C 2 Inst 3 D2 Inst 4 D 2 Inst 5 E2 Inst 6 F2 I...

Page 168: ...st 1 C2 Inst 2 C 2 Inst 3 D2 Inst 4 D 2 Inst 5 E2 Inst 6 F2 Inst 7 F 2 Inst 8 G2 BD Syn2 BD R B SD Dry3 Clap Dry SD Dry2 Rim Dry HH AN Ring C Tom Dry Drv Inst 9 G 2 Inst 10 A2 Inst 11 A 2 Inst 12 B2 I...

Page 169: ...12 B2 Inst 13 C3 Inst 14 C 3 Inst 15 D3 Inst 16 D 3 HH HPF Squ Waveshape Noise Deci Noise Comb Random Mod Cross Comb Impulse Comb Pitch Mod Inst 1 C2 Inst 2 C 2 Inst 3 D2 Inst 4 D 2 Inst 5 E2 Inst 6...

Page 170: ...6 BD Syn3 7 BD Syn4 8 BD Syn5 9 BD Dist 10 BD Zap 11 BD Dry1 12 BD Dry2 13 BD Dry3 14 BD Jazz 15 BD R B 16 BD Hip 17 BD DnB 18 SD 99 1 19 SD 99 2 20 SD 88 21 SD 77 22 SD Lynn 23 SD Syn1 24 SD Syn2 25...

Page 171: ...d Lead 54 Square Lead Lead 55 Dukey Lead Lead 56 Fusion Lead Lead 57 Phunky Lead Lead 58 SoftSaw Lead Lead 59 Detuned Lead Lead 60 UniPulseLead Lead 61 Wired Lead Lead 62 HPF Uni Lead Lead 63 CrossMod...

Page 172: ...63 Old EP Pan St Tremolo 64 St Vibrato St Vibrato 65 Vibrato Cho St Vibrato 66 Rotary CC 01 Rotary Speaker W 67 Rotary Pedal Rotary Speaker W 68 Ring Mod St Ring Modulator 69 SweepRingMod St Ring Modu...

Page 173: ...ld EP Pan St Tremolo 64 St Vibrato St Vibrato 65 Vibrato Cho St Vibrato 66 Rotary CC 01 Rotary Speaker W 67 Rotary Pedal Rotary Speaker W 68 Ring Mod St Ring Modulator 69 SweepRingMod St Ring Modulato...

Page 174: ...e simultaneously Eight notes 2 2 Total number of notes per step that can be recorded in the step sequencer Structure Two 32 step sequencers the two can be linked for playback three playback modes OneS...

Page 175: ...lobal or timbre MIDI Filter Prog Chg CtrlChg P Bend SystemEx BankChg setting is ENA 1 Transmitted according to the Global mode P08 PEDAL SW A PEDAL and A SwFunc settings 2 Transmitted and received on...

Page 176: ...ave purchased this product via the internet through mail order and or via a telephone sale you must verify that this product is intended to be used in the country in which you reside WARNING Use of th...

Reviews: