


Keysight EXG and MXG X-Series Signal Generators User’s Guide
233
Basic Digital Operation (Option 653/655/656/657)
Clipping a Waveform
Configuring Circular Clipping
Use this example to configure circular clipping and observe its affect on the peak–to–average
power ratio of a waveform. Circular clipping clips the composite I/Q data (I and Q data are clipped
equally). For more information about circular clipping, refer to
“How Clipping Reduces Peak–to–
Copy a Waveform File
1.
Display the signal generator’s files: Press
File
>
Catalog Type
>
More
>
Volatile Segments
.
2.
Highlight the waveform
RAMP_TEST_WFM
.
3.
Press
Copy File.
4.
Name the copy (in this example, the name is
MY_TEST_CIRC
) and press
Enter
.
Apply Circular Clipping to the Copied Waveform File
1.
Open the DUAL ARB Waveform Utilities menu: Press
Mode
>
Dual ARB
>
More
>
Waveform
Utilities
.
2.
In the list of files, highlight the copied file (in this example,
MY_TEST_CIRC
).
3.
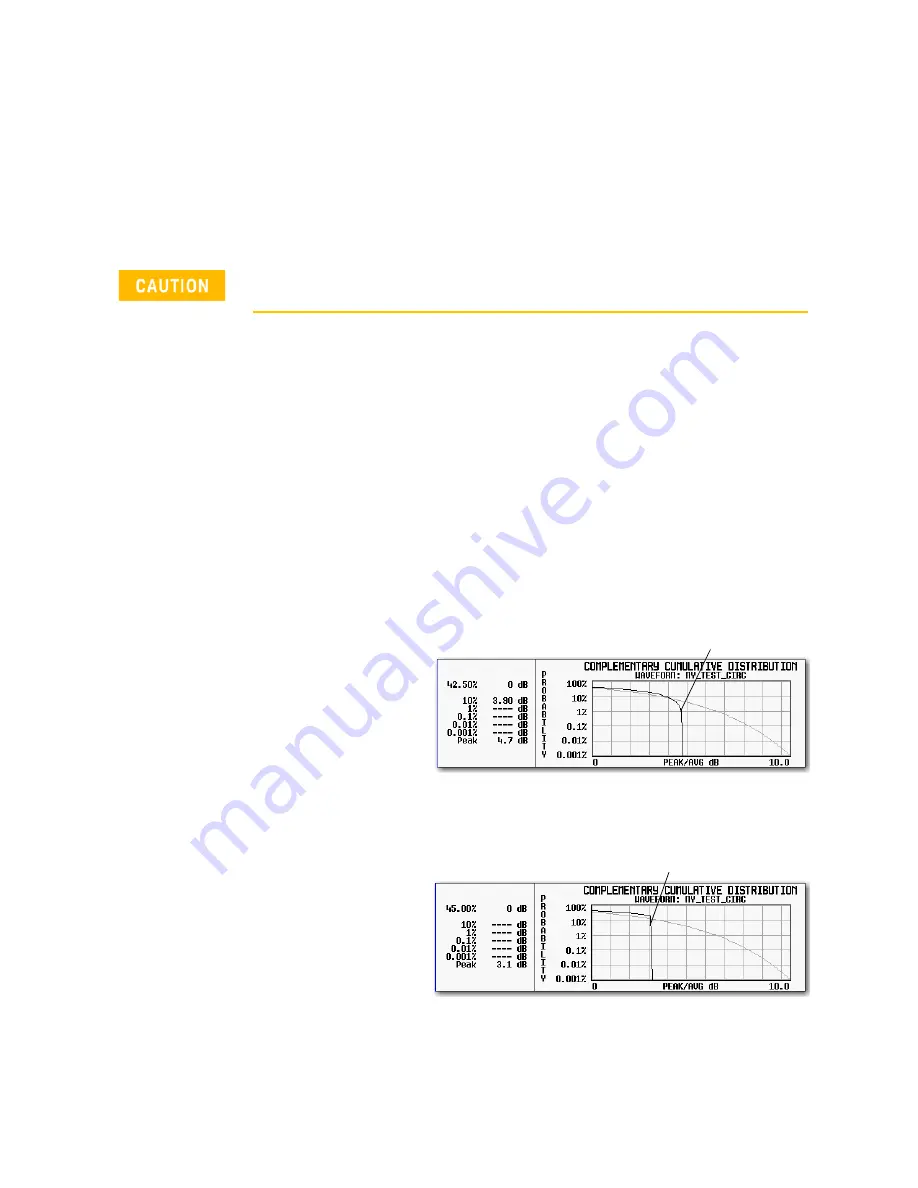
Create the CCDF plot: Press
Plot CCDF
.
4.
Observe the shape and position of the
waveform’s curve (the dark line in the
example at right).
5.
Activate circular clipping: Press
Return
>
Clipping
>
Clipping Type
until
|I+jQ|
highlights.
6.
Set circular clipping to 80%:
Press
Clip |I+jQ| To
>
80
>
%
.
7.
Apply 80% clipping to the I and Q data: Press
Apply to Waveform
.
8.
Create the CCDF plot (see the example
at right): Press
Plot CCDF
.
9.
Observe the waveform’s curve after
clipping.
Note the reduction in peak–to–average
power relative to the previous plot.
Clipping is non–reversible and cumulative. Save a copy of the waveform
file before you apply clipping.
Example waveform curve before clipping
Example waveform curve after circular clipping


