Calibration
Calibration of the Photometer
Thermo Scientific
146iQ Instruction Manual
4-9
The Photometer detector gain is determined at the factory and should only
be adjusted by a qualified technician. The only time the Detector Gain
should be adjusted is if there were changes to the elements that affect the
light path or detection (including the detector itself). Ensure that zero air is
being sampled when the detector gain adjustment is being performed.
There are two ways of calibrating the detector gain:
1.
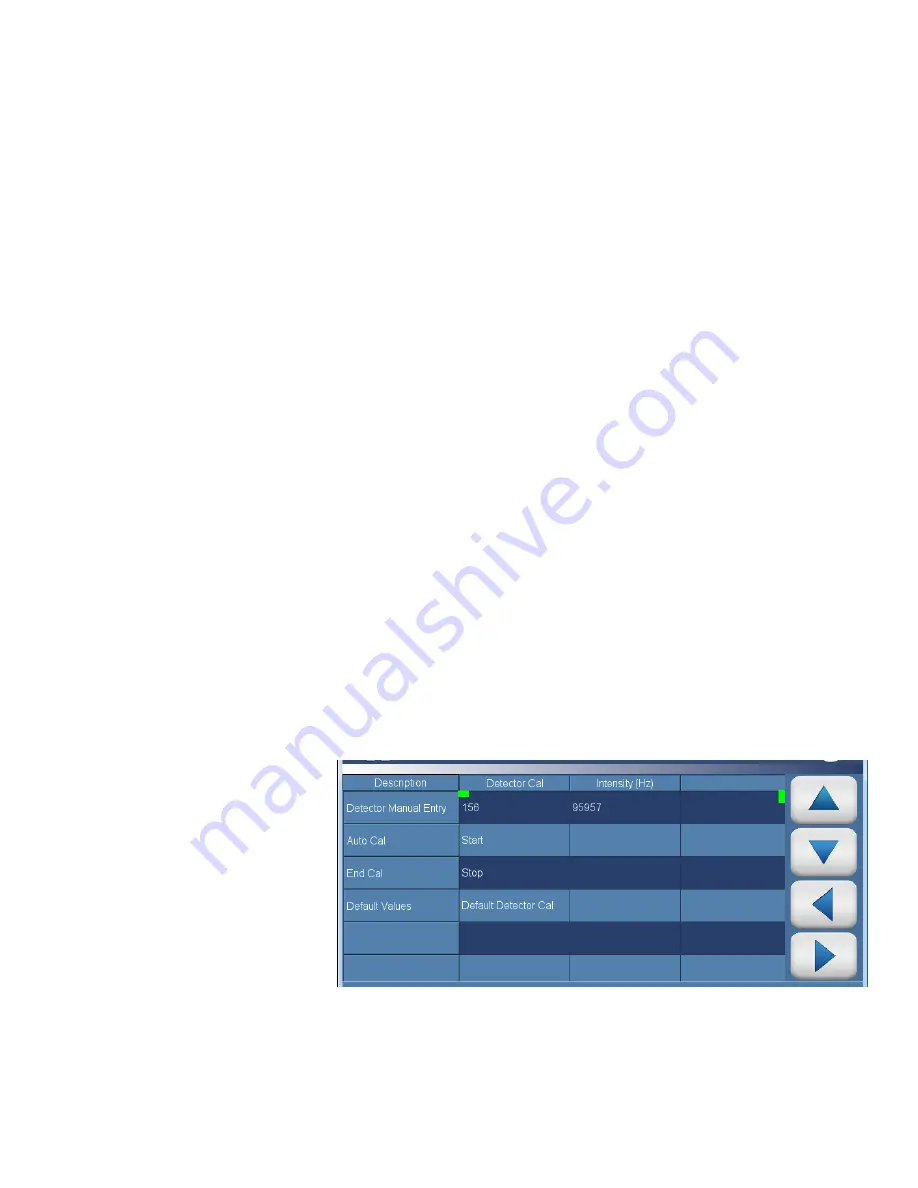
From the Home Screen, press Calibration>Photometer
Calibration>Advanced Photometer Calibration>Photometer Detector
Calibration,
Continue to Detector Calibration
. The user can
manually change the detector gain by clicking on the Detector Manual
Entry cell corresponding to the ‘Detector Cal’ column. The user will be
brought to a numeric keypad screen where a new value can be entered.
It is recommended that the detector gain be adjusted to obtain an
Intensity of ~100,000 Hz.
2.
The recommended method, however, is to run an Auto Calibration for
the Detector Gain. This is accomplished by pressing on the cell labeled
‘Start’ under the ‘Detector Cal’ column. It is advised to allow up to 5
minutes for the detector gain to be calibrated. Leaving the screen
prematurely terminates the calibration. The user can stop the
calibration at any time by pressing the cell labeled ‘Stop’ under the
‘Detector Cal’ column. Additionally, the user can set the detector gain
to its factory default value by pressing on the cell labeled ‘Default
Detector Cal’ under the ‘Detector Cal’ column.
The screen for the photometer detector gain adjustment is shown below for
reference:
Photometer Detector
Calibration
Содержание 146iQ
Страница 1: ...146iQ Instruction Manual Multi Gas Calibrator 117633 00 1Sep2019...
Страница 2: ......
Страница 8: ......
Страница 22: ......
Страница 37: ...Operation Instrument Display Thermo Scientific 146iQ Instruction Manual 3 7...
Страница 160: ......
Страница 170: ......
Страница 174: ...Maintenance Pump Rebuilding 5 4 146iQ Instruction Manual Thermo Scientific Figure 5 2 Pump Rebuilding...
Страница 176: ......
Страница 190: ...Servicing Fan Replacement 7 8 146iQ Instruction Manual Thermo Scientific Figure 7 8 Replacing the Fan...
Страница 208: ...Servicing Power Supply Replacement 7 26 146iQ Instruction Manual Thermo Scientific Figure 7 29 Replacing Power Supply...
Страница 231: ...Servicing Optional DMC Ozonator Thermo Scientific 146iQ Instruction Manual 7 49 Figure 7 55 Ozone DMC install pt 2...
Страница 252: ......
Страница 300: ......
Страница 301: ......


