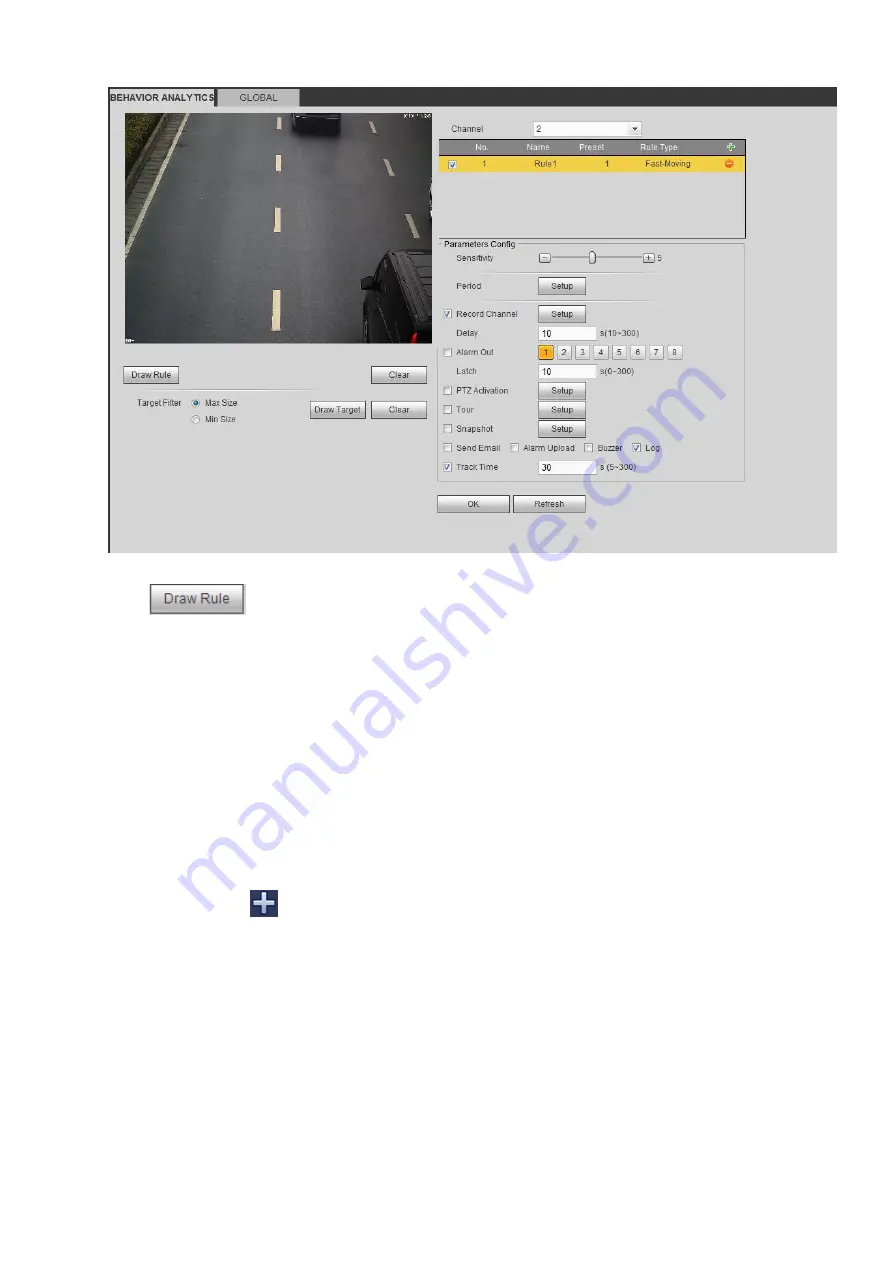
Figure 4-90
Click
to draw the rule.
Click OK to complete the rule setup.
For detailed setups, please refer to chapter 4.6.4.1.1 motion detect for detailed information.
4.6.4.3.2 Global Config
From main menu>Setup>Event>IVS>Global, you can go to the global configuration interface. See Figure
Channel: Please select a channel from the dropdown list.
Preset: Select a preset you want to set the rule. Please note, you need to add a preset first,
otherwise, you cannot see the preset dropdown list. If there is no preset, you can draw a rule in
current channel.
Calibration zone:
Click Add area
, you can draw a calibration zone at the left pane of the interface. Select a zone
and then click Delete zone button; you can remove the selected zone.
Select gauge type (vertical/level), you can set the corresponding length. You can draw three tilt
gauges and one horizontal gauge at the left pane of the interface.
Select Width/Height and then click Verify, you can draw a line in the calibration zone, and then you
can see its actual length.
Update preset: Click it to get the latest preset setup.
Содержание ELITE Network IP Series
Страница 1: ...64 Channel 4K Hot Swap NVR NVR ELHS 64 4K DH...
Страница 43: ...Figure 3 14 Step 2 Click Add new holiday button and device displays the following interface See Figure 3 15...
Страница 108: ...Figure 3 92 Figure 3 93...
Страница 131: ...Figure 3 111 Figure 3 112 Figure 3 113...
Страница 144: ...Figure 3 126 Figure 3 127...
Страница 146: ...Figure 3 129 Click draw button to draw the zone See Figure 3 130 Figure 3 130...
Страница 149: ...Figure 3 133 Click Draw button to draw a zone See Figure 3 134 Figure 3 134...
Страница 154: ...Figure 3 139 Click draw button to draw the zone See Figure 3 140...
Страница 165: ...Figure 3 151 Step 2 Add surveillance scene 1 Click Add The Add interface is displayed See Figure 3 152...
Страница 172: ...Figure 3 157 Figure 3 158...
Страница 173: ...Figure 3 159 Figure 3 160...
Страница 176: ...Figure 3 164 Figure 3 165...
Страница 211: ...Figure 3 199...
Страница 218: ...Figure 3 206 Step 2 Click Add user button in Figure 3 206 The interface is shown as in Figure 3 207 Figure 3 207...
Страница 234: ...Figure 3 227 Step 2 Click Add group Enter add group interface See Figure 3 228 Figure 3 228...
Страница 298: ...Figure 4 56 Figure 4 57...
Страница 304: ...Figure 4 62 Figure 4 63...
Страница 305: ...Figure 4 64 Figure 4 65...
Страница 330: ...Figure 4 101 Figure 4 102...
Страница 339: ...Figure 4 115 Figure 4 116...
Страница 359: ...Figure 4 144 Note For admin you can change the email information See Figure 4 145...


