background image

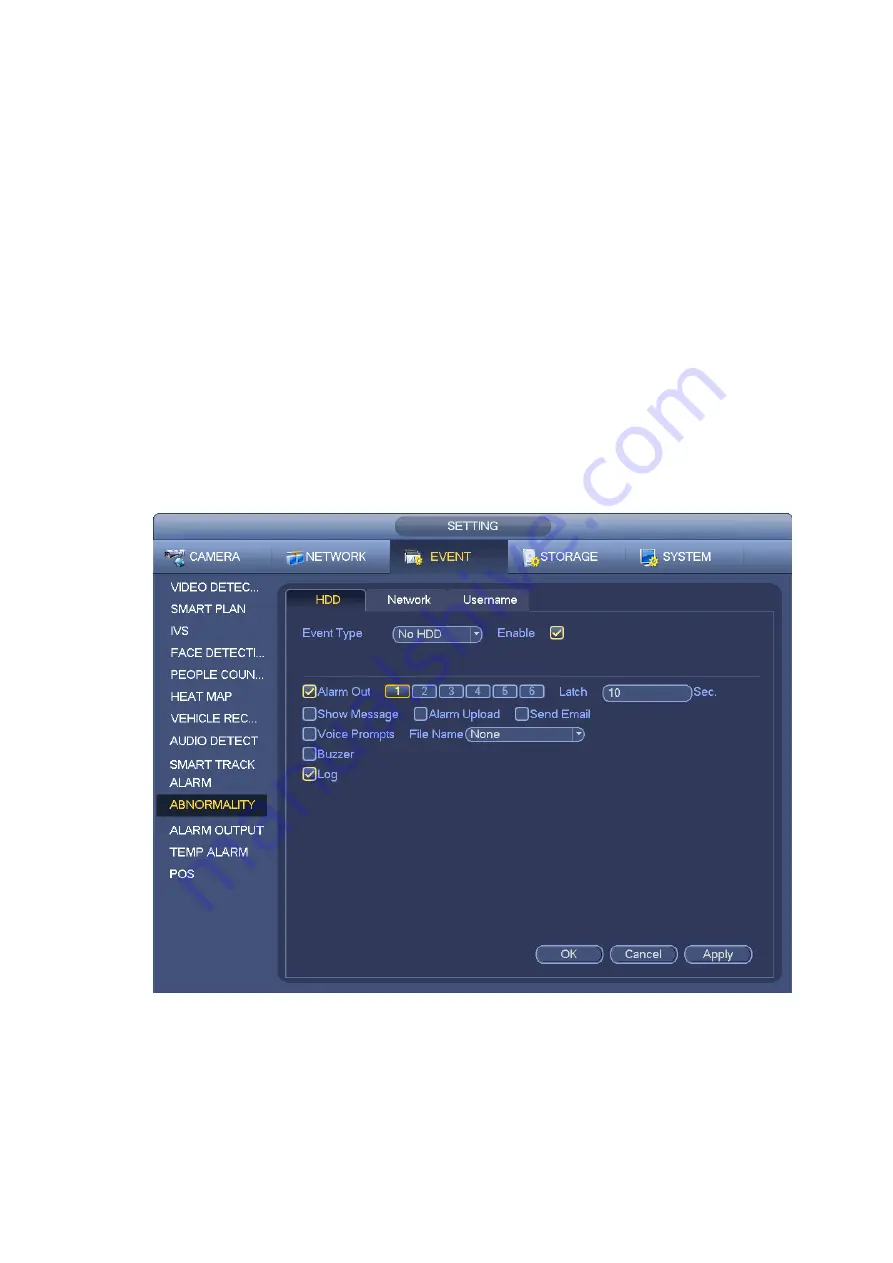
User: Illegal login. Figure 3-165.

Alarm output: Please select alarm activation output port (multiple choices).

Less than: System can alarm you when the HDD space is less than the threshold you set here

(For HDD no space type only).

Attempts: In user interface, select illegal login from the dropdown list. Here you can set login

attempts. The value ranges from 1 to 10.

Lock time: In user interface, select illegal login from the dropdown list. Here you can set account

lock time. The value ranges from 1 to 30 minutes.

Latch: Here you can set corresponding delaying time. The value ranges from 1s -300s. System

automatically delays specified seconds in turning off alarm and activated output after external alarm

cancelled.

Show message: system can pop up the message in the local screen to alert you when alarm

occurs.

Alarm upload: System can upload the alarm signal to the network (including alarm cent er) if you

enabled current function. For disconnection event, IP conflict event and MAC conflict event, this

function is null.

Send email: System can send out email to alert you when alarm occurs.

Buzzer: Highlight the icon to enable this function. The buzzer beeps when an alarm occurs.

Figure 3-163 

Содержание ELITE Network IP Series

Страница 1: ...64 Channel 4K Hot Swap NVR NVR ELHS 64 4K DH...

Страница 2: ...Change default HTTP and TCP ports for systems These are the two ports used to communicate and to view video feeds remotely These ports can be changed to any set of numbers between 1025 65535 Avoiding...

Страница 3: ...isabling UPnP is recommended when the function is not used in real applications 11 SNMP Disable SNMP if you are not using it If you are using SNMP you should do so only temporarily for tracing and tes...

Страница 4: ...e designed to provide reasonable protection against harmful interference in a commercial environment Operation of this equipment in a residential area is likely to cause harmful interference in which...

Страница 5: ...VR Series 2 4 2 Alarm Input Port 2 4 3 Alarm Output Port 2 4 4 Alarm Relay Specifications 2 5 Remote Control 2 6 Mouse Operation 2 7 Mouse Control 3 Local Basic Operation 3 1 Boot up and Shutdown 3 1...

Страница 6: ...review 3 6 1 Preview 3 6 2 Navigation bar 3 6 2 1 Main Menu 3 6 2 2 Dual screen operation 3 6 2 3 Output Screen 3 6 2 4 Previous screen next screen 3 6 2 5 Tour 3 6 2 6 PTZ 3 6 2 7 Color 3 6 2 8 Image...

Страница 7: ...PTZ Function 3 7 4 1 Call Preset 3 7 4 2 Call Pattern 3 7 4 3 Call Tour 3 7 4 4 Call Scan 3 7 4 5 Call Rotation 3 7 4 6 Aux 3 8 Record Settings 3 9 Search and Playback 3 9 1 Real time Playback 3 9 2...

Страница 8: ...0 7 ANPR 3 10 7 1 Plate recognition settings 3 10 7 2 B W List 3 10 8 Audio Detect 3 10 9 Smart Track 3 10 10 Alarm Settings 3 10 11 Abnormality 3 10 12 Alarm output 3 10 13 Temperature Alarm 3 10 14...

Страница 9: ...e and Manager 3 13 1 Account 3 13 1 1 User 3 13 1 1 1 Add User 3 13 1 1 2 Modify user 3 13 1 1 3 Change Password 3 13 1 2 Modify Group 3 13 1 3 Security Question 3 13 1 4 ONVIF User 3 13 1 5 Online Us...

Страница 10: ...el 4 5 1 1 Smart Track 4 5 1 2 Fisheye De Warp 4 5 1 3 Split Track 4 5 2 Voice Talk 4 5 3 PTZ 4 5 4 Image Alarm Output 4 5 5 Panoramic PTZ Camera Preview 4 5 6 Zero Channel Preview 4 5 7 Real Time Spo...

Страница 11: ...6 4 1 4 Scene Change 4 6 4 1 5 Video analytics 4 6 4 1 6 Video Quality Analytics 4 6 4 2 IVS Plan 4 6 4 3 IVS 4 6 4 3 1 IVS 4 6 4 3 2 Global Config 4 6 4 4 Face Detect 4 6 4 5 People Counting 4 6 4 6...

Страница 12: ...2 3 Custom Split 4 6 6 3 PTZ 4 6 6 4 Voice 4 6 6 4 1 File List 4 6 6 4 2 Schedule 4 6 6 5 Account 4 6 6 5 1 User name 4 6 6 5 2 Group 4 6 6 5 3 ONVIF User 4 6 6 6 Security 4 6 6 7 Auto maintain 4 6 6...

Страница 13: ...Watermark 4 7 6 Lock file 4 7 7 Unlock file 4 8 Smart Search 4 8 1 IVS 4 8 2 ANPR 4 8 3 Face Detection 4 9 Alarm 4 10 Information 4 10 1 Version 4 10 2 Log 4 10 3 Online User 4 10 4 Video Quality Ana...

Страница 14: ...age Take care to avoid coming into contact with electricity LASER BEAM Indicates a laser radiation hazard Take care to avoid exposure to a laser beam ESD Electrostatic Sensitive Devices Indicates a de...

Страница 15: ...en notice The product updates might cause some differences between the actual product and the Manual Please contact the customer service for the latest program and supplementary documentation There st...

Страница 16: ...and store the device within allowed humidity and temperature range Power Requirement Make sure to use the designated battery type Otherwise there may be explosion risk Make sure to use batteries acco...

Страница 17: ...ies support TV VGA HDMI output at the same time Short cut menu when preview Support popular PTZ decoder control protocols Support preset tour and pattern Playback Support each channel real time record...

Страница 18: ...You can search or playback the saved files at the local end or via the Web USB device Backup Support network backup USB2 0 record backup function the recorded files can be saved in network storage se...

Страница 19: ...Requirement 1 Package Appearance No obvious damage Packing materials No broken or distorted positions that could be caused by hit 2 Labels Labels on the device Not torn up Do not tear up or throw away...

Страница 20: ...1 Figure 2 1 SN Icon Function SN Icon Function 1 Status Status indicator light 2 HDD HDD indicator light 3 NET Network indicator light 4 Power Power indicator light 5 USB port 6 Power on off button 7...

Страница 21: ...own as in Figure 2 2 Figure 2 2 Please refer to the following sheet for detailed information SN Function SN Function 1 Power socket 2 Alarm input alarm output RS485 port 2 RS232 port 4 Audio output 5...

Страница 22: ...connecting two NVRs or you are connecting one NVR and one other device please use a relay to separate them 2 Alarm output The alarm output port should not be connected to high power load directly It s...

Страница 23: ...The A B cable to control the RS485 devices It is to connect to control devices such as PTZ dome camera 120 should be parallel connected between A B lines on the far end to reduce reflection and guaran...

Страница 24: ...es It is to connect to control devices such as PTZ dome camera 120 should be parallel connected between A B lines on the far end to reduce reflection and guarantee the signal quality 2 4 1 3 Super 4U...

Страница 25: ...ground with that of NVR if you use external power to the alarm device Figure 2 18 2 4 3 Alarm Output Port Provide power to peripheral alarm device To avoid overloading please read the following relay...

Страница 26: ...ol The remote control interface is shown as in Figure 2 19 Please note remote control is not our standard accessory and it is not included in the accessory bag Figure 2 19 Serial Number Name Function...

Страница 27: ...nu or cancel current operation close upper interface or control 10 Record Start or stop record manually In record interface working with the direction buttons to select the record channel Click this b...

Страница 28: ...alized Here stands for backspace button stands for space button In English input mode _stands for input a backspace icon and stands for deleting the previous character In numeral input mode _ stands f...

Страница 29: ...an input numeral English character small capitalized Here stands for backspace button stands for space button In English input mode _stands for input a backspace icon and stands for deleting the previ...

Страница 30: ...etting applies for current selected channel If you are in multiple window mode system automatically switches to the corresponding channel Exit current menu without saving the modification Press middle...

Страница 31: ...hutting down Do not click power on off button directly Do not unplug the power cable or click power on off button to shutdown the device directly when the device is running especially when it is recor...

Страница 32: ...two types from number letter and special character excluding and It is recommended to set a password of high security according to the prompt Prompt question If you set the prompt question here On th...

Страница 33: ...device goes to password protection interrface See Figure 3 3 Note Device adopts unlock pattern to login by default if you have set pattern here If there is no unlock pattern please input the password...

Страница 34: ...u have not input email here or you need to update the email information please go to the main menu Setting System Account to set Security question Set security questions and corresponding answers Prop...

Страница 35: ...need to contact the customer service for help Step 1 Go to the device login interface See Figure 3 4 or Figure 3 5 If you have set unlock pattern device displays unlock pattern login interface See Fi...

Страница 36: ...and then device goes to Figure 3 7 If you have input email when you are initializing the device device goes to Figure 3 7 Figure 3 6 Figure 3 7 Step 3 Click OK button and device goes to Figure 3 8 Af...

Страница 37: ...de you get via the assigned email For the same QR code max scan twice to get two security codes Refresh the QR code if you want to get security code again The security code on your email is only valid...

Страница 38: ...ew password and then confirm The password can be set from 8 characters through 32 characters and contain at least two types from number letter and special character excluding and It is recommended to...

Страница 39: ...initialization Device goes to startup wizard See Figure 3 11 Select Auto check for updates device automatically checks if there is new applications or not every day Figure 3 11 Note After auto check...

Страница 40: ...n bar and system replays the records in the current channel during the set time period Auto logout Here is for you to set auto logout interval once login user remains inactive for a specified time Val...

Страница 41: ...YYYYY MM DD MM DD YYYYY or DD MM YYYY Time format You can select 24 hour or 12 hour time format Date separator There are three denotations to separate date dot beeline and solidus System time Displays...

Страница 42: ...save settings 3 4 1 3 Holiday Here you can add edit delete holiday After you successfully set holiday information you can view holiday item on the record and snapshot period Step 1 Click Holiday butt...

Страница 43: ...Figure 3 14 Step 2 Click Add new holiday button and device displays the following interface See Figure 3 15...

Страница 44: ...pdown list of the state and you can enable disable holiday date Click to change the holiday information Click to delete current date Figure 3 16 Step 5 Click Apply button to save settings 3 4 2 Basic...

Страница 45: ...etwork TCP IP you can go to the TCP IP interface Different series products have different Ethernet adapter amount and type Please refer to the actual product Figure 3 17 Step 2 Click device display ed...

Страница 46: ...offline Network fault tolerance In this mode device uses bond0 to communicate with the external devices You can focus on one host IP address At the same time you need to set one master card Usually t...

Страница 47: ...P interface Note Click to cancel NIC bonding Please note device needs to reboot to activate new setup Step 5 Set network parameters IP Version There are two options IPv4 and IPv6 Right now system supp...

Страница 48: ...device name and device SN All collected information is used only for the purpose of remote access Step 3 Click Next to conplete the setting If system displays Online in the Status box P2P registratio...

Страница 49: ...sword Step 4 After device registraion on mobile App click Start Preview and you can see the monitor screen 3 4 4 Registration After add remote device the device can receive storage and manage the vide...

Страница 50: ...isplay network camera IP address Port It is to display network camera port number Device name It is to display network camera name Add Delete Click to delete the device click to add the device to the...

Страница 51: ...device IP address RTSP port Input RTSP port of the remote device The default setup is 554 Note Skip this item if the manufacture is private or customize HTTP port Input HTTP port of the remote device...

Страница 52: ...ng one channel number Decode buffer There are three items realtime local fluent Service type There are four types auto TCP UDP MULTICAST ONVIF device only Note The default connection mode is TCP if th...

Страница 53: ...RAID has different levels such as RAID 5 and RAID 6 Each level has different data protection data availability and performance You can create RAID according to the actual needs Step 1 Click Next The R...

Страница 54: ...vailable The system creates RAID 5 only and uses the existing hotspare disk Before the creation there is RAID available in the system The system breaks up the original RAID and creates a new RAID 5 wi...

Страница 55: ...4 6 Schedule After set record schedule and snapshot schedule the device can automatically record video and snapshot image at the specified time 3 4 6 1 Schedule Record After set schedule record device...

Страница 56: ...Week day There are eight options ranges from Saturday to Sunday and all Holiday It is to set holiday setup Please note you need to go to the General interface Main Menu Setting System General to add...

Страница 57: ...shown as in Figure 3 26 There are five record types regular motion detection MD Alarm MD alarm and IVS Figure 3 26 Please following the steps listed below to draw the period manually Step 1 Select a...

Страница 58: ...Figure 3 29 Step 3 Please draw manually to set record period There are six periods in one day See Figure 3 30 Note If you have added a holiday you can set the record period for the holiday Figure 3 30...

Страница 59: ...snapshot image according to the period you set here For example the alarm snapshot period is from 6 00 18 00 Monday device can snapshot during the 6 00 18 00 when an alarm occurs Step 1 Click Snapshot...

Страница 60: ...main menu Setting Event Video Detect Motion Detect please select the snapshot channel and enable snapshot function See Figure 3 33 Figure 3 33 Step 5 Refer to chapter 3 4 6 2 to set snapshot period St...

Страница 61: ...t function so that the device can automatically record and snapshot System supports main stream and sub stream There are three statuses schedule manual stop See Figure 3 35 Please highlight icon to se...

Страница 62: ...4 6 4 Record Info After system recorded video files go to the record info interface to view device name start time end time and etc From main menu Info System Record the interface is shown as below Se...

Страница 63: ...IP importing IP and exporting IP 3 5 1 1 Change IP address Step 1 From Main menu Setting Camera Registration check the box before the camera name and then click Change IP or click the before the camer...

Страница 64: ...sses If there is IP conflict when changing static IP address device pops up IP conflict dialogue box If batch change IP address device automatically skips the conflicted IP and begin the allocation ac...

Страница 65: ...includes IP address port remote channel number manufacturer user name and password When you enable backup encryption the extension name of the exported file is backup All the other softwares cannot op...

Страница 66: ...port and export The import and export device shall have the same language format 3 5 2 Remote Device Initialization Remote device initialization can change remote device login password and IP address...

Страница 67: ...want to use current device password and email information the remote device automatically uses NVR admin account information login password and email There is no need to set password and email Please...

Страница 68: ...e password ranges from 8 to 32 digitals It can contain letters numbers and special characters excluding The password shall contain at least two categories Usually we recommend the strong password 3 Cl...

Страница 69: ...on Email Input an email address for reset password purpose Note Cancel the box and then click Next or Skip if you do not want to input email information here Step 4 Click Next button Enter Change IP a...

Страница 70: ...nge several devices IP addresses at the same time please input incremental value Device can add the fourth address of the IP address one by one to automatically allocate the IP addresses If there is I...

Страница 71: ...60 Brightness It is to adjust monitor window bright The value ranges from 0 to 100 The default value is 50 The larger the number is the bright the video is When you input the value here the bright sec...

Страница 72: ...he brightness of the brightest section according to the HLC control level It can reduce the area of the halo and lower the brightness of the whole video OFF It is to disable the BLC function Please no...

Страница 73: ...From Main menu Setting System Encode you can see the following interface See Figure 3 46 Channel Select the channel you want Type It is to set device bit stream type For main stream there are three op...

Страница 74: ...on Bit rate type System supports two types CBR and VBR Main stream It is to set frame rate to change video quality The higher the frame rate is the better the video quality is The referenced bit rate...

Страница 75: ...Preview and Monitor Preview means the privacy mask zone cannot be viewed by user when system is in preview status Monitor means the privacy mask zone cannot be view by the user when system is in monit...

Страница 76: ...regular and trigger If you set regular mode you need to set snapshot frequency If you set trigger snapshot you need to set snapshot activation operation Image size Here you can set snapshot picture s...

Страница 77: ...From main menu Setting Camera Channel name you can see an interface shown as in Figure 3 49 It is to modify channel name It max supports 31 character Please note you can only modify the channel name o...

Страница 78: ...u Setting Camera Remote Upgrade the interface is shown as below See Figure 3 50 Step 2 Click Browse button and then select the upgrade file Then select a channel or you can select device type filter t...

Страница 79: ...sponding channel such as motion detect video loss tampering alarm and etc See Figure 3 51 IPC status Front end does not support Front end supports There is alarm event from current front end Connectio...

Страница 80: ...Figure 3 51 3 5 7 2 Firmware It is to view channel IP address manufacturer type system version SN video input audio input external alarm and etc See Figure 3 52 Figure 3 52...

Страница 81: ...is recording system displays this icon 2 When motion detection alarm occurs system displays this icon 3 When video loss alarm occurs system displays this icon 4 When current channel is in monitor loc...

Страница 82: ...55 3 6 2 1 Main Menu Click button to go to the main menu interface 3 6 2 2 Dual screen operation Important This function is for some series only Click to select screen 2 you can view an interface show...

Страница 83: ...TZ control interface 3 6 2 7 Color Click button system goes to the color interface Please make sure system is in one channel mode 3 6 2 8 Image Click to go to the image interface Please make sure syst...

Страница 84: ...er interface It is to view and manage HDD information 3 6 2 16 USB Manager Click system goes to the USB Manager interface It is to view USB information backup and update 3 6 3 Preview Control Interfac...

Страница 85: ...ord in current channel 2 Digital zoom It is to zoom in specified zone of current channel It supports zoom in function of multiple channel Click button the button is shown as There are two ways for you...

Страница 86: ...f the main stream and sub stream M Main stream Its bit streams are big and definition is high It occupies large network bandwidth suitable for video wall surveillance storage and etc S Sub stream Its...

Страница 87: ...is different for different models The actual product shall prevail Figure 3 62 3 6 5 Edit View Sequence It is to set customized view layout Warning The preview layout restores default channel layout a...

Страница 88: ...ay the max screen number amount and current screen number In Figure 3 63 click or switch the video from other channel Figure 3 63 Step 2 On the edit view interface drag the channel to the desired wind...

Страница 89: ...cel to exit without saving the settings Figure 3 65 3 6 6 Preview Display Effect Setup 3 6 6 1 Display From Main Menu Setting System Display you can go to the following interface See Figure 3 66 Here...

Страница 90: ...orts 4 window split Please note this function is for some series product only Screen enable Check the box here to enable the screen In this way it can display the video Screen No Select the correspond...

Страница 91: ...d channel 16 position please right click channel 1 video window and then drag to the channel 16 video window release button you can change channel 1 and channel 16 position Tour setup Here you can set...

Страница 92: ...lick to enable disable tour Click Save button to save current setup 3 6 6 3 Custom Split It is to set customized local preview display mode From Main menu Setting System Display Custom split you can s...

Страница 93: ...ct basic mode In regular mode drag the mouse in the preview frame you can merge several small windows to one window so that you can get you desired split mode After the setup the selected window has t...

Страница 94: ...for some series only 3 6 7 1 Fisheye de warp during preview interface The fisheye camera panoramic camera has wide video of angle but its video is serious distorted The de warp function can present t...

Страница 95: ...modes ceiling mount wall mount ground mount The different installations modes have different de warp modes Please refer to the following sheet for detailed information Installation modes Icon Note Cei...

Страница 96: ...o realize fish eye de warp 3 6 7 2 Fish eye de warp during playback Step 1 On the main menu click search button Step 2 Select 1 window playback mode and corresponding fish eye channel click to play Ri...

Страница 97: ...en On the main screen or the extension screen use the middle button of the mouse to zoom in or zoom out Figure 3 76 3 6 9 Smart Track This function allows you to view the trigger video of the fish eye...

Страница 98: ...ice with temperature measurement function is connected on the front end the system supports real time temperature measurement Note It might collect the human body temperature information in the monito...

Страница 99: ...an zoom in and out on the local scene The Panoramic PTZ camera shall be connected on the front end Step 1 On the preview interface double click the panoramic camera channel The preview interface of th...

Страница 100: ...port Connect power adapter to the dome In the main menu from Setting System PTZ you can see an interface is shown as in Figure 3 80 Here you can set the following items Channel Select the current came...

Страница 101: ...1 3 7 2 PTZ Control After completing all the setting please click save button Right click mouse click Fn Button in the front panel or click Fn key in the remote control The interface is shown as in Fi...

Страница 102: ...an speed 1 You can use the remote control to click the small keyboard to set You can click and of the zoom focus and iris to zoom in out definition and brightness The PTZ rotation supports 8 direction...

Страница 103: ...to open the menu you can set preset tour pattern scan and etc See Figure 3 85 Figure 3 85 Please refer to the following sheet for detailed information Please note the above interface may vary due to...

Страница 104: ...terface is shown as in Figure 3 87 Click Set button and then input preset number Click Set button to save current preset Figure 3 87 3 7 3 2 Tour Setup In Figure 3 86 click tour button Input tour valu...

Страница 105: ...go back to Figure 3 83 to operate zoom focus iris direction operation In Figure 3 86 click End button Figure 3 89 3 7 3 4 Scan Setup In Figure 3 86 click Scan button Use direction buttons to set camer...

Страница 106: ...to call a tour Click again to stop call 3 7 4 4 Call Scan In Figure 3 85 input Scan value and then click to call a tour Click again to stop call 3 7 4 5 Call Rotation In Figure 3 85 click to enable th...

Страница 107: ...ot according to the preset plan The factory default record mode is 24 hour continuous recording You can set the record time and type according to the actual needs For details see chapter 3 4 6 Schedul...

Страница 108: ...Figure 3 92 Figure 3 93...

Страница 109: ...the corresponding record file trace in the time bar 4 Playback mode and channel selection pane Playback mode 1 4 9 16 It may vary due to different series In 1 window playback mode you can select 1 X...

Страница 110: ...pane Play Pause There are three ways for you to begin playback The play button Double click the valid period of the time bar Double click the item in the file list In slow play mode click it to switch...

Страница 111: ...reen color stands for the regular record file The red color stands for the external alarm record file The yellow stands for the motion detect record file 11 Time bar unit The option includes The small...

Страница 112: ...ng the motion detect play process you cannot implement operations such as change time bar begin backward playback or frame by frame playback 16 Other channel synchroni zation switch to play when playb...

Страница 113: ...such as slow play 1 slow play 2 and etc Fast forward In playback mode click to realize various fast play modes such as fast play 1 fast play 2 and etc Adjust the volume of the playback Smart search Cl...

Страница 114: ...en click to playback Step 2 Select a time at the time bar and then click to start clip Step 3 Select a time at the time bar and then click to stop clip Step 4 Click system pops up dialogue box to save...

Страница 115: ...Event Video detect Motion detect Please follow the steps listed below Step 1 Select a channel to playback video and then click You can view the grids on the playback video Note This function is for o...

Страница 116: ...Figure 3 97 Figure 3 97 Playback Mark During 1 window playback mode click mark file list button in Figure 3 92 or Figure 3 93 you can go to mark file list interface Double click one mark file you can...

Страница 117: ...u exit mark management interface If the mark file you want to playback has been removed system begins playback from the first file in the list 3 9 5 Playback Image Here you can search and play the ima...

Страница 118: ...k mode System supports 1 4 8 16 split mode Slight different may be found here The 4 channel series product supports 4 split mode The 8 channel series product support 8 split mode The 16 channel or hig...

Страница 119: ...Figure 3 100 Step 2 Select Channel Start Time End Time and Event Type Click Smart Search The search results are displayed See Figure 3 101...

Страница 120: ...ture to play the video file Select the file click and select the backup catalog in the backup interface Select backup type and file type choose the file and click Start to save the file to an external...

Страница 121: ...to mark the time of the detected event 3 9 7 2 Face Detection Human face detection is to analyze the video from the camera and check there is any human face or not It is to search and playback human f...

Страница 122: ...el Start Time and End Time and choose the details for face detection as needed such as gender age wearing glasses or not wearing mask or not and with beard or not Click Smart Search The search results...

Страница 123: ...e the file and click Start to save the file to an external storage device Select a file and then click you can lock current file in case it will be overwritten in the future Select a file and then cli...

Страница 124: ...r start time end time Note Device supports fuzzy plate number search function Device searches all plate numbers by default if you do not input plate number information Step 3 Click Smart Search Device...

Страница 125: ...Figure 3 106 Step 4 Click the image you can view the record file Click Select Device Name and Address in the Browse interface and click OK to export plate information See Figure 3 107...

Страница 126: ...device Select a file and then click you can lock current file in case it will be overwritten in the future Select a file and then click you can mark the time of the detected event 3 9 8 File List Cli...

Страница 127: ...ecords of current day System max displays 128 record files in one list Click to go back to the calendar channel selection interface Lock or Unlock File In Figure 3 108 select a file first and then cli...

Страница 128: ...The video detect adopts the computer image and graphics process technology It can analyze the video and check there is considerable changing degree or not Once video has changed considerably such as...

Страница 129: ...pshot record channel will begin another 10s while the screen prompt alarm upload email will not be activated again After 10s if system detects another alarm signal it can generate an alarm since the a...

Страница 130: ...r from alarm activation channel you select at the Record channel item Buzzer Highlight the icon to enable this function The buzzer beeps when alarm occurs Please highlight icon to select the correspon...

Страница 131: ...Figure 3 111 Figure 3 112 Figure 3 113...

Страница 132: ...eo System can trigger the corresponding alarm operations In Figure 3 110 select video loss from the type list You can see the interface is shown as in Figure 3 115 This function allows you to be infor...

Страница 133: ...t tour pattern activation operation when video loss occurs Please refer to chapter 3 10 1 1 motion detection for detailed information Note In Detect interface copy paste function is only valid for the...

Страница 134: ...g When the detected scene has changed system can generate an alarm From main menu Setting Event Video detect Scene change the interface is shown as in Figure 3 117 Please refer to chapter 3 10 1 1Moti...

Страница 135: ...rs the phenomenon such as video fuzzy overexposure and image color cast the system triggers the alarm linkage actions Step 1 Enter from main menu Setting Event Video Detection Video Quality Analytics...

Страница 136: ...x Step 3 Click Setting on the right of Setting item The Video Quality Analytics interface is displayed See Figure 3 119 Figure 3 119 Step 4 Select the items such as strip and noise and set the thresho...

Страница 137: ...deo diagnosis Overexposure The brightness of the image refers to the intensity of image pixels Black is the darkest while white is the brightest Black is represented by 0 and white is represented by 2...

Страница 138: ...rt plan the interface is shown as below See Figure 3 120 Figure 3 120 Please select a channel number and a preset Click Add The preset is now on the list See Figure 3 121 Note Some smart camera does n...

Страница 139: ...on cannot be valid at the same time For example when add the IVS plan to the preset 1 the human face detection icon becomes grey Click OK to complete the setup 3 10 3 IVS The general behavior analysis...

Страница 140: ...the environment of too many objects or the changing light The surveillance environment shall not contain glasses reflection light from the ground and water Free of tree branches shadow mosquito and bu...

Страница 141: ...ort several tripwires at the same scene suitable for complicated environment Support object size filter From main menu Setting Event IVS the interface is shown as below See Figure 3 123 Figure 3 123 C...

Страница 142: ...ipwire can be a direct line curve or polygon Right click mouse to complete Tips Click to delete the corresponding rule Click you can see the following interface See Figure 3 125 You can refer to the f...

Страница 143: ...rm occurs Record channel System auto activates tripwire channel s to record once an alarm occurs Please make sure you have set intelligent record in Schedule interface Main Menu Setting Schedule and s...

Страница 144: ...Figure 3 126 Figure 3 127...

Страница 145: ...ny object entering or exiting the zone in the specified direction From main menu Setting Event IVS click Add button and then select type as intrusion the interface is shown as below See Figure 3 129 S...

Страница 146: ...Figure 3 129 Click draw button to draw the zone See Figure 3 130 Figure 3 130...

Страница 147: ...e the max size is larger than the min size Now you can draw a rule Left click mouse to draw a warning zone Right click mouse to complete the setup Tips Click to delete the corresponding rule Click you...

Страница 148: ...e the max size is larger than the min size Now you can draw a rule Left click mouse to draw a zone until you draw a rectangle you can right click mouse Tips Click to delete the corresponding rule Clic...

Страница 149: ...Figure 3 133 Click Draw button to draw a zone See Figure 3 134 Figure 3 134...

Страница 150: ...Now you can draw a rule Left click mouse to draw a zone until you draw a rectangle you can right click mouse Tips Click to delete the corresponding rule Click you can refer to the chapter 3 10 3 1 to...

Страница 151: ...m Please make sure the max size is larger than the min size Now you can draw a rule Left click mouse to draw a zone until you draw a rectangle you can right click mouse Tips Click to delete the corres...

Страница 152: ...Duration setup Sensitivity setup Min gathering zone setup Figure 3 137 Click draw button to draw the zone See Figure 3 138...

Страница 153: ...ect is smaller than the min size or larger than the max size there is no alarm Please make sure the max size is larger than the min size Now you can draw a rule Left click mouse to draw a zone until y...

Страница 154: ...Figure 3 139 Click draw button to draw the zone See Figure 3 140...

Страница 155: ...ntil you draw a rectangle you can right click mouse Tips Click to delete the corresponding rule Click you can refer to the chapter 3 10 3 1 to set other parameters Click Apply to complete the setup 3...

Страница 156: ...rent channel Calibration zone Click Add zone you can draw a calibration zone at the left pane of the interface Select a zone and then click Delete zone button you can remove the selected zone Select g...

Страница 157: ...Setting Event Face detection the interface is shown as in Figure 3 143 Face ROI Check the box here system can enhance the human face display pane Note Make sure the connected camera supports human fac...

Страница 158: ...box here you can view the people amount on the surveillance video Rule setup Click Set button you can set people counting zone name and direction entry exit Entry No It is to set people entry amount S...

Страница 159: ...lease refer to chapter 3 10 1 1 Motion detect for detailed information 3 10 6 Heat Map Heat map technology can monitor the active objects distribution status on the specified zone during a period of t...

Страница 160: ...Figure 3 145 Step 2 Select a channel number and then check the box to enable the function Step 3 Click Setup button Enter setup interface See Figure 3 146 Figure 3 146...

Страница 161: ...ted below Step 1 From main menu Setup Event ANPR Vehicle Recognition Enter Vehicle Recognition interface See Figure 3 147 Figure 3 147 Step 2 Check Enable to enable plate recognition function Step 3 S...

Страница 162: ...mber is red the whitelist plate number is green the regular plate number is white Add blacklist whitelist Step 1 From main menu Setting Event ANPR B W list Enter B W list interface See Figure 3 148 Fi...

Страница 163: ...3 149 Backup encryption is enabled by default when exporting the black white list If file backup encryption is enabled the extension name of the exported file is backup If the backup encryption is dis...

Страница 164: ...r parameters Figure 3 150 3 10 9 Smart Track This function allows you to view the trigger video of the fish eye PTZ camera The fish eye is the main camera to view the whole surveillance condition and...

Страница 165: ...Figure 3 151 Step 2 Add surveillance scene 1 Click Add The Add interface is displayed See Figure 3 152...

Страница 166: ...follows 1 Click Select corresponding to Main Cam item 2 In the displayed Fisheye dialogue box select the fisheye camera 3 Click OK In the text boxes behind the Main Cam item the system displays the ch...

Страница 167: ...fisheye camera and PTZ position CAUTION To enhance trigger accuracy a distant object is suggested as the first calibration 1 Click or double click the name line of the surveillance scene The Config i...

Страница 168: ...window For icon description see the following table Note indicates the center of the PTZ window Icon Description Control the PTZ to zoom in and zoom out Adjust the definition of the PTZ image Adjust...

Страница 169: ...and then you can view the smart track window For details see chapter 3 6 9 Smart Track 3 10 10 Alarm Settings In the main menu from Setting Event Alarm you can see alarm setup interface Alarm in Here...

Страница 170: ...ompt alarm upload email will not be activated again After 10s if system detects another alarm signal it can generate an alarm since the anti dither time is out Alarm output The number here is the devi...

Страница 171: ...m and MD event occurred at the same time Tour Here you can enable tour function when an alarm occurs System supports 1 8 window tour Please go to chapter3 6 6 1 Display for tour interval setup Please...

Страница 172: ...Figure 3 157 Figure 3 158...

Страница 173: ...Figure 3 159 Figure 3 160...

Страница 174: ...t the corresponding function After setting all the setups please click save button 3 10 11 Abnormality There are three types Disk Network User Disk Disk error no disk no space See Figure 3 163 Network...

Страница 175: ...1 to 30 minutes Latch Here you can set corresponding delaying time The value ranges from 1s 300s System automatically delays specified seconds in turning off alarm and activated output after external...

Страница 176: ...Figure 3 164 Figure 3 165...

Страница 177: ...vent occurs system can generate an alarm Manual Alarm device is always on the alarming mode Stop Disable alarm output function Click OK button of the alarm reset you can clear all alarm output status...

Страница 178: ...event Alarm Out Connect alarm device such as light siren in the alarm out port When an alarm occurs NVR transmits the alarm information to the alarm device Latch The alarm lasts for 0 300 seconds aft...

Страница 179: ...rs NVR triggers snapshot in the selected channel Note You shall enable alarm snapshot and auto snapshot first Log Select the check box When an alarm occurs NVR records the alarm information in the log...

Страница 180: ...ct Privacy After enable this function once the overlay information contain the privacy character it displays as For example the privacy character is 12 56 89 the local preview and WEB surveillance inf...

Страница 181: ...cter is 90 NVR displays 34567 on local preview and Web preview interface if the sending out information is 123456789 Line delimiter After set the line delimiter the overlay information after the delim...

Страница 182: ...vacy information Step 3 Click OK button 3 10 14 2 Connection type Connection type is UDP or TCP Step 1 Click Setup Enter Setup interface See Figure 3 170 Figure 3 170 Step 2 Source IP and port refers...

Страница 183: ...K to complete setup 3 11 Network 3 11 1 Network Settings 3 11 1 1 TCP IP From main menu Setting Network TCP IP the interface is shown as in Figure 3 172 IP Version There are two options IPv4 and IPv6...

Страница 184: ...the external devices You can focus on one host IP address At the same time you need to set one master card Usually there is only one running card master card System can enable alternate card when the...

Страница 185: ...rating you can not modify IP Subnet mask Gateway MTU It is to set MTU value of the network adapter The value ranges from 1280 7200 bytes The default setup is 1500 bytes Please note MTU modification ma...

Страница 186: ...there is no connection limit TCP port Default value is 37777 UDP port Default value is 37778 HTTP port Default value is 80 HTTPS port Default value is 443 RTSP port Default value is 554 Important Sys...

Страница 187: ...ame and PPPoE password you get from your ISP Internet service provider Click save button you need to restart to activate your configuration After rebooting NVR will connect to internet automatically T...

Страница 188: ...to access the device Preparation Before the operation make sure the device supports DNS type and go to the DDNS service provider website to register the domain name via the PC After you register the d...

Страница 189: ...have logged in the DDNS service provider website to register an account user name and password Interval After DDNS boots up it sends out refresh query regularly The unit is minute Step 4 Click Apply o...

Страница 190: ...ault UPNP default port setting is the HTTP TCP and UDP of the NVR Add to the list Click it to add the mapping relationship Delete Click it to remove one mapping item Double click one item you can chan...

Страница 191: ...ion to add a For the newly added IP address it is in enable status by default Remove the before the item and then current item is not in the list b System max supports 64 items c Address column suppor...

Страница 192: ...Figure 3 180 3 11 1 6 2 Sync Time Right By setting the trusted sites you can specify the IP host to synchronize or modify device time and prevent several IP hosts from synchronizing time with the sam...

Страница 193: ...able check box Step 3 Add IP host 1 Click Add The Add interface is displayed See Figure 3 182 Figure 3 182 2 Configure the IP address For details see the following table Note You can add 64 IP address...

Страница 194: ...git Receiver Please input receiver email address here System max supports 3 email boxes System automatically filters same addresses if you input one receiver repeatedly SSL enable System supports SSL...

Страница 195: ...management system SNMP is widely used in various scenarios network devices software and systems Preparation Install SNMP monitor and management tool such as MIB Builder and MG SOFT MIB Browser Obtain...

Страница 196: ...alled with MG SOFT MIB Browser It is the destination address to receive trap information from the device Trap Port The destination port to receive trap information from the device Read Only User Enter...

Страница 197: ...annel number and program version 3 11 1 9 Multicast Multicast setup interface is shown as in Figure 3 185 Figure 3 185 Here you can set a multiple cast group Please refer to the following sheet for de...

Страница 198: ...y get multiple cast address and add it to the multiple cast groups You can enable real time monitor function to view the view Please note multiple cast function applies to special series only 3 11 1 1...

Страница 199: ...D here shall be the same with the ID you input in Figure 3 187 Click Add button to complete the setup 4 Now you can boot up the proxy server When you see the network status is Y it means your registra...

Страница 200: ...l IP you set here is for cluster external control It is for external network connection Figure 3 188 3 11 1 13 P2P P2P is a kind of convenient private network penetration technology You do not need to...

Страница 201: ...t the same time After Sniffer began you can exit to implement corresponding network operation such as login WEB monitor Please go back to Sniffer interface to click stop Sniffer System can save the pa...

Страница 202: ...ty record time and etc The operation includes format resume from error change HDD property Read write Read only Here you can also set alarm and HDD storage position 3 12 1 Basic It is to manage HDD st...

Страница 203: ...edule It is to set schedule record and schedule snapshot NVR can record or snapshot as you specified For detailed information please refer to chapter 3 4 6 1 schedule record and 3 4 6 2 schedule snaps...

Страница 204: ...tting Storage FTP enter FTP interface See Figure 3 193 Step 2 Select the Enable check box to enable FTP function Select FTP type FTP transmits data with clear text mode and SFTP transmits data with en...

Страница 205: ...ads the lasted image If the image interval is 5 seconds and the snapshot frequency is 2 seconds system will send out the latest image at the buffer at 5 seconds If the image upload interval is smaller...

Страница 206: ...ormation please refer to chapter 3 4 6 3 record control 3 12 6 HDD Information Here is to list hard disk type total space free space and status See Figure 3 194 means current HDD is normal means there...

Страница 207: ...second HDD is current working HDD Type The corresponding HDD property Total space The HDD total capacity Free space The HDD free capacity Status HDD can work properly or not Bad track Display there is...

Страница 208: ...HDD Group number of current hard disk Figure 3 196 Please select the correspond group from the dropdown list and then click Apply button Click sub stream snapshot button to set corresponding HDD grou...

Страница 209: ...hat is recording 3 12 8 1 Manual Detect From main menu Setting Storage HDD Detect Manual Detect the interface is shown as below See Figure 3 197 Please select detect type and HDD Click start detect to...

Страница 210: ...Figure 3 198 Click View you can see the detailed information such as detect result backup and S M A R T See Figure 3 199 and Figure 3 200...

Страница 211: ...Figure 3 199...

Страница 212: ...IP address Port It is to input ISCSI server port value The default setup is 3260 User name password It is to input ISCSI server user name and password Check the Anonymous button if it supports anonym...

Страница 213: ...lick Ok button to complete the setup Tips Click the modify delete button to change or remove the ISCSI disk Now from the main menu setting Storage HDD manage you can see the corresponding interface Se...

Страница 214: ...aid1 Raid5 Raid6 and Raid10 Local hotspare supports Raid1 Raid5 Raid6 and Raid10 3 12 10 1 RAID Config From Main menu Setting Storage RAID RAID Config it is for you to manage RAID HDD It can display R...

Страница 215: ...Figure 3 203 3 12 10 2 RAID Info From Main menu Setting Storage RAID RAID info it is to display RAID name space type member HDD hotspare HDD status and etc Here you can delete RAID See Figure 3 204...

Страница 216: ...3 205 The type includes two options Global It is global hotspare disk When any RAID becomes degrading it can replace and build the RAID Local It is local hotspare disk When the specified RAID becomes...

Страница 217: ...mbers and _ The default user amount is 64 and the default group amount is 20 System account adopts two level management group and user The user authorities shall be smaller than group authorities The...

Страница 218: ...Figure 3 206 Step 2 Click Add user button in Figure 3 206 The interface is shown as in Figure 3 207 Figure 3 207...

Страница 219: ...o delete the user 3 13 1 1 2 Modify user From main menu Setting System Account User click you can go to the following interface to change user information See Figure 3 208 Figure 3 208 For admin user...

Страница 220: ...ase input old password and then input new password twice to confirm Password confirm password The password ranges from 8 to 32 digitals It can contain letters numbers and special characters excluding...

Страница 221: ...210 Step 2 Click add group button in Figure 3 210 Enter Add group the interface See Figure 3 211 Step 3 Input group name and then input some memo information if necessary Check the box to select auth...

Страница 222: ...r you successfully answered security questions you can reset admin account password From main menu Setting System Account Security question the interface is shown as below See Figure 3 212 Input corre...

Страница 223: ...VR via the ONVIF user please use the verified ONVIF account to connect to the NVR Here you can add delete modify user Note The default ONVIF user is admin It is created after you initialize the NVR St...

Страница 224: ...13 Step 2 Click Add User button Enter Add User interface See the following figure Figure 3 214 Step 3 Set user name password and then select group from the dropdown list Step 4 Click Save to complete...

Страница 225: ...ect or block one user if you have proper system right System detects there is any newly added or deleted user in each five seconds and refresh the list automatically Figure 3 215 3 13 2 System Info 3...

Страница 226: ...Figure 3 216 3 13 2 2 BPS Here is for you to view current video bit rate kb s and resolution See Figure 3 217 Figure 3 217 3 13 3 Voice...

Страница 227: ...es product only 3 13 3 1 File Manage Here you can add audio file listen to the audio file or rename delete audio file Here you can also set audio volume See Figure 3 218 Figure 3 218 Click Add button...

Страница 228: ...Figure 3 219 3 13 3 2 Schedule It is to set schedule broadcast function You can play the different audio files in the specified periods See Figure 3 220 Figure 3 220 3 13 4 Event Information...

Страница 229: ...igure 3 221 3 13 4 2 Video Quality Analytics You can view the video analysis results of the channel and the system supports histogram and list to show the occurrence number of video analysis types in...

Страница 230: ...splay the people amount statistics image From main menu Info Event People Counting you can go to the following interface See Figure 3 223 Channel Please select a channel from the dropdown list Type Pl...

Страница 231: ...of each channel From main menu Info Event Heat Map you can go to the following interface See Figure 3 224 Select a channel input start time and end time Please note the report search period shall be w...

Страница 232: ...n a list System max displays 100 logs in one page It can save 500 000 logs on the HDD and 16384 logs on the system System max supports 500 000 16384 logs if there is a HDD System max supports 16384 lo...

Страница 233: ...igure 3 225 Figure 3 226 3 13 6 Broadcast It is to broadcast to the camera or broadcast to a channel group Step 1 From Mani menu Setting System Broadcast Enter the following interface See Figure 3 227...

Страница 234: ...Figure 3 227 Step 2 Click Add group Enter add group interface See Figure 3 228 Figure 3 228...

Страница 235: ...3 230 You can add IP in the following list The list supports max 64 IP addresses System supports valid address of IPv4 and IPv6 Please note system needs to check the validity of all IPv6 addresses an...

Страница 236: ...ed IP address k System only checks start address if you add IP address System check start address and end address if you add IP section and the end address shall be larger than the start address l Sys...

Страница 237: ...ervice interface is displayed See Figure 3 232 Figure 3 232 Step 2 Configure the parameters For details see the below table Parameter Description Password Reset Enabled by default If it is disabled th...

Страница 238: ...the configuration 3 13 8 Auto Maintain Here you can set auto reboot time and auto delete old files setup You can set to delete the files for the specified days See Figure 3 233 You can select proper s...

Страница 239: ...y calculates the capacity needed and remained See Figure 3 235 e System only backup files with a before channel name You can use Fn or cancel button to delete after file serial number f Click backup b...

Страница 240: ...ng System Import Export you can see the configuration file backup interface is shown as below See Figure 3 236 Figure 3 236 Export Please connect the peripheral device first and then go to the followi...

Страница 241: ...e and then set start time end time click Search button you can see log time and event information Click to view detailed log information c Select log items you want to save and then click backup butto...

Страница 242: ...an restore factory default setup to fix some problems when the device is running slowly Configuration error occurred From Main menu Setting System Default you can go to the default interface See Figur...

Страница 243: ...ting Info Update you can go to the following interface See Figure 3 240 Step 1 Insert USB device that contain the upgrade file Step 2 Click Start button and then select the bin file Step 3 You can see...

Страница 244: ...n is available It includes auto check and manual check Auto check System automatically detects if any new version is available once in a while Manual check Detect new version at real time During the u...

Страница 245: ...splays the new version information including release date and upgrade notes new version is available and go to Step 3 Step 3 Click Upgrade to upgrade the system 3 13 11 3 Uboot When NVR boots up durin...

Страница 246: ...Logout Log out menu You need to input password when you login the next time Restart Reboot device If you shut down the device there is a process bar for your reference system waits for 3 seconds and...

Страница 247: ...there are routers The device default IP address is 192 168 1 108 Step 3 Check the PC and device connection is OK or not Refer to the following two ways to check the network connection is OK or not Whe...

Страница 248: ...The password ranges from 8 to 32 digitals It can contain letters numbers and special characters excluding The password shall contain at least two categories Usually we recommend the strong password S...

Страница 249: ...email information please go to the main Setup System Account to set Security question Set security questions and corresponding answers Properly answer the questions to reset admin password In case you...

Страница 250: ...cutive times Each time the wrong password is entered the system will prompt the remaining number of times that the wrong password is allowed to be entered You can modify the number of times that the w...

Страница 251: ...want to upgrade the Web delete the original control first See the following two ways to delete the control Enter C Program Files webrec WEB30 WebPlugin and run the uninstall tool uninst exe The syste...

Страница 252: ...rmation Figure 4 7 Section 3 Start Talk button You can click this button to enable audio talk Click to select bidirectional talk mode There are four options DEFAULT G711a G711u and PCM See Figure 4 8...

Страница 253: ...button system pops up the following interface for you to select local play file See Figure 4 10 Figure 4 10 Section 6 Zero channel encoding Section 7 PTZ operation panel Section 8 Section 9 From the l...

Страница 254: ...window display mode and the channel number are by default For example for the 16 channel the max window split mode is 16 3 Multiple channel monitor system adopts extra stream to monitor by default Do...

Страница 255: ...rd by email or by answering the security questions local menu only When the password reset function is enabled you can scan the QR code on the Web to reset the password When the password reset functio...

Страница 256: ...e same QR code max scan twice to get two security codes Refresh the QR code if you want to get security code again The security code on you email is only valid for 24 hours After five times security c...

Страница 257: ...smart track image 3 Audio talk Click it to realize the bidirectional communication between the Web and front end device 4 Fisheye Click it to adjust fisheye mounting mode and display mode 5 Digital zo...

Страница 258: ...eye channel The PTZ camera rotates to the specified position and zooms in or zooms out to display the image 4 5 1 2 Fisheye De Warp On the preview window click and the fisheye correction interface is...

Страница 259: ...ew 8 de warp windows Figure 4 17 Take 1 360 panorama 4 correction windows for example You can use the color areas in the pamoramic pictures on the right for correction action or by moving the small pi...

Страница 260: ...nsion screen On the main screen or the extension screen use the middle button of the mouse to zoom in or zoom out Figure 4 19 4 5 2 Voice Talk Voice talk enables voice interaction between NVR and remo...

Страница 261: ...esired location and then click left limit button Then move the camera again and then click right limit button to set a right limit Preset Select Preset from the dropdown list Turn the camera to the co...

Страница 262: ...an adjust its brightness contrast hue and saturation Current channel border becomes green Or you can click Reset button to restore system default setup Figure 4 22 Alarm Output Here you can enable or...

Страница 263: ...the Panoramic PTZ camera is displayed See Figure 4 24 1 is the panoramic window and 2 is the local scene window Figure 4 24 Step 2 Select the local scene image 2 and rotate the camera to the specified...

Страница 264: ...eal Time Spot Temperature Measurement When a device with temperature measurement function is connected on the front end the system supports real time temperature measurement Note It might collect the...

Страница 265: ...Figure 4 26 4 6 Setup 4 6 1 Camera 4 6 1 1 Registration 4 6 1 1 1 Registration From Main menu Setup Camera Registration Registration you can see the following interface See Figure 4 97...

Страница 266: ...tialized device and then click the Initialize button to set the account Preview Click to view the preview video of the remote device State It is to display the device has been initialized or not That...

Страница 267: ...he means current network camera mode is hotspot Delete Select a device in the Added device list and then click Delete button system can disconnect the device and remove it from the Added device list M...

Страница 268: ...ct button to get the channel amount of the remote device Note We recommend click Connect button to get remote device channel amount the manual add operation may result in failure if the input channel...

Страница 269: ...mask default gateway manually IP address subnet mask default gateway You can input corresponding information here User name password The account you login the remote device Please input here to passwo...

Страница 270: ...p Encryption interface is displayed See Figure 4 30 Figure 4 30 Step 2 File backup encryption is enabled by default Click OK to select the save path Step 3 Click Save After the export is completed sys...

Страница 271: ...rm overwrite or not Click OK button the new IP setup can overwrite the old one Click Cancel button system adds the new IP setup Important You can edit the exported file Please make sure the file forma...

Страница 272: ...ness The default value is 50 The larger the number is the bright the video is When you input the value here the bright section and the dark section of the video will be adjusted accordingly You can us...

Страница 273: ...osures according to the environments situation so that the darkest area of the video is cleared WDR For the WDR scene this function can lower the high bright section and enhance the brightness of the...

Страница 274: ...o the following sheet for detailed information Parameter Function Channel Please select a channel from the dropdown list Video enable Check the box here to enable extra stream video This item is enabl...

Страница 275: ...etween two I frames The value ranges from 1 to 150 Default value is 50 Recommended value is frame rate 2 Watermark enable This function allows you to verify the video is tampered or not Here you can s...

Страница 276: ...or video System max supports 4 privacy mask zones Time Title You can enable this function so that system overlays time information in video window You can use the mouse to drag the time title position...

Страница 277: ...Figure 4 36 4 6 1 4 Camera Name From main window Setup Camera Camera name here you can set channel name See Figure 4 37 Figure 4 37 4 6 2 Network Set the network parameters of NVR device to ensure th...

Страница 278: ...are supported currently Note The IP address default getway preferred DNS and alternate DNS for IPv6 are 128 digits It cannot be blank Preferred DNS DNS server IP address Alternate DNS DNS server alter...

Страница 279: ...Note The IP address default getway preferred DNS and alternate DNS for IPv6 are 128 digits It cannot be blank Only some series support this function See the actual situation Step 2 Click The Edit int...

Страница 280: ...in the same LAN Note Different models have different NIC numbers See the actual situation NIC Member Select the check box to select the NIC to bind The binding comes into effect only after device reb...

Страница 281: ...u can check the MTU of the gateway the MTU of the NVR shall be the same as or is lower than the MTU of the gateway In this way you can reduce packets and enhance network transmission efficiency The fo...

Страница 282: ...interface is shown as in Figure 4 41 Input the PPPoE user name and password you get from the IPS internet service provider and enable PPPoE function Please save current setup and then reboot the devic...

Страница 283: ...the parameters For details see the below table Parameter Description Server Type You can select DDNS protocol from the dropdown list and then enable DDNS function Address DDNS server IP address list...

Страница 284: ...g is right if you can view the Web interface of the device Otherwise check the parameters 4 6 2 5 Sync Time Right By setting the trusted sites you can specify the IP host to synchronize or modify devi...

Страница 285: ...address in the format such as aa aa aa aa aa aa aa aa 6 Click OK Step 8 Click OK to save the configuration 4 6 2 6 Email The email interface is shown as in Figure 4 45 Figure 4 45 Please refer to the...

Страница 286: ...ere to enable this function Update period interval This function allows the system to send out the test email to check the connection is OK or not Please check the box to enable this function and then...

Страница 287: ...s to map Device has three mapping items HTTP TCP UDP Note When you set the external port outport of the router the value ranges from 1024 to 5000 Do not use port 1 255 or system port 256 1023 in case...

Страница 288: ...It defined the authentication access control and the management relationship between one proxy and one group of the managers Please make sure the device and the proxy are the same The read community w...

Страница 289: ...haracters Encryption Type Select the encryption mode The default mode is CBC DES 4 6 2 9 Multicast The multicast interface is shown as in Figure 4 48 Multicast is a transmission mode of data packet Wh...

Страница 290: ...ter please set server IP port and etc When an alarm occurs system can send out data as the protocol defined so the client end can get the data Figure 4 50 4 6 2 12 P2P You can use your cell phone to s...

Страница 291: ...device SN The collected information is only used for remote device access 4 6 3 Temperature Measurement 4 6 3 1 Temp Alarm When a device with temperature measurement function is connected on the front...

Страница 292: ...port When an alarm occurs NVR transmits the alarm information to the alarm device Latch The alarm lasts for 0 300 seconds after the alarm event ends Send Email Select the check box When an alarm occu...

Страница 293: ...first Snapshot Select the check box and click Setting Select the snapshot channel When an alarm occurs NVR triggers snapshot in the selected channel Note You shall enable alarm snapshot and auto snaps...

Страница 294: ...efficient The range is 0 5 1 Target distance Yhe distance from the camera to the target The range is 0 10000m Target reflection temperature The target temperature The range is 50 327 7 5 Select Alarm...

Страница 295: ...and display the results on the preview interface You shall set at least two temp measurement rules first For details see 4 6 3 2 1 Temp Rule Step 1 Select Setup Temperature Measurement Rule Temp Compr...

Страница 296: ...mes into effect and the preset temp rule is displayed on the window The isotherm function is mainly used for the objects that need to be highlighted in the highlight screen The median temperature is t...

Страница 297: ...Object Reflective Temp The target temperature The range is 50 327 7 Hot Spot Follow After enabling hot spot follow the highest temp and lowest temp are marked in different colors in the monitor windo...

Страница 298: ...Figure 4 56 Figure 4 57...

Страница 299: ...larm rules for the heat map When the systems defines that the fire occurs it triggers the alarm and activates the linked action Step 1 Select Setup Temperature Measurement Fire Alarm The Thermal inter...

Страница 300: ...own the left button of the mouse and draw the effective detection region on the left preview interface 3 Configure the sensitivity of the detection region The greater the sensitivity the easier to det...

Страница 301: ...s NVR triggers snapshot in the selected channel Note You shall enable alarm snapshot and auto snapshot first Send Email Select the check box When an alarm occurs NVR semds email to the set mail box No...

Страница 302: ...ge Manual Set the customized color Alarm Conditions The condition that an alarm occurs Single Hot spot temperature higher than An alarm occurs when the temp is higher than the hot spot Cold spot tempe...

Страница 303: ...ck box in front of the period and then enter the time You can set six periods for each day 3 Click OK to complete the setting Step 4 Click OK to complete the setting After the setting the effect is di...

Страница 304: ...Figure 4 62 Figure 4 63...

Страница 305: ...Figure 4 64 Figure 4 65...

Страница 306: ...ou select motion detection type you can click this button to set motion detection zone The interface is shown as in Figure 4 64 Here you can set motion detection zone There are four zones for you to s...

Страница 307: ...alarm signal to the centre Including alarm centre Message When 3G network connection is OK system can send out a message when motion detect occurs Send Email If you enabled this function System can se...

Страница 308: ...ering the tampering interface is shown as in Figure 4 69 After analysis video system can generate a tampering alarm when the detected moving signal reached the sensitivity you set here For detailed se...

Страница 309: ...Figure 4 69 4 6 4 1 4 Scene Change From main window Setup Event Video detect Scene change the video diagnosis interface is shown as in Figure 4 70 Figure 4 70...

Страница 310: ...m can generate an alarm once there is stripe noise or video is color cast out of focus or over exposure Figure 4 72 For detailed setups please refer to chapter 4 6 4 1 1 motion detect for detailed inf...

Страница 311: ...tual needs For details see the following table Note Select the Select All check box and all the following items will be selected The threshold value range is 1 100 and the default value is 30 When the...

Страница 312: ...is defined as out of focus in video diagnosis Overexposure The brightness of the image refers to the intensity of image pixels Black is the darkest while white is the brightest Black is represented by...

Страница 313: ...tup 4 6 4 3 IVS Important Please contact your retailer or you service engineer if you can not use the IVS function Right now the IVS supports 32 rules 4 6 4 3 1IVS From main menu Setup Event IVS IVS y...

Страница 314: ...1 Tripwire From main menu Setup Event IVS IVS click you can see the following interface See Figure 4 79 System generates an alarm once there is any object crossing the tripwire in the specified direc...

Страница 315: ...click mouse to draw a tripwire The tripwire can be a direct line curve or polygon Right click mouse to complete See Figure 4 80 Figure 4 80 Click to draw filter object See Figure 4 81 Figure 4 81 Sele...

Страница 316: ...and amount Support enter leave both detection Can detect the moving object operation in the specified zone customized trigger amount and staying time Support objects filter function Figure 4 82 Check...

Страница 317: ...rmation 4 6 4 3 1 3 Abandoned Object Detect From main menu Setup Event IVS IVS click and then select rule type as abandoned object detection you can see the following interface See Figure 4 84 System...

Страница 318: ...em can generate an alarm once the object is in the zone for the specified period Click to draw the rule See Figure 4 85 Figure 4 85 Now you can draw a rule Left click mouse to draw a line until you dr...

Страница 319: ...Detect From main menu Setup Event IVS IVS click and then select rule type as missing object detection you can see the following interface See Figure 4 86 System supports customized area shape and amo...

Страница 320: ...Support objects filter function Figure 4 88 Duration System can generate an alarm once the object is in the zone for the specified period Click to draw the rule Click OK to complete the rule setup Fo...

Страница 321: ...ick to draw the rule Click OK to complete the rule setup For detailed setups please refer to chapter 4 6 4 1 1 motion detect for detailed information 4 6 4 3 1 7 Fast moving From main menu Setup Event...

Страница 322: ...rst otherwise you cannot see the preset dropdown list If there is no preset you can draw a rule in current channel Calibration zone Click Add area you can draw a calibration zone at the left pane of t...

Страница 323: ...upports 6 levels The sixth level has the highest sensitivity For detailed setups please refer to chapter 4 6 4 1 1 Figure 4 92 4 6 4 5 People Counting System can calculate the entry exit people amount...

Страница 324: ...amount has exceeded the threshold Stranded No It is to set people staying amount in the zone System can generate an alarm once the amount has exceeded the threshold For detailed setups please refer t...

Страница 325: ...generate an alarm once the audio input is abnormal Intensity change Check the box here system can generate an alarm once the audio volume becomes strong Sensitivity It refers to the audio recognition...

Страница 326: ...igure 4 97 Type Here you can select smart track mode It includes 1 fish eye 1 PTZ camera 1 fish eye 2 PTZ cameras 1 fish eye 3 PTZ cameras Scene It is the monitor position Input customized monitor pos...

Страница 327: ...After you go back to the smart track interface it is shown as in Figure 4 98 Figure 4 98 In Figure 4 98 click or double click the line you can go to the following interface See Figure 4 99 Here you c...

Страница 328: ...e the center position of the PTZ camera is the same as the position of the fish eye Note The of the PTZ camera is the center position of the video Button Function Zoom Focus Iris Electronic mouse move...

Страница 329: ...ke sure the calibration position is accurate For the first calibration group position please select the reference objects at the far distance to enhance the trigger accuracy Click OK button to complet...

Страница 330: ...Figure 4 101 Figure 4 102...

Страница 331: ...you do not select current setup applies to today only You can select all week column to apply to the whole week Click OK button system goes back to local alarm interface please click save button to ex...

Страница 332: ...can upload the alarm signal to the centre Including alarm centre Send Email If you enabled this function System can send out an email to alert you when an alarm occurs Tour You need to click setup but...

Страница 333: ...nal alarm the IPC external alarm interface is shown as in Figure 4 105 Network alarm refers to the alarm signal from the network System does not support anti dither and sensor type setup For setup inf...

Страница 334: ...generate an alarm once the network camera is offline For setup information please refer to chapter 4 6 4 9 1 Figure 4 106 4 6 4 10 Abnormality From main menu Setup Event Abnormality you can go to the...

Страница 335: ...e can alarm when capacity is not sufficient You need to draw a circle to enable this function Network event type includes Disconnect IP conflict MAC conflict See Figure 4 108 Power fault The interface...

Страница 336: ...the centre Including alarm centre Send Email If you enabled this function System can send out an email to alert you when an alarm occurs Buzzer Check the box here to enable this function The buzzer b...

Страница 337: ...See Figure 4 113 Figure 4 113 Set source IP and destination IP and then click OK System goes back to Figure 4 112 Source IP POS device IP address Destination IP NVR IP address In Figure 4 112 click C...

Страница 338: ...delete old files Never Do not auto delete old files Customized input customized period here system can auto delete corresponding old files 4 6 5 2 Schedule 4 6 5 2 1 Record From main menu Setup Stora...

Страница 339: ...Figure 4 115 Figure 4 116...

Страница 340: ...dancy Check the box here to enable redundancy function Please note this function is null if there is only one HDD Snapshot Check the box here to enable snapshot function Holiday Check the box here to...

Страница 341: ...t you can go to the record interface Please refer to chapter 4 6 5 2 1 for detailed information 4 6 5 3 HDD Manager From main menu Setup Storage HDD manager the HDD manager interface is shown as in Fi...

Страница 342: ...ry system can auto create different directories according to the IP time and channel If there is remote directory system can create corresponding folder under the FTP root path and then create differe...

Страница 343: ...ct upload type 4 6 5 5 Record Control From main menu Setup Storage Record the interface is shown as in Figure 4 120 Figure 4 120 Please refer to the following sheet for detailed information Parameter...

Страница 344: ...ream From main menu Setup Storage Advanced Main stream the main stream interface is shown as in Figure 4 122 Here you can set corresponding HDD group to save main stream Figure 4 122 4 6 5 6 3Sub Stre...

Страница 345: ...e your purchased product support the RAID function otherwise you can not see the following interface 4 6 5 7 1RAID Config From main menu Setup Storage RAID RAID config you can go to the following inte...

Страница 346: ...From main menu Setup Storage RAID Hotspare you can see an interface shown as in Figure 4 127 The type includes two options Global It is global hotspare disk When any RAID becomes degrading it can rep...

Страница 347: ...re 4 128 Check the box to enable iSCSI function and then input iSCSI server IP address and port The default port number is 3260 Click Set path button system pops up the path setup dialogue box Please...

Страница 348: ...utton or input customized user name Click add button now you have added an iSCSI server Click OK button the setup is finish The interface is shown as in Figure 4 130 Note If you have not input a user...

Страница 349: ...PAL HDD full Here is for you to select working mode when hard disk is full There are two options stop recording or rewrite If current working HDD is overwritten or the current HDD is full while the ne...

Страница 350: ...sheet for detailed information Parameter Function Date format Here you can select date format from the dropdown list Time Format There are two options 24 H and 12 H Time zone The time zone of the dev...

Страница 351: ...en click Save button to save Figure 4 133 Note When you enable Holiday settings and schedule setup at the same time holiday setting has the priority If the selected day is a holiday then system record...

Страница 352: ...title channel title Check the box here you can view system time and channel number on the monitor video Image enhance Check the box you can optimize the margin of the preview video POS info Check the...

Страница 353: ...20s The default setup is 5s Split Here you can set window mode and channel group System can support 1 4 8 9 16 25 36 window according to device channel amount Motion tour Alarm tour Here you can set m...

Страница 354: ...he frame is red you can click to cancel the merge to restore regular mode Click OK to exit 4 6 6 3 PTZ The PTZ interface is shown as in Figure 4 137 local type and Figure 4 138 remote type Before setu...

Страница 355: ...ect the dome baud rate Default setup is 9600 Data Bit Default setup is 8 Please set according to the speed dome dial switch setup Stop bit Default setup is 1 Please set according to the speed dome dia...

Страница 356: ...g sheet for detailed information Parameter Function Period There are six periods Check the box to enable current setup Repeat It is to set audio file repeat times in the specified period Interval It i...

Страница 357: ...nt adopts two level management group and user The user authorities shall be smaller than group authorities The admin user authorities are set by default For group or user management there are two leve...

Страница 358: ...e setup Note Please note the user rights shall not exceed the group right setup For convenient setup please make sure the general user has the lower rights setup than the admin Modify user It is to mo...

Страница 359: ...Figure 4 144 Note For admin you can change the email information See Figure 4 145...

Страница 360: ...Figure 4 145 Modify password It is to modify the user password Step 1 In Modify user interface click Modify password box See Figure 4 146...

Страница 361: ...t can contain letters numbers and special characters excluding The password shall contain at least two categories Usually we recommend the strong password 4 6 6 5 2 Group It is to add remove group mod...

Страница 362: ...ter add group interface See Figure 4 148 Figure 4 148 Step 2 Input the group name and then check the box to select the corresponding rights It includes system playback and monitor Step 3 Click Save bu...

Страница 363: ...ter add user interface See Figure 4 151 Figure 4 151 Step 3 Set user name password and then select group from the dropdown list Step 4 Click Save to complete setup Note Click to change user informatio...

Страница 364: ...ze aa 0000 00 00aa 00aa 00aa 00aa 00aa as aa aa aa aa aa aa aa d System automatically removes space if there is any space before or after the newly added IP address e System only checks start address...

Страница 365: ...the auto delete old files function you need to set the file period Click Manual reboot button you can restart device manually Figure 4 154 4 6 6 8 Import Export The interface is shown as in Figure 4 1...

Страница 366: ...upgrade process do not unplug the power cable network cable or shutdown the device Improper upgrade program may result in device malfunction There are two upgrade modes file upgrade and online upgrad...

Страница 367: ...vice is a system component used to control activities on a single node When one or several device s are malfunction it can switch to the slave device to replace the work accordingly There are two stan...

Страница 368: ...7 2 Master Device From main menu Setup Cluster service Master device you can go to the following interface See Figure 4 159 In this interface you can add several master devices manually After you enab...

Страница 369: ...nd reason See Figure 4 161 Figure 4 161 4 6 7 3 Slave Device When you add the first slave device the default IP is the device IP address that logins in the WEB From main menu Setup Cluster service Sla...

Страница 370: ...d system can use slave device to record instead You can use this function to forward the record files on the slave device to the main device After the master device is malfunction the slave device bec...

Страница 371: ...terface See Figure 4 164 Figure 4 164 Click Add task button you can go to the following interface to set device IP channel start time end time See Figure 4 165 Figure 4 165 4 6 7 5 Cluster control 4 6...

Страница 372: ...r device PC gateway that can connect to the NVR From main menu Setup Cluster service Cluster control Arbitration IP you can see the following interface See Figure 4 167 Figure 4 167 4 6 7 6 DCS Log Fr...

Страница 373: ...he blue highlighted date means it has record files Window display mode Now you can select window display mode Click to view the full screen Click Esc on the keyboard to exit full screen Channel You ca...

Страница 374: ...acks from the first of current date by default Click time bar system playbacks from the time you click Click you can select on the file list Note System can auto slice file of one channel into 4 8 16...

Страница 375: ...the playback control bar to implement various operations such as play pause stop slow play fast play and etc See Figure 4 172 Figure 4 172 4 7 4 Download Select the file s you want to download and th...

Страница 376: ...channel record type and record time to download Or you can use watermark function to verify file 4 7 5 1 Download By File Select channel record type bit stream type and then input start time and end...

Страница 377: ...ion you can see corresponding dialog box Download to USB Connect the corresponding p peripheral device and then click Download to USB button you can see the following interface See Figure 4 176 Figure...

Страница 378: ...rmark Watermark interface is shown as In Figure 4 178 Please select a file and then click Verify button to see the file has been tampered with or not Figure 4 178 4 7 6 Lock file Check the box to sele...

Страница 379: ...ent functions Some smart camera supports the intelligent functions For NVR it just displays the intelligent alarm information from the smart network camera and set or playback the record file NVR supp...

Страница 380: ...u can view the record file Select a file and then click you can save current file to peripheral storage devices Select a file and then click you can lock current file in case it will be overwritten in...

Страница 381: ...tions are displayed See Figure 4 183 Figure 4 183 Step4 Click the image and you can view the record file Click Export Plate to export the plate information to local Select a file and then click you ca...

Страница 382: ...layed See Figure 4 184 Figure 4 184 Step2 Select Channel Start Time and End Time and set the filter conditions Step3 Click Search The images meeting the conditions are displayed See Figure 4 185 The f...

Страница 383: ...rs Motion detection System alarms when motion detection alarm occurs Tampering System alarms when camera is viciously masking Disk full System alarms when disk is full Disk error System alarms when di...

Страница 384: ...Figure 4 187 Please note the following information for reference only Here you can view record channel alarm input output information software version release date and etc When there is any new versi...

Страница 385: ...e requested log Search You can select log type from the drop down list and then click search button to view the list You can click the stop button to terminate current search operation Detailed inform...

Страница 386: ...Select Info Info Video Quality Analytics The Video Quality Analytics interface is displayed See Figure 4 190 Figure 4 190 Step 2 Enter the start time end time and select the channel Select the type to...

Страница 387: ...nterface is shown as in Figure 4 191 Figure 4 191 4 10 6 Heat Map From main menu Info Heat Map the interface is shown as in Figure 4 192 Figure 4 192 4 10 7 HDD From main menu Info HDD the HDD interfa...

Страница 388: ...Figure 4 193 4 11 Log Out Click Logout tab and the system goes back to the login interface See Figure 4 194 You need to input user name and password to log in again Figure 4 194...

Страница 389: ...acity i m which is storage of each channel needed unit Mbyte i m i q i h i D 2 In the formula i h means the recording time for each day hour i D means number of days for which the video shall be kept...

Отзывы: