


Page 342
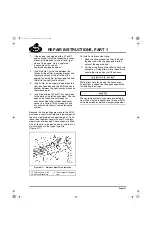
REPAIR INSTRUCTIONS, PART 1
Turbocharger Installation
[214 SC]
Refer to Figure 403.
A thorough inspection is required as even small
particles can cause severe rotor damage if
inducted during high-speed operation.
Use only
new
and approved gaskets at the
various air, oil and exhaust connections to the
turbocharger. Avoid the use of sealing or jointing
compounds at all flanged connections.
After completing the reassembly of the engine,
the turbocharger must be prelubricated with clean
engine oil before starting the engine. Refer to the
procedure under “Turbocharger” in the ENGINE
PREPARATION AND OPERATIONAL CHECK
section.
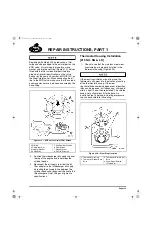
1. Inspect the intake and exhaust systems
leading to and from the turbocharger to
ensure absence of foreign material,
including burrs and loose lining fragments.
Place protective caps over the compressor
and turbine outlets to keep debris and dirt
out of the turbocharger as engine
reassembly progresses.
2. Install a
new
turbocharger gasket over the
four mounting studs.
The turbocharger is heavy, weighing
approximately 76 lbs. DO NOT attempt to remove
or install the turbocharger without the help of an
assistant or the use of a suitable lifting device.
3. Place the turbocharger in position over the
mounting studs on the exhaust manifold.
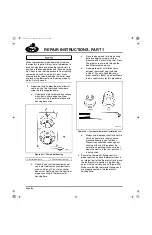
4. Apply a coating of clean engine oil to the
flanges and threads of the four nuts. Install
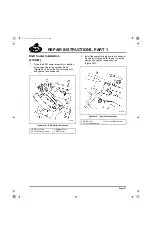
the nuts and using torque wrench J 24406,
or equivalent, tighten the nuts in a
cross-pattern sequence (Figure 402) in two
stages:
앫
First stage — 50 lb-ft (68 N
폷
m)
앫
Second stage — 100 lb-ft (136 N
폷
m)
402
Figure 402 — Turbocharger Tightening Sequence
5. Inspect the turbocharger oil supply line to
make sure it is flushed clean and free of all
debris. Then, install the supply line.
6. Place the oil drain tube in position between
the port on the engine block and the
turbocharger. Apply anti-seize compound to
the threads of the capscrews and install the
capscrews. Tighten the capscrews to the
specified torque, 15 lb-ft (20 N
폷
m), using
torque wrench J 24406, or equivalent.
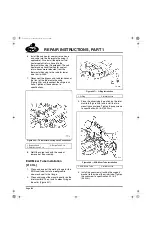
If the VTG actuator has been removed, refer to
“VTG TURBOCHARGER SERVICE
PROCEDURES (ASET™ AC ENGINE)” for
installation and adjustment procedures.
5-111.bk Page 342 Monday, July 10, 2006 2:26 PM
Содержание ASET AC
Страница 6: ...TABLE OF CONTENTS Page iii TABLE OF CONTENTS 5 111 bk Page iii Monday July 10 2006 2 26 PM...
Страница 14: ...INTRODUCTION Page 1 INTRODUCTION 5 111 bk Page 1 Monday July 10 2006 2 26 PM...
Страница 23: ...Page 10 NOTES 5 111 bk Page 10 Monday July 10 2006 2 26 PM...
Страница 24: ...VISUAL IDENTIFICATION Page 11 VISUAL IDENTIFICATION 5 111 bk Page 11 Monday July 10 2006 2 26 PM...
Страница 28: ...DESCRIPTION AND OPERATION Page 15 DESCRIPTION AND OPERATION 5 111 bk Page 15 Monday July 10 2006 2 26 PM...
Страница 96: ...COMPONENT LOCATOR Page 83 COMPONENT LOCATOR 5 111 bk Page 83 Monday July 10 2006 2 26 PM...
Страница 99: ...Page 86 NOTES 5 111 bk Page 86 Monday July 10 2006 2 26 PM...
Страница 100: ...TROUBLESHOOTING Page 87 TROUBLESHOOTING 5 111 bk Page 87 Monday July 10 2006 2 26 PM...
Страница 140: ...MAINTENANCE Page 127 MAINTENANCE 5 111 bk Page 127 Monday July 10 2006 2 26 PM...
Страница 153: ...Page 140 NOTES 5 111 bk Page 140 Monday July 10 2006 2 26 PM...
Страница 154: ...REPAIR INSTRUCTIONS PART 1 Page 141 REPAIR INSTRUCTIONS PART 1 5 111 bk Page 141 Monday July 10 2006 2 26 PM...
Страница 383: ...Page 370 NOTES 5 111 bk Page 370 Monday July 10 2006 2 26 PM...
Страница 384: ...REPAIR INSTRUCTIONS PART 2 Page 371 REPAIR INSTRUCTIONS PART 2 5 111 bk Page 371 Monday July 10 2006 2 26 PM...
Страница 454: ...REPAIR INSTRUCTIONS PART 3 Page 441 REPAIR INSTRUCTIONS PART 3 5 111 bk Page 441 Monday July 10 2006 2 26 PM...
Страница 479: ...Page 466 NOTES 5 111 bk Page 466 Monday July 10 2006 2 26 PM...
Страница 480: ...SPECIFICATIONS Page 467 SPECIFICATIONS 5 111 bk Page 467 Monday July 10 2006 2 26 PM...
Страница 505: ...Page 492 NOTES 5 111 bk Page 492 Monday July 10 2006 2 26 PM...
Страница 506: ...SCHEMATIC ROUTING DIAGRAMS Page 493 SCHEMATIC ROUTING DIAGRAMS 5 111 bk Page 493 Monday July 10 2006 2 26 PM...
Страница 513: ...Page 500 NOTES 5 111 bk Page 500 Monday July 10 2006 2 26 PM...
Страница 514: ...SPECIAL TOOLS EQUIPMENT Page 501 SPECIAL TOOLS EQUIPMENT 5 111 bk Page 501 Monday July 10 2006 2 26 PM...
Страница 519: ...Page 506 NOTES 5 111 bk Page 506 Monday July 10 2006 2 26 PM...
Страница 520: ...APPENDIX Page 507 APPENDIX 5 111 bk Page 507 Monday July 10 2006 2 26 PM...
Страница 528: ...INDEX Page 515 INDEX Index fm Page 515 Monday July 10 2006 2 48 PM...
Страница 535: ...Page 522 NOTES Index fm Page 522 Monday July 10 2006 2 48 PM...