TROUBLESHOOTING
Page 95
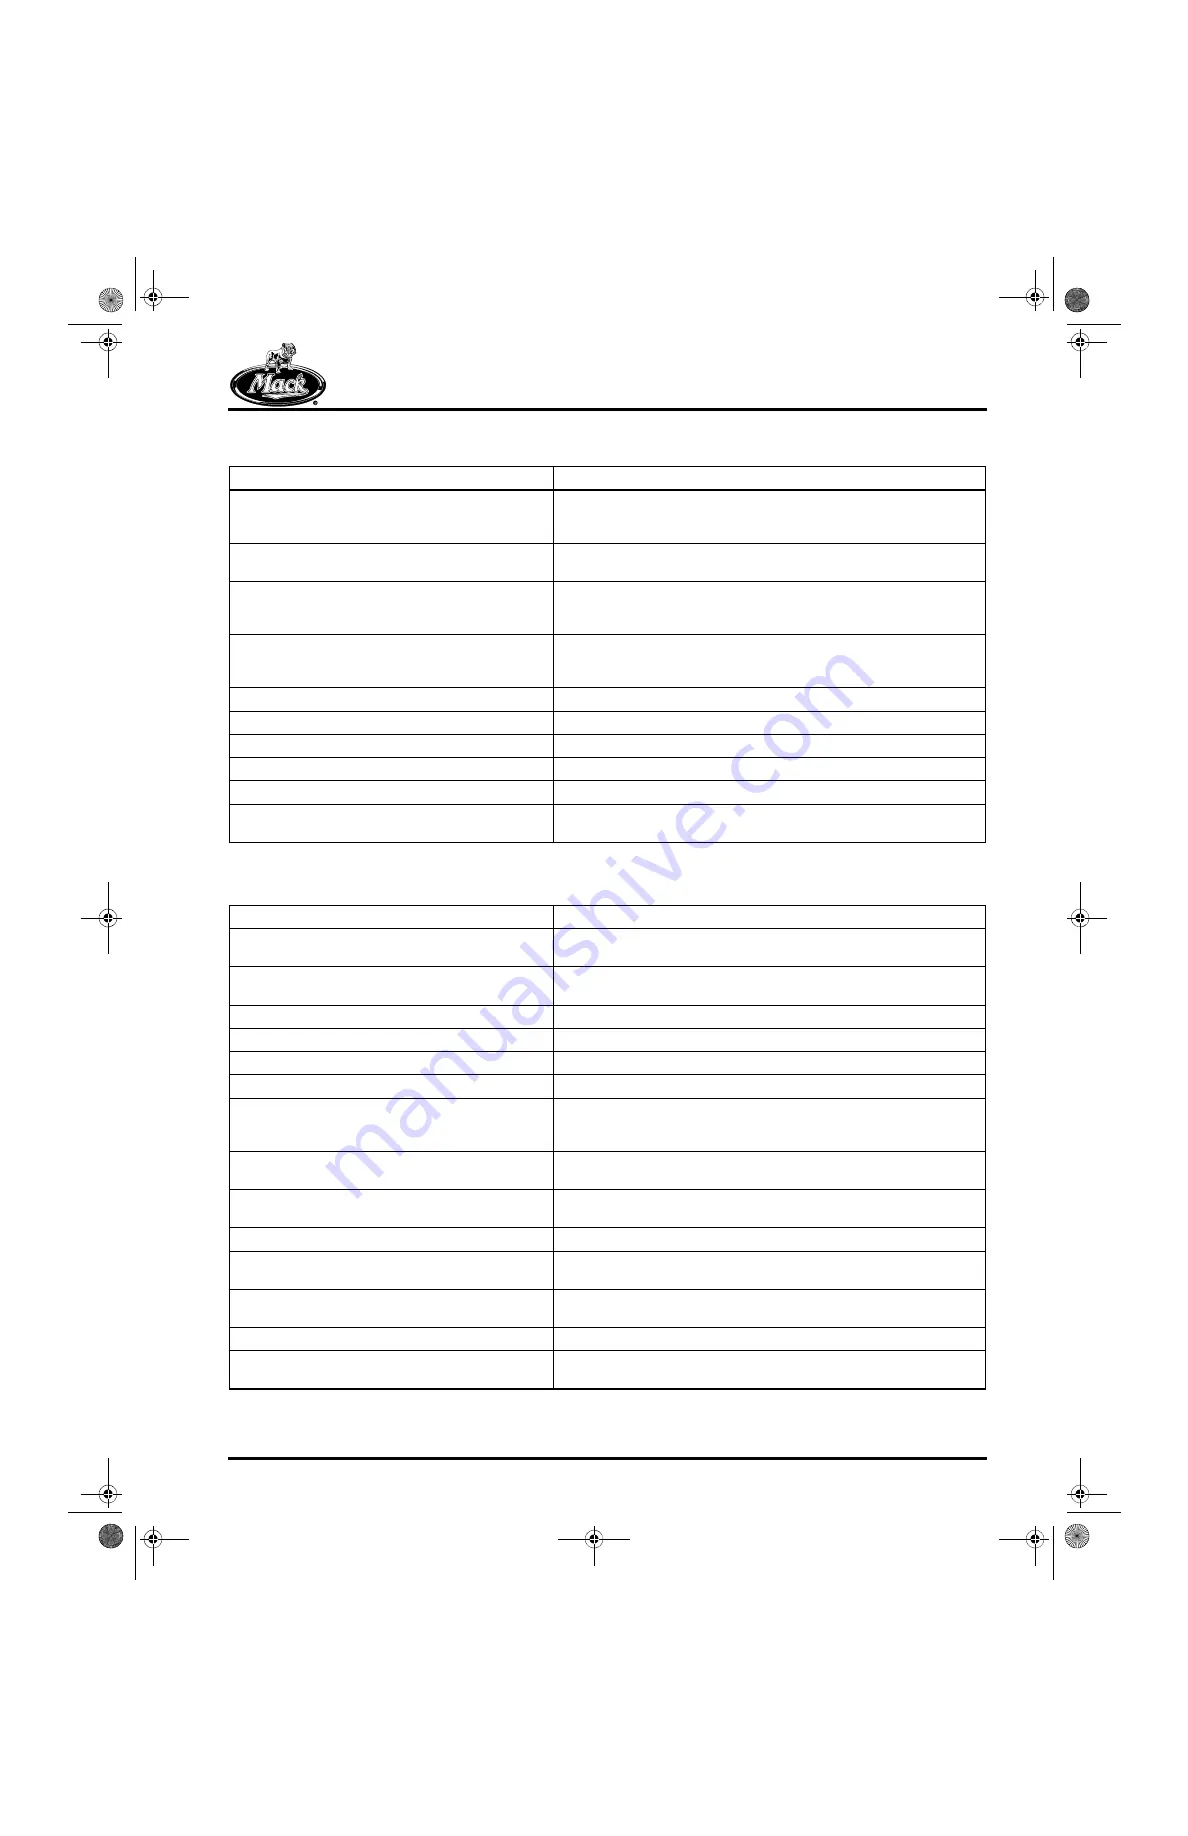
EXCESSIVE OIL CONSUMPTION
ENGINE OVERHEATS
Possible Cause
Correction
1. External oil leaks.
1. Check engine for visible signs of oil leakage. Look for loose or
stripped oil drain plugs, broken gaskets (cylinder head cover, etc.),
and front and rear oil seal leakage.
2. Seal leak past EGR valve piston shaft.
2. Inspect EGR valve for oil loss over exhaust manifold. Replace
EGR valve to correct.
3. External oil line leakage (J-Tech™, turbo, EGR
feeds, etc.).
3. Check lines, hoses and connections for leaks. Ensure connections
are at proper torque specifications. Replace any hoses or lines
found to be leaking. Replenish oil.
4. Turbocharger passing oil.
4. Check for oil in the inlet manifold. Check for excessive inlet
restriction (such as a dirty air filter). Repair/replace air filter or
turbocharger as required.
5. Air compressor passing oil.
5. Repair or replace air compressor.
6. Clogged crankcase breather pipe.
6. Remove obstructions.
7. Excessive exhaust back-pressure.
7. Check exhaust pressure. Repair as required.
8. Worn valve stem seals.
8. Replace valve stem seals.
9. Worn valve guides.
9. Check for valve guide wear and replace guides as required.
10. Internal engine wear.
10. Determine and correct the root cause, and repair engine as
required.
Possible Cause
Correction
1. Coolant level low.
1. Locate cause. Look for leaking gaskets or loose or leaking hoses.
Repair, replace or tighten as required. Replenish coolant.
2. EGR cooler coolant leak.
2. Replacement of the EGR cooler is required as no weld repairs are
allowed to this stainless steel unit.
3. Loose or worn fan belts.
3. Adjust belt tension or replace belts as required.
4. Restricted airflow through radiator.
4. Remove any restrictions from the outer surface of the radiator.
5. Plugged radiator core.
5. Remove, repair or replace radiator as required.
6. Defective radiator pressure cap.
6. Test pressure of the radiator cap. Replace cap if required.
7. Defective coolant thermostat or temperature
gauge.
7. Check opening temperature of thermostat. Check for correct
installation. Check temperature gauge and sending unit. Replace if
defective.
8. Viscous (or ON/OFF) fan drive not operating
properly, or fan improperly positioned.
8. Check fan operation. Repair as required.
9. Combustion gases in coolant.
9. Determine point where gases are entering the cooling system.
Repair or replace parts as required.
10. Defective water pump.
10. Remove, repair and reinstall water pump as required.
11. Plugged oil cooler.
11. Remove oil cooler. Disassemble, remove restrictions/replace parts
as required. Reinstall.
12. Plugged oil cooler filter screen.
12. Remove the Y-shaped hose at the oil cooler inlet. Remove and
clean the filter screen or replace parts as required. Reinstall.
13. Winterfront (if equipped) not opened.
13. Open or remove winterfront at specified ambient temperatures.
14. Shutters not opening properly (for chassis
equipped with shutters).
14. Check shutter operation. Repair as required.
5-111.bk Page 95 Monday, July 10, 2006 2:26 PM
Содержание ASET AC
Страница 6: ...TABLE OF CONTENTS Page iii TABLE OF CONTENTS 5 111 bk Page iii Monday July 10 2006 2 26 PM...
Страница 14: ...INTRODUCTION Page 1 INTRODUCTION 5 111 bk Page 1 Monday July 10 2006 2 26 PM...
Страница 23: ...Page 10 NOTES 5 111 bk Page 10 Monday July 10 2006 2 26 PM...
Страница 24: ...VISUAL IDENTIFICATION Page 11 VISUAL IDENTIFICATION 5 111 bk Page 11 Monday July 10 2006 2 26 PM...
Страница 28: ...DESCRIPTION AND OPERATION Page 15 DESCRIPTION AND OPERATION 5 111 bk Page 15 Monday July 10 2006 2 26 PM...
Страница 96: ...COMPONENT LOCATOR Page 83 COMPONENT LOCATOR 5 111 bk Page 83 Monday July 10 2006 2 26 PM...
Страница 99: ...Page 86 NOTES 5 111 bk Page 86 Monday July 10 2006 2 26 PM...
Страница 100: ...TROUBLESHOOTING Page 87 TROUBLESHOOTING 5 111 bk Page 87 Monday July 10 2006 2 26 PM...
Страница 140: ...MAINTENANCE Page 127 MAINTENANCE 5 111 bk Page 127 Monday July 10 2006 2 26 PM...
Страница 153: ...Page 140 NOTES 5 111 bk Page 140 Monday July 10 2006 2 26 PM...
Страница 154: ...REPAIR INSTRUCTIONS PART 1 Page 141 REPAIR INSTRUCTIONS PART 1 5 111 bk Page 141 Monday July 10 2006 2 26 PM...
Страница 383: ...Page 370 NOTES 5 111 bk Page 370 Monday July 10 2006 2 26 PM...
Страница 384: ...REPAIR INSTRUCTIONS PART 2 Page 371 REPAIR INSTRUCTIONS PART 2 5 111 bk Page 371 Monday July 10 2006 2 26 PM...
Страница 454: ...REPAIR INSTRUCTIONS PART 3 Page 441 REPAIR INSTRUCTIONS PART 3 5 111 bk Page 441 Monday July 10 2006 2 26 PM...
Страница 479: ...Page 466 NOTES 5 111 bk Page 466 Monday July 10 2006 2 26 PM...
Страница 480: ...SPECIFICATIONS Page 467 SPECIFICATIONS 5 111 bk Page 467 Monday July 10 2006 2 26 PM...
Страница 505: ...Page 492 NOTES 5 111 bk Page 492 Monday July 10 2006 2 26 PM...
Страница 506: ...SCHEMATIC ROUTING DIAGRAMS Page 493 SCHEMATIC ROUTING DIAGRAMS 5 111 bk Page 493 Monday July 10 2006 2 26 PM...
Страница 513: ...Page 500 NOTES 5 111 bk Page 500 Monday July 10 2006 2 26 PM...
Страница 514: ...SPECIAL TOOLS EQUIPMENT Page 501 SPECIAL TOOLS EQUIPMENT 5 111 bk Page 501 Monday July 10 2006 2 26 PM...
Страница 519: ...Page 506 NOTES 5 111 bk Page 506 Monday July 10 2006 2 26 PM...
Страница 520: ...APPENDIX Page 507 APPENDIX 5 111 bk Page 507 Monday July 10 2006 2 26 PM...
Страница 528: ...INDEX Page 515 INDEX Index fm Page 515 Monday July 10 2006 2 48 PM...
Страница 535: ...Page 522 NOTES Index fm Page 522 Monday July 10 2006 2 48 PM...


