Page 124
Job Editor
Group 8
Release 2.02
JET3 Series
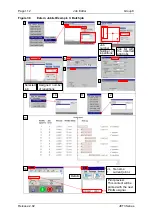
Proceeding:
Press on the tab
<Date/Time>
(2)
to select the tab.
Press on the arrow key of the Drop-down list
<Date format>
(3)
to define the
format. A drop-down list opens.
Now select the requested format.
Press the button
<OK>
(4)
to take over the changes.
ATTENTION
For changing the date format you have to shut down the complete
system and initialize it again!
A
confirmation prompt
(5)
pops up. Press the button
<No>
(6)
to abort the
process or press the button
<Yes>
(7)
to save the changes.
Now the device will will be rebooted automatically.
After the reboot the device switches into standby-mode (display is dark).
Содержание JET3
Страница 1: ...Operating Manual V2 02 Please keep for future reference ...
Страница 2: ......
Страница 21: ...Group 2 Safety Page 19 JET3 Series Release 2 02 2 4 Safety sticker Figure 1 Safety sticker Safety sticker ...
Страница 380: ...Page 378 Appendix Connection Examples for the Interfaces Group 12 Release 2 02 JET3 Series Interface X3 Outputs ...
Страница 390: ...Page 388 Appendix List of illustrations Group 12 Release 2 02 JET3 Series 12 4 2 Print head SK 6 ...
Страница 391: ...Group 12 Appendix List of illustrations Page 389 JET3 Series Release 2 02 12 4 3 Print head SK 4 Option ...
Страница 392: ...Page 390 Appendix List of illustrations Group 12 Release 2 02 JET3 Series 12 4 4 Cabinet JET printer ...


