Group 8
Job Editor
Page 351
JET3 Series
Release 2.02
8.7.5.3.4 Mailing
–
Printout
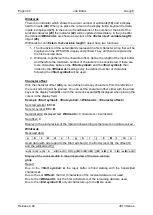
See figure 181
If there are
<Mailing>
objects in the current print job you will see the placeholders in the
print preview of the main window
(1)
as long as there was no print-out. If you press the
green
<Print Start>
button
(2)
the database settings dialog box will be displayed
(3)
.
You can identify the data set the last print-out made was from
(6)
and you can set from
which data sets shall be printed by defining the first record to be printed
(4)
and the last
one
(5)
.
It is possible to print fields from already printed data sets once again. That means the
setting in the
<StartAt>
display field
(4)
do not depend on the
<Last printed database
record>
(5)
.
You can confirm the settings by pressing the
<OK>
button
(8)
. Pressing the
<Cancel>
button
(7)
will close the dialog box without any changes and the red
<Print Stop>
button
(9)
will remain switched on.
If the settings are confirmed the dialog box will close and the
<Print Start>
button will
switch on
(11)
. You will see the content of the fields of the first data set selected for print-
out in the print preview of the main window
(10)
. With the next PrintGo signal the first data
set will be printed. With each following PrintGo signal the respectively next data set is
printed.
Which field of a data set is printed has to be defined in the object settings of the
<Mailing>
object. Each field to be printed has to be assigned to a
<Mailing>
Object. You can only
assign one filed of a data set to one
<
Mailing>
object.
With the parameter
<Wildcard>
you can define how many character of one field shall be used. The parameter indicates
the number of used characters on the basis of a left-to right reading direction.
INFORMATION
With the
<Wildcard>
settings. See
<Example
–
Field number>
and
for details.
If a PrintGo signal is received after the last data set was printed an error message will
be displayed
(12)
. The message has to confirmed and the printer is set to
<Print Stop>
(9)
.
For a new printing sequence you will have to press the green
<Print Start>
(2)
button
again and specify the data sets to be printed.
Содержание JET3
Страница 1: ...Operating Manual V2 02 Please keep for future reference ...
Страница 2: ......
Страница 21: ...Group 2 Safety Page 19 JET3 Series Release 2 02 2 4 Safety sticker Figure 1 Safety sticker Safety sticker ...
Страница 380: ...Page 378 Appendix Connection Examples for the Interfaces Group 12 Release 2 02 JET3 Series Interface X3 Outputs ...
Страница 390: ...Page 388 Appendix List of illustrations Group 12 Release 2 02 JET3 Series 12 4 2 Print head SK 6 ...
Страница 391: ...Group 12 Appendix List of illustrations Page 389 JET3 Series Release 2 02 12 4 3 Print head SK 4 Option ...
Страница 392: ...Page 390 Appendix List of illustrations Group 12 Release 2 02 JET3 Series 12 4 4 Cabinet JET printer ...


