Page 196
Job Editor
Group 8
Release 2.02
JET3 Series
The font editor is started from the main window of the printer. To start the font editor
choose the respective menu item from the drop-down menu
(3)
:
<Extra>-<Editors>-<Font editor>
.
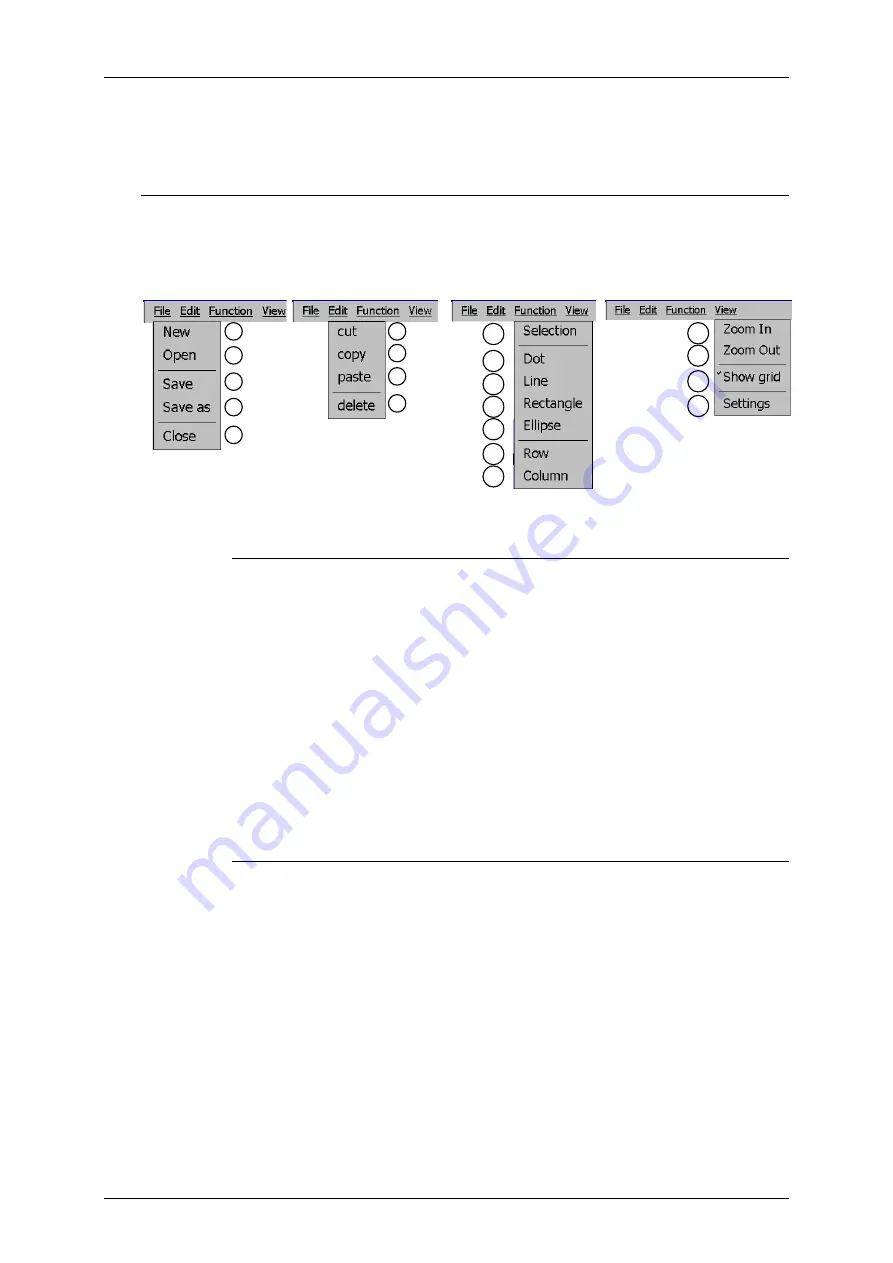
The user interface of the font editor consists of various components:
Menu bar
With the drop-down menus of the menu bar
(4)
you can select various commands, options
and tools. The following drop down menus are available:
Options <File> menu
Options <Edit> menu
Options <Func.>menu
Options <View> menu
File:
The <File> menu provides all standard operations for file handling:
New (1):
A new font file is created. In a first step you will have to define
the size of the editor and the grid (measured in dots)
Open (2):
Opens a standard file dialog box to open a stored font from the
file system (hard disk, SD-card or USB-stick)
Save (3):
Saves the current file. If the current file is still unnamed a
standard file dialog box will open and you will have to specify the file
name and the storage location
Save as (4):
Opens a standard file dialog box to save the current file.
You will have to specify the file name and the storage location
Close (5):
Closes the current file. If there were made any changes to the
file you will be asked whether you like to save them.
Edit:
The <Edit> menu provides several standard commands for drawing
objects:
Cut (6):
Cuts out a selected area (see: <Function>-<Selection>) and
stores it in the clipboard until you use the <cut> or <copy> command
again.
Copy (7):
Copies a selected area (see: <Function>-<Selection>) and
stores it in the clipboard until you use the <cut> or <copy> command
again.
Paste (8):
In the status bar of the drawing area you will be asked to place
the cursor in the upper left corner of the drawing area but this is not
mandatory.
1
2
3
4
5
7
8
9
6
13
14
15
12
10
11
16
17
18
19
20
Содержание JET3
Страница 1: ...Operating Manual V2 02 Please keep for future reference ...
Страница 2: ......
Страница 21: ...Group 2 Safety Page 19 JET3 Series Release 2 02 2 4 Safety sticker Figure 1 Safety sticker Safety sticker ...
Страница 380: ...Page 378 Appendix Connection Examples for the Interfaces Group 12 Release 2 02 JET3 Series Interface X3 Outputs ...
Страница 390: ...Page 388 Appendix List of illustrations Group 12 Release 2 02 JET3 Series 12 4 2 Print head SK 6 ...
Страница 391: ...Group 12 Appendix List of illustrations Page 389 JET3 Series Release 2 02 12 4 3 Print head SK 4 Option ...
Страница 392: ...Page 390 Appendix List of illustrations Group 12 Release 2 02 JET3 Series 12 4 4 Cabinet JET printer ...


