Group 8
Job Editor
Page 199
JET3 Series
Release 2.02
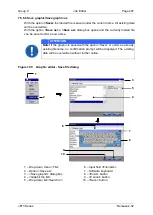
Drawing area
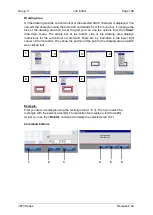
On the drawing area the current content of the selected ASCII character is displayed. You
can edit the character using the tools and commands from the menu bar. To change the
size of the drawing area and to set the grid you can use the options from the
<View>
drop-down menu. The status bar at the bottom side of the drawing area displays
instructions for the current tool or command. There are x-y indicators in the lower right
corner of the font editor. They show the position of the point in the drawing area on which
was clicked last.
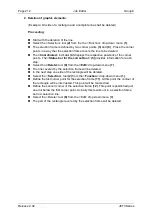
Example:
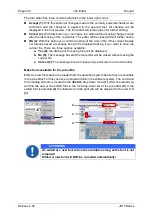
First you draw a rectangle using the rectangle tool (1 to 3). Then you select the
rectangle with the selection tool
(4)
. The selection tool creates a red frame
(5)
.
At last you use the
<Delete>
command to delete the selected area (6-7).
Command buttons
1
2
3
4
5
6
7
1
2
3
4
6
5
Содержание JET3
Страница 1: ...Operating Manual V2 02 Please keep for future reference ...
Страница 2: ......
Страница 21: ...Group 2 Safety Page 19 JET3 Series Release 2 02 2 4 Safety sticker Figure 1 Safety sticker Safety sticker ...
Страница 380: ...Page 378 Appendix Connection Examples for the Interfaces Group 12 Release 2 02 JET3 Series Interface X3 Outputs ...
Страница 390: ...Page 388 Appendix List of illustrations Group 12 Release 2 02 JET3 Series 12 4 2 Print head SK 6 ...
Страница 391: ...Group 12 Appendix List of illustrations Page 389 JET3 Series Release 2 02 12 4 3 Print head SK 4 Option ...
Страница 392: ...Page 390 Appendix List of illustrations Group 12 Release 2 02 JET3 Series 12 4 4 Cabinet JET printer ...


