


FUEL SYSTEM
Choke and Air Intake System
Page 14-14
2006-2010 Turf/Carryall 272/472 and XRT 1200/1200 SE Maintenance and Service Manual
14
NOTE:
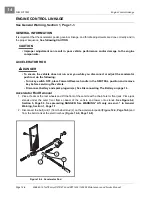
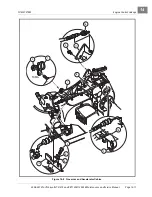
The bolt must be removed completely before the splined coupling can be separated.
Make an alignment mark on the steering column shaft and the steering joint for use during replace-
ment.
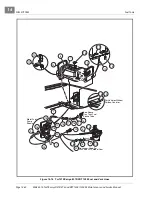
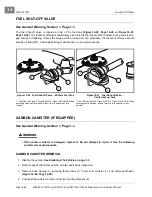
2.7. Remove the four bolts and locknuts (2) from the rack and pinion assembly mount and gently dis-
connect the steering joint from steering column shaft at the bolt (1) location
. Gently allow both the rack and pinion assembly and the steering column shaft to drop
down, remaining suspended between both rod ball joint ends.
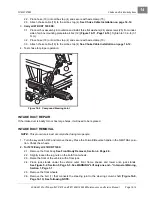
2.8. Remove the two bolts (26), locknuts and flat washers that secure the top of the strap plate (27) to
the vehicle frame
.
2.9. Remove the two bolts (28) and nuts that connect the upper shock mounts to the shock tower and
bottom of the strap plate (27). Remove the strap plate.
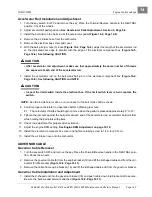
See following CAUTION.
ý
CAUTION
• When removing the two bottom bolts (28) from the strap plate and shock tower, the A-arm
assemblies will drop. It’s best to have one person hold the front brake drum assembly while a
second person removes each bolt from their respective shock and shock tower, and gently
allow the A-arm assembly to rest in a suspended condition.
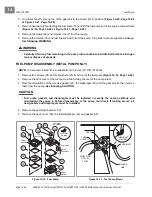
2.10. Roll the floormat from underneath the dashboard and drill out the one bottom pop rivet (30) that
secures the air intake shield (29) to the floorboard.
2.11. Use a putty knife or other thin bladed device and gently pry apart the adhesive strip that holds the
shield to the vehicle frame.
See following NOTE.
NOTE:
It may become necessary to re-form the shield prior to installation.
2.12. Remove the shield (29) from the vehicle frame.
2.13. Drill out the pop rivet (24) securing the top of the intake duct to the floorboard
.
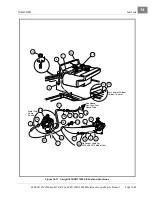
2.14. Remove the air box assembly.
See Air Box Removal on page 14-12.
2.15. Lift air box assembly off the intake duct. Be careful that the intake seal on the bottom of the air box
assembly is not dislodged in the process.
2.16. Pull the intake duct forward, and out of the vehicle.
3. Carryall 472/XRT 1200 SE:
3.1. Remove the air box assembly
See Air Box Removal on page 14-12.
3.2. Lift rear floor mat on the drivers side and drill out pop rivets (27) and remove strap (14).
3.3. Cut wire tie (23) holding Forward/Reverse cable and choke cable to the air duct under the vehicle.
3.4. Slide the air duct toward the front of the vehicle and down until it clears the chassis plate.
Содержание CARRYALL 272
Страница 2: ......
Страница 14: ......
Страница 18: ...1...
Страница 52: ...5...
Страница 90: ...6...
Страница 110: ...7...
Страница 112: ...8...
Страница 128: ...10...
Страница 170: ...11...
Страница 224: ...13...
Страница 284: ...16...
Страница 302: ...17...
Страница 308: ......
Страница 309: ...Club Car R NOTES...
Страница 310: ...Club Car R NOTES...
Страница 311: ......


