Amending an Existing Point
SECTION 3 Points
43
The point value which is stored to disk may be Volatile or Non-volatile by
selecting or deselecting the Non-Volatile check-box. A Non-volatile point
ensures the preservation of the point's value at regular intervals. If power is
lost, or CX-Supervisor is shut down for any reason, then when the application
is restarted the point is initialised to the last saved value. These values are
saved in a project file with .NVP extension. To prevent unexpected operation,
this file is automatically deleted if further point changes are made in the
Developer. In this case points revert to their Default value.
Select the Validate Point is Within Specified Range check-box. This option is
only available for Input or I/O points of type Integer or Real. When checked, an
error message opens in the error log if the data passed to CX-Supervisor is
outside of the specified Minimum and Maximum range.
Click the
OK
button to accept the advanced settings, or the Cancel button to
abort the operation.
3-5
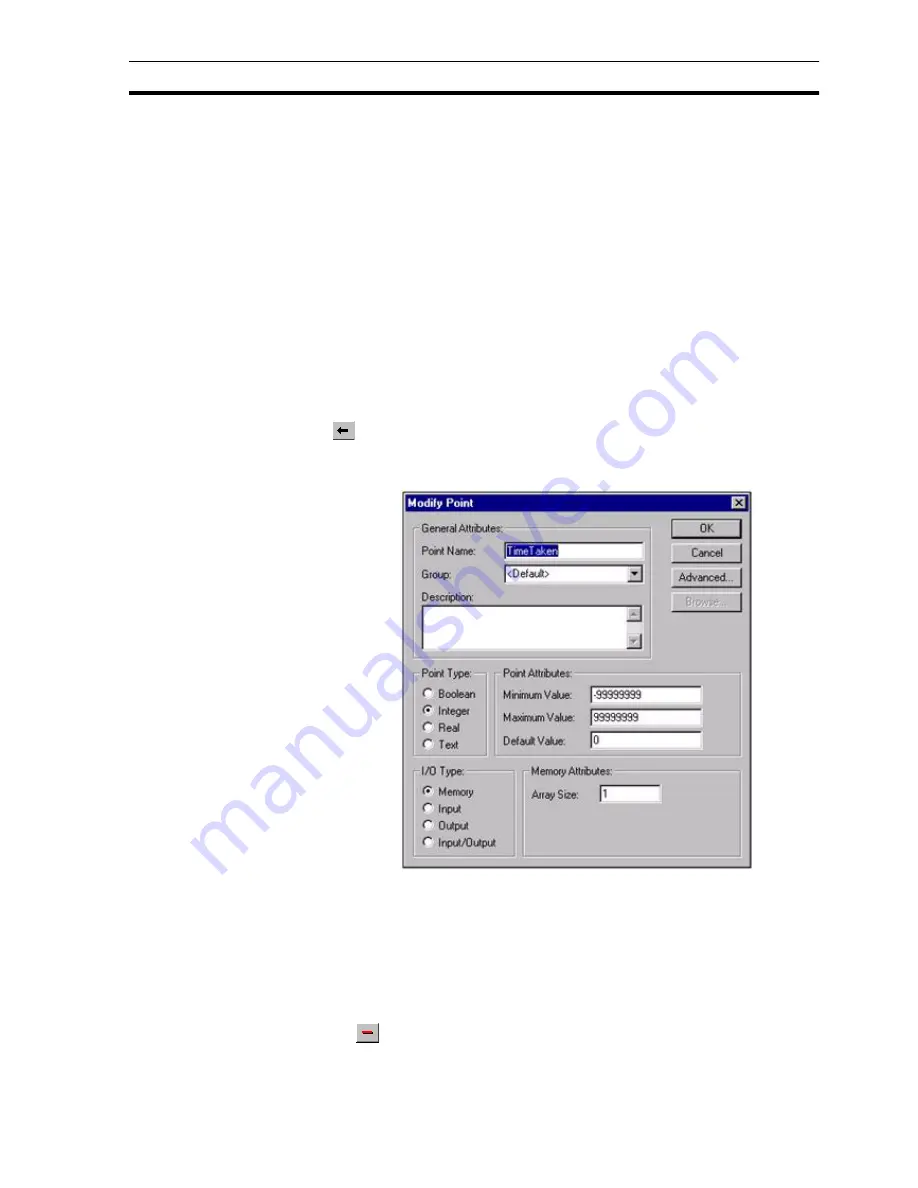
Amending an Existing Point
To modify an existing point, highlight the point from the points list and click the
button.
This results in the View Point dialog box being displayed as shown below, a
dialog box based on the
Add Point
dialog box:
The selected point can be redefined as described in chapter 3, Creating a
Point.
Note: If a point is renamed then any animations or scripts that were using the
previous point name become invalid. Run the Analyse Application tool to
check for References to non-existent points.
3-6
Deleting an Existing Point
To remove an existing point, highlight the point from the points list and click
the
button. This results in a confirmation dialog box being displayed. Click
the
Yes
button to remove the point from the points database, or the
No
button
to abort the delete operation.
Summary of Contents for CX-Supervisor
Page 1: ...CX Supervisor Software Cat No W10E EN 01 User Manual Software Release 3 1...
Page 3: ...Copyright Notice 2...
Page 16: ...15...
Page 17: ...16...
Page 27: ...Tip of the Day SECTION 1 Graphics Editor 26...
Page 35: ...CX Supervisor Preferences SECTION 2 Pages 34...
Page 79: ...Responding to Events SECTION 5 ActiveX Objects 78...
Page 115: ...Printing the Graphics Library SECTION 7 Graphics Library 114...
Page 181: ...Data Logging SECTION 11 Data Logging 180...
Page 201: ...Examples SECTION 12 Databases 200...
Page 243: ...Performance Monitor SECTION 16 Application Analysis Performance Monitor 242...
Page 253: ...Using with Omron s CX Server OPC SECTION 17 Using CX Supervisor as an OPC Cli 252...
Page 259: ...Creating a CX Supervisor Client application SECTION 18 Connecting to a remote CX 258...
Page 263: ...Adding a Point Linked to a Parameter SECTION 19 Connecting to Omron Industrial 262...
Page 271: ...Data Logging SECTION 20 Best Practices 270...
Page 275: ...Configuring a Server PC running Windows NT or 2000 Appendix A Configuring a PC 274...
Page 277: ...Appendix B Frequently Asked Questions 276...
Page 296: ...Appendix B Frequently Asked Questions 295...
Page 297: ...Appendix B Frequently Asked Questions 296...
Page 298: ...Appendix B Frequently Asked Questions 297...
Page 299: ...Appendix B Frequently Asked Questions 298...
Page 333: ...Revision history 332...