7 Smart 3D
Operator’s Manual
7 - 11
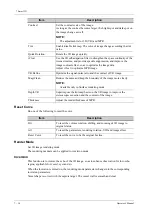
Rotate the Image
NOTE:
You can view the back of the VR by rotating it 180°. The back view image may not be as vivid as
the front. (Here we call the initial view of the VR the “front”). It is recommended to re-capture
rather than rotate the VR if a certain desired region is obscured in the VR.
•
Axial rotation
Axial rotation is to rotate the 3D image around the X, Y or Z axis.
Use [X Axis], [Y Axis] and
[Z Axis] buttons to rotate the image along the selected axis:
–
Tap the left part of the button, or rotate the multi-functional knob anticlockwise: the image
rotates left along the selected axis.
–
Tap the right part of the button or rotate the multi-functional knob clockwise: the image
rotates right along the selected axis.
•
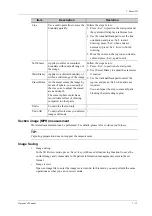
Auto Rotation
a.
In 3D viewing mode, tap [Tools] > [Auto Rot.] to enter into auto rotation preparation
state.
b.
Tap [Left/Right] or [Up/Down] to set the auto rotation direction
c.
Set Start position and End position:
Start position: Use the trackball/trackpad to view to a certain position, tap [Set Start].
End position: Use the trackball/trackpad to view to a certain position, tap [Set End]
d.
Set the auto rotation increment: rotate the knob under the [Increment].
e.
Tap [Off] to start auto rotation.
Use [Speed] to adjust the rotation speed
Tap [SE/SE] for single direction rotation; tap [SE/ES] for bidirectional rotation.
Surface Enhancement
This function is to make the edge structure of the image and surface details clearer, so as to enhance
the overall contrast.
Tap [Surf. ENH] to adjust the enhancement level, the higher the level is, the clearer the edge
structure of the image is.
When the level is higher than 0 and [Move Light] is highlighted, image close to the light source is
clearer, and image away from the light source is darker.
Move the light
This function is to adjust the position of the light source as VR is considered. The image becomes
clearer as keeping closer to the light.
Use the trackball/trackpad and change the light position to make fine adjustments after tapping
[Move Light].
Sync
This function is to switch the direction of the image to the direction that is perpendicular to the
current active plane, so as to get a better observation.
Comments and Body Marks
Add comments and body marks to the MPR and VR.
The operations are the same with these in B mode.
Summary of Contents for Anesus ME7T
Page 2: ......
Page 58: ...This page intentionally left blank ...
Page 154: ...This page intentionally left blank ...
Page 164: ...This page intentionally left blank ...
Page 182: ...This page intentionally left blank ...
Page 190: ...This page intentionally left blank ...
Page 208: ...This page intentionally left blank ...
Page 254: ...This page intentionally left blank ...
Page 264: ...This page intentionally left blank ...
Page 280: ...This page intentionally left blank ...
Page 311: ......
Page 312: ...P N 046 018839 00 5 0 ...


