Troubleshooting
78
5
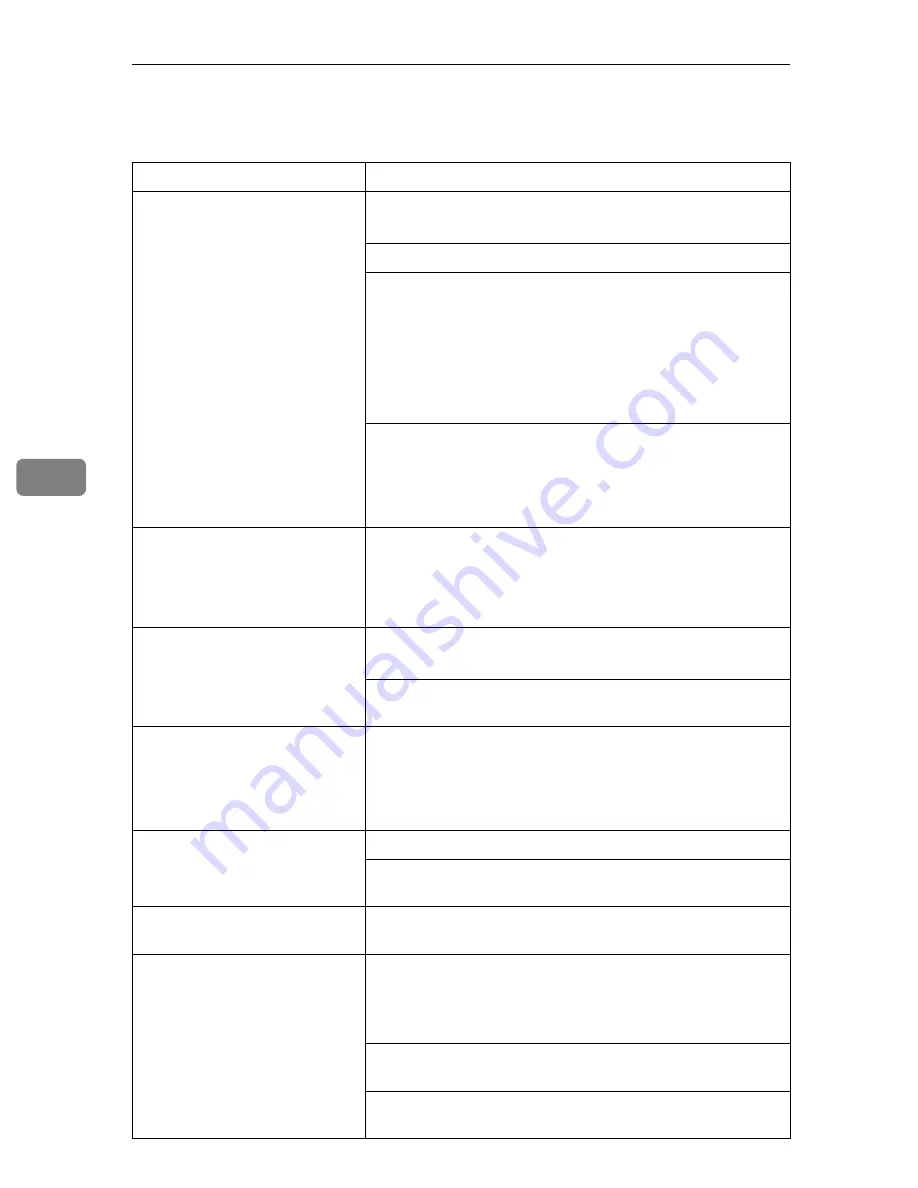
Other Printing Problems
Status
Possible Causes, Descriptions, and Solutions
The print side of the page is a
hazy gray.
Adjust the image density.
See p.99 “Making Printer Settings with the Control Panel”.
If paper is curled, correct it.
Check if the size selected with the paper tray dial matches that
selected with the control panel. If not, select the correct size
that matches the size and feed direction loaded in the tray.
If you print something after printing on the paper whose size
is smaller than the actual document size, the back of the next
output might get dirty.
See p.33 “Loading Paper and Other Media”.
If you continuously print data that contains extremely small
amount of words or images in the printable area, the printed
side of the page could be a hazy gray. Adjust the image den-
sity. See p.99 “Making Printer Settings with the Control Pan-
el”.
Image quality varies when
printing on thick paper or on
OHP transparencies.
Switch to Thick Paper mode.
• When toner is not fused enough, set it to “On”.
• When the image is blurred, set it to “----”.
See p.104 “Paper Input Menu”.
Some parts of the print image
are not clear.
Make the image density darker.
See p.112 “Maintenance Menu”.
If Toner Saving mode is selected using the control panel, the
whole image gets lighter.
The print image is not clear.
Due to a sudden change in temperature, condensation might
appear inside the printer, reducing print quality. If this oc-
curs, when you move the printer from a cold room to a
warmer room, do not use the printer until it acclimatizes to
the temperature.
Multiple pages are fed through
the printer at once.
Clean the friction pad if it is dirty.
Remove all paper from the tray and fan it gently to get air be-
tween the sheets. After that, load it back into the tray.
The image is printed on the re-
verse side of the paper.
Set the paper the other way up.
Paper misfeeds occur frequent-
ly.
Check the paper size settings. The size set with the paper size
dial might be different from the actual paper size. Make the
correct dial setting.
See p.33 “Loading Paper and Other Media”.
Use the recommended paper. Avoid using curled, folded,
wrinkled, perforated or glossy paper.
Clean the paper feed roller, friction pad and/or registration
roller, if they are dirty.
Summary of Contents for AP4510
Page 1: ...Setup Guide...
Page 10: ...viii...
Page 40: ...Installing Options 30 2...
Page 46: ...Configuring the Printer for the Network 36 3...
Page 66: ...56 UE USA G065 MEMO...
Page 92: ...Setting Up the Printer Driver and Canceling a Print Job 18 1...
Page 118: ...Paper and Other Media 44 3...
Page 128: ...Sample Print Locked Print 54 4...
Page 206: ...Making Printer Settings with the Control Panel 132 6...
Page 225: ......
Page 226: ...UE USA G065 8667...
Page 240: ...xii...
Page 252: ...Windows 95 98 Me Configuration 12 1...
Page 278: ...Windows NT 4 0 Configuration 38 3...
Page 338: ...98 UE USA EE GB G065...
Page 339: ...Copyright 2001...
Page 340: ...Network Printing Guide UE USA EE GB G065 8605...
Page 344: ...ii...
Page 370: ...26 UE USA EE GB G065...
Page 371: ...Copyright 2001...
Page 372: ...PostScript 3 Operating Instructions Supplement UE USA EE GB G065 8615...
Page 373: ...UNIX Supplement...
Page 408: ...32 EE GB G065...
Page 409: ...Copyright 2001...
Page 410: ...UNIX Supplement EE GB...
Page 418: ...8 Copyright 2001 G065 8537 Printed in Japan UE USA EE GB...


