background image

Grounding the BlackDiamond 12802 Chassis


Extreme Networks Consolidated ExtremeXOS Hardware Installation Guide

119

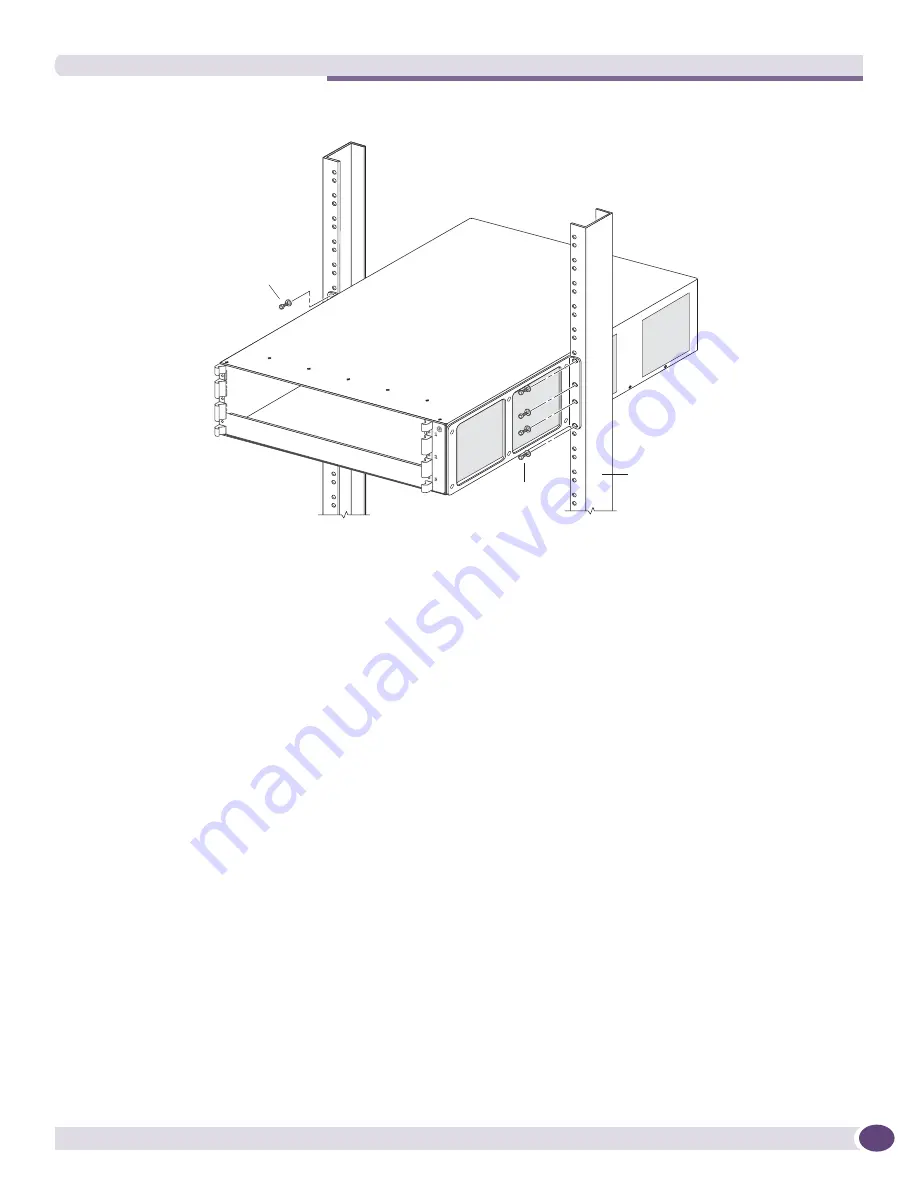
Figure 66: Securing the BlackDiamond 12802 switch to the rack (mid-mount position)

Grounding the BlackDiamond 12802 Chassis

Although grounding the BlackDiamond 12802 chassis is optional, it is recommended. A grounding 
point with integrated pem-nuts is provided on the back of the chassis.

You need the following materials to ground the chassis:

Two 10-24 screws

One copper, standard barrel 2-hole compression grounding lug, type LDC, equivalent to Panduit 
part number LCD4-14A-L or Thomas & Betts part number: LCN4-14

Appropriate grounding wire for your system, based on the available input current for the power 
supply:

For AC systems using a 20A breaker per PSU (SSI AC), the chassis ground can be as small as 
14 AWG. 

For DC systems using a 40A breaker per PSU (SSI DC), the chassis ground can be as small as 
10 AWG. 

Rack

Screws (x4)

Screws

BD_152

Summary of Contents for BlackDiamond 10808

Page 1: ... 3000 408 579 2800 http www extremenetworks com Extreme Networks Consolidated ExtremeXOS Hardware Installation Guide BlackDiamond 8800 Series Switches BlackDiamond 12800 Series Switches BlackDiamond 10808 Switch Summit Family Switches Published 2007 Part number 100172 00 Rev 07 ...

Page 2: ...Access RF Manager UniStack Universal Port the Extreme Networks logo the Alpine logo the BlackDiamond logo the Extreme Turbodrive logo the Summit logos the Powered by ExtremeXOS logo and the Color Purple among others are trademarks or registered trademarks of Extreme Networks Inc or its subsidiaries in the United States and or other countries 2006 2007 Extreme Networks Inc All Rights Reserved Speci...

Page 3: ...ements 25 BlackDiamond Family Chassis Airflow Requirements 25 Electrostatic Discharge 27 Humidity 27 Rack Specifications and Recommendations 27 Mechanical Recommendations for the Rack 28 Protective Grounding for the Rack 28 Space Requirements for the Rack 29 Securing the Rack 29 Evaluating and Meeting Cable Requirements 30 Cabling Standards 30 Cable Labeling and Record Keeping 30 Installing Cable ...

Page 4: ...MSM 53 Slots for BlackDiamond 8800 MSMs 53 MSM Activity 54 MSM G8X and MSM 48 Modules 54 MSM LEDs 56 I O Modules 56 BlackDiamond 8800 Original Series I O Modules 57 G24X I O Module 57 10G4X I O Module 58 G48T I O Module 59 G48P I O Module 59 BlackDiamond 8800 A Series I O Modules 61 G48Ta I O Module 61 G48Xa I O Module 62 10G4Xa I O Module 63 10G4Ca I O Module 63 BlackDiamond 8800 E Series I O Mod...

Page 5: ... GBIC Ports 86 G20X LEDs 86 10G6X Module 86 XENPAK Ports 87 10G6X LEDs 87 10G2X Module 88 XENPAK Ports 88 10G2X LEDs 89 10G2H Module 89 XENPAK Ports 90 Mini GBIC Ports 90 10G2H LEDs 90 I O Module LEDs 91 Part 3 Installing BlackDiamond Switches and Modules Chapter 6 Installing the BlackDiamond 8810 Chassis 95 Safety Information 95 Unpacking the BlackDiamond 8810 Chassis 96 Pre Installation Requirem...

Page 6: ...Carton from the Chassis 126 Installing the Chassis 128 Standard Rack Installation 129 Mid Mount Rack Installation 132 Grounding the BlackDiamond 10808 Chassis 134 Initial Management Access 136 Chapter 10 Extreme Networks Power Supply Units for BlackDiamond Switches 137 Safety 137 BlackDiamond PSU Compatibility 138 Extreme Networks 1200 W DC PSU 139 Minimum Software Required 139 Pre Installation Re...

Page 7: ... Installing a BlackDiamond 8800 or 12800 Series Module 175 Connecting and Disconnecting Cables on the 10G4Ca Module 178 Installing a BlackDiamond 10808 Series Module 179 Installing a Backup MSM 182 Verifying the Module Installation 182 Displaying Slot Status Information 182 Removing a BlackDiamond 8800 or 12800 Series Module 183 Removing a BlackDiamond 10808 Series Module 184 BlackDiamond Series B...

Page 8: ...nstalling a BlackDiamond 8800 12804 Spare PSU Fan Controller 216 Chapter 16 Replacing a BlackDiamond 12804 or 8800 Series Fan Tray 217 Pre Installation Requirements 217 Removing the Fan Tray 217 Installing the BlackDiamond 8810 Spare Fan Tray 219 Chapter 17 Replacing the BlackDiamond 10808 Switch Fan Tray Air Filter and Power Supply Controller 221 Replacing a BlackDiamond 10808 Switch Fan Tray 221...

Page 9: ...0 24t Switch 252 Summit X450 24t Switch Front Panel 252 Summit X450 24t Switch Rear Panel 253 Summit X450 24x Switch 254 Summit X450 24x Switch Front Panel 254 Summit X450 24x Switch Rear Panel 255 Summit X450a Series Switches 256 Summit X450a 24t Switch 256 Summit X450a 24t Switch Front Panel 257 Summit X450a 24t Switch Rear Panel 257 Summit X450a 24tDC Switch 259 Summit X450a 24tDC Switch Front ...

Page 10: ... 286 Removing a Summit Switch from a Rack AC units only 286 Installing and Removing Summit X450a Series DC Powered Switches 286 Connecting the Internal DC Power Supply to the DC Source Voltage 287 Grounding the Summit X450a 48tDC Switch 287 Connecting the DC Wiring Harness to the DC Source Voltage 288 Attaching the DC Wiring Harness to the DC Power Socket on the Switch 290 Removing a Summit X450a ...

Page 11: ...uirements 322 Rack Mounting the EPS T2 322 Installing an EPS 150DC 322 Connecting the DC Wiring Harness to the DC Source Voltage 323 Installing an EPS 150DC Unit into an EPS T2 324 Connecting the DC Wiring Harness to the DC Power Socket on the EPS 150DC 325 Connecting the EPS 150DC to a Switch 325 Removing an EPS 150DC 327 EPS 600LS External Power Module 328 Power Supply Overview 328 Single 600 LS...

Page 12: ... Fiber Cables 348 100FX 1000LX Mini GBIC 348 LX100 Mini GBIC 348 XFP Interfaces 349 LR XFP Module 349 SR XFP Module 350 Installing an XFP Module 350 Removing an XFP Module 353 XENPAK Interfaces 354 SR XENPAK 354 LR XENPAK 355 ER XENPAK 356 ZR XENPAK 357 LX4 XENPAK 358 LW XENPAK 359 Transmitter Clock Locking Mode 360 Installing and Removing a XENPAK Module 361 Part 8 Initial Management Access Chapt...

Page 13: ... Optical Safety 377 GBIC Mini GBIC XENPAK and XFP Regulatory Compliance 377 Appendix B Technical Specifications 385 BlackDiamond 10808 Switch 385 BlackDiamond 8810 Switch 388 BlackDiamond 8806 12804 Switch 390 BlackDiamond 12802 Switch 393 Power Supplies for the BlackDiamond Family of Switches 395 Summit Family of Switches 398 Summit X250e Series Switches 398 Summit X450 Series Switches 402 Summit...

Page 14: ...Table of Contents Extreme Networks Consolidated ExtremeXOS Hardware Installation Guide 14 ...

Page 15: ... series and Summit X450e series This guide also contains information about site preparation switch functionality and switch operation NOTE The Summit X250e series switches Summit X450 series switches Summit X450e series switches and Summit X450a series switches are called the Summit family of switches when referred to collectively This guide is intended for use by network administrators responsibl...

Page 16: ...system damage or loss of data Warning Risk of severe personal injury Table 2 Text conventions Convention Description Screen displays This typeface represents information as it appears on the screen or command syntax The words enter and type When you see the word enter in this guide you must type something and then press the Return or Enter key Do not press the Return or Enter key when an instructi...

Page 17: ...orks documentation from the Documentation Overview page Software User Guides Hardware User Guides You can find archived user guides for software at http www extremenetworks com services documentation swuserguides asp You can also find archived installation guides for hardware at http www extremenetworks com services documentation hwuserguides asp ...

Page 18: ...Preface Extreme Networks Consolidated ExtremeXOS Hardware Installation Guide 18 ...

Page 19: ...1 Site Preparation ...

Page 20: ......

Page 21: ...enance and removal of a switch chassis or its components must be done by qualified service personnel only Qualified service personnel have had appropriate technical training and experience that is necessary to be aware of the hazards to which they are exposed when performing a task and of measures to minimize the danger to themselves or other people By carefully planning your site you can maximize...

Page 22: ...al requirements for the equipment you plan to install Distribution rack requirements Evaluating and Meeting Cable Requirements After examining your physical site and ensuring all environment requirements are met evaluate and compare your existing cable plant with the requirements of the Extreme Networks equipment to determine if you need to install new cables or cabling Meeting Power Requirements ...

Page 23: ...the National Fire Protection Association NFPA The address is NFPA 1 Batterymarch Park Quincy Massachusetts 02169 USA http www nfpa org Underwriters Laboratory UL USA only an independent research and testing laboratory UL evaluates the performance and capability of electrical wiring and equipment to determine whether they meet certain safety standards when properly used Acceptance is usually indica...

Page 24: ...met such as ambient temperature and humidity NOTE Extreme Networks recommends that you consult an electrical contractor for commercial building and wiring specifications Temperature Extreme Networks equipment generates a significant amount of heat It is essential that you provide a temperature controlled environment for both performance and safety Install the equipment only in a temperature and hu...

Page 25: ...nches 8 cm of clear space in front of the air intake and outflow vents on the sides of the switch airflow moves from side to side For proper airflow through a Summit family switch leave clear space on the left and right sides of the switch Depending on other conditions in the equipment room it may be possible to install the switches closer to each other consult your Extreme Networks Customer Suppo...

Page 26: ...re Installation Guide 26 Figure 1 Airflow through the BlackDiamond 10808 system chassis Figure 2 Airflow through the BlackDiamond 8810 chassis EX_010 Airflow through power supplies Airflow through chassis ASP045 Airflow at power supply level Airflow through fan tray ...

Page 27: ...rovided with your equipment All switches come with ESD preventive wrist strap connectors and an ESD preventive wrist strap as shown in Figure 3 Figure 3 Using an ESD preventive wrist strap Humidity Operating humidity should be kept between 50 to 70 relative humidity non condensing during typical operation and 10 to 95 relative humidity non condensing for short intervals to maximize equipment life ...

Page 28: ...ollow these guidelines to ground equipment racks to the earth ground CAD weld appropriate wire terminals to building I beams or earth ground rods Use the appropriate chassis grounding wire for your system which is dependant upon the available input current to the power supply For AC systems using a 20A breaker per PSU SSI AC the chassis ground can be as small as 14 AWG The power cable ground shoul...

Page 29: ...isconnected by removing the wall plug from the electrical outlet For systems using a DC SSI power supply power to the chassis can be turned off by lifting the handle on the power supply or by de energizing the circuit that feeds the power supply which is usually accomplished by turning off a circuit breaker Power to the Summit X450a 24tDC switch and the EPS 150DC can be turned off be disconnecting...

Page 30: ...en planning and installing a network Maintaining accurate records helps you to Relocate devices easily Make changes quickly Isolate faults in the distribution system Locate the opposite end of any cable Know the types of network devices that your cabling infrastructure can support Consider the following recommendations when setting up a cable labeling system suitable for your installation Identify...

Page 31: ...cro straps to avoid injuring cables If you build your own cable be sure that cable is properly crimped When installing a patch panel using twisted pair wiring untwist no more than 1 inch 2 54 cm of the cable to avoid radio frequency RF interference Discharge the RJ45 Ethernet cable before plugging it into a port on the switch When required for safety and fire rating requirements use plenum rated c...

Page 32: ...me Networks Consolidated ExtremeXOS Hardware Installation Guide 32 Figure 5 Properly installed and bundled cable SPG_008 Proper bundling of cables Cable managers supporting and directing cables Adequate slack and bend radius ...

Page 33: ...le and maintain an adequate bend radius at all cable turns particularly where the cable connects to the I O module Figure 6 Bend radius for fiber optic cable Cable Distances Table 3 shows cable media types and maximum distances that support reliable transmission in accordance with international standards except where noted Table 3 Media types and maximum distances Standard Media Type Mhz Km Rating...

Page 34: ...that are wider than the connectors can cause Connectors that are not properly aligned with the port Crowded cable installation which can cause connectors to pop out of the port Figure 7 shows examples of connector jacket types that are not recommended as well as those that are recommended Figure 7 RJ 45 connector jacket types 1000BASE T 100BASE TX 10BASE T Category 5 and higher UTP cable Category ...

Page 35: ...P cable near electrical transformers In areas or applications where these situations cannot be avoided use fiber optic cabling or shielded twisted pair cabling STP Making Network Interface Cable Connections Use the appropriate type of cable to connect the ports of your switch to another switch or router Working carefully one port at a time 1 Verify that you have identified the correct cable for th...

Page 36: ...containing the cable is bonded to each building grounding electrode system Power Supply Requirements Adhere to the following requirements to operate your Extreme Networks equipment safely Be sure that your equipment is placed in an area that accommodates the power consumption and component heat dissipation specifications Be sure that your power supply meets the site power or AC power requirements ...

Page 37: ... to the Neutral plug terminal which may be marked with the letter N or colored black Yellow Green wire to the Ground plug terminal which may be marked with the letter E the Earth symbol or colored yellow green Uninterruptible Power Supply Requirements An uninterruptible power supply UPS is a device that sits between a power supply such as a wall outlet and a device such as a switch to prevent outa...

Page 38: ...equirements What is the longest potential time period that the UPS would be required to supply backup power Where will the UPS be installed What is the maximum transition time that your installation will allow NOTE Extreme Networks recommends that you use a UPS that provides online protection Calculating Amperage Requirements To determine the size of UPS that you need 1 Locate the voltage and ampe...

Page 39: ...g ANSI TIA EIA standards ANSI TIA EIA 568 A discusses the six subsystems of a structured cabling system ANSI TIA EIA 569 A discusses design considerations ANSI TIA EIA 606 discusses cabling system administration ANSI TIA EIA 607 discusses commercial building grounding and bonding requirements You can access these standards at http www ansi org or http www tiaonline org ...

Page 40: ...Site Preparation Extreme Networks Consolidated ExtremeXOS Hardware Installation Guide 40 ...

Page 41: ...2 BlackDiamond Switches ...

Page 42: ......

Page 43: ... module series For information about installing the BlackDiamond switches see Chapter 2 Chapter 3 Chapter 4 or Chapter 5 Supported Features The BlackDiamond switches are chassis based Ethernet service core switches designed for core applications For more information about configuring a BlackDiamond switch see the ExtremeXOS 12 0 Concepts Guide and the ExtremeXOS 12 0 Command Reference Guide The fe...

Page 44: ...witch configurations External Compact Flash Memory Card All MSMs in the BlackDiamond family include a compact flash slot next to the console port on the MSM This slot accepts a compact flash memory card which can be used to download a new version of ExtremeXOS and for other functions including capturing debug information and core dump files See the ExtremeXOS 12 0 Concepts Guide for more informati...

Page 45: ...panel of the BlackDiamond 8806 chassis Figure 9 Rear panel of the BlackDiamond 8806 chassis The rear panel of the BlackDiamond 8806 chassis provides Chassis serial number Ethernet MAC address of the switch Symbols of safety certification Access to the PSU fan controllers Attachment point for optional chassis ground EX_127 ESD wrist strap connector MSM module slot Power supplies Fan tray I O module...

Page 46: ...ix power supplies accessed from the front of the unit One fan tray accessed from the front right of the unit One connector for an ESD preventive wrist strap When two MSMs are installed the chassis can support up to 48 Gigabit bandwidth per slot Figure 8 shows the front of a BlackDiamond 8810 chassis equipped with two MSMs and three optional I O modules Figure 10 Front of the BlackDiamond 8810 chas...

Page 47: ...onal chassis ground BlackDiamond 12804 Switch Chassis The BlackDiamond 12804 chassis consists of the following components One 6 slot chassis with backplane Four dedicated I O module slots labeled 1 2 5 and 6 Two MSM slots labeled 3 A and 4 B Up to six SSI redundant AC DC power supplies accessed from the front of the unit One fan tray accessed from the front right of the unit One connector for an E...

Page 48: ...el of the BlackDiamond 12804 chassis The rear panel of the BlackDiamond 12804 chassis provides Chassis serial number Ethernet MAC address of the switch Symbols of safety certification Access to the PSU fan controllers Attachment point for optional chassis ground EX_157 EX_127 ESD wrist strap connector MSM module slots Power supplies Fan tray I O module slots Power cord connectors I O module slots ...

Page 49: ...s equipped with one MSM and two I O modules Figure 14 Front of the BlackDiamond 12802 chassis Figure 15 shows the rear panel of the BlackDiamond 12802 chassis Figure 15 Rear panel of the BlackDiamond 12802 chassis The rear panel of the BlackDiamond 12802 chassis provides Access to the fan tray Access to the PSU fan controller module Four bays for installing power supplies Attachment point for opti...

Page 50: ... or obstruct the fan ventilation holes at the rear of the unit Doing so can result in overheating and possible damage to the BlackDiamond 10808 switch Thermal sensors will shut down the BlackDiamond 10808 switch if the internal temperature exceeds 60 degrees Celsius The BlackDiamond 10808 switch includes two power supply controllers located in the back of the chassis that collect data from the ins...

Page 51: ...me Networks Consolidated ExtremeXOS Hardware Installation Guide 51 Figure 16 Front view of the BlackDiamond 10808 switch EX_001 I O module slots I O module slots MSM module slots ESD wrist strap connector Power supplies behind grill ...

Page 52: ...switch Figure 17 Rear view of the BlackDiamond 10808 switch The rear panel of the BlackDiamond 10808 switch provides Access to the fan units Chassis serial number Ethernet MAC address of the switch Symbols of safety certification Access to power supply controllers Attachment point for optional chassis ground EX_007A Fan trays Grounding point Power supply controllers ...

Page 53: ...gh three ASICs Each module also contains a temperature sensor nonvolatile random access memory NVRAM and a real time clock The BlackDiamond 8800 MSMs consist of a printed circuit board mounted on a metal panel that acts as the insertion vehicle in the BlackDiamond 8800 series of switches The module carrier also includes ejector injector levers and captive retaining screws at each end of the module...

Page 54: ...ckDiamond 8810 switch this is slot 5 in the BlackDiamond 8806 switch this is slot 3 When a switch boots with a single MSM regardless of the slot position it is selected as the primary MSM If a second MSM is added to the switch after it has been powered up the added MSM becomes the backup MSM MSMs that operate as backup MSMs can be inserted and removed without disrupting network services If you rem...

Page 55: ...ly D Use the D button to force a system dump that dumps the debug information into NVRAM This information is available on the next reboot No core file is created R Use the R button to reset the MSM G8X without removing the module from the chassis The MSM G8X has the following additional ports Eight SFP fiber mini GBIC data ports These data ports operate the same as the ports on the G24X I O module...

Page 56: ...s a default configuration for any slots that contain I O modules The default configuration allows the I O module ports to Table 5 MSM G8X and MSM 48 LEDs LED Color Indicates SYS STA Green blinking Normal operation is occurring Amber blinking The status LED flashes amber while diagnostic tests are running on the module If a diagnostic test fails the status LED becomes solid amber The LED resets if ...

Page 57: ...I O modules BlackDiamond 8800 a series I O modules and BlackDiamond 8800 e series I O modules CAUTION When BlackDiamond 8800 I O modules from different series original series a series and e series are installed in the same BlackDiamond 8800 series chassis limitations on feature sets may occur See the ExtremeXOS 12 0 Concepts Guide and the ExtremeXOS 12 0 Command Reference Guide for complete detail...

Page 58: ...t the LEDs and their activity on the G24X module see I O Module LEDs on page 66 10G4X I O Module Figure 21 shows the 10G4X I O module Figure 21 10G4X I O module The 10G4X I O module has four unpopulated XENPAK based 10 Gigabit Ethernet ports The default configuration of the 10G4X I O module is as follows All ports Are added to the default VLAN as untagged Inherit the properties of the default VLAN...

Page 59: ...ts Are added to the default VLAN as untagged Inherit the properties of the default VLAN for example protocol type and VLANid Operate in autonegotiation mode The G48T I O module has the following LEDs Module status Module diagnostics Port status For information about the LEDs and their activity on the G48T I O module see I O Module LEDs on page 66 G48P I O Module Figure 23 shows the G48P I O module...

Page 60: ...implements the following functions Enables the port for discovery classification and power delivery Enforces port power limits by denying power to a device exceeding the configured limit Enforces class limits by denying power to a device exceeding the class limit Reports and tracks port power faults The default configuration of the G48P I O module is as follows All ports Are added to the default V...

Page 61: ...be recognized by the software and it will not power up The following error messages are similar to the messages that may be displayed on the console or in the log Samples represent an unrecognized module in slot 2 On the console ERROR Unknown cardtype in slot 2 please program the eeprom In the log Error HAL Card Error MSM A Unable to read cardtype for slot 2 G48Ta I O Module Figure 24 shows the G4...

Page 62: ...d their activity on the G48Ta I O module see I O Module LEDs on page 66 G48Xa I O Module Figure 25 shows the G48Xa I O module Figure 25 G48Xa I O module The G48Xa I O module has 48 1000BASE X ports SPF fiber mini GBIC connectors The default configuration of the G48Xa module is as follows All ports Are added to the default VLAN as untagged Inherit the properties of the default VLAN for example prot...

Page 63: ... LEDs Module status Module diagnostics Port status For information about the LEDs and their activity on the 10G4Xa I O module see I O Module LEDs on page 66 10G4Ca I O Module Figure 26 shows the 10G4Ca I O module Figure 27 10G4Ca I O module The 10G4Ca I O module has four 10 gigabit Ethernet ports that use CX4 interface connectors The default configuration of the 10G4Ca I O module is as follows All...

Page 64: ...power up The following error messages are similar to the messages that may be displayed on the console or in the log Samples represent an unrecognized module in slot 2 Console ERROR Unknown cardtype in slot 2 please program the eeprom Log Error HAL Card Error MSM A Unable to read cardtype for slot 2 G48Te I O Module Figure 28 shows the G48Te I O module Figure 28 G48Te I O module The G48Te I O modu...

Page 65: ... a single MSM this module will be oversubscribed 4 1 When powered devices PDs are connected to a port the PDs are discovered and classified as 802 3af compliant or as legacy devices ExtremeXOS implements the following functions Enables the port for discovery classification and power delivery Enforces port power limits by denying power to a device exceeding the configured limit Enforces class limit...

Page 66: ...Diamond 8800 series I O modules These include the G24X G48T 10G4X G48Ta G48Xa G48Te 10G4Xa and 10G4Ca I O modules Table 8 describes the LED meanings for each port on the non PoE BlackDiamond 8800 series I O modules Table 7 BlackDiamond 8800 series I O module LEDs LED Color Indicates Status Green blinking Amber blinking Off Normal operation Configuration error code version error diagnostic failure ...

Page 67: ...ports Table 9 describes the LED meanings for each port on the G48P and G48Pe I O modules Table 9 Port LEDs for the G48P and G48Pe I O modules LED Color Indicates Port with power enabled Solid amber Link up Amber blinking Activity Slow amber blinking Port disabled or Link down Blinking amber green Power fault or insufficient power Port with power disabled Solid green Link up Slow green blinking Por...

Page 68: ...BlackDiamond 8800 Modules Extreme Networks Consolidated ExtremeXOS Hardware Installation Guide 68 ...

Page 69: ... Generation ASICs that enable high availability advanced security and deterministic performance independent of traffic mix The BlackDiamond 12800 series R series modules further provide hierarchical QoS and larger MAC address IP route and ACL capacity for network designs that need the advanced QoS features and scale The R series modules support rate limiting which is the ability to control bandwid...

Page 70: ...e Memory TCAM The MSM 5R has more memory available for routing tables learned MAC addresses and access control lists ACLs For specific details about memory allocation refer to the data sheet for each module CAUTION You must use compatible MSMs and I O modules from either the BlackDiamond 12800 series or the 12800 R series of modules Do not attempt to mix MSMs from the two different series The Extr...

Page 71: ...e inserted and removed without disrupting network services If you remove the primary MSM while the switch is operating the secondary MSM performs a soft reset and then becomes the primary MSM For example if you have a BlackDiamond 12804 switch with a primary MSM in slot 3 A and a secondary MSM in slot 4 B and you remove the primary MSM from slot 3 A the secondary or backup MSM in slot 4 B becomes ...

Page 72: ...module does not support NOTE You must use BlackDiamond 12800 R series modules to use rate limiting You must use the MSM 5R module plus the GM 20XTR I O module and or the XM 2XR I O module The MSM 5 module and MSM 5R module consist of a printed circuit board mounted on a metal panel that acts as the insertion vehicle in the BlackDiamond 12800 series switch The module carrier also includes ejector i...

Page 73: ...s switch is powered on the software generates a default configuration for any slots that contain I O modules The default configuration allows the I O module ports to participate in the VLAN named default The default configuration for the I O module is not preserved unless you explicitly save the configuration to NVRAM You can configure parameters of an I O module after it is installed or preconfig...

Page 74: ...onnectors Table 13 Port LEDs for the BlackDiamond GM 20XT GM 20XTR XM 2X and XM 2XR I O modules LED Color Meaning Port Solid green Link up Slow green blinking Port disabled Amber blinking Activity Off Link down Table 14 Port LEDs for the BlackDiamond GM 20T module LED Color Meaning Port with power enabled Solid amber Link up Slow amber blinking Port disabled Amber blinking Activity Slow amber blin...

Page 75: ...XT and GM 20XTR I O Modules Figure 33 shows the GM 20XT I O module Figure 33 GM 20XT I O module Figure 34 shows the GM 20XTR I O module Figure 34 GM 20XTR I O module NOTE Although the GM 20XT module and the GM 20XTR module are similar in appearance they have different functionality The GM 20XTR is part of the R series and includes the rate limiting feature the GM 20XT module does not support rate ...

Page 76: ...20XTR LEDs The GM 20XT and GM 20XTR I O modules have the following LEDs Module status Module diagnostics Port status XM 2X and XM 2XR I O Modules Figure 35 shows the XM 2X I O module Figure 35 XM 2X I O module Figure 36 shows the XM 2XR I O module Figure 36 XM 2XR I O module NOTE Although the XM 2X module and the XM 2XR module are similar in appearance the functionality of each I O module varies T...

Page 77: ...nd 12800 Series MSM from an I O Module A quick way to distinguish a BlackDiamond 12800 series MSM from a BlackDiamond 12800 series I O module is by the color of the release latch on each injector ejector handle Orange injector ejector release latches indicate that the module is a BlackDiamond 12800 series MSM and green injector ejector release latches indicate that the module is a BlackDiamond 128...

Page 78: ... 12804 switch will only run an MSM module BlackDiamond 12802 switch I O modules in slots 1 and 2 top and bottom MSM in slot MSM middle NOTE The MSM slot in the BlackDiamond 12802 switch is labeled MSM on the front panel This slot will only operate an MSM The ExtremeXOS software refers to this MSM as MSM A in all related displays and command output ...

Page 79: ...addition each MSM has two CPUs for protocol processing and network management The BlackDiamond 10808 chassis has two slots for installing an MSM Two MSMs are required for full system bandwidth the system will operate with a single MSM but bandwidth is reduced The MSM 1 and MSM 1XL have different size Ternary Content Addressable Memory TCAM The MSM 1XL has more memory available for routing tables l...

Page 80: ...her becomes the backup The primary MSM is responsible for upper layer protocol processing and system management functions For example OSPF computation and SNMP functions are performed by the primary MSM Packet handling is distributed among the CPUs of all installed MSMs When you save the switch configuration it is saved to all MSMs If you download a new ExtremeXOS image the image is downloaded to ...

Page 81: ...t contact Extreme Networks Customer Support Table 15 MSM LEDs LED Color Indicates SYS Green blinking Amber blinking Amber Off Normal operation is occurring Diagnostic test is in progress Diagnostic failure has occurred Switch is not receiving power MSTR Green Amber Module is operating as primary Module is operating as backup ENV Green Amber Environment temperature fan power supply is operating pro...

Page 82: ...including G60T Module G60X Module G20X Module 10G6X Module 10G2X Module 10G2H Module No configuration information is stored on the I O modules all configuration information is stored on the MSM s When the BlackDiamond 10808 switch is powered on the software generates a default configuration for any slots that contain I O modules The default configuration allows the I O module ports to participate ...

Page 83: ...orts on the G60T module are switched through the MSM in slot A and the bottom 30 ports are switched through the MSM in slot B during normal operation The default configuration of the G60T module is as follows All ports Are added to the default VLAN as untagged Inherit the properties of the default VLAN for example protocol type and VLANid Operate in autonegotiation mode G60T LEDs The G60T module h...

Page 84: ... Gigabit Ethernet ports on these modules use SFP fiber mini GBIC connectors and support 1000BASE SX 1000BASE LX 1000BASE LX70 and 1000BASE ZX ports The default configuration of the G60X module is as follows All ports Are added to the default VLAN as untagged Inherit the properties of the default VLAN for example protocol type and VLANid Mini GBIC Ports The G60X module supports any of the following...

Page 85: ...dule are switched through the MSM in slot A and the bottom 10 ports are switched through the MSM in slot B during normal operation Using the G20X module allows you to fulfill line rate traffic All Gigabit Ethernet ports on these modules use SFP mini GBIC connectors either fiber or copper The module supports SFP fiber mini GBICs 1000BASE SX 1000BASE LX 1000BASE LX70 and 1000BASE ZX connectors If yo...

Page 86: ...i GBIC which conforms to the IEEE 802 3z standard NOTE For more information about the supported mini GBIC types and specifications see Mini GBIC Interfaces on page 338 G20X LEDs The G20X module has the following LEDs Module status Port status For information about the LEDs and their activity on the G20X module see I O Module LEDs on page 91 10G6X Module Figure 42 shows the 10G6X module Figure 42 1...

Page 87: ... follows All ports Are added to the default VLAN as untagged Inherit the properties of the default VLAN for example protocol type and VLANid XENPAK Ports The 10G6X module supports any of the following XENPAKs SR XENPAK LR XENPAK ER XENPAK ZR XENPAK LX4 XENPAK LW XENPAK CX4 XENPAKs are also supported with Extreme Networks devices contact your vendor to obtain these NOTE For more information about t...

Page 88: ... the bottom port is switched through the MSM in slot B during normal operation The default configuration of the 10G2X module is as follows All ports Are added to the default VLAN as untagged Inherit the properties of the default VLAN for example protocol type and VLANid XENPAK Ports The 10G2X module supports any of the following XENPAKs SR XENPAK LR XENPAK ER XENPAK ZR XENPAK LX4 XENPAK LW XENPAK ...

Page 89: ...e 44 shows the 10G2H module Figure 44 10G2H module The 10G2H module has the following 2 unpopulated XENPAK based 10 Gigabit Ethernet ports 20 10 100 1000BASE T RJ 45 connector ports 20 unpopulated mini GBIC based Gigabit Ethernet fiber ports The default configuration of the 10G2H module is as follows All ports Are added to the default VLAN as untagged Inherit the properties of the default VLAN for...

Page 90: ... GBIC Ports The 10G2H module supports any of the following mini GBICs 1 Gigabit copper mini GBIC SX mini GBIC which conforms to the 1000BASE SX standard LX mini GBIC which conforms to the 1000BASE LX standard ZX mini GBIC which conforms to the IEEE 802 3z standard 1000BX mini GBIC BiDi mini GBIC which conforms to the IEEE 802 3ah 1000BASE BX10 standard NOTE For more information about the supported...

Page 91: ...able 16 BlackDiamond 10808 series Ethernet I O module LEDs LED Color Indicates Status Green blinking Amber blinking Off Normal operation Configuration error code version error diagnostic failure or other severe module error No power DIAG Off Amber blinking Amber Normal operation Diagnostics in progress Diagnostic failure Port x Green Green blinking Amber blinking Off Link up Link down Packet activ...

Page 92: ...BlackDiamond 10808 Series Modules Extreme Networks Consolidated ExtremeXOS Hardware Installation Guide 92 ...

Page 93: ...3 Installing BlackDiamond Switches and Modules ...

Page 94: ......

Page 95: ... Chassis on page 103 Initial Management Access on page 104 Safety Information WARNING Correct lifting procedures for the BlackDiamond 8810 chassis require two or more people Only trained service personnel should perform service to Extreme Networks switches and their components Trained service personnel have read all related installation manuals have the technical training and experience necessary ...

Page 96: ... chassis requires two people To uncrate and unpack the BlackDiamond 8810 chassis 1 Verify that the Tilt Watch and Shock Watch indicators display a white state as shown in Figure 45 Figure 45 Tilt watch and shock watch indicators CAUTION Do not proceed with uncrating and unpacking the chassis if either the Tilt Indicator or the Shock Indicator is displaying a red warning state Immediately contact E...

Page 97: ...rongs inward applying equal pressure on each side c Pull the prongs outward until the clip lock is released from the carton d Repeat steps 3a through 3c to release each of the remaining clip locks Figure 47 Clip locks on the BlackDiamond 8810 shipping carton 4 Lift the BlackDiamond 8810 shipping carton up and off the chassis 5 Remove all four restraining bolts that hold the BlackDiamond 8810 chass...

Page 98: ...of the BlackDiamond 8810 chassis see Figure 49 CAUTION Do not use the fan tray handle to lift or maneuver the BlackDiamond 8810 chassis This handle is not designed to support the weight of the chassis WARNING The BlackDiamond 8810 chassis should be empty before being lifted This will also prevent damage to the system components due to possible chassis flex when lifting 7 Carefully lift the BlackDi...

Page 99: ...0 chassis ESD preventive wrist strap provided 19 inch helper bracket provided For installing the chassis in a mid mount position in the rack Optional BlackDiamond 8810 mid mount kit Model 41141 Order this kit separately from the chassis Rack mount screws appropriate for your organization s rack system as follows 4 screws to attach the helper bracket to the rack 8 screws to secure the BlackDiamond ...

Page 100: ... mount brackets 1 Set the empty chassis in an upright position on a secure flat surface 2 Determine the position for the mid mount brackets NOTE Each side of the chassis has two sets of mounting holes to provide two positions for attaching the mid mount brackets 3 Identify the left and right brackets Each mid mount bracket is clearly marked for placement on either the right or left side as viewed ...

Page 101: ...the rack location where the chassis will be installed 3 Using four rack mounting screws attach the helper bracket to the system rack immediately below the chassis location as shown in Figure 51 You must provide the screws for attaching the helper bracket Figure 51 Attaching the helper bracket to the system rack 4 Lift the back of the empty chassis onto the helper bracket 5 Slowly guide the chassis...

Page 102: ...cations NOTE Figure 52 shows a standard rack mount For mid mount installation use the same mounting locations shown in the figure but insert the screws through the designated slot locations of the mid mount brackets Figure 52 Securing the BlackDiamond 8810 chassis to a standard rack system 7 Remove the helper bracket from the system rack after the chassis is secured Save the bracket for future use...

Page 103: ... Thomas Betts part number LCN4 14 Appropriate grounding wire for your system based on the available input current for the power supply For AC systems using a 20A breaker per PSU SSI AC the chassis ground can be as small as 14 AWG For DC systems using a 40A breaker per PSU SSI DC the chassis ground can be as small as 10 AWG To ground the chassis 1 Locate the grounding point on the back of the chass...

Page 104: ...g to the manufacturer s specifications 5 Insert the screws through the lug and into the grounding point on the back of the chassis 6 Connect the other end of the wire to a known reliable earth ground point at your site Initial Management Access For instructions on accessing the switch for initial management setup see Chapter 2 Initial Management Access ...

Page 105: ...ctions Unpacking the BlackDiamond 8806 12804 Chassis on page 106 Pre installation Requirements on page 109 Attaching the BlackDiamond 8806 12804 Mid Mount Brackets on page 109 Rack Mounting the BlackDiamond 8806 12804 Chassis on page 110 Grounding the BlackDiamond 8806 12804 Chassis on page 112 Initial Management Access on page 113 NOTE Read the information in this chapter thoroughly before you at...

Page 106: ...d documentation pack from the shipping carton see Figure 54 Lift out the packing foam Figure 54 Removing accessories from the BlackDiamond 8806 12804 chassis shipping carton 3 Release the clip locks see Figure 55 a Place your thumb and index finger inside the clip lock touching the prongs b Squeeze the prongs inward applying equal pressure on each side c Pull the prongs outward until the clip lock...

Page 107: ...e BlackDiamond 8806 12804 chassis shipping carton 4 Slide the shipping carton up over the BlackDiamond 8806 12804 chassis see Figure 56 Figure 56 Removing the carton from the BlackDiamond 8806 12804 chassis 5 Unwrap the chassis EX_111A Clip lock Open lock Squeeze prongs to unlock EX_120A Lift box off chassis Open remove 4 clip locks to free box ...

Page 108: ...ng the BlackDiamond 8806 12804 chassis CAUTION Do not use the fan tray handle to lift or maneuver the BlackDiamond 8806 12804 chassis This handle is not designed to support the weight of the chassis Verify that the following items are included in the crate BlackDiamond 8806 12804 chassis with four installed blank front panels Power cord retaining bracket 19 inch helper bracket installation tray Bl...

Page 109: ...crewdriver size will vary based on the requirements of your organization s rack system Attaching the BlackDiamond 8806 12804 Mid Mount Brackets To install the BlackDiamond 8806 12804 switch in a mid mount position in the rack attach the optional BlackDiamond 8806 12804 mid mount brackets To attach the BlackDiamond 8806 12804 mid mount brackets 1 Place the empty BlackDiamond 8806 12804 chassis in a...

Page 110: ...hassis To mount the BlackDiamond 8806 12804 chassis in a rack 1 Locate the 19 inch helper bracket that is shipped with the BlackDiamond 8806 12804 chassis 2 Identify the rack location where the chassis will be installed 3 Using four rack mounting screws attach the helper bracket to the system rack immediately below the chassis location see Figure 59 You must provide the screws for attaching the he...

Page 111: ...guide the chassis into the system rack until the mounting brackets are flush against the rack uprights 6 Attach the chassis to the system rack using eight rack mounting screws Screws are not provided Be sure that the screws are secure Refer to Figure 60 for the screw locations NOTE Figure 60 shows a standard rack mount For mid mount installation use the same mounting locations shown in the figure ...

Page 112: ...6 12804 chassis is optional it is recommended A grounding point with integrated pem nuts is provided on the back of the chassis You need the following materials to ground the chassis Two 10 24 screws One copper standard barrel 2 hole compression grounding lug type LDC equivalent to Panduit part number LCD4 14A L or Thomas Betts part number LCN4 14 Appropriate grounding wire for your system based o...

Page 113: ...into the cable lug CAUTION Be sure that no copper is visible between the lug and the cable insulation 4 Crimp the lug onto the cable according to the manufacturer s specifications 5 Insert the screws through the lug and into the grounding point on the back of the chassis 6 Connect the other end of the wire to a known reliable earth ground point at your site Initial Management Access For instructio...

Page 114: ...Installing the BlackDiamond 8806 and BlackDiamond 12804 Chassis Extreme Networks Consolidated ExtremeXOS Hardware Installation Guide 114 ...

Page 115: ...ss the latest 12 0 1 image at the Extreme Networks support website and follow the upgrade instructions in the ExtremeXOS 12 0 Release Notes This chapter includes the following sections Unpacking the BlackDiamond 12802 Chassis on page 115 Rack Mounting the BlackDiamond 12802 Chassis on page 117 Grounding the BlackDiamond 12802 Chassis on page 119 Initial Management Access on page 120 NOTE Read the ...

Page 116: ... CAUTION Do not lift the chassis using the top of the front opening The weight of the chassis may cause the enclosure to deform Set the chassis on a secure flat work surface 6 Break the inspection seal on the packing bag and remove the chassis from the bag NOTE Save the box and all packaging for future use in case the BlackDiamond 12802 chassis must be returned to Extreme Networks Inc BlackDiamond...

Page 117: ...ools and equipment to install the chassis in a rack 8 rack system mounting screws The screw size will vary based on your organization s rack system screws are not provided Screwdriver appropriate for the selected rack mounting screws Front Mounting a BlackDiamond 12802 Chassis To front mount the BlackDiamond 12802 chassis in a rack 1 Place each mounting bracket against the switch chassis with the ...

Page 118: ...lackDiamond 12802 Chassis To mid mount the BlackDiamond 12802 chassis in a rack 1 Place each mounting bracket against the switch chassis with the mounting flange at the middle of the chassis side Figure 65 Figure 65 Mounting flanges at the middle 2 Insert and tighten the provided flat head screws to secure the brackets to the chassis 3 Slide the chassis into the equipment rack 4 Attach the chassis...

Page 119: ...d on the back of the chassis You need the following materials to ground the chassis Two 10 24 screws One copper standard barrel 2 hole compression grounding lug type LDC equivalent to Panduit part number LCD4 14A L or Thomas Betts part number LCN4 14 Appropriate grounding wire for your system based on the available input current for the power supply For AC systems using a 20A breaker per PSU SSI A...

Page 120: ...cable lug CAUTION Be sure that no copper is visible between the lug and the cable insulation 4 Crimp the lug onto the cable according to the manufacturer s specifications 5 Insert the screws through the lug and into the grounding point on the back of the chassis 6 Connect the other end of the wire to a known reliable earth ground point at your site Initial Management Access For instructions on acc...

Page 121: ...attempt to install or remove the BlackDiamond 10808 switch Safety Information CAUTION Correct lifting procedures for the BlackDiamond 10808 chassis requires two or more people Only trained service personnel should perform service to Extreme Networks switches and their components Trained service personnel have read all related installation manuals have the technical training and experience necessar...

Page 122: ...ack not provided Screwdriver appropriate for the rack mount screws A minimum of two people to help install the chassis into the rack Unpacking the Chassis and Preparing the Rack The BlackDiamond 10808 chassis is shipped bolted to a wooden pallet with a carton fastened over the pallet An accessory box is inside the top of the carton To begin the installation process unpack the accessories and remov...

Page 123: ...hipping status indicators Each indicator has two color coded states or modes a good white state and a warning red state A smooth shipping procedure should leave all four indicators in good white states Figure 69 shows the tilt watch and shock watch indicators in both conditions EX_083A Pallet Cardboard box Tilt watch Shock watch ...

Page 124: ... and speak to a representative before continuing Removing the Accessories Box Begin unpacking the chassis from the carton by removing the accessories box from the top of the carton To remove the accessories box from the carton 1 Cut away the plastic that wraps the carton 2 Cut the tape that seals the top of the carton 3 Open the top carton flaps and lift out the accessories box as shown in Figure ...

Page 125: ...e 125 Figure 70 Accessories box in top of carton 4 Set the accessories box aside in a safe place The accessories box contains 19 inch helper bracket for installing the chassis in a rack ESD preventive wrist strap Front bezel for shielding the switch after installation Documentation and media EX_085 Accessory box ...

Page 126: ...arance to remove the shipping carton from the chassis To remove the carton from the chassis 1 Remove the four v boards from the corners of the crate as shown in Figure 71 Figure 71 V boards in the chassis carton 2 Remove the four detachable plastic clip locks found near the bottom of the shipping carton as shown in Figure 72 Two clip locks are located on each side of the carton EX_093A V boards ...

Page 127: ...two vertical prongs located there b Press the prongs inward applying equal pressure on each side c Pull the prongs toward you until the clip lock is released from the carton d Repeat steps 2a through 2c to release each of the remaining three clip locks Figure 73 Removing the clip locks 3 Slide the carton up over the chassis as shown in Figure 74 EX_182 Pallet Clip locks Cardboard box EX_087B Clip ...

Page 128: ...ou need to return the BlackDiamond 10808 switch Installing the Chassis The BlackDiamond 10808 switch is shipped with a pre installed fan tray For your safety because of the increased weight of the chassis after components are installed and to prevent damage to the equipment Extreme Networks strongly recommends that you install the I O modules after you mount the chassis in a rack NOTE Mount the ch...

Page 129: ... the standard rack position 1 Locate the helper bracket 2 Mount the helper bracket in the lowest available position in the rack using four appropriate screws not provided as shown in Figure 75 Figure 75 Helper bracket for mounting the BlackDiamond 10808 switch 3 Using all four handles lift the switch from the pallet as shown in Figure 76 EX_086A ...

Page 130: ...g the switch from the pallet 4 Place the back of empty chassis on the helper bracket in the equipment rack 5 Using the higher handles at the front slowly guide the chassis into the rack until it is securely seated 6 While holding the empty chassis secure the chassis to the rack using eight rack mount screws see Figure 77 EX_090A ...

Page 131: ...rdware Installation Guide 131 Figure 77 Securing the BlackDiamond 10808 chassis to a standard rack 7 After you secure the chassis to the rack remove the helper bracket Store the bracket for future use for example if you need to remove the chassis from the rack EX_009A ...

Page 132: ...e rack using the mid mount kit 1 Locate the helper bracket 2 Mount the helper bracket in the lowest available position in the rack using four appropriate screws not provided as shown in Figure 78 Figure 78 Helper bracket for mounting the BlackDiamond 10808 switch 3 Attach a mid mount flange to each side of the BlackDiamond 10808 chassis using the provided screws Use the appropriate flange for the ...

Page 133: ...Installing the Chassis Extreme Networks Consolidated ExtremeXOS Hardware Installation Guide 133 Figure 79 Mid mount flange for the BlackDiamond 10808 chassis EX_075 Midmount flanges ...

Page 134: ...e use for example if you need to remove the chassis from the rack Grounding the BlackDiamond 10808 Chassis Although grounding the BlackDiamond 10808 chassis is optional it is recommended A grounding point with integrated pem nuts is provided on the back of the chassis You need the following materials to ground the chassis Two 10 24 screws One copper standard barrel 2 hole compression grounding lug...

Page 135: ...on from the stranded copper wire cable 3 Insert the stripped wire into the cable lug CAUTION Be sure that no copper is visible between the lug and the cable insulation 4 Crimp the lug onto the cable according to the manufacturer s specifications 5 Insert the screws through the lug and into the grounding point on the back of the chassis 6 Connect the other end of the wire to a known reliable earth ...

Page 136: ...nd 10808 Chassis Extreme Networks Consolidated ExtremeXOS Hardware Installation Guide 136 Initial Management Access For instructions on accessing the switch for initial management setup see Chapter 2 Initial Management Access ...

Page 137: ...azards to which they are exposed in performing a task and are aware of measures to minimize the danger to themselves or other persons Before installing an Extreme Networks PSU into your network Read the latest installation and safety information provided in this chapter and in Appendix A Safety Information See Appendix A Safety Information for additional information regarding regulatory compliance...

Page 138: ...C PSU is disabled on all chassis In ExtremeXOS releases before those the software does not recognize the 600 900 W AC PSU and the PSU will not be budgeted properly possibly resulting in PSU shutdown and or chassis reboot Table 17 PSU compatibility in the BlackDiamond switches BlackDiamond Switch Compatible PSU Compatibility Notes BlackDiamond 8806 600W 900W AC PSU AND OR 700W 1200W AC PSU OR 1200W...

Page 139: ...on with any Extreme Networks AC PSU in the same BlackDiamond 8800 series BlackDiamond 10808 or BlackDiamond 12804 system Extreme Networks recommends that DC and AC PSU units not be used together in the same BlackDiamond switch NOTE For central DC power connections the 1200 W DC PSU is intended to be installed only in restricted access locations dedicated equipment rooms equipment closets or the li...

Page 140: ...stribution to the 1200 W DC PSU shall be provided using the 48 VDC harness provided Power to the 1200 W DC PSU can be from either a 50 A UL approved overcurrent protection breaker or an SELV approved power source in accordance with IEC 60950 1 utilizing 50 A overcurrent protection The input DC cable has an input connector on one end and precut wire on the other end that goes to the DC power source...

Page 141: ...ing point on the back of the switch is securely connected to earth ground For information about grounding the switch see Grounding the BlackDiamond 8810 Chassis on page 103 Grounding the BlackDiamond 8806 12804 Chassis on page 112 or Grounding the BlackDiamond 10808 Chassis on page 134 2 Verify that the 1200 W DC PSU is right side up and press the yellow locking lever to the left while lifting the...

Page 142: ...Do not slam the 1200 W DC PSU into the system switch backplane Figure 84 1200 W DC PSU sliding into the power supply bay 4 Connect the input DC cable to the front of the 1200 W DC PSU as shown in Figure 85 NOTE An AC power cord is not required for proper functioning of the DC PSU 5 Rotate the locking handle down to latch the input cable connector onto the DC PSU CAUTION Always be sure that the DC ...

Page 143: ...itch and exit out the right side of the grate The right most cable harness should be routed across the switch and exit out the left side of the grate It is important to route each of the outer most cables out the opposite side of installation to maximize the bend radius and to avoid stress on the cables The four middle cables can route in either direction 7 Energize the DC circuit for the 1200 W D...

Page 144: ...C PSU 4 Disconnect the cable from the front of the DC PSU by pressing down the catch see Figure 86 and pulling out the cable Figure 86 Disconnecting the cable from the DC PSU WARNING Always be sure that the 1200 W DC PSU does not have the input cabled connected at any time when the DC PSU is not installed into the switch Do not remove the DC PSU from the switch before disconnecting the input DC ca...

Page 145: ...ch Airflow through the 1200 W DC PSU is independent from the airflow that exists through the rest of the switch Table 18 Extreme Networks 1200 W DC PSU front panel LED behavior PSU Condition Power Green Predictive Fail Amber Fail Amber Power supply DC outputs working normally On Off Off DC input power present standby output on Blinking Off Off Current limit on 48 VDC output On Off Blinking Predict...

Page 146: ...ormation about configuring your Extreme Networks BlackDiamond switch NOTE The Extreme Networks 700W 1200 W AC PSU can be used in conjunction with an Extreme Networks 600 900 W AC PSU in the same BlackDiamond 8806 system NOTE Extreme Networks does not recommended using the 700 1200 W AC PSU in conjunction with an Extreme Networks 1200W DC PSU in the same BlackDiamond 8800 series BlackDiamond 10808 ...

Page 147: ...PSU CAUTION Make sure that the Extreme Networks 700 1200 W AC PSU circuit is not overloaded Use proper over current protection such as a circuit breaker to prevent over current conditions To install an Extreme Networks 700 1200 W AC PSU 1 Attach an ESD preventive wrist strap to your wrist and connect the metal end to the ground receptacle which is located on the top left corner of the switch front...

Page 148: ...ly unused slot on a switch with a retaining bracket remove the power cord retaining bracket See Chapter 2 BlackDiamond AC Power Cord Retaining Brackets for information on removing the power cord retaining bracket and re installing it Connect the AC power cord to the AC input on the front of the switch and to the wall outlet on the other end Then re install the power cord retaining bracket c If you...

Page 149: ...er cord at all b If you are going to use a new AC power cord remove the power cord retaining bracket See Chapter 2 BlackDiamond AC Power Cord Retaining Brackets for information on removing the power cord retaining bracket and re installing it Connect the AC power cord to the AC input on the front of the switch and to the wall outlet on the other end Then re install the power cord retaining bracket...

Page 150: ...e with both 110 V AC and 220 V AC power supply cords The 110 V AC power supply cord allows for a maximum DC output power of 700 W The 220V AC power supply cord allows for a maximum DC output power of 1200 W CAUTION All power supply cords provided by Extreme Networks are designed for use in North America only Power supply cords for use outside of North America are typically provided by a third part...

Page 151: ...lable power required for the switch and enables the modules accordingly When a mixture of AC PSU types the 600 900 W AC PSU and the 700 1200 W AC PSU are powered on in the same BlackDiamond 8806 chassis all PSUs will be budgeted down to the lower powered 600 900 W AC output values to avoid PSU shutdown due to over current ExtremeXOS optimizes total system power avoiding the possibility of over cur...

Page 152: ...tch only BlackDiamond 8806 switch Extreme Networks 600 900 W AC PSUs are fully fault tolerant and load sharing in an N 1 configuration After the system is properly configured should one Extreme Networks 600 900 W AC PSU fail the others will provide sufficient power to operate a fully loaded switch The power supply bay can accommodate up to six hot swappable Extreme Networks 600 900 W AC PSUs See t...

Page 153: ...ftware does not recognize the 600 900 W AC PSU and the PSU will not be budgeted properly possibly resulting in PSU shutdown and or chassis reboot Pre Installation Requirements WARNING Extreme Networks 600 900 W AC PSUs do not have switches for turning the unit on and off Remove the wall plug from the electrical outlet to disconnect the power to an Extreme Networks 600 900 W AC PSU Make sure that t...

Page 154: ...nd connect the metal end to the ground receptacle which is located on the top left corner of the switch front panel 2 Verify that the Extreme Networks 600 900 W AC PSU is right side up and the locking handle is open see Figure 90 Figure 90 Extreme Networks 600 900 W AC PSU with locking handle open 3 Carefully slide the Extreme Networks 600 900 W AC PSU all the way into the power supply bay see Fig...

Page 155: ...onents To install additional Extreme Networks 600 900 W AC PSUs repeat steps 1 through 5 Removing or Replacing an Extreme Networks 600 900 W AC PSU CAUTION The AC PSU is hot to the touch use thermal protective gloves when handling the 600 900 W AC PSU during removal To remove or replace an Extreme Networks 600 900 W AC PSU 1 Attach an ESD preventive wrist strap to your wrist and connect the metal ...

Page 156: ...ply cords provided by Extreme Networks are designed for use in the United States and Canada only Power supply cords for use outside of North America are typically provided by a third party distribution center and must meet the following requirements Power supply cords must be agency certified for country of use Power supply cords must contain an IEC 320 C13 connector on the end of the PSU Power su...

Page 157: ... avoid PSU shutdown due to over current ExtremeXOS optimizes total system power avoiding the possibility of over current by deciding whether to budget down PSUs with 220 V AC inputs when PSUs with 110 V AC inputs are present or to keep 110 V AC PSUs disabled CAUTION Even though this process avoids the possibility of over current an I O module may be powered off if a 600 900 W AC PSU is added to an...

Page 158: ...W DC PSUs are fully fault tolerant and load sharing in an N 1 configuration After the system is properly configured if one Extreme Networks 325 W DC PSU fails the others will provide sufficient power to operate a fully loaded switch The power supply bay can accommodate up to four hot swappable Extreme Networks 325 W DC PSUs See the ExtremeXOS 12 0 Concepts Guide for information about configuring y...

Page 159: ...Model 65052 shipped separately from the PSU Thermal protective gloves required for removal Installing the DC Wiring NOTE All wiring methods involving the DC input cable assembly must be performed according to the relevant articles of the National Electrical Code The Extreme Networks 325 W DC PSU requires input DC cable Model 65025 see Figure 92 This cable is shipped separately from the power suppl...

Page 160: ...t the DC power cord to the 325 W DC PSU or disconnect the DC power cord from the 325 W DC PSU WARNING Wiring the 325 W DC PSU DC power cord to your facility DC source voltage must be performed by a qualified licensed electrician After the DC power cord is connected to a permanent DC voltage source by a qualified licensed electrician you can remove replace and maintain the 325 W DC PSU without furt...

Page 161: ... Refer to Table 21 for the recommended installation sequence NOTE A minimum of two Extreme Networks 325 W DC PSUs are required to run a BlackDiamond 12802 switch WARNING Do not put your hand into an open power supply bay when a power supply is not present Empty power supply bays require a cover plate at all times CAUTION Do not slam the Extreme Networks 325 W DC PSU into the system switch backplan...

Page 162: ...Figure 95 Figure 95 Securing the Extreme Networks 325 W DC PSU 5 Verify that the DC input cord was connected to a permanent DC voltage source by a qualified licensed electrician 6 Verify that the DC power is turned off at the source 7 Plug the DC input cord into the DC input socket on the front of the 325 W DC PSU see Figure 96 Verify that the input connector latch locks onto the connector on the ...

Page 163: ...ower disconnect ALL power supply units Disconnect the power cord before you remove the PSU from the chassis To remove an Extreme Networks 325 W DC PSU 1 Turn off the DC power at the source 2 Attach an ESD preventive wrist strap to your wrist and connect the metal end to the ground receptacle on the top right corner of the switch front panel 3 Press down the catch on the DC input connector and disc...

Page 164: ...figure or replace fuses inside Extreme Networks 325 W DC PSUs In the event of failure immediately return the defective Extreme Networks 325 W DC PSU for a complete replacement Specifications The 325 W DC PSU functions from 40 V to 72 V DC input The software determines the maximum available power required for the switch and enables the modules accordingly CAUTION The 325 W DC PSU does not have a sw...

Page 165: ...sed in conjunction with any other Extreme Networks PSU Pre Installation Requirements WARNING Extreme Networks 325 W AC PSUs do not have switches for turning the unit on and off Remove the wall plug from the electrical outlet to disconnect the power to an Extreme Networks 325 W AC PSU Make sure that this connection is easily accessible Do not connect the power supply to an electrical outlet when th...

Page 166: ...e Networks 325 W AC PSU 3 Carefully slide the Extreme Networks 325 W AC PSU all the way into an open power supply bay see Figure 98 until you hear a click Extreme Networks recommends that you populate the two left power supply bays before the two right power supply bays Refer to Table 21 for the recommended installation sequence NOTE A minimum of two Extreme Networks 325 W AC PSUs are required to ...

Page 167: ...ke sure before you install the PSU in the power supply bay that the AC power cord is not connected to the PSU Figure 98 Installing a 325 W AC PSU 4 To secure the 325 W AC PSU in the power supply bay align and tightening the two captive screws on the PSU front panel As you tighten the screws work from left to right see Figure 99 Figure 99 Securing the Extreme Networks 325 W AC PSU Torino AC PSU_01 ...

Page 168: ...cords To install the brackets and connect power to the switch 1 Attach a power cord retaining bracket to each installed PSU as follows a Remove the two screws from the AC input socket on the PSU see Figure 100 b Using the screws and spacers provided with the bracket attach the retaining bracket to the AC input socket as shown in Figure 100 c Tighten the screws to secure the power cord bracket Figu...

Page 169: ...eeded loosen the middle screw of the power cord bracket to allow installation of the power cord b After the power cord is connected tighten the middle screw of the bracket to secure the power cord in place see Figure 102 Figure 102 Connecting the AC power cord 3 Connect the opposite end of the AC power cord to the wall outlet NOTE Leave the ESD strap permanently connected to the switch so that the...

Page 170: ...screw on the power cord bracket to allow removal of the power cord After the screws are loosened disconnect the AC power cord from the AC input on the front of the PSU 4 Loosen the two captive screws that secure the PSU front panel to the chassis frame 5 Use the handle to slide the PSU out of the chassis NOTE Leave the ESD strap permanently connected to the switch so that the strap is always avail...

Page 171: ... applicable to the country of installation Power supply cords must be less than 5 m long Wire size must be a minimum of 18 AWG 0 82 mm2 copper stranded WARNING Make sure that the source outlet is properly grounded before plugging the AC power cord into the Extreme Networks 325 W AC PSU Fuse The Extreme Networks 325 W AC PSU line is fused This is not a field operator replaceable fuse In the event o...

Page 172: ...Extreme Networks Power Supply Units for BlackDiamond Switches Extreme Networks Consolidated ExtremeXOS Hardware Installation Guide 172 ...

Page 173: ...Diamond 8800 or 12800 Series Module on page 183 Removing a BlackDiamond 10808 Series Module on page 184 BlackDiamond Series Blank Front Panels on page 185 NOTE Read the information in this chapter thoroughly before you attempt to install or remove an 8800 series MSM or I O module CAUTION Do not attempt to mix modules across Extreme Networks product lines BlackDiamond 8800 series modules are for us...

Page 174: ...ch and slots A and B in the BlackDiamond 10808 switch MSMs reside in different slots depending on which BlackDiamond switch you operate If you are using only one MSM in the BlackDiamond 8806 switch install that MSM in slot 3 If you want to use two MSMs to increase reliability and throughput install the second MSM in slot 4 If you are using only one MSM in the BlackDiamond 8810 switch install that ...

Page 175: ...d connect the metal end to the ground receptacle on the chassis On a BlackDiamond 12804 or 8800 series chassis the ground receptacle is at the top left corner On a BlackDiamond 12802 chassis the ground receptacle is at the top right corner 2 Select a slot for the module See Module Slot Assignments on page 173 3 Remove a blank front panel from a chassis slot if applicable NOTE Any unoccupied module...

Page 176: ... injector ejector handles in the open position as you slide the module into the chassis slot CAUTION Do not slide the module into the open chassis slot if the injector ejector handles are in the latched position 7 Use both hands to latch the injector ejector handles by simultaneously pushing both handles toward the center of the module as shown in Figure 105 Figure 105 Injector ejector handles sho...

Page 177: ...f the captive screw on each handle has a red line on the head see Figure 107 turn each captive screw one quarter turn 90 degrees clockwise When the module is correctly locked the red line on the captive screw in each injector ejector handle is in a vertical position CAUTION Be sure to turn each captive screw only 90 degrees or one quarter turn clockwise Tightening the captive screws beyond 90 degr...

Page 178: ...correctly engage the latch when you connect cables and to correctly disengage the latch when you disconnect cables To connect cables to the 10G4Ca module 1 Make sure that the connector latch is pulled back to the unlatched position 2 Align the connector with the module port and push it into place until the connector is flush with the front panel of the module Figure 108 3 Evenly push the latch tow...

Page 179: ...an insert a BlackDiamond 10808 series MSM or I O module at any time without causing disruption of network services Complete the action of inserting a BlackDiamond 10808 series module in a reasonable time frame Be sure to insert the module completely to avoid partial connection of backplane connectors The BlackDiamond 10808 switch comes with eight blank front panels already installed Use a blank fr...

Page 180: ...n from EMI and to maintain adequate airflow through the chassis 4 Remove the module from the anti static bag as follows a Place the anti static bag containing the module on a flat surface that is clear of any debris b Break any seals on the bag c Open the bag and firmly grasp the rail of the module d Holding the rail of the module pull the ESD bag off the module NOTE By holding the rail of the mod...

Page 181: ...nds simultaneously to push the handles toward the center of the module as shown in Figure 110 9 Secure the module by tightening the two screws NOTE Tighten the screws of each installed module before you insert additional modules Otherwise you might unseat modules that you have not secured To install additional modules repeat steps 3 through 9 NOTE Leave the ESD preventive wrist strap permanently c...

Page 182: ...ration for correctly installed MSMs and I O modules Use the command line interface CLI show slot slot number command to display slot specific information about the newly installed module For more information about LED activity see the module chapter for each switch series Displaying Slot Status Information Assuming the module has no problems the command show slot slot where slot is the number of t...

Page 183: ... on the chassis On a BlackDiamond 12804 or 8800 series chassis the ground receptacle is at the top left corner On a BlackDiamond 12802 chassis the ground receptacle is at the top right corner 2 Unlock the module in one of the following ways On a module without red lines on the screwheads turn each captive screw counter clockwise Figure 111 Verify that the yellow band around the captive screw head ...

Page 184: ... starting on page 175 NOTE Leave the ESD preventive wrist strap permanently connected to the chassis so that it is always available when you need to touch ESD sensitive components Removing a BlackDiamond 10808 Series Module All BlackDiamond 10808 series modules are hot swappable You do not need to power off the system to remove a module You need the following tools and equipment to remove a module...

Page 185: ...lank front panel at any time without disrupting network services Complete the action of installing a blank front panel in a reasonable time frame to avoid disruption to adequate airflow CAUTION All unoccupied slots in a BlackDiamond 8800 or 12800 series switch must have blank front panels correctly installed to ensure conformance to FCC requirements as well as to maintain adequate airflow through ...

Page 186: ...nected to the chassis so that it is always available when you need to touch ESD sensitive components Removing a Blank Front Panel To remove a BlackDiamond blank front panel 1 Attach the ESD preventive wrist strap to your wrist and connect the metal end to the ground receptacle on the switch front panel On a BlackDiamond 12804 or 8800 series chassis or a BlackDiamond 12808 chassis the ground recept...

Page 187: ...re 115 Figure 115 Blank front panel being removed from a BlackDiamond 8800 series or 12800 series switch 4 Install an I O module or MSM in the open slot as described in Installing a BlackDiamond 8800 or 12800 Series Module on page 175 or Installing a BlackDiamond 10808 Series Module on page 179 NOTE Leave the ESD preventive wrist strap permanently connected to the switch so that the strap is alway...

Page 188: ...e card into the compact flash slot until you feel resistance a portion of the card will protrude from the slot 5 Carefully push the card until it is seated into the slot The card should be fully inserted or seated inside the slot 6 To verify that the card is fully seated use the show memorycard command To remove the external compact flash memory card 1 Use the eject memorycard command to ensure th...

Page 189: ...4 Installing BlackDiamond Switch Accessories ...

Page 190: ......

Page 191: ... removing the wall plug from the electrical outlet Always be sure that all plugs and electrical outlets are easily accessible BlackDiamond 8810 AC Power Cord Retaining Bracket Connect all AC power cords before you install the power cord retaining bracket The following tools and equipment are required to install or remove the AC power cord retaining bracket ESD preventive wrist strap 2 Phillips scr...

Page 192: ... sure that each AC power cord is firmly plugged into the power outlet as shown in Figure 119 Figure 119 AC power cord plugged into the BlackDiamond 8810 switch power outlet 5 Align the BlackDiamond 8810 AC power cord retaining bracket over the AC power cord ends as shown in Figure 120 Figure 120 AC power cord retaining bracket correctly aligned ASP009 ASP010 ASP012A REMOVE TO INSTALL POWER CORDS ...

Page 193: ...amond 8810 AC Power Cord To disconnect a BlackDiamond 8810 AC power cord 1 Attach the ESD preventive wrist strap to your wrist and connect the metal end to the ground receptacle on the top left corner of the switch chassis 2 Disconnect the AC power cord from the power source 3 Loosen the captive screws in the middle and on each end of the BlackDiamond AC power cord retaining bracket using a 2 Phil...

Page 194: ...d retainer channel bracket ESD preventive wrist strap 2 Phillips screwdriver Installing the BlackDiamond 8806 12804 AC Power Cord Retainer Channel To install the BlackDiamond 8806 12804 AC power cord retainer channel 1 Attach the ESD preventive wrist strap to your wrist and connect the metal end to the ground receptacle on the top left corner of the switch front panel 2 Starting at the left insert...

Page 195: ...el against the switch as shown in Figure 124 Tighten the captive screw at each end of the channel Figure 124 Securing the BlackDiamond 8806 12804 AC power cord retainer channel 5 Starting from the left lay the first four power cords into the channel see Figure 125 6 Lay the last two power cords on top of the bottom four cords see Figure 125 EX_141 Captive screw Captive screw EX_139 Install and sec...

Page 196: ...mond 8806 12804 AC power cord retainer channel 1 Attach the ESD preventive wrist strap to your wrist and connect the metal end to the ground receptacle on the top left corner of the switch front panel 2 Using a 2 Phillips screwdriver loosen the captive screw located on each end of the AC power cord retainer channel 3 Remove the retainer channel from the switch NOTE Leave the ESD preventive wrist s...

Page 197: ...ble clips provide additional free standing rigid structural support for individual cables and cable bundles in front of the switch You can use the cable holders and cable clips individually or connect them together to manage multiple cable bundles The cable management accessories keep cables collected in one place rather than all just hanging free If you must remove a module from the chassis for r...

Page 198: ... in order to attach the cable manager base to the rack To install the cable manager 1 At the top of the cover lift the latches as you pull out on the corners to open the cover 2 Rotate the cover outward and lift it off the base Removing the cover exposes the six screws holding the cable guides onto the mounting base see Figure 127 EX_079 Cable manager cover Cable manager base Cable guides Three sc...

Page 199: ...ded to ensure proper alignment of the screw holes The distance between the top of the chassis and the cable manager base will be approximately 1 4 inch 6 mm to 7 8 inch 20 mm 5 Use six rack mounting screws not supplied to mount the base onto the rack as follows a On each side insert the center screw first and partially tighten it see Figure 128 b Insert the remaining screws c Tighten all six screw...

Page 200: ...ching the cable manager base to the rack 6 Reattach the cable guides to the cable manager mounting base using the screws you removed previously see Figure 129 Do not overtighten the screws Figure 129 Securing the cable guides to the mounted cable manager base EX_076A Center screws in first Center screws in first EX_077 ...

Page 201: ...are Installation Guide 201 7 Route bundled cables through the channels in the cable guides as shown in Figure 130 Use the cable holders and cable clips to organize and bundle the cables as described in Using the Cable Holders and Cable Clips on page 202 Figure 130 Using the cable manager EX_080A ...

Page 202: ...rks recommends the following Attach the cables to the holders by slipping the cable through the opening Connect the cable holders if you need more than one Refer to Connecting Cable Holders on page 203 If you need more than one cable clip for a bundle connect the clips together before you route the cables through the clips Refer to Connecting Cable Clips on page 204 To form a cable bundle thread t...

Page 203: ...arate cables with 6 on each side Connect cable holders end to end as needed to accommodate the number of cables you need to organize To connect the cable holders 1 Hold two cable holders as shown in Figure 133 Make sure that one locking tab at the joint is on top and the other is on the bottom Figure 133 Connecting cable holders Interlocking cable holder and cable clips ENIN005A Side view Cable ho...

Page 204: ...ted cable holders 3 Connect as many cable holders together as you need to manage your cable bundles 4 To disconnect the holders grasp one in each hand firmly and carefully pull them apart Connecting Cable Clips To connect the cable clips 1 Hold two clips next to each other with the split sides facing the same way see Figure 135 2 Slide the connecting grooves together see Figure 135 Figure 135 Conn...

Page 205: ...ion Guide 205 3 Press the clips together until l the connectors lock into place see Figure 136 Figure 136 Cable clip chain 4 Connect as many cable clips together as you need to manage your cable bundles 5 To disconnect the cable clips push on the bottom ring while holding the top ring steady ENIN002A ...

Page 206: ...BlackDiamond Cable Management Extreme Networks Consolidated ExtremeXOS Hardware Installation Guide 206 ...

Page 207: ...5 BlackDiamond Maintenance Procedures ...

Page 208: ......

Page 209: ...ance certifications applicable to a BlackDiamond PSU fan controller Thoroughly review the information about power supplies in Chapter 6 before working with the PSU fan controller unit Pre installation Requirements You must have access to the back of the BlackDiamond switch to replace an installed BlackDiamond 12802 fan tray or PSU fan controller Power off the BlackDiamond 12802 switch before you b...

Page 210: ...half way out of the fan tray slot see Figure 137 This action disconnects the fan tray from the switch power Wait for the fan blades to stop turning before continuing with this procedure WARNING Be sure that all fan blade motion has ceased before continuing to remove the fan tray d Support the bottom of the fan tray with your free hand as you use the handle to slide the fan tray completely out of t...

Page 211: ...OTE Removing the PSU fan controller causes the switch to stop operation until the controller is replaced Be sure to have the replacement controller available before you start the replacement process To replace a PSU fan controller 1 Attach the ESD preventive wrist strap to your wrist and connect the metal end to the ground receptacle on the front top right corner of the switch 2 Power off the swit...

Page 212: ...m its antistatic packaging b Insert the replacement controller into the controller slot on the BlackDiamond 12802 chassis Figure 140 c Align and tighten the captive retaining screws Figure 140 Installing a PSU fan controller 5 Power on the switch NOTE Leave the ESD preventive wrist strap permanently connected to the switch so that it will always be available when you need to handle ESD sensitive c...

Page 213: ...Diamond 8800 12804 PSU fan controller fail NOTE The BlackDiamond 8810 uses the same PSU fan controller as the BlackDiamond 8806 and BlackDiamond 12804 but the BlackDiamond 8810 uses a different fan tray This chapter includes the following sections Pre Installation Requirements on page 213 Removing a BlackDiamond 8800 12804 PSU Fan Controller on page 213 Installing a BlackDiamond 8800 12804 Spare P...

Page 214: ... switch 2 Locate the eight captive screws on the PSU control card access panel cover located on the back side of the BlackDiamond 8800 12804 switch as shown in Figure 141 Figure 141 Eight captive screws on the PSU control card access panel cover 3 Turn each captive screw counter clockwise using a 2 Phillips screwdriver to loosen all eight captive screws on the PSU control card access panel cover a...

Page 215: ...tive screws on the BlackDiamond 8800 12804 PSU fan controller 6 Turn each captive screw counter clockwise using a 1 Phillips screwdriver to loosen all four captive screws on the PSU fan controller also shown in Figure 142 7 Pull the PSU fan controller out from the PSU control card access panel on the switch by pulling equally on the upper and lower handles Leave the ESD preventive wrist strap perm...

Page 216: ...iamond 8800 12804 spare PSU fan controller 3 Push the BlackDiamond 8800 12804 spare PSU fan controller into the empty PSU control card access panel until the four captive screws on the spare PSU fan controller are in alignment 4 Turn each captive screw clockwise using a 1 Phillips screwdriver to tighten all four captive screws on the spare PSU fan controller 5 Align the guide pins on the PSU contr...

Page 217: ... to remove and replace a fan tray in a BlackDiamond 12804 or 8800 series switch ESD preventive wrist strap 2 Phillips screwdriver BlackDiamond spare fan tray NOTE To avoid long periods of operation without forced air cooling make sure you have the replacement fan tray ready before you start the replacement procedure Removing the Fan Tray To remove a fan tray from the BlackDiamond 12804 or 8800 ser...

Page 218: ...tray half way out from the fan tray slot This action disconnects the fan tray from the switch power Wait for the fan blades to stop turning before continuing with this procedure WARNING Be sure that all fan blade motion has ceased before continuing to remove the fan tray 5 Support the bottom of the fan tray with your free hand as you use the handle to slide the fan tray completely out from the fan...

Page 219: ...ray into the BlackDiamond 8810 switch 1 Attach the ESD preventive wrist strap to your wrist and connect the metal end to the ground receptacle on the top left corner of the switch 2 Support the bottom of the fan tray with one hand as you lift the fan tray by the handle using the other hand Align the spare fan tray with the fan tray slot on the switch and then slide the fan tray into place in the s...

Page 220: ...he fan tray in the BlackDiamond 8806 12804 switch 3 Use a 2 Phillips screwdriver to turn each captive screw clockwise to tighten the screws Figure 145 Leave the ESD preventive wrist strap permanently connected to the switch so that it is always available when you need to touch ESD sensitive components EX_115 Fan tray handle Fan tray captive screws x2 ...

Page 221: ...ackDiamond 10808 switch if the internal temperature exceeds 60 degrees Celsius BlackDiamond 10808 fan trays are hot swappable You do not need to turn off power to the BlackDiamond 10808 switch to remove a fan tray You need the following tools and equipment to replace a fan tray ESD preventive wrist strap 2 Phillips screwdriver CAUTION Service to all equipment should be performed by trained and qua...

Page 222: ...g the Replacement Fan Tray To install the fan tray in the BlackDiamond 10808 switch 1 Attach the ESD preventive wrist strap to your wrist and connect the metal end to the ground receptacle on the top left corner of the switch front panel 2 Check the connectors on the switch fan tray for dust and packing materials 3 Support the fan tray with one hand under the tray as you guide the fan tray into th...

Page 223: ...NOTE Extreme Networks recommends that you visually inspect the air filter at least once every three months Replace or clean as necessary To replace the filter in the BlackDiamond 10808 switch 1 Remove the bezel from the front of the chassis using a 2 Phillips screwdriver 2 Slide the old filter out from the chassis 3 Slide a new filter into the chassis Use the directional arrows on the top side of ...

Page 224: ...ed At least one power supply controller must be installed at all times CAUTION Do not reach into the power supply controller access area when power is on Figure 149 shows the front panel of the power supply controller Figure 149 Power supply controller front panel NOTE The RJ 45 port on the power supply controller is not an Ethernet port and no connection should be made to it The front panel of th...

Page 225: ...olid green indicating normal operation before you replace the second controller DO NOT remove both power controllers simultaneously doing so will cause the entire system to power down To replace a power supply controller 1 Attach the ESD preventive wrist strap to your wrist and connect the metal end of the strap to the ground receptacle on the top left corner of the BlackDiamond chassis front pane...

Page 226: ...ing the power supply controller bay remove it and save it for future use 3 Verify that the power supply controller is right side up 4 Slide the power supply controller into the slot aligning the notch on the top of the slot with the power supply controller 5 Tighten the captive thumbscrews to secure the power supply controller into the slot Verifying a Successful Installation After you supply powe...

Page 227: ...fore you attempt to remove a BlackDiamond chassis Safety Information CAUTION Correct lifting procedures for a BlackDiamond chassis require two or more people Only trained service personnel should perform service to Extreme Networks switches and their components Trained service personnel have read all related installation manuals have the technical training and experience necessary to be aware of t...

Page 228: ...unting screws that secure the chassis to the system rack 4 On each side of the chassis place one hand in the empty power supply bay and the other hand in the rear slot on the back panel of the chassis see Figure 150 CAUTION Do not use the fan tray handle to lift or maneuver the BlackDiamond 8810 chassis This handle is not designed to support the weight of the chassis 5 Slowly guide the chassis out...

Page 229: ... the BlackDiamond 8810 chassis 9 Insert the clip locks as shown in Figure 152 a Place your thumb and index finger inside the clip lock touching the prongs b Squeeze the prongs inward applying equal pressure on each side c Push the prongs inward until the clip lock is secured to the carton d Repeat steps 8a through 8c to insert each of the remaining clip locks Figure 152 Clip locks located on Black...

Page 230: ...nd 8810 chassis as shown in Figure 153 Figure 153 Placing packing foam into the BlackDiamond 8810 shipping carton 11 Close the top flaps on the shipping carton and seal them with packing tape 12 Secure the BlackDiamond 8810 shipping carton with nylon straps as shown in Figure 154 Figure 154 BlackDiamond 8810 shipping carton with nylon straps ASP024A ASP026 ...

Page 231: ...ove the eight rack mounting screws that secure the chassis to the system rack 4 On each side of the chassis place one hand in the empty power supply bay and the other hand in the rear slot on the back panel of the chassis CAUTION Do not use the fan tray handle to lift or maneuver the BlackDiamond 8806 12804 chassis This handle is not designed to support the weight of the chassis 5 Slowly guide the...

Page 232: ...e prongs b Squeeze the prongs inward applying equal pressure on each side c Push the prongs inward until the clip lock is secured onto the carton Repeat steps 8a through 8c to insert each of the remaining clip locks CAUTION Proper installation of the clip locks is critical for safe shipment of the BlackDiamond 8806 12804 chassis Make sure that the clip locks are secure and accurately installed Fig...

Page 233: ...hem with packing tape 11 Secure the shipping carton with nylon straps see Figure 159 NOTE Nylon straps are optional but are recommended by Extreme Networks for extra security during shipment The installation of nylon straps requires a crimping tool If you do not have nylon straps and a crimping tool available to secure the carton the chassis can be shipped without the straps however it is critical...

Page 234: ...ving components from the BlackDiamond chassis 3 Remove the chassis from the equipment rack as follows a Loosen and remove the eight mounting screws holding the chassis to the rack b Guide the chassis out of the rack and set it on a secure flat surface 4 Remove the rack mounting brackets 5 Place the chassis into the shipping bag 6 Carefully set the chassis onto the foam cushion in the bottom of the...

Page 235: ...me Networks Customer Support for instructions on returning the chassis CAUTION The BlackDiamond 10808 chassis weighs more than 100 lb 45 kg Correct lifting procedures for the chassis require two people To recrate the chassis 1 Mount the helper bracket in the rack using four appropriate screws not provided see Figure 161 Figure 161 Helper bracket for the BlackDiamond 10800 series chassis 2 With one...

Page 236: ...e 162 4 Slide the carton down over the chassis see Figure 162 Figure 162 Securing the BlackDiamond 10808 series chassis to the shipping pallet 5 Engage the four plastic clip locks near the bottom of the shipping carton see Figure 163 Two clip locks are located on opposite sides of the carton Figure 163 Location of clip locks EX_088C Install 4 bolts securing chassis to pallet Slide carton down over...

Page 237: ... b Press the prongs inward applying equal pressure on each side c Press the prongs into the carton until the clip clicks into place Repeat steps 5a through 5c to engage each of the remaining three clip locks Figure 164 Installing the clip locks 6 Insert the four v boards in the corners of the crate see Figure 165 Figure 165 Inserting the v boards EX_087C Clip lock Close lock Squeeze prongs to unlo...

Page 238: ... tape 8 Place four plastic corner protectors on top of the shipping crate and secure the crate to the pallet by using two nylon straps as shown in Figure 166 Figure 166 Nylon strap location CAUTION Do not overtighten the nylon straps Tighten them securely but not enough to crush the corners of the shipping crate EX_094 Pallet Nylon straps Corner protectors ...

Page 239: ...6 Summit Family of Switches ...

Page 240: ......

Page 241: ...le SummitStack management entity The Summit X450 switches include three series of switches These switches provide high density 10 100 1000BASE T ports combination copper fiber Ethernet ports optional pluggable 10 gigabit uplink ports and high speed stacking ports for combining multiple units into a single SummitStack management entity Table 27 shows the models in each Summit series in the Summit f...

Page 242: ... unit 1 75 inches high 1 U that includes the following Twenty four fixed 10 100BASE T ports ports 1 24 that deliver high density copper connectivity for 2 4 Gbps Two combination ports ports 25 26 that provide 10 100 1000 BASE T or mini GBIC connectivity for 2 Gbps of copper or fiber connectivity NOTE For information about mini GBICs see Mini GBIC Interfaces on page 338 Two high performance stackin...

Page 243: ...of copper or fiber connectivity Console port Serial port used to connect a terminal and perform local management Summit X250e 24t Switch Rear Panel Figure 168 shows the rear panel of the Summit X250e 24t switch Figure 168 Summit X250e 24t switch rear panel The rear panel on the Summit X250e 24t switch includes Management port Used to connect the system to a parallel management network for administ...

Page 244: ...vity NOTE For information about mini GBICs see Mini GBIC Interfaces on page 338 Two high performance stacking ports with associated LEDs Redundant power input connector for use with the EPS 500 External Power Supply Model No 10911 When this power supply is used with the Summit X250 24p switch the power supplies internal and redundant are fully fault tolerant and load sharing If one power supply fa...

Page 245: ...Two LEDs for the management port located in the bottom corners of the port Two high performance stacking ports with associated LEDs Redundant power input connector for an optional redundant EPS 500 Power Supply with full PoE power support see EPS 500 External Power Supply Unit on page 317 for complete details The connecting redundant power supply cable is shipped with the EPS 500 unit AC power soc...

Page 246: ...e Summit X250e 48t switch Figure 171 Summit X250e 48t switch front panel The front panel on the Summit X250e 48t switch includes LEDs For a description of the LEDs and their operation see Summit X250e Series Switch LEDs on page 250 Stack number indicator Numeric indicator of the position of this switch in a stacked configuration 10 100BASE T Ethernet ports Forty eight 10 100BASE T Ethernet ports t...

Page 247: ...o the supply voltage The power supply operates from 100 VAC to 240 VAC Summit X250e 48p Switch The Summit X250e 48p switch is a compact unit 1 75 inches high 1 U that includes the following Forty eight fixed 10 100BASE T PoE ports ports 1 48 that deliver high density copper connectivity and a full 15 4 Watts of PoE per port when used with the EPS 600LS External Power Module Two combination ports p...

Page 248: ...nfiguration 10 100BASE T PoE ports Forty eight 10 100BASE T PoE ports that deliver high density copper connectivity and a full 15 4 Watts of PoE per port Combination ports Two combination ports that provide 10 100 1000 BASE T PoE or mini GBIC connectivity for 2 Gbps of copper or fiber connectivity Console port Serial port used to connect a terminal and perform local management Summit X250e 48p Swi...

Page 249: ...an internal power supply and an optional external redundant power supply system Internal Power Supply The internal Summit X250e 48p internal power supply is capable of 370 W of PoE power It supplies 15 4 W to each port for a 24 port configuration and 7 7 W to each port for a 48 port configuration or any combination of ports where total PoE power does not exceed 370 watts If the total system demand...

Page 250: ...ernal power only with 2 1 redundancy Internal power supply disabled 370 W of internal power only Internal power supply Power Failure 370 W of external power only 740 W of external power only 740 W of external power only with 2 1 redundancy No PoE power Table 29 LEDs on the Summit X250e series switches Label or Type Color State Meaning Chassis LEDs MGMT Blinking green Power on self test POST in pro...

Page 251: ...wered Steady amber Link OK port is powered no traffic Blinking green Link OK transmitting packets port not powered Blinking amber Link OK transmitting packets port is powered Slow blinking amber No link or disabled port port is powered Alternating amber and green Port has a power fault Off Port is not powered has no link or is disabled Stacking Port LEDs Stack 1 2 front panel Stack Port 1 Stack Po...

Page 252: ... Mini GBIC Interfaces on page 338 Two high performance stacking ports Optional Summit XGM 2xn option card which allows you to add up to two 10 Gigabit XENPAK modules NOTE For information about the Summit XGM 2xn option card see Summit XGM 2xn Option Card on page 295 Redundant power input connector for use with the EPS 160 External Power Module Model No 10907 When this power supply is used with the...

Page 253: ...4t switch rear panel The rear panel on the Summit X450 24t switch includes Slot for the Summit XGM 2xn option card which allows you to add up to two 10 Gigabit XENPAK modules see Summit XGM 2xn Option Card on page 295 for complete details Management port Used to connect the system into a parallel management network for administration OR Used to connect an Ethernet cable directly from your laptop i...

Page 254: ...compatible redundant power supply available for use with the Summit X450 24x When this switch is used with the EPS 160 the power supplies internal and redundant are fully fault tolerant and load sharing If one power supply fails the other power supply will provide sufficient power to operate the switch Summit X450 24x Switch Front Panel Figure 177 shows the front panel of the Summit X450 24x switc...

Page 255: ...e details Management port Used to connect the system into a parallel management network for administration OR Used to connect an Ethernet cable directly from your laptop into the management port to view and locally manage the switch configurations Two LEDs for the management port located in the bottom corners of the port Two high performance stacking ports Redundant power input connector for an op...

Page 256: ... mini GBIC connectivity for 4 Gbps of copper or fiber connectivity ports 21 24 NOTE For information about mini GBICs see Mini GBIC Interfaces on page 338 Two high performance stacking ports Optional Summit XGM2 2xn option card which allows you to add up to two 10 Gigabit XENPAK modules Summit XGM2 2xf option card which allows you to add up to two 10 Gigabit XFP modules NOTE For information regardi...

Page 257: ...ion Combination ports Four combination ports that provide 10 100 1000 BASE T or mini GBIC connectivity for 4 Gbps of copper or fiber connectivity 10 100 1000 BASE T Ethernet ports Twenty 10 100 1000 BASE T Ethernet ports that deliver high density copper connectivity in 1 75 inch 1U form factor Console port Serial port used to connect a terminal and perform local management Summit X450a 24t Switch ...

Page 258: ...page 302 Management port Used to connect the system into a parallel management network for administration OR Used to connect an Ethernet cable directly from your laptop into the management port to view and locally manage the switch configurations Two LEDs for the management port located at the bottom corners of the port Two high performance stacking ports Redundant power input connector for an opt...

Page 259: ...XGM2 2xf Option Card on page 302 Optional EPS 150DC External Power Module Model No 10909 which is the redundant power supply for use with the Summit X450a 24tDC switch When this switch is used with the EPS 150DC the power supplies internal and redundant are fully fault tolerant and load sharing If one power supply fails the other power supply will provide sufficient power to operate the switch NOT...

Page 260: ...the rear panel of the Summit X450a 24tDC switch Figure 182 Summit X450a 24tDC switch rear panel The rear panel on the Summit X450a 24tDC switch consists of Slot for a Summit option card Summit XGM2 2xn option card which allows you to add up to two 10 Gigabit XENPAK modules OR Summit XGM2 2xf option card which allows you to add up to two 10 Gigabit XFP modules NOTE For information regarding these c...

Page 261: ...formance stacking ports Optional Summit XGM2 2xn option card which allows you to add up to two 10 Gigabit XENPAK modules Summit XGM2 2xf option card which allows you to add up to two 10 Gigabit XFP modules NOTE For information regarding these compatible Summit option cards see Summit XGM2 2xn Option Card on page 297 or Summit XGM2 2xf Option Card on page 302 Optional EPS LD External Power Supply U...

Page 262: ...anel of the Summit X450a 24x switch Figure 184 Summit X450a 24x switch rear panel The rear panel on the Summit X450a 24x switch includes Slot for a Summit option card Summit XGM2 2xn option card which allows you to add up to two 10 Gigabit XENPAK modules OR Summit XGM2 2xf option card which allows you to add up to two 10 Gigabit XFP modules NOTE For information regarding these compatible Summit op...

Page 263: ... see Mini GBIC Interfaces on page 338 Two high performance stacking ports Optional Summit XGM2 2xn option card which allows you to add up to two 10 Gigabit XENPAK modules Summit XGM2 2xf option card which allows you to add up to two 10 Gigabit XFP modules NOTE For information regarding these compatible Summit option cards see Summit XGM2 2xn Option Card on page 297 or Summit XGM2 2xf Option Card o...

Page 264: ...h density fiber connectivity in 1 75 inch 1U form factor Console port Serial port used to connect a terminal and perform local management Summit X450a 24xDC Switch Rear Panel Figure 186 shows the rear panel of the Summit X450a 24xDC switch Figure 186 Summit X450a 24xDC switch rear panel The rear panel on the Summit X450a 24xDC switch includes Slot for a Summit option card Summit XGM2 2xn option ca...

Page 265: ...72 V DC Summit X450a 48t Switch The Summit X450a 48t switch includes the following 44 fixed 10 100 1000 BASE T ports that deliver high density copper connectivity for 44 Gbps in 1 75 inch 1U form factor ports 1 44 Four combination ports that provide 10 100 1000 BASE T or mini GBIC connectivity for 4 Gbps of copper or fiber connectivity ports 45 48 NOTE For information about mini GBICs see Mini GBI...

Page 266: ...et ports that deliver high density copper connectivity in 1 75 inch 1U form factor Console port Serial port used to connect a terminal and perform local management Summit X450a 48t Switch Rear Panel Figure 188 shows the rear panel of the Summit X450a 48t switch Figure 188 Summit X450a 48t switch rear panel The rear panel on the Summit X450a 48t switch includes Slot for a Summit option card Summit ...

Page 267: ...240 VAC Summit X450a 48tDC Switch The Summit X450a 48tDC switch includes the following 44 fixed 10 100 1000 BASE T ports that deliver high density copper connectivity for 44 Gbps in 1 75 inch 1U form factor ports 1 44 Four combination ports that provide 10 100 1000 BASE T or mini GBIC connectivity for 4 Gbps of copper or fiber connectivity ports 45 48 NOTE For information about mini GBICs see Mini...

Page 268: ...behavior see Summit X450 X450a and X450e Series Switch LEDs on page 276 Stack number indicator Numeric indicator of the position of this switch in a stacked configuration Combination ports Four combination ports that provide 10 100 1000 BASE T or mini GBIC connectivity for 4 Gbps of copper or fiber connectivity 10 100 1000 BASE T Ethernet ports Forty four 10 100 1000 BASE T Ethernet ports that del...

Page 269: ...rd on page 302 Management port Used to connect the system into a parallel management network for administration OR Used to connect an Ethernet cable directly from your laptop into the management port to view and locally manage the switch configurations Two LEDs for the management port located in the bottom corners of the port Two high performance stacking ports Redundant power input connector for ...

Page 270: ...s can provide PoE power NOTE For information about mini GBICs see Mini GBIC Interfaces on page 338 Two high performance stacking ports Optional Summit XGM2 2xn option card which allows you to add up to two 10 Gigabit XENPAK modules Summit XGM2 2xf option card which allows you to add up to two 10 Gigabit XFP modules NOTE For information regarding these compatible Summit option cards see Summit XGM2...

Page 271: ...1000 BASE T PoE ports Twenty 10 100 1000 BASE T PoE ports that deliver high density copper connectivity and a full 15 4 Watts of PoE per port Console port Serial port used to connect a terminal and perform local management Summit X450e 24p Switch Rear Panel Figure 192 shows the rear panel of the Summit X450e 24p switch Figure 192 Summit X450e 24p switch rear panel STACK NO PORTS 1 24 POWERED AMBER...

Page 272: ...put connector for an optional redundant Extreme External Power Supply with full PoE power support see EPS LD External Power Supply Unit on page 313 for complete details The connecting redundant power supply cable is shipped with the EPS LD AC power socket The switch automatically adjusts to the supply voltage The power supply operates from 100 VAC to 240 VAC Summit X450e 48p Switch The Summit X450...

Page 273: ...ummit X450e 48p switch front panel The front panel on the Summit X450e 48p switch includes LEDs For a description of the LEDs and their behavior see Summit X450 X450a and X450e Series Switch LEDs on page 276 Stack number indicator Numeric indicator of the position of this switch in a stacked configuration Combination ports Four combination ports that provide 10 100 1000 BASE T PoE or mini GBIC con...

Page 274: ...gement network for administration OR Used to connect an Ethernet cable directly from your laptop into the management port to view and locally manage the switch configurations Two LEDs for the management port located in the bottom corners of the port Two high performance stacking ports Redundant power input connector for optional connection to an EPS C chassis which can hold up to three EPS 600LS e...

Page 275: ...power input connector on the rear of the switch The EPS C External Power Supply Chassis is shipped with the redundant power supply cable that connects to the redundant input connector on the rear of the switch The EPS C chassis can hold from one to three 600 Watt EPS 600LS External Power Module units The PoE capability of the Summit X450e 48p switch varies depending on the number of external power...

Page 276: ...l power attached Fan LED Green Solid Normal operation Amber Blinking Failure Off No power Internal Power Supply LED Green Solid Normal operation Amber Blinking Failure Off No power External Power Supply LED Green Solid Normal operation Amber Blinking Failure Off No external power attached Ethernet Port LED Green Solid Link OK Green Blinking Activity Management Port LED Green Solid Link OK Green Bl...

Page 277: ... 24p Summit X450e 48p All front panel ports Solid Amber Port is powered with link no traffic Blinking Amber Port is powered with link traffic Slow Blinking Amber Port is powered with no link Alternating Amber and Green Port is faulted Off Port is not powered no link or disabled Table 31 LEDs on the Summit X450 X450a and X450e switches Continued Label or Type Color State Meaning ...

Page 278: ...Summit Family of Switches Extreme Networks Consolidated ExtremeXOS Hardware Installation Guide 278 ...

Page 279: ... personnel should perform service to Extreme Networks switches and their components Trained service personnel have read all related installation manuals have the technical training and experience necessary to be aware of the hazards to which they are exposed in performing a task and are aware of measures to minimize the danger to themselves or other persons NOTE See Appendix A Safety Information f...

Page 280: ...ge 281 and configure the stack from the console on the switch at the top of the physical stack the switches will be assigned numbers 1 through 8 from the top down Each Summit switch has a seven segment LED on its front panel called the stack number indicator When a stack is operating the indicator displays the slot number for the switch This LED does not light on switches that are not operating in...

Page 281: ...s refer to the ExtremeXOS 12 0 Concepts Guide When you install switches for a SummitStack configuration follow these recommendations Use the shortest possible stacking cables to connect the switches in the stack this reduces the likelihood that the stacking cables might be accidentally damaged or disconnected Stacking cables are available in lengths from 0 3 meters to 5 meters see Table 32 When po...

Page 282: ...mmended order for stacking connections 8 switch stack Slot Number Connect Stack Port 1 on this switch to Connect Stack Port 2 on this switch to 1 Slot 8 Port 2 Slot 2 Port 1 2 Slot 1 Port 2 Slot 3 Port 1 3 Slot 2 Port 2 Slot 4 Port 1 4 Slot 3 Port 2 Slot 5 Port 1 5 Slot 4 Port 2 Slot 6 Port 1 6 Slot 5 Port 2 Slot 7 Port 1 7 Slot 6 Port 2 Slot 8 Port 1 8 Slot 7 Port 2 Slot 1 Port 1 BD_159B ...

Page 283: ...back of the first switch Figure 198 2 Firmly press the cable connector into place on the mating stacking port connector 3 Align and tighten the retaining screws on the cable connector Repeat steps 1 through 3 to connect the cable to the second switch Table 34 Recommended stacking port connections 4 switch stack Slot Number Connect Stack Port 1 on this switch to Connect Stack Port 2 on this switch ...

Page 284: ...able If you followed the cabling examples in Table 33 and Table 34 and you use the easy setup configuration procedure only slots 1 and 2 will be allowed to become master Management Port Cabling Connect the master backup and all other master capable switches to your management network using the Ethernet management port on the rear panel of each switch If you choose the default redundancy setup only...

Page 285: ...6 For information about installing and connecting redundant power supplies see Chapter 5 Summit External Power Supplies EPS Rack Mounting a Summit Switch To install the switch in a rack you will need the following tools and equipment Mounting brackets provided Eight screws provided to secure the mounting brackets to the switch Four rack system mounting screws The screw size will vary based on your...

Page 286: ...ummit family switches on top of one another Removing a Summit Switch from a Rack AC units only To remove the Summit switch from a rack 1 Remove power from the switch Unplug the power cable s from the from the wall outlet s first and then from the switch 2 Disconnect the Summit switch from the redundant power supply if applicable 3 Loosen and remove the four screws holding the switch in place in th...

Page 287: ...quipment rack as described in Rack Mounting a Summit Switch on page 285 If you are installing a Summit X450a 48tDC switch you must ground the chassis before connecting the switch to the DC source voltage see Grounding the Summit X450a 48tDC Switch below If you are not installing a Summit X450a 48tDC switch go to Connecting the DC Wiring Harness to the DC Source Voltage on page 288 Grounding the Su...

Page 288: ...y a qualified electrician before the connector on the wiring harness can be attached to the DC power supply socket on the switch Figure 201 shows the wiring harness and connector WARNING The Summit X450a 24tDC or Summit X450a 24xDC switch and rack must be connected to protective earth ground before installing any switch components WARNING Wiring the DC input power harness to your facilities DC sou...

Page 289: ...and national electrical codes Figure 201 Three wire Cable Harness NOTE Each wire on the harness has been properly marked for proper attachment to the DC power source Leave these labels on each lead wire for future reference Table 35 provides the wire to pin connection specifications Table 35 Wire to Pin Connection Specifications Pin Number Wire Color Circuit Connection 1 Green Yellow Chassis Groun...

Page 290: ...ss to the internal DC power supply perform the following steps 1 Plug the DC wiring harness connector into the DC power supply socket on the rear of the switch see Figure 202 The pins must align properly for the cable to completely connect Do not force the cable into the socket until the keyway is aligned properly Refer to Figure 201 for the DC wiring harness connector Table 36 Summit X450a family...

Page 291: ...but is not limited to wrist straps that are grounded to the switch chassis and earth grounds To remove a DC powered Summit switch from an equipment rack 1 De energize the DC circuit for all power connections 2 Loosen the retainer nut and unplug the DC power connector from the DC power supply socket on the rear of the switch 3 Disconnect the Summit switch from the redundant power supply if applicab...

Page 292: ...mily Switches Extreme Networks Consolidated ExtremeXOS Hardware Installation Guide 292 Initial Management Access For instructions on accessing the switch for initial management setup see Chapter 2 Initial Management Access ...

Page 293: ...tion card Overview CAUTION The Summit option cards Summit XGM 2xn Summit XGM2 2xn and Summit XGM2 2xf are not hot swappable Disconnect power to the switch before installing or removing a Summit option card After the Summit option card is installed in a compatible switch compatible optical modules may be hot swapped into and out of the option card Use optics approved by Extreme Networks only Three ...

Page 294: ...e the following precautions to prevent exposure to hazardous radiation Never look at the transmit LED laser through a magnifying device while it is powered on Never look directly at a fiber port on the switch or at the ends of a fiber cable when they are powered on Invisible laser radiation can occur when the connectors are open Avoid direct eye exposure to the beam when optic connections are unpl...

Page 295: ...PAK module operating in the 1269 1355 nm range NOTE For more information about these XENPAK modules refer to XENPAK Interfaces on page 354 NOTE Standards based CX 4 XENPAKs are also recognized by ExtremeXOS contact your CX 4 module vendor to obtain these Mixing ZR XENPAKs with Other Types Table 37 lists the supported combinations of XENPAK types using ZR XENPAKs in a Summit X450 series switch You ...

Page 296: ...e before switch maintenance is performed This includes but is not limited to wrist straps that are grounded to the switch chassis and earth grounds To install the Summit XGM 2xn card 1 Disconnect the AC power and any redundant power supply from the Summit switch 2 Attach the ESD preventive wrist strap to your wrist and connect the metal end to the equipment rack 3 Remove the screws holding the fil...

Page 297: ...ot Be sure that the option slot always has either an installed Summit option card or a faceplate over the opening An open slot could divert air from the switch and cause overheating Summit XGM2 2xn Option Card The Summit XGM2 2xn option card allows you to add up to two 10 gigabit XENPAK modules to the following switches Summit X450a 24t switch running ExtremeXOS 11 5 0 or later Summit X450a 24tDC ...

Page 298: ...efer to XENPAK Interfaces on page 354 for more information about XENPAK modules Standards based CX 4 XENPAKs are also recognized by ExtremeXOS contact your CX 4 module vendor to obtain these Installing the Summit XGM2 2xn Option Card CAUTION The Summit XGM2 2xn option card is not hot swappable Disconnect power to the switch before installing or removing the Summit XGM2 2xn option card After the Su...

Page 299: ...for re use Figure 206 Option slot filler panel 5 Align the sheet metal edges on the option card with the card guides in the switch housing Carefully slide the Summit XGM2 2xn option card into the switch housing until the connectors engage and the option card is flush with the back panel of the switch Figure 207 Figure 207 Installing the Summit XGM2 2xn option card 6 Using the screws from the fille...

Page 300: ...alling or removing the module Handle the module by its sides only Never touch the card edge connectors at the insertion end of the module Installing a XENPAK Module CAUTION Be sure that proper ESD controls are in use before switch maintenance is performed This includes but is not limited to wrist straps that are grounded to the switch chassis and earth grounds To install a XENPAK module 1 Attach a...

Page 301: ...ith your installation site test data by consulting the average power reference values shown on the XENPAK module test data sheet Part No 121074 00 enclosed with your module Remove the dust covers from the module connectors before you connect cables Removing a XENPAK Module CAUTION Be sure that proper ESD controls are in use before switch maintenance is performed This includes but is not limited to...

Page 302: ...NPAK module cover the opening with a cover plate Summit XGM2 2xf Option Card The Summit XGM2 2xf option card allows you to add up to two 10 gigabit XFP modules to the following switches Summit X450a 24t switch running ExtremeXOS 11 5 0 or later Summit X450a 24tDC switch running ExtremeXOS 11 5 0 or later Summit X450a 24x switch running ExtremeXOS 11 6 1 or later Summit X450a 24xDC switch running E...

Page 303: ... air from the switch and cause overheating To install the Summit XGM2 2xf option card 1 Disconnect the power from the Summit switch by removing the plug from the wall outlet 2 If a redundant power supply is in use disconnect the power of the redundant power supply by removing the plug from the wall outlet 3 Attach the ESD preventive wrist strap to your wrist and connect the metal end to the equipm...

Page 304: ...talling or replacing the XFP modules in the Summit XGM2 2xf option card NOTE If you install only one XFP module in the Summit XGM2 2xf option card attach the supplied cover plate over the remaining open module slot Installing or Removing XFP Modules This section describes installing and removing an XFP module You can install or remove an XFP module from your Extreme Networks switch without powerin...

Page 305: ... and connect the metal end to the equipment rack 2 Remove the XFP module from its antistatic container and remove the dust covers from the module optical connectors If your module has a protective pad covering the card edge connector remove it Store the antistatic container dust covers and card edge connector protective pad in a clean location from which they can be easily retrieved if you need to...

Page 306: ...stallation site test data by consulting the average power reference values shown on the XFP module test data sheet Part No 121074 00 enclosed with your module Removing an XFP Module To remove an XFP module 1 Attach an ESD preventive wrist strap to your wrist and connect the metal end to the equipment rack 2 Release the handle bail latch on the XFP module 3 Carefully pull the XFP module out of the ...

Page 307: ...view Summit X450 family and X250e series switches are shipped with an internal power supply which supplies all of the power needed for most switch operation An optional redundant power supply can be added to protect against a power supply failure and to provide increased support for PoE operation on applicable switches Refer to Table 38 for a compatibility chart of Summit X450 family switches and ...

Page 308: ...ry compliance certifications CAUTION Be sure that proper ESD controls are in use before switch maintenance is performed This includes but is not limited to wrist straps that are grounded to the switch chassis and earth grounds Summit X450e Series Switches Summit X450e 24p EPS LD External Power Supply Unit 45019 Summit X450e 48p EPS 600LS External Power Module with EPS C Chassis EPS 600LS 10913 EPS...

Page 309: ...EPS T rack mountable chassis The EPS T chassis can be ordered with one or two EPS 160 power supplies already installed You can also order an additional power supply from your Extreme Networks reseller NOTE Each individual EPS 160 power supply is shipped with an AC cord for use in North America and a special redundant power supply cord Table 39 shows the wire to pin connections for the connector on...

Page 310: ...fore installing or removing any components of the system or before carrying out any maintenance procedures you must read the safety information provided in Appendix A of this guide Not following these precautions can result in equipment damage or shock Rack Mounting the EPS T You need the following tools and equipment to rack mount the EPS T 1 Phillips screwdriver Rack mount kit CAUTION Do not use...

Page 311: ...it switch by following the procedure in Connecting the EPS 160 on page 311 Connecting the EPS 160 CAUTION Do not attach the AC power cord to the EPS 160 power supply until the EPS 160 is properly grounded and until after the redundant power supply cord is connected You need the following tools and equipment to install an EPS 160 power supply Electrostatic discharge ESD preventive wrist strap 1 Phi...

Page 312: ...ight require a different AC cord that is not supplied Contact your sales representative for the appropriate cord type and for information regarding the voltage and current requirements of the power supply NOTE Consider all of the equipment that is connected to the power supply circuit to ensure that the circuit is not overloaded Use proper overcurrent protection such as a circuit breaker to preven...

Page 313: ...ve an IEC320 C14 connector and the appropriate power input plug for the country in which you are operating The cord must be 10 feet or less and at least 16 gauge copper wire The EPS LD unit can be mounted in a rack or placed free standing on a tabletop You can mount the EPS LD facing either the front or the back of the rack For this reason each unit has two sets of mounting holes two on each end M...

Page 314: ...tput connectors are on the same side as the external connector on the connecting switch If you mount the EPS LD with the connectors facing in the opposite direction as the Extreme switch connector leave at least 1 U between the switch and the EPS LD through which to slide the power cords Do not route the power cords around the equipment rack 7 Insert the screws into the rack and the mounting brack...

Page 315: ...er end of the EPS LD cord to the Extreme switch The connector fits in only one direction NOTE If your switch shipped with a metal cover plate over the redundant power input connector remove the cover WARNING The redundant power input connector on the rear of the switch contains high energy and is a burn hazard Use care when connecting the redundant power supply cord to the rear of the switch Figur...

Page 316: ...ould not be plugged into the same circuit breaker To connect the EPS LD to power 1 Connect the AC input power cord to the AC connector on the EPS LD unit 2 Connect the other end of the AC cord to the electrical outlet Make sure the electrical outlet is properly grounded The Power LED on the front of the EPS LD unit turns solid green to indicate that it is ready Table 40 shows the possible LED stat...

Page 317: ...wer supply fails the other power supply will provide sufficient power to operate the switch The EPS 500 unit is shipped with the following items in the box One EPS 500 unit Mounting hardware including screws One input AC power cord for use in North America One output EPS 500 redundant power cord for connecting to Summit switches NOTE Refer to Appendix A Safety Information for additional informatio...

Page 318: ...djacent to other equipment To avoid hazardous conditions due to uneven mechanical loading make sure that the equipment is mounted properly in the rack system CAUTION Do not use the rack mount brackets to suspend the EPS 500 from under a table or desk or to attach the unit to a wall To install the EPS 500 you need the following tools and materials ESD preventive wrist strap 1 Phillips screwdriver T...

Page 319: ... unit until the unit is properly grounded at the electrical outlet and the redundant power cord is connected 1 Connect the keyed end of the EPS 500 redundant power cord to the power supply unit The key is a plastic tab on the connector housing that fits into the EPS 500 unit to ensure correct alignment of the connector See Figure 225 for details on the connector key and see Figure 226 to locate th...

Page 320: ...grounded NOTE Consider all of the equipment that is connected to the power supply circuit to ensure that the circuit is not overloaded Use proper overcurrent protection such as a circuit breaker to prevent overcurrent conditions The switch and its redundant power source should not be plugged into the same circuit breaker The Power LED on the front of the EPS 500 unit turns solid green to indicate ...

Page 321: ...one or two EPS 150DC power supplies Each EPS 150DC provides one to one redundancy to an attached Extreme switch The EPS 150DC installs into an EPS T2 rack mountable chassis NOTE The EPS 150DC is available for use with the Summit X450a 24tDC Summit X450a 24xDC or Summit X450a 48tDC switch When the one of these Summit switches is used with the EPS 150DC the power supplies internal and redundant are ...

Page 322: ... screws from the packaging 3 Locate a mounting bracket over the mounting holes on one side of the unit 4 Insert the screws and fully tighten with a screwdriver as shown in Figure 227 Figure 227 Fitting the mounting bracket 5 Repeat steps 3 and 4 for the other side of the EPS T2 6 Slide the EPS T2 into a 19 inch rack and secure it using appropriate rack mount screws Installing an EPS 150DC NOTE Ins...

Page 323: ...an before the connector on the wiring harness can be attached to the DC power supply socket on the rear of the unit This section provides information about connector pinouts and Appendix B Technical Specifications provides DC power specifications to be used in connecting the wiring harness to the DC source voltage WARNING Wiring the EPS 150DC DC wiring harness to your facilities DC source voltage ...

Page 324: ... connection specifications Installing an EPS 150DC Unit into an EPS T2 WARNING The EPS 150DC unit and rack must be connected to protective earth ground To install an individual EPS 150DC into an EPS T2 1 Remove the EPS 150DC from the packing material 2 Insert the EPS 150DC into the front of the EPS T2 3 Tighten the provided thumbscrews to secure the power supply to the tray Table 42 Wire to pin co...

Page 325: ...ower socket location on the rear of the EPS 150DC unit Figure 229 Connecting the input cable to the EPS 150DC unit 2 Tighten the retainer nut on the connector until it is finger tight Connecting the EPS 150DC to a Switch If you are connecting the EPS 150DC unit to a Summit X450a 48tDC switch you must ground the switch before connecting power For instructions on grounding the switch see Grounding t...

Page 326: ... such as a circuit breaker to prevent overcurrent conditions The Power LED on the front of the EPS 150DC unit turns solid green to indicate that it is ready Table 41 shows the possible LED status for the power supply Table 43 LED status for EPS 150DC Power LED Power LED Indicates Green solid The external power module is operating normally Off The external power module is not connected Collin s ES4...

Page 327: ...0DC unit 1 Attach the ESD strap to your wrist and connect the metal end to the ground receptacle on the top right corner of the switch front panel 2 De energize the DC circuit 3 Remove power from the switch by unplugging the DC connector from the DC power supply socket on the rear of the EPS 150DC unit 4 Disconnect the switch from the EPS 150DC unit by disconnecting the redundant power cord betwee...

Page 328: ...ehavior for the Summit X450e 48p or X250e 48p switch based on the number of power modules in use Single 600 LS Module Configuration Redundant PoE Power A single EPS 600LS power module provides redundant PoE power capability with the same 370 watt capacity as the internal PSU The internal Summit X450e 48p or X250e 48p PSU is capable of 370 W of PoE power 15 4 W supplied to each port for a 24 port c...

Page 329: ...ated to enable 740 W of PoE power The internal PSU is disabled to prevent damage from excessive current demands beyond the internal PSU s capabilities External to Internal PSU Transfer This section describes the conditions where power from an external power module either fails or is disconnected Active Internal PSU with single 600 LS module failure When an EPS C configured with a single EPS 600LS ...

Page 330: ...rce The internal PSU is already enabled and provides uninterrupted 370 watts of PoE power NOTE After an EPS 600LS unit is disconnected from its power source it may be removed from the EPS C See Removing an EPS 600LS on page 334 for complete disconnect and removal details d Disconnect the EPS C from the switch Installing an EPS C Chassis This section describes the installation process for the Extre...

Page 331: ...wer cord to the EPS C see Figure 234 Verify that the side of the connector marked TOP is facing up The key is a plastic tab on the cable connector housing that fits into the chassis to ensure correct alignment of the connector 8 Connect the other end of the redundant power cord to the Summit X450e 48p or X250e 48p switch see Figure 234 Be sure that the side of the connector marked TOP is facing up...

Page 332: ...vered by a cover plate when not in use The EPS C is shipped with slots 2 and 3 covered and with slot 1 open Extreme Networks recommends that you populate slot 1 with an EPS 600LS unit first but this is not required You can install EPS 600LS units into any of the slots in the EPS C The installation sequence does not affect the performance of the power supply units but empty slots must be covered at...

Page 333: ... unit in place Figure 236 Securing the EPS 600LS to the EPS C chassis 4 Connect the AC power cord to the AC connector on the EPS 600LS unit see Figure 237 5 Use the cable clip on the EPS 600LS unit to hold the AC power cord in place see Figure 237 CAUTION The EPS 600LS unit does not have a switch for turning the unit on and off Disconnect power to the EPS 600LS unit by removing the plug from the e...

Page 334: ...o prevent overcurrent conditions The switch and each redundant power supply source in the power supply chassis should be plugged into separate branch circuits to provide redundancy 7 Repeat steps 1 through 6 for each EPS 600LS unit maximum three units per EPS C Removing an EPS 600LS To remove an EPS 600LS unit 1 Disconnect the AC power by removing the plug from the wall 2 Release the cable clip se...

Page 335: ...7 Optics ...

Page 336: ......

Page 337: ...l related installation manuals have the technical training and experience necessary to be aware of the hazards to which they are exposed in performing a task and are aware of measures to minimize the danger to themselves or other persons WARNING When working with laser optic modules always take the following precautions to prevent exposure to hazardous radiation Never look at the transmit LED lase...

Page 338: ...nverter GBIC also known as the mini GBIC The types of switches and the modules identify the compatible type of mini GBIC Mini GBIC Types and Specifications The types of mini GBIC interfaces are as follows SX mini GBIC which conforms to the 1000BASE SX standard LX mini GBIC which conforms to the 1000BASE LX standard ZX mini GBIC a long haul mini GBIC that supports links up to 80 km long 1000BX mini...

Page 339: ...er BlackDiamond 12804 ExtremeXOS 11 4 1 or later BlackDiamond 12802 ExtremeXOS 12 0 Summit Switches Summit X450 series ExtremeXOS 11 2 1 or later Summit X450a series ExtremeXOS 11 5 1 or later Summit X450e series ExtremeXOS 11 5 1 or later Summit X250e series ExtremeXOS 12 0 Table 46 SX mini GBIC specifications Parameter Minimum Typical Maximum Transmitter Average launch power 9 5 dBm 4 dBm Center...

Page 340: ...udget or minimum cable length restriction because the maximum receive power is the same as the maximum transmit power There is no minimum attenuation or minimum cable length restriction Summit Switches Summit X450 series ExtremeXOS 11 2 1 or later Summit X450a series ExtremeXOS 11 5 1 or later Summit X450e series ExtremeXOS 11 5 1 or later Summit X250e series ExtremeXOS 12 0 Table 48 LX mini GBIC ...

Page 341: ... budget or attenuation is required to prevent saturation of the receiver Table 49 ZX mini GBIC software requirements Switch Model Required Software BlackDiamond Switches BlackDiamond 10808 ExtremeXOS 11 0 0 or later BlackDiamond 8800 series ExtremeXOS 11 1 1 9 or later BlackDiamond 12804 ExtremeXOS 11 4 1 or later BlackDiamond 12802 ExtremeXOS 12 0 Summit Switches Summit X450 series ExtremeXOS 11 ...

Page 342: ...ber ports 1 through 20 Not supported on combination ports 21 through 24 Summit X450a 24xDC ExtremeXOS 11 6 1 or later Supported on fiber ports 1 through 20 Not supported on combination ports 21 through 24 Summit X250e Series Switches Summit X250e 24t ExtremeXOS 12 0 or later Supported on fiber combination ports 25x and 26x Summit X250e 24p ExtremeXOS 12 0 or later Supported on fiber combination po...

Page 343: ...kilometer for example 0 25 dB km Extreme Networks recommends that 3 dB of the total budget be reserved for losses induced by cable splices or connectors and operating margin NOTE The 100FX 1000LX mini GBIC detects link status based only on the presence of light in the receive cable Therefore if a single strand is broken the link partner on the other port will not detect link down 100FX mini GBIC T...

Page 344: ...ed on combination ports 21 through 24 Summit X450a 24xDC ExtremeXOS 11 6 1 or later Supported on fiber ports 1through 20 Not supported on combination ports 21 through 24 Summit X250e Series Switches Summit X250e 24t ExtremeXOS 12 0 or later Supported on fiber combination ports 25x and 26x Summit X250e 24p ExtremeXOS 12 0 or later Supported on fiber combination ports 25x and 26x Summit X250e 48t Ex...

Page 345: ...d Software BlackDiamond Switches BlackDiamond 10808 ExtremeXOS 11 6 1 or later BlackDiamond 8800 series ExtremeXOS 11 4 1 or later BlackDiamond 12804 ExtremeXOS 11 6 1 or later BlackDiamond 12802 ExtremeXOS 12 0 Summit Switches Summit X450 series ExtremeXOS 11 4 1 or later Summit X450a series ExtremeXOS 11 5 1 or later Summit X450e series ExtremeXOS 11 5 1 or later Summit X250e series ExtremeXOS 1...

Page 346: ...e the bend radius of the fiber is not less than 2 inches 5 08 cm Table 58 LX100 mini GBIC software requirements Switch Model Required Software BlackDiamond Switches BlackDiamond 10808 ExtremeXOS 12 0 or later BlackDiamond 8800 series ExtremeXOS 12 0 or later BlackDiamond 12804 ExtremeXOS 12 0 or later BlackDiamond 12802 ExtremeXOS 12 0 or later Summit Switches Summit X450 series ExtremeXOS 11 4 1 ...

Page 347: ...nk to the Tx port Without an attenuator measure the total loss from the Tx port to the other site of the link The total loss must not exceed the total optical system budget Installing and Removing a Mini GBIC You can add or remove mini GBICs from your switch without powering off the system Figure 238 shows the types of mini GBIC modules and connectors NOTE The 1000BX mini GBIC consists of two SFP ...

Page 348: ...GBIC similar to Module A in Figure 238 press and hold the black plastic tab at the bottom of the connector On a mini GBIC similar to Module B Module C or Module D in Figure 238 rotate the front handle down 3 Pull the mini GBIC out of the port on the switch Connecting Fiber Cables Before you connect fiber cables to the dual speed 100FX 1000LX mini GBIC or the LX100 mini GBIC note the following info...

Page 349: ...XFP interfaces LR XFP module SR XFP module LR XFP Module The LR XFP module supports single mode fiber SMF and has LC duplex connectors The LR XFP module requires the software versions listed in Table 60 Table 61 lists the specifications for the LR XFP module Table 60 LR XFP module software requirements Switch Model Required Software BlackDiamond Switches BlackDiamond 8800 series ExtremeXOS 11 6 1 ...

Page 350: ...rements Switch Model Required Software BlackDiamond Switches BlackDiamond 8800 series ExtremeXOS 11 6 1 9 or later Summit Switches Summit X450a series ExtremeXOS 11 5 1 or later Summit X450e series ExtremeXOS 11 5 1 or later Parameter Minimum Maximum Average launch power 7 3 dBm 1 3 dBm Channel insertion loss 62 5 μm 160 200 MHz km 62 5 μm 200 MHz km 50 μm 400 MHz km 50 μm 500 MHz km 50 μm 2000 MH...

Page 351: ...ouch the card edge connectors at the insertion end of the module To install an XFP module 1 Remove the XFP module from its antistatic container and remove the dust covers from the module optical connectors If your module has a protective pad covering the card edge connector remove it Store the antistatic container dust covers and card edge connector protective pad in a clean location from which th...

Page 352: ... clicks into place see Figure 241 6 Slide the XFP module as far back into the slot as possible until you hear it click indicating that it is firmly attached see Figure 241 and Figure 242 Figure 241 Installing an XFP module Figure 242 Installed XFP Module NOTE If you are installing only one XFP module make sure that all unoccupied ports are covered with a rubber dust cover which is shipped with the...

Page 353: ...closed with the module Removing an XFP Module This section describes how to remove an XFP module You can remove an XFP module from your Extreme Networks switch or I O module without powering off the system The XFP module is shown in Figure 239 on page 351 To remove an XFP module 1 Release the handle bail latch on the XFP module 2 Carefully pull the XFP module out of the port 3 Place the dust cover...

Page 354: ... support the following types of XENPAK interfaces SR XENPAK LR XENPAK ER XENPAK ZR XENPAK LX4 XENPAK LW XENPAK NOTE CX4 XENPAKs are also supported by Extreme Networks devices contact your vendor to obtain these NOTE Use only Extreme Networks approved XENPAK modules in all Extreme Networks devices SR XENPAK The SR XENPAK supports multimode fiber MMF and has SC connectors The SR XENPAK requires the ...

Page 355: ...0 200 MHz km 62 5 μm 200 MHz km 50 μm 400 MHz km 50 μm 500 MHz km 50 μm 2000 MHz km 1 6 dB 1 6 dB 1 7 dB 1 8 dB 2 6 dB Wavelength range 840 nm 860 nm Operating distance range depends on type and modal bandwidth 62 5 μm MMF 160 MHz km 62 5 μm MMF 200 MHz km 50 μm MMF 400 MHz km 50 μm MMF 500 MHz km 50 μm MMF 2000 MHz km 26 m 33 m 66 m 82 m 300 m Maximum receiver sensitivity in OMA 11 1 dBm Table 66...

Page 356: ... 0 5 dBm Optical link budget 6 2 dB Wavelength range 1260 nm 1355 nm Distance range 2 m 10 km Maximum receiver sensitivity in OMA 12 6 dBm Table 68 ER XENPAK software requirements Switch Model Required Software BlackDiamond Switches BlackDiamond 10808 ExtremeXOS 11 1 1 or later BlackDiamond 8800 series ExtremeXOS 11 1 1 or later BlackDiamond 12804 ExtremeXOS 11 4 or later BlackDiamond 12802 Extrem...

Page 357: ...l loopback for diagnostics purposes the loopback requires a minimum of 10 dB optical attenuation The recommended attenuation range is 10 dB to 15 dB Table 70 ZR XENPAK software requirements Switch Model Required Software BlackDiamond Switches BlackDiamond 10808 ExtremeXOS 11 3 1 or later BlackDiamond 8800 series ExtremeXOS 11 3 1 or later BlackDiamond 12804 ExtremeXOS 11 4 or later BlackDiamond 12...

Page 358: ...1 or later BlackDiamond 12804 ExtremeXOS 11 4 or later BlackDiamond 12802 ExtremeXOS 12 0 or later Summit Switches Summit X450 series ExtremeXOS 11 3 1 or later Summit X450a series ExtremeXOS 11 3 1 or later Summit X450e series ExtremeXOS 11 3 1 or later Table 73 LX4 XENPAK module specifications Parameter Minimum Maximum Transmitter Average launch power 4 lanes 5 5 dBm Average launch power per lan...

Page 359: ...performance in the Summit X450a and X450e series switches Table 75 lists specifications for the LW XENPAK module Table 74 LW XENPAK software support requirements Switch Model Required Software Release BlackDiamond Switches BlackDiamond 10808 ExtremeXOS 11 4 1 or later BlackDiamond 12804 ExtremeXOS 11 4 1 or later BlackDiamond 12802 ExtremeXOS 12 0 or later Summit Switches Summit X450a ExtremeXOS 1...

Page 360: ...ock locking mode of the LW XENPAK module is set to line timing mode When in line timing mode the LW XENPAK module transmitter clock is locked to the receiver recovered clock When the LW XENPAK is connected to the SONET SDH network on the other side of optical cable the LW XENPAK transmitter clock synchronizes with the SONET SDH clock source which helps reduce the pointer adjustment between the SON...

Page 361: ...ENPAK module is inserted into an optional module card Although the module card is not hot swappable you can hot swap the XENPAK into and out of the module card on the Summit See Chapter 4 for information about the optional module card for XENPAKs on a Summit X450 series X450a series or X450e series switch Figure 243 XENPAK module WARNING XENPAK modules contain Class 1 lasers Invisible laser radiat...

Page 362: ... XENPAK module to the I O module or option card by turning the two captive screws clockwise until the screws are hand tight NOTE To ensure that your XENPAK module is undamaged upon installation you can correlate factory test data with your installation site test data by consulting the average power reference values shown on the XENPAK module test data sheet Part No 121074 00 enclosed with your mod...

Page 363: ...8 Initial Management Access ...

Page 364: ......

Page 365: ...software that you connect to an Extreme Networks switch must be configured with these settings This procedure is described in the documentation supplied with the terminal Appropriate cables are available from your local supplier or you can make your own To ensure the electromagnetic compatibility of the unit use only shielded serial cables Table 76 describes the pinouts for a DB 9 console plug con...

Page 366: ...l cable Figure 245 PC AT serial null modem cable pinouts Screen TxD RxD Ground RTS CTS DSR DCD DTR Cable connector 9 pin female Switch Cable connector 25 pin male female 25pin PC Terminal Screen RxD TxD Ground RTS DTR CTS DSR DCD Shell 3 2 5 7 8 6 1 4 1 3 2 7 4 20 5 6 8 Screen TxD RxD Ground RTS CTS DSR DCD DTR Cable connector 9 pin female Switch Cable connector 25 pin male female 25pin PC Termina...

Page 367: ... which allow all forms of management access for convenience in setting the initial configuration Answer each question based on the level of security needed for the particular management access type NOTE For more information about logging in to the switch and configuring switch management access see the ExtremeXOS 12 0 Concepts Guide 5 At the password prompt press Return The default user name admin...

Page 368: ...Initial Management Access Extreme Networks Consolidated ExtremeXOS Hardware Installation Guide 368 ...

Page 369: ...9 Appendixes ...

Page 370: ......

Page 371: ...s Temperature and humidity controlled indoor area where maximum ambient room temperature shall not exceed 40ºC 104ºF Clean and free from airborne materials that can conduct electricity Well ventilated and away from sources of heat including direct sunlight Away from sources of vibration or physical shock Isolated from strong electromagnetic fields produced by electrical devices Secured enclosed an...

Page 372: ...swappable power supplies do not slam the PSU into the bay If multiple power supplies are used in a switch connect each power supply to a different independent power source If a single power source fails it will affect only that power supply to which it is connected If all the power supplies on a single switch are connected to the same power source the entire switch is vulnerable to a power failure...

Page 373: ...s or other modular accessories put on the electrostatic discharge ESD preventive wrist strap to reduce the risk of electronic damage to the equipment Leave the ESD preventive wrist strap permanently attached to the chassis so that it is always available when you need to handle ESD sensitive components Install all cables in a manner that avoids strain Use tie wraps or other strain relief devices Re...

Page 374: ...inside the same building and use a low voltage power distribution system per IEEE 802 3af Uninterruptible Power Supply Requirements An uninterruptible power supply UPS is a device that sits between a power supply such as a wall outlet and a device such as a switch to prevent outages sags surges and bad harmonics from adversely affecting the performance of the device UPS Features A UPS traditionall...

Page 375: ...r supply cords for use outside of the United States and Canada are typically provided separately by third party distribution centers Contact the Extreme Networks TAC for questions regarding the proper selection of a power input cord for your specific switch The following are power cord requirements for use on Extreme switches Summit Family of Switches Wire 18 AWG 823mm2 minimum 3 conductor flexibl...

Page 376: ...power supplies Denmark The supply plug must comply with section 107 2 D1 standard DK2 1a or DK2 5a International Use CEE 7 7 for 110 220 VAC power supplies Japan Use JIS 8303 for 110 220 VAC power supplies The power cord provided with the power supply switch or chassis is for use only with that specific product from Extreme Networks it is not for use with any other product from Extreme Networks or...

Page 377: ... module and allow it to cool before removing it completely Only trained service personnel should perform service to Extreme Networks switches and their components Trained service personnel have read all related installation manuals have the technical training and experience necessary to be aware of the hazards to which they are exposed in performing a task and are aware of measures to minimize the...

Page 378: ...at all customers use Extreme Networks optics in their Extreme Networks switches Extreme Networks assumes no liability for third party optics While Extreme Networks does not block third party optics we cannot ensure that all third party party optics operate properly in all Extreme Networks switches The customer assumes all risks associated with using third party optics in Extreme Networks switches ...

Page 379: ...itsregelung wobei die maximale Raumtemperatur 40 C 104ºF nicht überschreiten darf Sauber und frei von elektrisch aufladbaren Teilchen in der Luft Ausreichende Belüftung und Abstand zu Wärmequellen einschließlich direktem Sonnenlicht Ausreichender Abstand zu Quellen die Erschütterungen oder Schläge Stöße hervorrufen können Isolierung von starken elektromagnetischen Feldern wie sie durch Elektrogerä...

Page 380: ...it internationalen Sicherheitsnormen zu gewährleisten Nur Stromkabel verwenden die für den Einsatz in dem jeweiligen Land zugelassen sind Wechselstromkabel dürfen nicht manipuliert werden Die Wandsteckdose muss in der Nähe der Anlage installiert und leicht zugänglich sein um eine schnelle Trennung vom Netz zu ermöglichen Spannung und Frequenz der Steckdose müssen den elektrischen Nenndaten des Sys...

Page 381: ...hniker von Extreme Networks durchzuführen Der An Aus Schalter des Systems darf nicht die gesamte Stromversorgung zum System unterbrechen Zur Unterbrechung der Wechselstromversorgung zum System müssen alle Stromkabel aus den Wandsteckdosen gezogen werden Das Stromkabel dient zur Trennung von der Netzstromversorgung Vor dem Entfernen der Rückwand eines Extreme Networks Switch muss die gesamte Stromz...

Page 382: ...em für das Einsatzland zugelassenen Wandsteckkontakt mit der geeigneten Nennleistung ausgerüstet sein Die Konfiguration der Steckvorrichtung die Steckverbindung zur Einheit nicht zur Wandsteckdose muss für eine Gerätesteckdose gemäß EN60320 IEC320 C14 ausgeführt sein Die Länge der Stromkabel muss weniger als 5 m 15 Fuß betragen Die Mindestspezifikation für das flexible Kabel lautet Nr 18 AWG 0 823...

Page 383: ...ften sind weltweit verschieden Extreme Networks empfiehlt daher ausdrücklich einen Elektroinstallateur zu beauftragen um die sachgemäße Geräteerdung und Stromverteilung für Ihre spezifische Installation sicherzustellen Austauschen und Entsorgen von Batterien Im Umgang mit Batterien sind folgende Hinweise zu beachten Austauschen der Lithium Batterie Die in diesem Gerät enthaltenen Batterien können ...

Page 384: ...uide 384 Einhaltung behördlicher Vorschriften durch GBIC Mini GBIC XENPAK und XFP Laserprodukt der Klasse 1 EN60825 1 A2 2001 oder jünger Europäische Richtlinie für Lasersysteme Anwendung der CE Kennzeichnung gemäß der Richtlinien 89 336 EWG EMV und 73 23 EWG für Niederspannungsgeräte ...

Page 385: ...08 switch technical specifications Physical Dimensions BlackDiamond 10808 chassis Height 38 5 inches 98 cm Width 17 3 inches 44 cm Depth 21 0 inches 53 3 cm Weight BlackDiamond 10808 chassis empty 105 lb 47 7 kg BlackDiamond 10808 chassis fully loaded 242 lb 110 kg Power supply 7 lb 3 2 kg BlackDiamond 10808 MSM 10 7 lb 4 9 kg BlackDiamond 10808 I O module 9 25 lb 4 2 kg Safety Standards North Ame...

Page 386: ...c VCCI Class A Japan Emissions AS NZS 3548 ACA Australia Emissions CNS 13438 1997 Class A BSMI Taiwan MIC Mark EMC Approval North Korea Telecom Standards ETSI EN 300 386 2001 EMC Telecommunications ETSI EN 300 019 Environmental for Telecommunications IEEE 802 3 Media Access Standards Note These standards are module specific and may not apply to every module in the series IEEE 802 3 10BASE T IEEE 8...

Page 387: ...00 Hz 14 drops minimum on sides corners 39 5 22 lb 10 kg modules 11 8 110 lb 50 kg chassis Acoustic Sound BlackDiamond 10808 Switch with AC Power Supplies Sound power in accordance with EN 300 753 10 1997 Sound power Low 71 dBA per ISO 7779 Normal 80 dBA per ISO 7779 High 85 dBA per ISO 7779 Declared sound power Low 7 4 belsA per ISO 7779 ISO 9296 Normal 8 2 belsA per ISO 7779 ISO 9296 High 8 8 be...

Page 388: ...TE EN 60950 1 2001 A11 EN 60825 1 A2 2001 Lasers Safety TUV R GS Mark by German Notified Body 73 23 EEC Low Voltage Directive International Safety of ITE CB Report Certificate per IEC 60950 1 2001 Country Deviations AS NZX 60950 1 Australia New Zealand EMI EMC Standards North America EMC for ITE FCC CFR 47 part 15 Class A USA ICES 003 Class A Canada European EMC standards EN 55022 1998 Class A EN ...

Page 389: ...temperature range 0 C to 40 C 32 F to 104 F Operating humidity 10 to 93 relative humidity non condensing Operational shock 30 m s2 3 g 11 ms 60 shocks Operational sine vibration 5 to 100 to 5 Hz 0 2 g 0 to peak 0 1 oct min Operational random vibration 3 to 500 Hz 1 5g rms Storage transportation conditions packaged Transportation temperature 40 C to 70 C 40 F to 158 F Storage and transportation hum...

Page 390: ...BlackDiamond 12804 PSU Fan Controller 1 75 lb 79 kg Safety Standards North American Safety of ITE UL 60950 1 2003 1st Ed Listed Device US CSA 22 2 60950 1 03 1st Ed Canada Complies with FCC 21CFR 1040 10 US Laser Safety CDRH Letter of Approval US FDA Approval NOM NYCE Mexico IEEE 802 3af 6 2003 Environment A for PoE Applications European Safety of ITE EN 60950 1 2001 A11 EN 60825 1 A2 2001 Lasers ...

Page 391: ...E T IEEE 802 3ac VLAN Tag IEEE 802 3ad Link Aggregation IEEE 802 3ae 10GBASE X IEEE 802 3aef Power over Ethernet Environmental Standards Environmental EN ETSI 300 019 2 1 v2 1 2 Class 1 2 Storage EN ETSI 300 019 2 2 v2 1 2 Class 2 3 Transportation EN ETSI 300 019 2 3 v2 1 2 Class 3 1e Operational EN ETSI 300 753 1997 10 Acoustic Noise Operating conditions Operating temperature range 0 C to 40 C 32...

Page 392: ...300 753 10 1997 Sound power Normal 70 dBA per ISO 7779 High 73 dBA per ISO 7779 Declared sound power Normal 7 2 belsA per ISO 7779 ISO 9296 High 7 6 belsA per ISO 7779 ISO 9296 Sound pressure in accordance with NEBS GR 63 Issue 2 Bystander sound pressure Normal 64 dBA front side 0 6m High 66 dBA left side 0 6m Table 79 BlackDiamond 8806 and BlackDiamond 12804 switch technical specifications Contin...

Page 393: ...an Safety of ITE EN 60950 1 2001 A11 EN 60825 1 A2 2001 Lasers Safety TUV R GS Mark by German Notified Body 73 23 EEC Low Voltage Directive International Safety of ITE CB Report Certificate per IEC 60950 1 2001 Country Deviations AS NZX 60950 1 Australia New Zealand EMI EMC Standards North America EMC for ITE FCC CFR 47 part 15 Class A USA ICES 003 Class A Canada European EMC standards EN 55022 19...

Page 394: ... Transportation EN ETSI 300 019 2 3 v2 1 2 Class 3 1e Operational EN ETSI 300 753 1997 10 Acoustic Noise Operating conditions Operating temperature range 0 C to 40 C 32 F to 104 F Operating humidity 10 to 93 relative humidity non condensing Operating altitude 0 to 3000 meters 0 to 9 850 ft Operational shock 30 m s2 3 g 11 ms 60 shocks Operational random vibration 5 to 500 Hz 1 5g rms Storage trans...

Page 395: ...ne frequency 47 to 63 Hz PS input socket IEC 320 C14 Minimum wire size 16 AWG 1 31mm2 copper stranded Output DC output 48 V 24 A 12 V 4 A high line 48 V 13 5 A 12 V 4 A low line DC output power W 700 to 1200 W Power supply cord selection Refer to Power Supply Cords Selection on page 375 AC power supply input socket IEC 320 C14 Minimum wire size 16 AWG 1 0mm2 copper stranded pre approved cord set f...

Page 396: ...0 mm2 listed tray cable copper stranded rated 90 C minimum Connector Molex connector PN 42816 0312 Connector pins Molex connector pins PN 42815 0032 Output DC output 48 V 24 A 12 V 4 A DC output power W 1200 W Operating conditions Operating temperature 0 C to 40 C 32 F to 104 F Operating humidity 10 to 90 relative humidity non condensing Operating altitude 0 m to 3 000 m 0 ft to 9 850 ft Operation...

Page 397: ...um Operational voltage range 40 V to 72 V Maximum input amperages 10 A 40 V low line 8 A 48 V 7 A 60 V high line Maximum in rush current 8 A Input circuit protection 15 A Wire harness provided by Extreme Networks with each power supply Extreme part number 4340 00028 Minimum wire size 14 AWG 1 3 mm2 copper stranded pre approved cord set for county of use Connector Molex connector PN 42816 0312 Conn...

Page 398: ...itch Summit X250e 24p switch Height 1 73 inches 4 4 cm Width 17 35 inches 44 1 cm Depth 12 13 inches 30 8 cm Summit X250e 48t switch Summit X250e 48p switch Height 1 73 inches 4 4 cm Width 17 35 inches 44 1 cm Depth 15 28 inches 38 8 cm Weight Summit X250e 24t switch 12 01 lb 5 46 kg Summit X250e 24p switch 14 9 lb 6 8 kg Summit X250e 48t switch 15 1 lb 6 9 kg Summit X250e 48p switch 17 0 lb 7 7 k...

Page 399: ...00 to 240 V 50 60 Hz 5 25 A Input current 4 25 A 115 V low line 2 0 A 230 V high line Line frequency range 47 to 63 Hz Inrush current 30 A 115 V 60 A 230 V Power supply cord type AC Power supply input socket IEC 320 C14 Power cord input plug IEC 320 C13 Power cord wall plug Refer to Power Supply Cords Selection on page 375 Power supply cord gauge 18 AWG 0 82mm2 copper stranded Efficiency 81 Heat d...

Page 400: ...Power consumption DVT 520 Acoustic noise in dBA per ISO 7779 46 high fan speed 39 low fan speed Safety Standards North American Safety of ITE UL 60950 1 2003 1st Ed Listed Device US CSA 22 2 60950 1 03 1st Ed Canada Complies with FCC 21CFR 1040 10 US Laser Safety CDRH Letter of Approval US FDA Approval IEEE 802 3af 6 2003 Environment A for PoE Applications European Safety of ITE EN 60950 1 2001 A1...

Page 401: ...a Access Standards IEEE 802 3ab 1000BASE T Environmental Standards Environmental EN ETSI 300 019 2 1 v2 1 2 Class 1 2 Storage EN ETSI 300 019 2 2 v2 1 2 Class 2 3 Transportation EN ETSI 300 019 2 3 v2 1 2 Class 3 1e Operational EN ETSI 300 753 1997 10 Acoustic Noise ASTM D3580 Random Vibration Unpackaged 1 5G Operating conditions Operating temperature range 0 C to 40 C 32 F to 104 F Operating humi...

Page 402: ... hr Power supply cord selection Refer to Power Supply Cords Selection on page 375 Safety Standards North American Safety of ITE UL 60950 1 2003 1st Ed Listed Device US CSA 22 2 60950 1 03 1st Ed Canada Complies with FCC 21CFR 1040 10 US Laser Safety CDRH Letter of Approval US FDA Approval NOM NYCE Mexico IEEE 802 3af 6 2003 Environment A for PoE Applications European Safety of ITE EN 60950 1 2001 ...

Page 403: ...Storage EN ETSI 300 019 2 2 v2 1 2 Class 2 3 Transportation EN ETSI 300 019 2 3 v2 1 2 Class 3 1e Operational EN ETSI 300 753 1997 10 Acoustic Noise ASTM D3580 Random Vibration Unpackaged 1 5G Operating conditions Operating temperature range 0 C to 40 C 32 F to 104 F Operating humidity 10 to 95 relative humidity non condensing Operational shock half sine 30 m s2 3g 11ms 18 shocks Operational rando...

Page 404: ...24t switch 13 75 lb 6 24 kg Summit X450a 24tDC switch 12 25 lb 5 57 kg Summit X450a 24x switch 13 lb 5 9 kg Summit X450a 24xDC switch 12 50 lb 5 67 kg Summit X450a 48t switch 15 75 lb 7 14 kg Summit X450a 48tDC switch 14 25 lb 6 50 kg Packaged Dimensions Summit X450a 24t switch Summit X450a 24tDC switch Summit X450a 24x switch Summit X450a 24xDC switch Summit X450a 48t switch Summit X450a 48tDC sw...

Page 405: ...CO PN 206061 1 Power cord input plug TYCO PN 206060 1 Power cord wall plug Refer to Power Supply Cords Selection on page 375 Power supply cord gauge 14 AWG Heat dissipation Watts BTU 108 W 368 5 BTU hr Power consumption Watts BTU 108 W 368 5 BTU hr Summit X450a 48t Power Acoustic Sound Operational voltage range 85 to 264 V Nominal input ratings 100 to 240 V 50 60 Hz 1 5 A Nominal input current 1 4...

Page 406: ...wer consumption Watts BTU 98 W 334 4 BTU hr Summit X450a 24xDC Power Operational voltage range 36 to 72 V Nominal input ratings 48 V 2 5 A Input current 2 5 A 36 V low line 1 25 A 72 V high line Power supply cord type DC Power supply input socket TYCO PN 206061 1 Power cord input plug TYCO PN 206060 1 Power cord wall plug Refer to Power Supply Cords Selection on page 375 Power supply cord gauge 14...

Page 407: ...al North Korea Telecom Standards ETSI EN 300 386 2001 EMC Telecommunications ETSI EN 300 019 Environmental for Telecommunications IEEE 802 3 Media Access Standards IEEE 802 3ab 1000BASE T Environmental Standards Environmental EN ETSI 300 019 2 1 v2 1 2 Class 1 2 Storage EN ETSI 300 019 2 2 v2 1 2 Class 2 3 Transportation EN ETSI 300 019 2 3 v2 1 2 Class 3 1e Operational EN ETSI 300 753 1997 10 Aco...

Page 408: ...h 16 25 lb 7 4 kg Packaged Dimensions Summit X450e 24p switch Summit X450e 48p switch Height 5 9 inches 15 cm Width 22 4 inches 57 cm Depth 21 7 inches 55 cm Packaged Weight Summit X450e 24p switch 18 9 lb 8 6 kg Summit X450e 48p switch 21 lb 9 6 kg Summit X450e 24p Power Acoustic Sound Operational voltage range 85 to 264 V Nominal input ratings 100 to 240 V 50 60 Hz 5 25 A Input current 4 25 A 11...

Page 409: ...rman Notified Body 73 23 EEC Low Voltage Directive International Safety of ITE CB Report Certificate per IEC 60950 1 2001 Country Deviations AS NZX 60950 1 Australia New Zealand EMI EMC Standards North America EMC for ITE FCC CFR 47 part 15 Class A USA ICES 003 Class A Canada European EMC standards EN 55022 1998 Class A EN 55024 1998 Class A includes IEC 61000 4 2 3 4 5 6 8 11 EN 61000 3 2 3 Harmo...

Page 410: ... Operating temperature range 0 C to 40 C 32 F to 104 F Operating humidity 10 to 93 relative humidity non condensing Operating altitude 0 to 3 000 meters 9 850 feet Operational shock half sine 30 m s2 3 g 11 ms 60 shocks Operational random vibration 3 to 500 Hz 1 5 g rms Storage transportation conditions packaged Transportation temperature 40 C to 70 C 40 F to 158 F Storage and transportation humid...

Page 411: ...rational voltage range 90 to 264 V Nominal input ratings 100 to 250 V 4 to 2 A 47 to 63 Hz Line frequency range 47 to 63 Hz Input current 2 A at 100 V 1 A at 240 V Line frequency 50 to 60 Hz Heat dissipation Watts BTU 160 W 546 BTU hr AC power supply input socket IEC 320 C14 Minimum wire size 16 AWG 1 0mm2 copper stranded Output 12 V 11 A 5 V 1 5 A Power Supply Cord Selection Refer to Power Supply...

Page 412: ...wall plug Refer to Power Supply Cords Selection on page 375 Minimum wire size 18 AWG 0 82mm2 less than 2 m or 16 AWG 1 3mm2 copper stranded Heat dissipation 132 W Power consumption 732 W Operating conditions Temperature 0 C to 40 C 32 F to 104 F Humidity 10 to 93 relative humidity non condensing Altitude 0 to 3000 meters 9 850 ft Shock 10 ms 3 axis half sine Vibration 5 to 200 to 5 Hz 5 to 32 Hz 0...

Page 413: ... line 2 6 A 72 V high line Line frequency range 47 to 63 Hz Power supply cord type DC Power supply input socket TYCO PN 206061 1 Power cord input plug TYCO PN 206060 1 Power cord wall plug Refer to Power Supply Cords Selection on page 375 Power supply cord gauge 14 AWG Heat dissipation 64 W Power consumption 214 W Ambient operating temperature 0 C to 40 C Storage and transportation temperature 40 ...

Page 414: ...Technical Specifications Extreme Networks Consolidated ExtremeXOS Hardware Installation Guide 414 ...

Page 415: ...SM 55 AC power cord retainer channel installing 194 removing 196 AC power cord retaining bracket BlackDiamond 8810 switch installing 191 removing 193 installing on 325 W AC PSU 168 airflow requirements BlackDiamond switches 25 alternate BootROM image 55 amperage calculating for UPS 38 375 ANSI standards 39 B bend radius fiber optic cable 33 UTP cable 31 BICSI standards 30 BlackDiamond 10808 switch...

Page 416: ...59 G48T 59 BlackDiamond 8800 series of switches removing spare PSU Fan controller 214 BlackDiamond 8800 series switch XENPAK module 361 BlackDiamond 8800 series switches handles on MSMs and I O modules 176 hot swapping modules 183 I O modules 56 installing modules 175 mini GBICs 338 PSU fan controller replacing 213 replacing PSU fan controller 216 slot assignments 173 BlackDiamond 8806 switch AC p...

Page 417: ...08 switch 129 backup MSM 182 cable manager 198 fan tray 222 fan tray filter 223 mid mount brackets 132 MSM 180 power supply controller 226 standard rack mount 129 BlackDiamond 8810 switch 101 AC power cord retaining bracket 191 fan tray 219 helper bracket 101 BlackDiamond switches blank front panel 185 external memory card 188 XENPAK module 305 362 XFP module 351 components removing BlackDiamond 1...

Page 418: ...wer System 313 Extreme Networks switch airflow 25 F fan tray BlackDiamond 10808 switch description 50 filter replacement 223 hot swapping 221 installing 222 removing 221 BlackDiamond 8810 switch installing 219 removing 217 fan tray filter installing 223 fiber optic cable bend radius 33 care 33 connections making 35 first switch login 367 full duplex 44 G G20X I O module 85 G24X I O module 57 G48P ...

Page 419: ...10808 chassis 121 BlackDiamond 12800 series module 175 BlackDiamond 12802 chassis 117 BlackDiamond 12804 chassis 105 BlackDiamond 8800 series module 175 BlackDiamond 8806 chassis 105 BlackDiamond 8810 chassis 95 BlackDiamond blank front panels 185 BlackDiamond cable manager 197 DC wiring for 1200 W DC power supply 140 DC wiring for 325 W DC power supply 159 mini GBIC 347 optional hardware 309 Summ...

Page 420: ...g configurations 80 MSM BlackDiamond 12800 series switch booting 71 console port 73 dual MSMs 71 external compact flash slot 73 management port 73 primary backup functionality 71 saving configurations 71 MSM BlackDiamond 8800 series switch available slots 53 174 booting 54 console port 55 dual MSMs 54 external compact flash slot 53 LEDs 56 management port 55 MSM 48 54 MSM G8X 54 primary backup fun...

Page 421: ...9 411 EPS 500 317 411 EPS 600LS 328 EPS LD 313 for BlackDiamonds 137 Power supply unit PSU EPS LD 411 power supply unit PSU 1200 W DC PSU 139 600 900 W AC PSU 152 700 1200 W AC PSU 146 power on self test See POST PSU fan controller BlackDiamond 12804 switch installing 216 replacing 213 BlackDiamond 8800 series of switches installing 216 replacing 213 R R button MSM 55 rack installation mid mount B...

Page 422: ...C 345 100FX mini GBIC 344 100FX 1000LX mini GBIC 342 BlackDiamond 10808 switch 385 BlackDiamond 12802 switch 393 BlackDiamond 12804 switch 390 BlackDiamond 8806 switch 390 BlackDiamond 8806 12804 switch 393 BlackDiamond 8810 switch 388 LX mini GBIC 340 LX100 mini GBIC 346 power cable 37 Summit family of switches 398 410 Summit X250e series switch 398 Summit X450 series switch 402 Summit X450a seri...

Page 423: ...s switch 404 Summit X450e series switch 398 408 temperature wiring closet 24 text conventions 16 tilt watch BlackDiamond 10808 switch 123 BlackDiamond 8810 96 tools for installing equipment BlackDiamond 8810 AC power cord retaining bracket 191 blank front panel BlackDiamond 10808 switch 185 external memory card 188 external power supply Summit 310 fan tray BlackDiamond 10808 switch 223 fan tray Bl...

Page 424: ...t swapping 304 361 installing 300 305 361 362 LR XENPAK 356 LW XENPAK 359 LX4 XENPAK 358 removing 301 306 362 SR XENPAK 355 ZR XENPAK 357 XFP interfaces 349 XFP module description 304 features 349 installing 351 LR XFP 349 removing 353 SR XFP 350 XFP modules 306 installing Summits 304 removing Summits 306 XFP modules installing XGM2 2xf 304 XFP modules removing XGM2 2xf 306 XGM2 2xf option card 30...

Reviews: