


Notes:
• If the volume settings are changed, all data on the volume will be erased. Before changing any settings, back up
any important data.
• The TeraStation can have up to 255 volumes, but we recommend creating no more than 32. Exceeding this
volume amount may cause irreparable damage to the unit.
• Do not use a name already in use as a shared folder name; do not use any of the following words as an iSCSI
volume name as these words are reserved for internal use by the TeraStation: array
x
, authtest, disk
x
, global,
homes, info, lost+found, lp, mediacartridge
x
, msdfs_root, mt-daapd, printers, ram, spool, usbdisk
x
. Any instances
of “x” denote a number (for example: array1 or disk3)
• There are two options for the “Backstore” setting to select the type of iSCSI volume. Refer to the differences below.
◦
File I/O
(recommended): This type of volume can specify the volume size and multiple volumes can be
created on one drive or RAID array. This also allows you to expand the volume size after the volume is
created and data has been stored.
Snapshots can create on the iSCSI volume. The volume can also be set as a backup folder.
◦
Block I/O
: This type of volume will create an iSCSI volume for a whole drive or RAID array. However, if you
enable LVM, you can create multiple volumes on the drive or the RAID array or expand the volume size later,
just like a file I/O volume. It is recommended to enable LVM if you want to create multiple volumes on one
drive or RAID array, or expand the volume later.
The block I/O volume affords higher performance than the file I/O volume because there won’t be any delays
to the file system.
Be aware that block I/O volumes with LVM enabled cannot use snapshots. The volumes also cannot be
used as the backup folders.
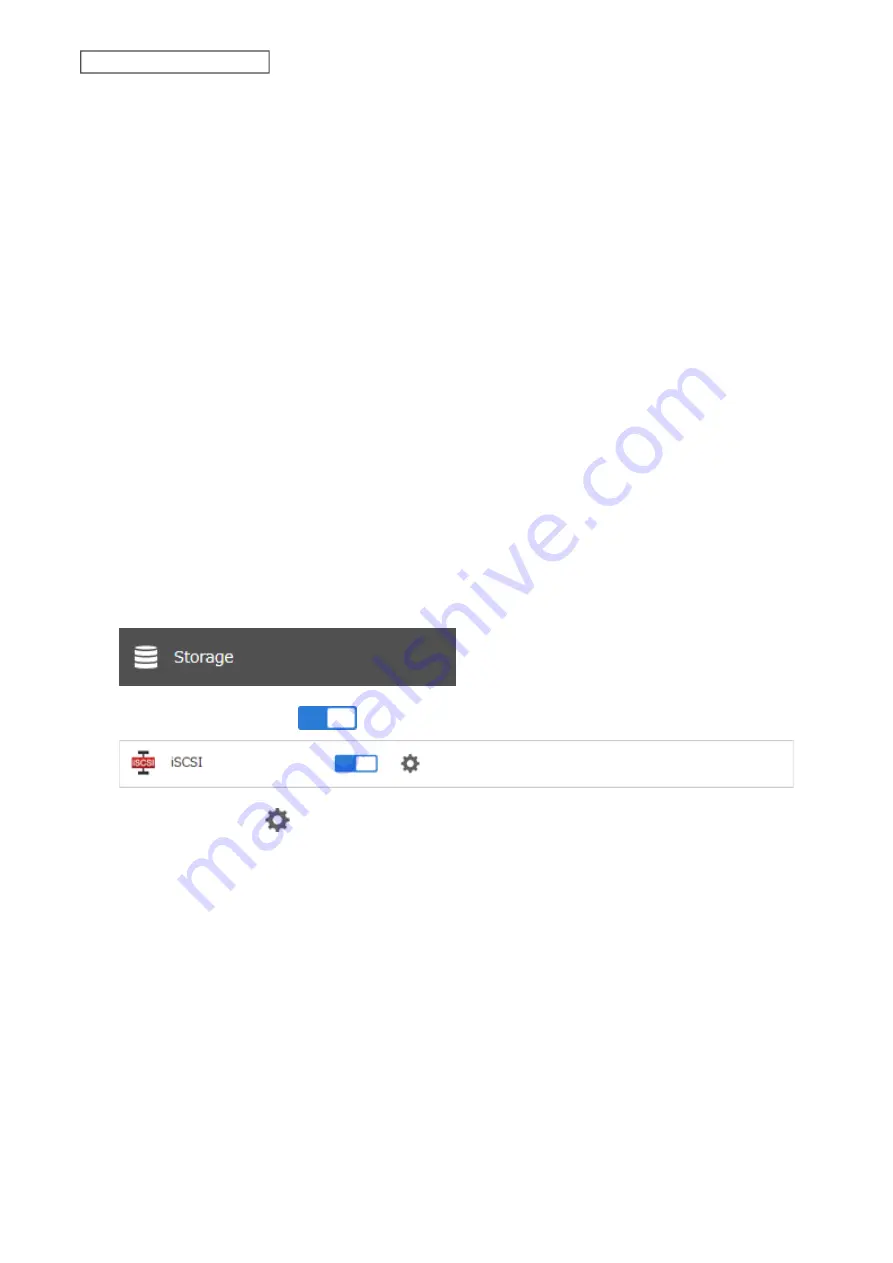
1
From Settings, click
Storage
.
2
Move the iSCSI switch to the
position to enable iSCSI.
3
Click the settings icon (
) to the right of “iSCSI”.
63
Chapter 4 Storage Management
Summary of Contents for TeraStation 6000 Series
Page 32: ...3 Click Add Group 31 Chapter 3 File Sharing...
Page 120: ...2 Click Time Machine 119 Chapter 5 Backup...
Page 121: ...3 Click Select Backup Disk 4 Select the TeraStation then click Use Disk 120 Chapter 5 Backup...
Page 123: ...7 Time Machine will count down from 120 seconds then backup will begin 122 Chapter 5 Backup...
Page 132: ...5 Click Edit 131 Chapter 6 Remote Access...
Page 144: ...4 Click the Options tab 5 Click Edit 143 Chapter 6 Remote Access...
Page 153: ...4 Click the Options tab 152 Chapter 6 Remote Access...
Page 154: ...5 Click Edit 153 Chapter 6 Remote Access...
Page 169: ...11Click the NFS Rules tab 12Click Add 168 Chapter 7 Advanced Features...


