


1
Download the application for the authentication server, “Boot Authentication Tool”, from the
and install it onto the Windows PC.
2
Register the specific port number that is used on the application as a firewall exception rule. Navigate to
Control Panel
>
System and Security
>
Windows Defender Firewall
on the authentication server.
3
Click
Advanced settings
.
4
Click and right-click
Inbound Rules
, then click
New Rule
.
5
Select “Port” and click
Next
.
6
Select “TCP”, enter the port number that is used on the application to the right of “Specific local ports”, and click
Next
. The default port number on the application is “7010”. The port number can be confirmed on the
Options
tab of the application.
7
Click
Next
, then click
Next
again.
8
Enter a desired name for the setting and click
Finish
to complete.
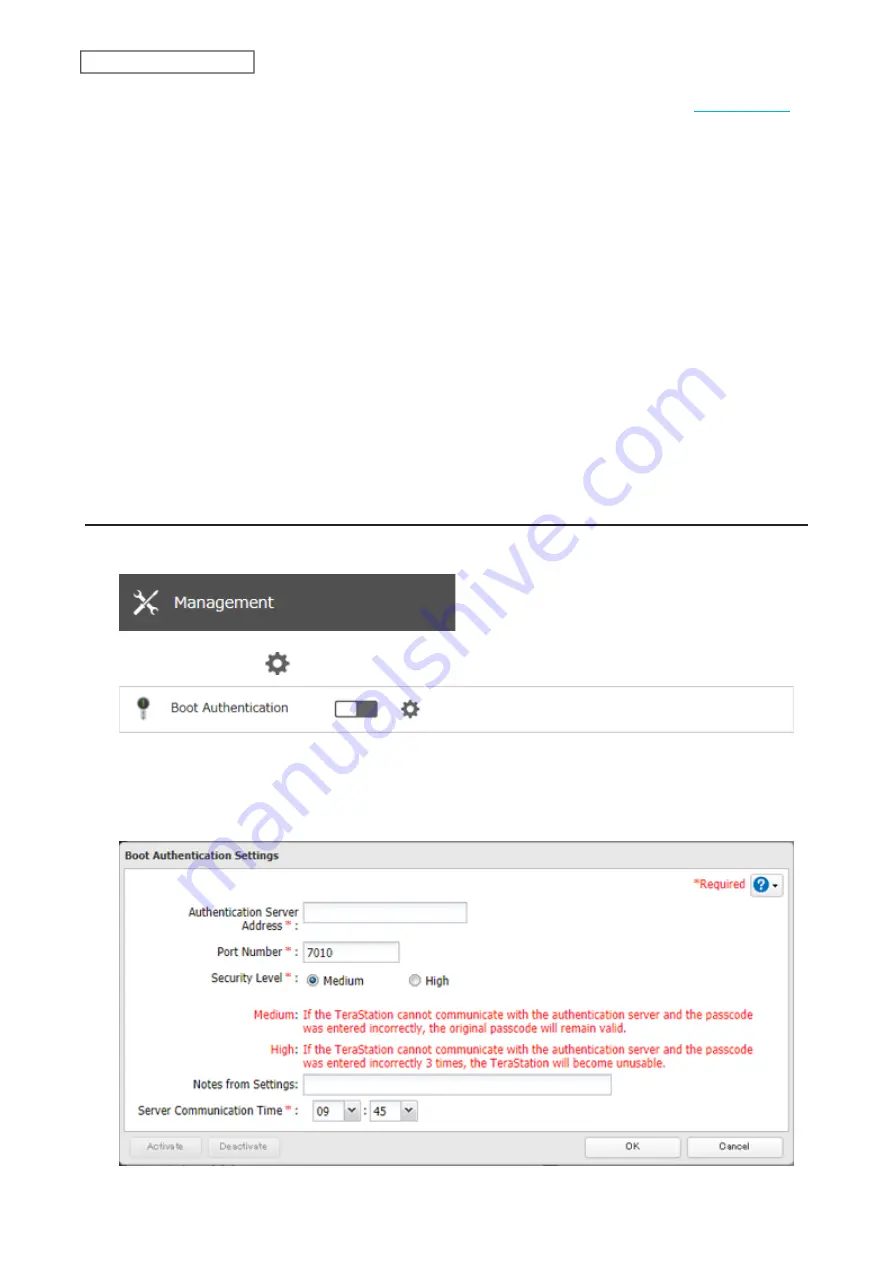
Configuring Boot Authentication on the TeraStation
1
From Settings, click
Management
.
2
Click the settings icon (
) to the right of “Boot Authentication”.
3
Click
Edit
.
4
Enter the authentication server’s IP address or hostname and port number, specify the security level and
communication time settings, then click
Activate
.
198
Chapter 7 Advanced Features
Summary of Contents for TeraStation 6000 Series
Page 32: ...3 Click Add Group 31 Chapter 3 File Sharing...
Page 120: ...2 Click Time Machine 119 Chapter 5 Backup...
Page 121: ...3 Click Select Backup Disk 4 Select the TeraStation then click Use Disk 120 Chapter 5 Backup...
Page 123: ...7 Time Machine will count down from 120 seconds then backup will begin 122 Chapter 5 Backup...
Page 132: ...5 Click Edit 131 Chapter 6 Remote Access...
Page 144: ...4 Click the Options tab 5 Click Edit 143 Chapter 6 Remote Access...
Page 153: ...4 Click the Options tab 152 Chapter 6 Remote Access...
Page 154: ...5 Click Edit 153 Chapter 6 Remote Access...
Page 169: ...11Click the NFS Rules tab 12Click Add 168 Chapter 7 Advanced Features...


