


R5905948 /12
Event Master Devices
219
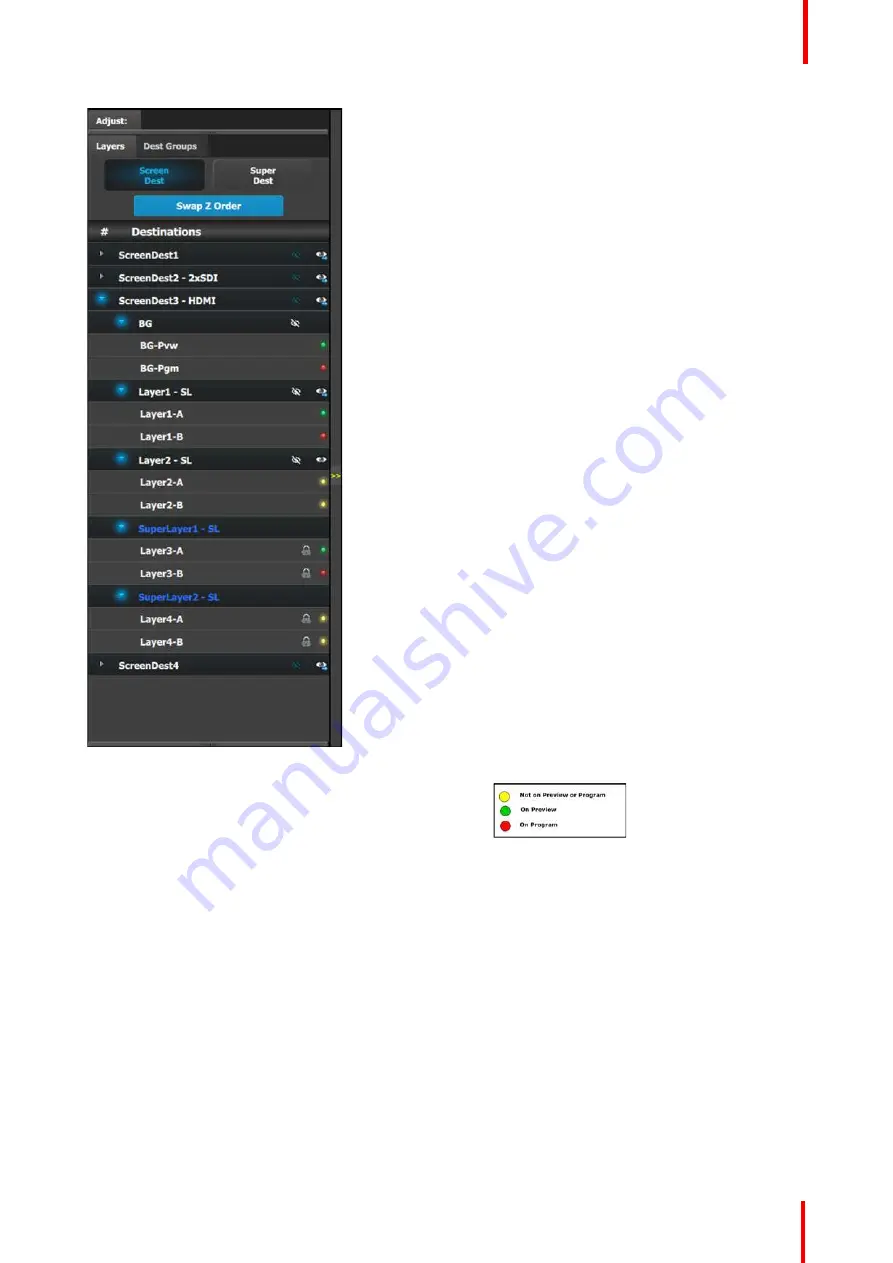
This menu provides:
•
A button to select Screen Destinations and a
button to select Super Destinations.
•
A
Swap Z order
button that allows for layers that
are in the same Destination and of the same size
and type to be swapped.
•
A list of the available Screen Destinations (or
Super Destinations) and the layers associated with
each Screen or Super Destination.
-
Destinations
: Provides list of all destinations
that are available in the Programming page.
Each destination can be expanded to reveal
the Background and the layers assigned to
them.
◦
The outlined
“
eye
”
with a backslash through
it acts as a toggle to hide or show the BG
and Layers to the Relative Preset recorder.
When the icon is white, the item is "shown";
when the icon is blue, the item is "hidden."
When the BG or Layers are "Hidden" they
may or may not be in use in the workspace,
and they will not be part of the "snapshot"
taken when a Relative Preset is saved and
recalled.
◦
The filled-in
“
eye
”
icon clears or replaces
the layers from the Preview destination.
This button works in a toggle mode. When a
small blue arrow is indicated below the eye,
the layer is on Preview. If no blue arrow is
evident, the layer is cleared from Preview.
-
BG and ScreenDest
: Backgrounds and
Destinations layers can be further expanded to
reveal the A and B sources that are used in the
transitions.
-
LEDs
: The LEDs provide an indication of the
“
A
”
and
“
B
”
backgrounds or layers.
Note that there is no A or B side of the scaler,
only A and B usage, all layers are independent
of each other in respect to Z-order.
Image 6-84
Swap Z order rules
There are several rules that apply when changing Z order:
1.
Can only swap Z order on layers in the same Destination.
2.
Can only swap Z order on layers that are of the same size (SL, DL, or 4K) and type (Mix or Single).
How to swap Z order
1.
Click on
Swap Z order
button to enter in the Swap Z order mode.
2.
Click on 1 layer at a time and drag it to a different location in the list.
How to access the layer adjustments
Adjustments to layers are performed in the
“
Adjust
”
panel:
1.
Select the layer from the list on the Layers tab.
Summary of Contents for Event Master E2 Series
Page 1: ...ENABLING BRIGHT OUTCOMES User s Guide Event Master Devices...
Page 12: ...R5905948 12 Event Master Devices 12...
Page 24: ...R5905948 12 Event Master Devices 24 Safety...
Page 52: ...R5905948 12 Event Master Devices 52 General...
Page 82: ...R5905948 12 Event Master Devices 82 Hardware orientation...
Page 102: ...R5905948 12 Event Master Devices 102 Front Panel Menu orientation...
Page 272: ...R5905948 12 Event Master Devices 272 Image 6 137 EM GUI orientation...
Page 304: ...R5905948 12 Event Master Devices 304 Updating firmware...
Page 326: ...R5905948 12 Event Master Devices 326 Image 9 28 General operation example...
Page 382: ...R5905948 12 Event Master Devices 382 Preventive maintenance actions...
Page 444: ...R5905948 12 Event Master Devices 444 E2 Maintenance...
Page 528: ...R5905948 12 Event Master Devices 528 EC 200 EC 210 Maintenance...
Page 569: ...569 R5905948 12 Event Master Devices Troubleshooting C...
Page 572: ...R5905948 12 Event Master Devices 572 Troubleshooting...


