background image


Maintenance and Service  


NXT Owner’s Manual, NXT-UM01, MAN2010   

91 

Symptoms 

Possible Cause(s) 

Corrective Action(s) 

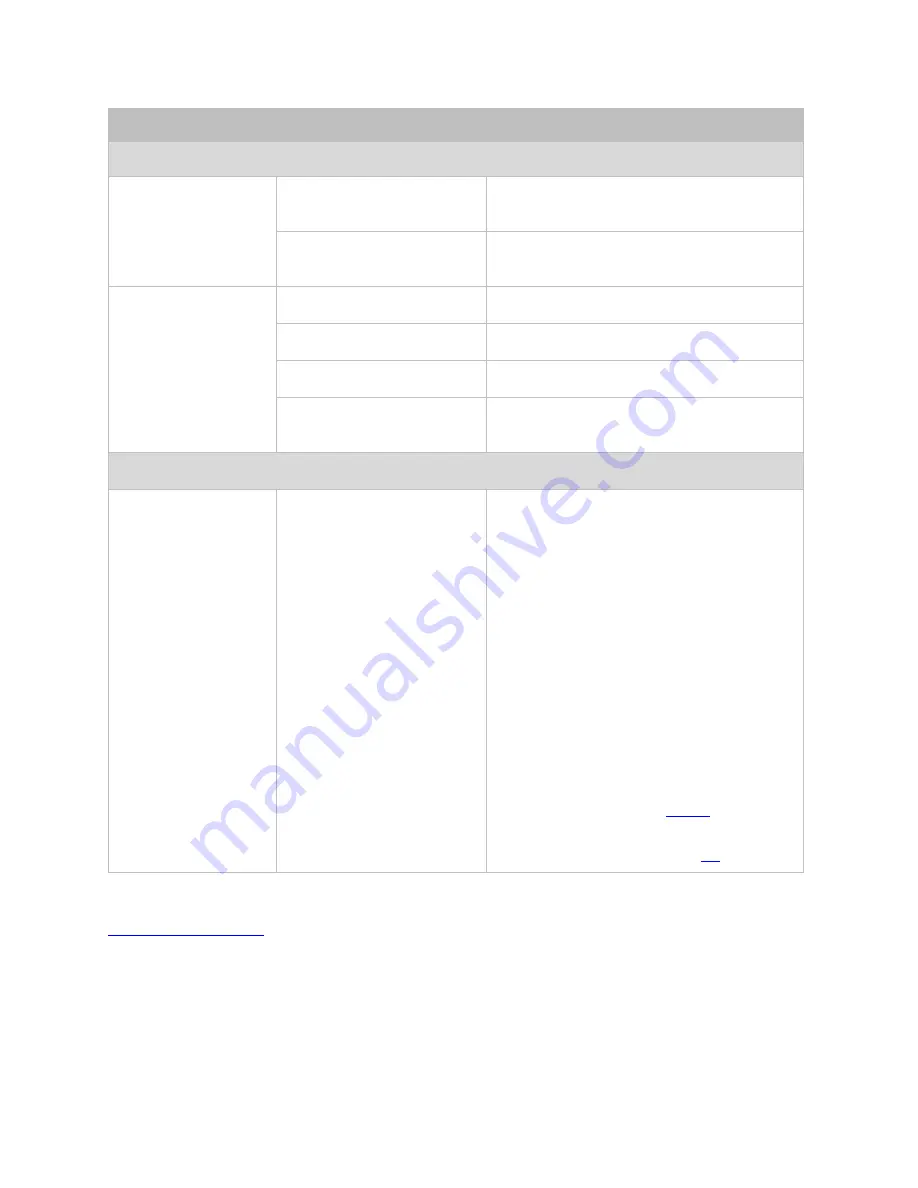
Printer 

Printer LED does 

not light up? 

Printer power cable 

unplugged? 

Plug in printer power cable and try 

again. 

Printer not turned on? 

Turn on printer by pressing printer 

power button. 

Printer Error LED on 

steady or flashing? 


Printer paper out? 

Load printer paper. 

Printer cover open? 

Close cover of printer. 

Printer out of ink? 

Replace printer cartridges. 

Printer paper jammed or 

misfed? 

Clear the jammed paper and then 

press the paper feed button. 

Software 

Valsalva readings 

are being marked 

automatically as 

coughs.  

When performing 

Valsalva procedure, 

patient is triggering a 

sharp rise in pressure 

resembling a cough 

spike? 

Activate Bristol cough marker in the 

workflow configuration.   
Click on 

Settings

>

Workflow


Settings

>

Phases

.  Create a copy of 

the workflow.  In each study phase 

scroll to the 

Workflow Additional 

Configuration Items

 subtitle and de-

select 

Auto Cough artifact 

detection

.   

Select 

Auto Bristol artifact 

detection

 and save changes to custom 

Workflow.  Use the new custom 

workflow to complete test with the 

patient.   
For more information on custom 

workflows refer to the 

Study


Management 
Workflows section on page 

50

 
If problems continue, contact the LABORIE Service team at 1-800-333-1039 or email 

[email protected]


Содержание NXT Series

Страница 1: ...NXT Owner s Manual NXT UM01 V9 00 MAN2010 NXT Owner s Manual Version 9 00 ...

Страница 2: ...s of LABORIE devices in this publication are property of LABORIE and may not be reproduced without the prior written permission of LABORIE Copyright 2019 2020 LABORIE Document Number NXT UM01 Version Number V9 00 Release Date May 1 2020 LABORIE Headquarters 6415 Northwest Dr Unit 10 Mississauga Ontario Canada L4V 1X1 Customer Service 1 905 612 1170 Fax 1 905 612 9731 LABORIE International Medical ...

Страница 3: ... the Urocap NXT 21 2 4 Preparing the Roam NXT 21 2 5 Setting Up Consumables and Preparing the Patient 22 Infusion Pump Tubing Setup 22 2 5 1 1 Replacing the Pump Tubing 23 Setting Up T DOC Air Charged Catheters 23 Placing the EMG Patch Electrodes 25 Performing Roam NXT Patient Setup 25 How to Perform a Study 26 3 1 Starting a Study 26 3 2 FreeFlow Study 28 Starting the FreeFlow Study 28 Performing...

Страница 4: ...nting the Study Result Optional 36 3 8 Troubleshooting 36 Synergy Software 37 4 1 User Access Control 37 Login 37 Creating User Accounts 38 4 1 2 1 User Account Setup and Password Reset 38 4 1 2 2 Managing User Role 40 4 2 Sections and Icons in the Main Window 41 Overview of Sections 42 Overview of Icons in the Title Bar 42 4 2 2 1 Settings 42 4 2 2 2 Admin 43 4 3 Patient Management 43 Patients 43...

Страница 5: ...4 5 1 1 Slide Sidebar 57 4 5 1 2 Consumable Traceability 58 Procedure Recording Phases 59 Questionnaire 60 Reports 60 4 5 4 1 Editing 60 4 5 4 2 Adding Comments 61 4 5 4 3 Quick Results and Nomograms 62 4 5 4 4 Normal Values 63 4 5 4 5 Video Images 63 4 5 4 6 Sending Reports to EMR 65 Review 65 4 6 UDS Intelligence 67 Quality Control QC 67 4 6 1 1 Pre test Quality Control 67 4 6 1 2 Protocol Guida...

Страница 6: ...pleting Cleaning and Disinfection 77 5 1 5 1 Reconnect and Reassemble 77 5 1 5 2 Packaging and Storage 77 5 2 Preventive Maintenance 78 General Maintenance 78 5 2 1 1 Caring for the Interlocked Roam NXT PIM NXT 78 5 2 1 2 Caring for the Urocap NXT 78 Caring for Cart and its Components 79 5 2 2 1 Safely Moving the Cart 79 5 3 Verifying Calibration 81 Urocap NXT Verifying Calibration 81 5 3 1 1 Chec...

Страница 7: ...tery Replacement 95 6 4 NXT Docking Station 95 Infusion Pump NXT 95 6 5 Infusion Volume Transducer 96 6 6 Roam NXT 97 Replacing the PIM NXT 98 6 6 1 1 Removing the PIM NXT 98 6 6 1 2 Attaching New PIM NXT 98 6 6 1 3 Removing and Attaching the Clip 99 Roam NXT Charging the Battery 99 6 7 Urocap NXT 100 Urocap NXT Charging the Battery 101 Urocap NXT Charging Hub 102 Urocap NXT Configuration with Wal...

Страница 8: ...NXT Owner s Manual NXT UM01 MAN2010 viii Medical Device Label Placement 111 Appendix C Electronic Compatibility EMC 112 ...

Страница 9: ...gin Page 37 Figure 22 Accessing User Setup Application 38 Figure 23 User Setup Window 39 Figure 24 Password Reset 39 Figure 25 Accessing the Manage User Role Application 40 Figure 26 Manage User Role Window 40 Figure 27 Adding New User Role 41 Figure 28 Synergy Main Window Reading Guide 41 Figure 29 Patients Section 43 Figure 30 Default Patient Details 44 Figure 31 Export Document Window 45 Figure...

Страница 10: ...7 Roam NXT Device Diagnostics 84 Figure 68 Infusion Pump NXT Diagnostics Window 85 Figure 69 NXT Pro Isolation Diagram 86 Figure 70 Urocap NXT and Wall Charger Isolation Diagram 86 Figure 71 Bluetooth Dongle NXT 93 Figure 72 Remote Control NXT Membrane Icons 93 Figure 73 NXT Docking Station 95 Figure 74 Status of the Pump 95 Figure 75 Infusion Volume Transducer Setup 96 Figure 76 PIM NXT Connected...

Страница 11: ...erview 57 Table 8 QC Score Allotment Process 70 Table 9 Remote Control NXT Icons 94 Table 10 Remote Control NXT LED Signals 94 Table 11 Roam NXT LED Signals 100 Table 12 Urocap NXT LED Signals 101 Table 13 Equipment Specifications 109 Table 14 Classifications and Directives 109 Table 15 Symbols Glossary 111 Table 16 Guidance and Manufacture s Declaration Electromagnetic Emissions 112 Table 17 Guid...

Страница 12: ...rt 1 1 Intended Use The NXT family are medical device systems used for Urodynamics and pelvic floor assessment These systems can display record and store data such as vesical urethral and abdominal pressures urine flow and volume and pelvic floor EMG from the patient for diagnostics purposes only 1 2 Indications of Use The NXT Urodynamics System is indicated for urologic diagnostic testing to aid ...

Страница 13: ... and display and store data Bluetooth Dongle NXT Allows wireless communication between modules and the system Remote Control NXT Wireless and battery powered device which allows control of the system from a distance Optional Equipment Video Card Adaptor Allows information from an external image source to be recorded by the system Printer Allows hardcopy reports to be created Accessories The access...

Страница 14: ... software license agreement IMPORTANT Ensure that Windows automatic updates are always enabled LABORIE strongly recommends that BitLocker remain enabled on the NXT system to comply with the HIPAA standard regarding data privacy and security Ensure that an antivirus program is always enabled For more information about the use of antivirus programs refer to the Computer Virus Protection section on p...

Страница 15: ...ping the carrying cases and cartons provided with the devices to use during transport if the equipment must be sent in for service Standard NXT System Configuration NXT Pro Cart Plenary PC All In One AIO Computer PN POC W243 Printer Inkjet Pump Hub Docking Station with Pump Uroflowmeter Urocap NXT 1 2 UDS Roam NXT 2 Electronic Medical Records EMR Add on feature Video Add on feature Table 1 NXT Sys...

Страница 16: ...all by trained personnel ONLY Ensure all wheels are locked during testing procedures to prevent injury to the patient Do not lean on the equipment or hang excessively weighted objects on the platform only hang LABORIE standard accessories on the platform Exhibit caution when adjusting the PC and monitor from its lowest or highest position ensure all extremities are clear of moving parts If the PC ...

Страница 17: ...nly connect this equipment to a mains power supply with protective earth This device is intended for use in a clinical environment with controlled EMC standards to limit potential interference The NXT System may be adversely affected by Bluetooth cellular or EMC interference Minimize interference from other Bluetooth devices by setting up all modules of the system in proximity to each other Only c...

Страница 18: ...lever with the bottom of your foot as shown in Figure 2 To unlock push the lever up from underneath with the top of your foot Connect the PIM NXT to the Roam NXT For instructions on how to connect these devices refer to the Replacing the PIM NXT section on page 98 If utilizing Video function for Urodynamic study prepare the connecting device Synergy supports HDMI and DVI connections provided by th...

Страница 19: ...ess the ON button as indicated in the Figure 4 below Figure 4 Connecting the NXT Pro Cart to Supply Mains For information on charging the Roam NXT refer to the Roam NXT Charging the Battery section on page 99 For information on charging the Urocap NXT refer to the Urocap NXT Charging the Battery section on page 101 Refer to the Maintenance and Service section on page 71 for information on cleaning...

Страница 20: ...ies and Equipment Prior to beginning a Urodynamics study the user should ensure that the following supplies and equipment have been gathered and prepared for use during the procedure IMPORTANT Place the required supplies on a table or tray for easy access when preparing the patient for full Urodynamic testing Procedure Specific items Straight catheter Catheterization supplies such as cleansing swa...

Страница 21: ...f the commode chair Carefully place the Urocap NXT transducer on the floor Place the graduated beaker on top of the transducer Place the commode chair and funnel over the Urocap NXT and beaker NOTE For setup instructions using the Urocap NXT Stand refer to MAN1000 IMPORTANT Ensure all preparation steps are completed before starting a study in Synergy 2 4 Preparing the Roam NXT Ensure the Roam NXT ...

Страница 22: ...igure 6 Figure 6 Consumable Traceability Preview Window Infusion Pump Tubing Setup LABORIE Infusion Pump Tubing is intended for single use only Do not re use reprocess or resterilize pump tubing Use of the Infusion Pump Tubing outside of its intended use may affect pump accuracy Do not run the pump at a speed exceeding the limitation of the catheter IMPORTANT Always use only LABORIE Infusion Pump ...

Страница 23: ... pump Synergy automatically displays pump activation markers Attach the luer connector of the tubing to the fill connection of a prepared catheter 2 5 1 1 Replacing the Pump Tubing To replace the pump tubing Close the tubing clamp Disconnect the pump tubing from the catheter Remove the pump tubing spike from the bag and empty the saline bag Open the pump door and remove the pump tubing Discard the...

Страница 24: ...the PIM NXT and push gently until they lock Verify that all catheters are connected properly by giving a gentle tug on the catheter connector Do not pull catheter lumens Close any doors of the PIM NXT which are not in use to seal the empty transducer channels from dirt or debris IMPORTANT The catheter connectors are color coded blue Pves red Pabd and yellow Pura per industry standard Figure 7 Cath...

Страница 25: ... T DOC catheters Placing the EMG Patch Electrodes Enter consumables information into the Consumable Traceability section in the Preview phase Place two electrodes peri anally at the 10 o clock and 2 o clock position or at the 9 o clock and 3 o clock position as close to the anal verge as possible Place the third electrode on a bony prominence such as the knee or on a fatty portion of the inner thi...

Страница 26: ...n window For information on how to login to the Synergy application refer to the Login section on page 37 Ensure that all devices required for the study are ready i e fully charged Refer to the Hardware section on page 93 for instructions on charging the NXT System modules Verify that all devices required for the study are connected to the NXT System either via Bluetooth technology or USB cable Th...

Страница 27: ...etails If required input any relevant past medical history under the History tab Once the patient has been added select the patient and proceed to the next step NOTE The following fields are mandatory for completing new patient setup First Last and Birth Date To begin the study ensure a patient is selected in the Patients section Within the Patient Details section select any applicable symptoms un...

Страница 28: ... that the Urocap NXT device is ready to use i e fully charged with the beaker in place For information on preparing the Urocap NXT refer to the Preparing the Urocap NXT section on page 21 Performing a FreeFlow Study 3 2 2 1 Preview Phase The Preview phase begins as represented in Figure 14 For information about the icons in the Preview phase refer to the Procedure Preview Phase on page 57 Figure 1...

Страница 29: ... window to resume Figure 15 FreeFlow Record Phase The flow phase will stop 60 seconds after voiding ends A Post Voided Residual window Figure 16 will pop up Select the preferred method of capturing Post Voided Residual PVR meaning the amount of fluid remaining in the bladder at the completion of the voiding phase Use of the PVR functions is at the discretion of the overseeing physician a Calculate...

Страница 30: ...igure 17 The user can apply the default configuration for the report or customize the report For information on customizing the report refer to the Reports section on page 60 Figure 17 FreeFlow Preview Report Click the Finish button The report will appear under the Studies tab in the Patient Details section The operator may begin a secondary test with the same patient under the guidance of the ove...

Страница 31: ...fusion Pump NXT and Bluetooth Dongle NXT Ensure all modules are connected in the Synergy Software Ensure that the Urocap NXT and Roam NXT are fully charged The Synergy Software will recognize the PIM NXT and the Roam NXT as one device under the title Roam NXT Prepare the Urocap NXT as detailed in the Preparing the Urocap NXT section on page 21 Performing a Urology Urodynamic Study 3 3 2 1 Preview ...

Страница 32: ...luid button A popup window will appear and the study will pause If desired update the Fluid Density setting using the dropdown menu available on the popup window and click OK to resume the study Fluid density options must be configured in the Workflow Configuration window before starting the study Refer to the Customizing Workflows section on page 51 Encourage the patient to give feedback on sensa...

Страница 33: ...sure Flow Voiding Phase The voiding phase will stop 60 seconds after voiding ends A Post Voided Residual window Figure 16 will pop up Select the preferred method of capturing Post Voided Residual PVR meaning the amount of fluid remaining in the bladder at the completion of the voiding phase Click OK to move to the Report 3 3 2 5 Urology Urodynamics Report A preview of the Pressure Flow Report will...

Страница 34: ... the Infusion Pump and begin filling the bladder Click Smart Pump Up or Smart Pump Down buttons to increase or decrease the pump speed respectively NOTE To change the infusion bag click the Change Infusion Fluid button A popup window will appear and the study will pause If desired update the Fluid Density setting using the dropdown menu available on the popup window and click OK to resume the stud...

Страница 35: ...e a Filling or Cystometry phase Stress Test Commence the stress test once the patient s bladder had been infused with 150 200ml of fluid Position the patient so that the meatus the urinary opening is easily observed Select the Stress Test toggle button to begin the stress test Clicking the Stress Test toggle button will automatically stop the pump If a leak is observed select the Leak button to ma...

Страница 36: ...proximal to the bladder neck to repeat the profile Once the required number of profiles is complete finish the selected study 3 6 Finishing the Studies When all tests have been completed remove any catheters and EMG patches from the patient and dispose of them in accordance with hospital clinic procedures Empty the beaker The beaker should then be thoroughly washed and reused Refer to the Maintena...

Страница 37: ... Intelligence 4 1 User Access Control Login To login to Synergy follow the steps below Double click the Synergy shortcut icon on the desktop or launch the Synergy application from the LABORIE Dashboard The Synergy Login Page will be displayed Figure 21 Upon first login ensure to accept the End User License Agreement Input account User Name and Password into the Synergy Login Page Initial access in...

Страница 38: ...s Domain accounts are intended to link to the Active Directory of the user institution if creating domain accounts ensure that all roles within Synergy align with the Active Directory User Group roles of the user institution 4 1 2 1 User Account Setup and Password Reset To create a new account in Synergy the user must have a Local Admin or Domain Admin account To create new user accounts follow th...

Страница 39: ...active account select the existing account from the user list Under the Update User Info tab enter the new password and press OK Figure 24 Figure 24 Password Reset NOTE Local and Domain Users may reset their own passwords ONLY Local or Domain Admin access is required to reset password information for other users ...

Страница 40: ...nstructions provided below for managing user roles Click the Admin icon located on the Synergy title bar and select Mange User Role Figure 25 Accessing the Manage User Role Application The Manage User Role window will pop up To create a new role press Add Figure 26 Manage User Role Window Create a new role by entering a new title in the Role category and selecting an Authentication Type from the d...

Страница 41: ...n icon located on the Synergy title bar and select User Setup Update User Info Tab Select the newly created role press Save 4 2 Sections and Icons in the Main Window This section overviews the various features accessible from the Main Window Figure 28 Synergy Main Window Reading Guide Title Bar New Studies Patients Patient Details ...

Страница 42: ...ew Overview of Icons in the Title Bar A brief description of the icons located on the Title Bar in the Main Window is provided in Table 3 below Refer to Figure 28 for a visual guide showcasing the location of all sections described Icons Description Help Click this icon to launch the help file Settings Click this icon to access System Settings Device Manager Patient Settings Database Management an...

Страница 43: ...accounts and update user information for Local users Manage User Role Displays the Manage User Role window Change Password Displays the Change Password window you can change the Synergy login password Audit Log Viewer Displays the Audit Log Details table which contains the event logs for Synergy software on the local machine Table 5 Admin Options Overview 4 3 Patient Management Patients The Patien...

Страница 44: ... be customized for the Patients section and the Patient Details Mandatory fields are marked with a red asterisk 4 3 1 2 Deleting Patient Data Select the patient in the Patients section and right click to open the context menu Select Delete Patient Name option A User Notification window will appear Click the Ok button to proceed NOTE Deleted Patients can be restored from the Database Management win...

Страница 45: ... the user to transfer study results from one patient to another if the wrong patient was selected Exercise caution when using this functionality Select the patient in the Patients section Select the study to reassign under the Studies tab in Patient Details section Right click on the study and select the Reassign Study option Select the appropriate patient to reassign the study within the Patients...

Страница 46: ... in the EMR column Figure 32 Figure 32 Patient List EMR By default this EMR column is not visible To make it visible navigate to Settings Patient Display Settings By default the EMR field will be off Select Table in the table options column and click Save Figure 33 Figure 33 Patient Settings EMR NOTE EMR is an add on feature that must be configured to interact with Synergy Contact LABORIE Service ...

Страница 47: ...le under the Symptoms tab Figure 34 and can include Involuntary Leakage on Effort Exertion Involuntary Leakage associated with urgency and also effort exertion Post Prostatectomy Leakage Urgency with Involuntary Leakage Low Capacity High Capacity Frequency Urgency without Leakage Decreased Bladder Sensation Increased Bladder Sensation Absent Bladder Sensation Feeling of incomplete bladder emptying...

Страница 48: ... select a different location click the Browse button Click OK to save changes or click Cancel to exit By default each time patients are archived a new folder will be created in the selected location Click the Archive button A pop up window will appear to confirm a successful archive Archive status will also be displayed under the status column IMPORTANT Once a patient is archived data associated w...

Страница 49: ...atients tab in the Database Management window Figure 37 Figure 37 Database Management Deleted Patients Select the patients for data restore using the check boxes provided To select patients individually select individual check boxes To select all patients select the checkbox located on the header Click the Restore button a User Notification window pops up click the OK button to restore the selecte...

Страница 50: ... a single pressure bladder catheter o Preview Voiding Preview 2 Filling Voiding UPP Urogynegology 3P Urodynamics o Five phase procedure for Urodynamics using a single pressure bladder catheter o Preview Voiding Preview 2 Filling Voiding Cystometry o Two phase procedure for Urodynamics with a combined filling and voiding phase called Cytometry o Preview and Cystometry The workflows described above ...

Страница 51: ...e Synergy Main window click OK or continue customization Configure custom workflows by completing the following steps Customize workflow step naming by selecting a step under Workflow Steps and assigning a new name under Step Name if desired Update Workflow Steps layout by using the plus up down and delete icons provided Select Procedure from under Workflow Steps Customize Global Channel Phase and...

Страница 52: ...g a Phase to a Custom Workflow iii Adjust Fluid Density in the Phases tab by entering a new value The Fluid Density setting is available in the filling voiding and UPP phases If updating Fluid Density settings ensure to update in all relevant phases Fluid density can be changed during a study using the Change Infusion Fluid button to fluid densities previously saved to the workflow Click the fluid...

Страница 53: ...following setting tab is available under the Report Workflow Step Settings Silent Report Execution Landscape Graph Scaling The following setting tab is available under the Review Workflow Step Settings Automatically Execute Review Control Panel 4 4 2 2 Customizing Control Panel The control panel is a customizable space available in each study phase window providing control buttons that allow the u...

Страница 54: ...t the desired number of Control Panel buttons are provided Use the Row Count and Column Count fields to increase or decrease the number of buttons shown in the control panel To add or change a button s label click on the button to launch the select action for button window Figure 41 Select the label of choice and press OK To remove a button label click the button to be adapted and select Empty But...

Страница 55: ...flow 4 4 2 3 Accessing Hardware Channels To access hardware channels click the Settings icon in the title bar and then click Workflow Editor Select the required workflow then navigate to the Channels tab If hardware channels are not set correctly a red exclamation point icon will appear on the Channels tab as shown in Figure 43 Figure 43 Workflow Configuration with Hardware Channel Error To set ha...

Страница 56: ...he start study button when the device battery is below 15 connect the device to the applicable charging hub Connect the Urocap NXT to power using the NXT Magnetic Pogo Pin Cable Urodynamic studies cannot be completed with the Urocap NXT seated within the NXT Hoop Refer to the Urocap NXT section on page 100 for information on using the NXT Magnetic Pogo Pin Cable 4 5 Workflow Steps Studies in Syner...

Страница 57: ...elow provides an overview of each icon s functionality Slide Sidebar Icon Button Description Patients Displays the Patients section Patient Details Displays the Patient Details History Displays the Patient History Consumable Traceability Displays the Consumable Traceability For more information on Consumable Traceability refer to the Consumable Traceability section on page 57 Quality Control Check...

Страница 58: ...intended to act as a standalone indicator or as an alert for consumable scanning status Operators must verify that consumables have successfully scanned into consumable traceability by verifying their addition in the Consumable Traceability window Figure 46 Consumable Traceability Consumables are classified as automatic and manual Follow the instructions provided below for scanning different types...

Страница 59: ...are for other patients Synergy allots catheters and infusion pump tubing two hours of activity once registered Synergy considers consumables as registered to a specific patient once the user proceeds to the recording phases with the submitted consumables Procedure Recording Phases Once setup activities are complete move to the recording phases of the Procedure workflow step During the Recording ph...

Страница 60: ...e study the user may click the Pause button to pause the study and click the Resume button to resume the study Questionnaire The Questionnaire workflow step provides optional questionnaires to aid in better understanding patient problems and the study being conducted The user may choose to pose the questions to the patient or skip and proceed to the Report step NOTE The Questionnaires are availabl...

Страница 61: ... enable or disable various data fields by clicking the checkbox next to the required data field in the Configuration Settings The position of some data fields in the report may be moved using the Up and Down buttons To move a data field select the applicable field The arrow marks will appear beside the selection Click the appropriate arrow mark to move the data field depending upon the desired dir...

Страница 62: ...nges to the report 4 5 4 3 Quick Results and Nomograms Quick Results and Nomograms generated by Synergy are intended for use as quick references complementary to the complete study data Study results are calculated from the data recorded by NXT system transducer channels during the procedure values are rounded to a single decimal place for user viewing Calculations and nomograms are calculated usi...

Страница 63: ...o Images Video Images is a data field available for activation in report customization for applicable workflows When Video Settings are activated in the workflow configuration of a study the Video panel provides access to live video and image capture With this feature the operator can record short videos and capture images during the study Videos and images can be viewed in the Review workflow ste...

Страница 64: ...elect the images required for the report from each tab Press the close icon to exit the window Images selected for inclusion in the report will display a blue circle in the upper right corner of the thumbnail The number of images selected from each image burst tab will be displayed within the blue circle on the video thumbnail Figure 54 Video Panel Image Selection To incorporate selected images in...

Страница 65: ...seconds then display a message asking if the user wants to continue waiting This 10 second wait time is configurable and can be increased if needed from Synergy application configuration file After 60 seconds from the time the report was sent to EMR the process will timeout and show an Export Failed dialog if no acknowledgement had been received from EMR system Figure 55 EMR Sending Status NOTE Th...

Страница 66: ...dow use the arrows to navigate through images captured during the study Use the vertical red marker to zoom in on a specific portion of the graph Left click and drag the red marker to select the portion of the graph to expand Use the Previous Zoom button in the control panel to return to the previous magnification or click Zoom 100 to view the full graph Move the phase boundaries in the graph Phas...

Страница 67: ... prepare the NXT system for the recording phases of the study The user can expand each module to show actions required for submodules by using the plus minus boxes The color of the module indicates its status If a submodule requires attention the main module will reflect this in its assigned status Figure 57 a If the color of the module is red action is required Grey submodules are provided to giv...

Страница 68: ... and blue a fair score Figure 58 Protocol Guidance Total Score and Phase Score Refer to QC Score and QC Score Summary on page 69 for an overview of how QC score is calculated 4 6 1 3 UDS Intelligence in the Review Workflow Step Compiled features of UDS Intelligence can be referenced in the Review workflowstep Select the Quality Control Icon from the Slide Sidebar From this window the Protocol Guid...

Страница 69: ... field in the report Create a new report copy or select a previously created report copy from the configuration dropdown menu NOTE Refer to the Reports section on page 60 for more information on creating report copies Expand the Report content option by clicking the arrow beside the title Click the checkbox beside the QC Score Summary field to enable this function To save changes to the report cli...

Страница 70: ...Infused Volume 10 EBC Not Possible Infused Volume 10 EBC Sensations None marked 2 marked 3 marked Stress Test Not Possible Performed Vinf 150 ml Max Pves 30 cmH2O if Leak 60cmH2O if no leak Pre test QC Out of Scope Not performed Performed but not passed Baseline Cough passed Cough Check Out of Scope Not performed Done at least once after FS Done every 100 150 ml infused Voiding Phase Blue 0 points...

Страница 71: ...rocessing excluding the AIO PC are compatible with the following cleaning and disinfection reagent QUAT wipes Sani Cloth or equivalent CAUTION LABORIE has not evaluated the use of cleaning disinfection reagents which do not appear on the lists above Use of unapproved reagents could damage the NXT system and should be avoided For questions on the compatibility of a reagent which is not listed above...

Страница 72: ...overview of standard equipment and accessories CAUTION No abrasive tools should be used Do not spray the cleaning reagents on the NXT System components modules accessories or peripherals Do not autoclave the NXT System components modules accessories or peripherals or clean them with sharp tools or abrasives Do not immerse or rinse the NXT System components modules accessories or peripherals Do not...

Страница 73: ...transducer doors while not in use or by the catheter connector during Urodynamic study If dirt or debris is observed in the transducer channels as a part of daily inspection Contact LABORIE for service and or disposal instructions If contamination is observed near the transducer channels during or post procedure follow the instructions provided in the Cleaning the Roam NXT and PIM NXT section on p...

Страница 74: ... cloth Ensure the area is dry to the touch Re insert the vent plug Cleaning the Urocap NXT Accessories and Urocap NXT Stand Rinse and dry the beaker after each use While the beaker can be reused it will discolor over time and may need to be replaced When cleaning the funnel the maximum cleaning temperature should not exceed 80 C 176 F Refer to MAN1000 for instructions on cleaning the Urocap NXT St...

Страница 75: ...d Disinfection Reagents section on page 71 2 Remove the drip tray from the pump Figure 61 and clean it separately with an approved cleaning reagent Figure 61 Pump Rollers and Drip Tray 5 1 3 5 Performing Manual Cleaning This section covers the cleaning method for the Cart Shelves Docking Station Remote Control NXT and peripherals For the Roam NXT PIM NXT Urocap NXT and NXT Infusion Pump ensure to ...

Страница 76: ...ted on the product label of the cleaning solution Ensure to refer to module specific cleaning instructions Ensure the device is dry to the touch before using it to perform another study Once disinfection is complete confirm that each module is working correctly by verifying calibration Refer to the Verifying Calibration section on page 81 for calibration instructions per module IMPORTANT Refer to ...

Страница 77: ...ct and Reassemble If previously disassembled reassemble the Roam NXT and PIM NXT by inserting the PIM NXT into the Roam NXT collar until it is flush Screw together re using the screw supplied with the device Ensure not to overtighten the screw Reattach PIM NXT and Roam NXT belt clips Refer to the Removing and Attaching the Clip section on page 99 Ensure to return the drip tray to the pump and clos...

Страница 78: ...M NXT should be replaced every two years to sustain recording quality As a part of regular maintenance inspect the device transducer channels for any obstructions dirt or debris Any objects inserted into the PIM NXT transducer channels other than the intended catheter connector may cause damage and channel obstruction If an object is trapped inside the cavity do not insert a catheter into that cha...

Страница 79: ...tray into the cart Close and secure all drawers and doors as applicable The workspace drawer stop will click once it reaches the locked position Remove any weight from the NXT Infusion Hook and remove the Infusion Pump Tubing from the Pump NXT Disconnect the cart power cord from the mains power source as well as any accessories Organize and contain any cables and tubing to prevent trip hazards Adj...

Страница 80: ... of damage to the cart Do not lean on trays accessories monitors the main tower or the spine of any carts Keep the monitor free of any obstacles Do not move the cart while connected to the main power source Do not move the cart while connected to separate accessories Do not suspend extra weight or hang anything on the monitors Ensure the maximum weight on the printer shelf and worksurface does not...

Страница 81: ...w the steps provided below NOTE To complete the calibration procedure prepare one LABORIE beaker and 500ml of tap water 1 Login to the Synergy software 2 Connect the Urocap NXT to the Synergy software and set up the hardware channels 5 3 1 1 Checking the Absolute and Relative Weight To begin calibration verification check the total weight measured on the Urocap NXT without a beaker a Place the Uro...

Страница 82: ...eight with water a Take a beaker and measure its weight Wb on the Urocap NXT Press the Zero Weight button b Add 500 ml of water to the beaker c Verify that the Absolute Weight and Relative Weight for the Urocap NXT in the diagnostic window is 500 00 g 3 Wb Water 500ml as exemplified in Figure 65 Figure 65 Urocap NXT Device Diagnostics with Water Roam NXT Verifying Calibration To setup verification...

Страница 83: ...nectors into the EMG input cable Refer to Figure 66 for a visual representation of the signal generator and the Roam NXT setup Legend Abbreviation Definition A1 EMG Positive of EMG signal A1 EMG Negative of EMG Signal GND Ground RLD Right Leg Drive Figure 66 Wiring Diagram EMG Calibration Verification with a Waveform Generator e Once the signal generator and the Roam NXT are connected as displayed...

Страница 84: ...heter connectors into the relevant PIM NXT transducer channels d Click the Settings icon in the title bar then click the System Settings Device Manager option The Device Manager window will pop up e Click the Roam NXT option then click the Run Diagnostics button The device diagnostics window will pop up Figure 67 Figure 67 Roam NXT Device Diagnostics f The Pressure P1 should be approximately 18cm ...

Страница 85: ...Pump NXT option then click the Run Diagnostics button The device diagnostics window will pop up Figure 68 d Press the Zero button e The Total Weight should measure as zero immediately after zeroing To complete calibration verification check the total weight with a saline bag Figure 68 Infusion Pump NXT Diagnostics Window 5 3 3 2 Checking the Total Weight with a Saline Bag To complete calibration v...

Страница 86: ... 50 60Hz Direct electrical con Indirect electrical c J Docking Station UroCap 6 Extension cable Figure 69 NXT Pro Isolation Diagram Urocap NXT and Wall Charger Isolation Diagram Refer to the diagram below in Figure 70 for a visual representation of the method to isolate the Urocap NXT from supply mains when configured with a wall charger For further information regarding electrical isolation conta...

Страница 87: ...ectronic equipment is collected separately and returned to the locally designated recycling service for these types of products Batteries Dispose of any end of life batteries according to local regulations Packaging waste Ensure any packaging waste is collected separately for available national packaging collection and recycling services Packaging is 80 recyclable renewable by weight 5 7 Environme...

Страница 88: ...device connection Computer or Printer cannot power on No power on electrical outlet Ensure electrical outlet is working power cords are not damaged and all power cords are secure at both ends Damaged power cord Power cord not connected properly EMG EMG reading too high low EMG channel scale not optimized Set EMG scale in the Workflow Configuration for Pressure flow Electrodes are wet or generally ...

Страница 89: ...n Preview workflow step Catheter kinked Replace catheter if necessary Pump Pump not running Pump pressure limit reached Reset Pves to zero Check for kinked bladder catheter Ensure Pump pressure does not exceed 150 ml min Pump settings Check Pump and Infusion lines Check if Pump door is closed Check if Pump tubing is inserted correctly Urocap Uroflowmeter signal shows vibration and or spike pattern...

Страница 90: ...oflowmeter Incorrect beaker in use Use beakers supplied by LABORIE only Bluetooth Connection Unable to connect via Bluetooth Connection broken Reduce the distance between the device and the computer The maximum distance between the processor and the computer can be up to 10 meters 33 feet Clear any physical barriers between the device and the computer Unable to connect devices to Bluetooth at firs...

Страница 91: ...salva readings are being marked automatically as coughs When performing Valsalva procedure patient is triggering a sharp rise in pressure resembling a cough spike Activate Bristol cough marker in the workflow configuration Click on Settings Workflow Settings Phases Create a copy of the workflow In each study phase scroll to the Workflow Additional Configuration Items subtitle and de select Auto Co...

Страница 92: ... are displayed in Synergy software contact the LABORIE Service team at 1 800 333 1039 or email service laborie com Hardware Failure Device is not ready for another process Data could not be written to EEPROM Data could not be read from EEPROM SD card error Study map full SD card full SD card not present SD card faulty ...

Страница 93: ...le NXT as shown in Figure 71 allows modules such as the Roam NXT and Urocap NXT to wirelessly communicate with the NXT system Figure 71 Bluetooth Dongle NXT 6 3 Remote Control NXT The Remote Control NXT Figure 72 is a battery powered device which connects to the computer wirelessly via Bluetooth technology This device allows the user to control the NXT System from a distance Figure 72 Remote Contr...

Страница 94: ...Start Stop Urgency Marker UPP Puller Reset Leak Marker Record Video Burst User Custom 1 4 Video Burst Start Stop User Custom 5 8 Record Video Snapshot Table 9 Remote Control NXT Icons Remote Control NXT LED Signals The Roam NXT contains a LED light to convey status of device Table 10 provides descriptions of LED indications per color LED Status Description Blinking Blue Connecting through Bluetoot...

Страница 95: ...ing Station Figure 73 includes the Infusion Pump NXT and pump controls the docking stations for the Roam NXT and the SmartSense tag reader Figure 73 NXT Docking Station Infusion Pump NXT The Infusion Pump NXT is part of the docking station located on the NXT Cart The Infusion Pump NXT is used to fill the patient s bladder with fluid during Urodynamic Study The maximum pump rate of the Infusion Pum...

Страница 96: ...t the Infusion Pump Tubing to the saline bag IMPORTANT Ensure that the infusion line is not pulled tight or the transducer reading will not be accurate Do not allow the saline bag to touch any other mechanical component or module of the system The saline bag must free hang from the NXT Infusion Hook to allow the transducer to measure an accurate weight Figure 75 Infusion Volume Transducer Setup Th...

Страница 97: ... and needles The PIM NXT houses SmartSense tag readers in each transducer channel to scan catheters upon insertion of the catheter connector into each channel Refer to the Consumable Traceability section on page 57 for more information on scanning catheters into Synergy software Figure 77 below displays an interlocked Roam NXT and PIM NXT and indicates key parts and controls Figure 77 Roam NXT and...

Страница 98: ...tructions provided below 1 Using a flat head screwdriver loosen the screw not fully located at the back of PIM NXT 2 Gently pull the PIM NXT away from Roam NXT base until it disconnects from the base Figure 78 Figure 78 Roam NXT with a Detached PIM NXT 6 6 1 2 Attaching New PIM NXT To attach a new PIM NXT follow the instructions provided below NOTE The PIM NXT unit includes a screw and belt clip l...

Страница 99: ...ions for the Roam NXT To ensure a proper connection make sure the device clicks into place A beeping sound signifies the Roam NXT is fully connected If the battery of the Roam NXT is completely drained the device will not beep when inserted into the docking station Table 11 indicates the different statuses for the Roam NXT and its battery LABORIE recommends for the user to have the device plugged ...

Страница 100: ...XT The Bluetooth technology built into the Urocap NXT provides the patient with more privacy during voiding Bluetooth connection allows the Urocap NXT the beaker the commode chair and the funnel to be set up in one room while the cart computer printer and study operator can be in another room collecting and printing data The Urocap NXT features air vents along its base The center air vent should b...

Страница 101: ... mode not ready to use Device will go into sleep mode one hour after system shutdown Return the Roam NXT to the docking station for charging or activation Table 12 Urocap NXT LED Signals LABORIE recommends for the user to have at least 1 2 hours of battery charge on the Urocap NXT prior to the start of a test or to complete the test with the Urocap NXT plugged in using the NXT Magnetic Pogo Pin Ca...

Страница 102: ...upwards as shown in Figure 83 Align the indicator strip located on the cable binder connector with the indicator strip located on the Urocap NXT Charging Hub binder attachment This will align the internal connections of the cable binder connector and the Urocap NXT Charging Hub binder attachment allowing them to link Figure 84 Figure 84 Cable Clasps and Urocap NXT Charging Hub Binder Attachment At...

Страница 103: ...e workstation An adjustable workstation height that allows 500mm of travel with tool free adjustments for use from sitting or standing positions A large workstation surface with dedicated handles for control of cart movement Refer to figure below for a diagram indicating key parts and terms Figure 85 NXT Pro Cart The controls for turning the NXT Urodynamics System on and off are located at base of...

Страница 104: ...curely locked in the PIM NXT When external pressure is applied to the balloon the pressure transducer registers this pressure differential and sends the data to the Roam NXT For information on how to setup the T DOC Air Charged Catheters refer to the Setting Up T DOC Air Charged Catheters section on page 23 To disconnect the catheter from the PIM NXT press down on the thumb tab and gently pull the...

Страница 105: ... EMG patches are required for the user to perform a Urology Urodynamic study Snap on electrodes ELE428 and cable Compatible LABORIE Cables For information on how to place the electrodes refer to the Placing the EMG Patch Electrodes section on page 25 6 11 Commode The Commode Chair CHA181 or CHA171 and Funnel CHA102 are required equipment for performing a FreeFlow or Urology Urodynamic study Furthe...

Страница 106: ...AC or 220 240VAC 2 0 A 50 60Hz POW1033 Power Supply Medical Grade AC DC 10W Class II Wall Plug 2MOPP Universal Input 100 240VAC Binder 4POS Conn Output 5VDC 2A Operating Conditions Temperature 10 C to 40 C Humidity A relative humidity range of 15 to 90 non condensing but not requiring a water vapor partial pressure greater than 50 hPa Transport Conditions Temperature 30 C to 60 C Humidity up to 95...

Страница 107: ...2 Wired 2x Ethernet Bluetooth LABORIE Bluetooth Dongle NXT BTX2001 required Audio 2 x 2W Speakers 1 x MIC in and speaker out Video Optional Input BNC VGA or DVI connection Source Analog Digital NTSC RS170 or non standard IP Rating IP54 enclosure IP65 front panel For complete AIO specifications and instructions for use refer to the Manufacturer s Owner s Manual https support advantech com support n...

Страница 108: ...exan 8010 Film Urocap NXT P N UCX2001 Dimensions 150mmx150mmx80mm Weight 700g Flow Range 0 to 50mL s Volume Range 0 2L Output Channels 1 Weight Measured Weight Range 0 to 2000g Bandwidth Flow 1Hz max Volume 5Hz IP Rating Compliance IP47 External Power Supply 5VDC 1 5A max Internal Power Supply Li Polymer Battery 3 7V 2400mAh Type BF Applied Part N A External Materials Dow Corning QP1 250 Cycoloy C...

Страница 109: ...tives Classifications Class I Type BF Applied Part Mode of Operation Continuous Equipment not suitable for use in the presence of a Flammable Anesthetic Mixture with Air or Oxygen or Nitrous Oxide Applicable Directives and Standards IEC 60601 1 2012 CAN CSA C22 2 No 60601 1 14 AAMI ANSI ES60601 1 2005 R 2012 A1 2012 EN 60601 1 2006 A1 2013 IEC 60601 1 6 2006 A1 2013 IEC 60601 2 49 2011 CAN CSA C22...

Страница 110: ...ndicates use of Alternating Current Direct Current Table D 1 1 2 Indicates use of Direct Current Non ionizing electromagnetic Radiation 5140 5 Radio Frequency RF Transmitting Device Indicates presence of RF transmitters Keep Dry 5 3 4 1 Indicates a device requiring protection from moisture Power Off Table D1 13 2 Indicates power off control Power ON Table D 1 14 2 Indicates a stable position power...

Страница 111: ...top button Safety Label EMG Identifies connection point for electromyography GS1 2D Data Matrix 01 GTIN 11 Date of Manufacture 21 Serial Number 1 EN ISO 15223 1 Medical Devices Symbols to be used with medical device labels labelling and information to be supplied Part 1 General Requirements 2 CAN CSA C22 2 No 60601 1 14 Medical electrical equipment Part 1 General requirements for basic safety and ...

Страница 112: ...se in the electromagnetic environment specified below The customer or the user of the NXT measurement system should assure that it is used in such an environment When the NXT system is exposed to electromagnetic EM disturbances the system may show abnormal behavior For instance the measured traces may become obscured the software may crash or in case of very high level transient voltage events lik...

Страница 113: ... should be that of a typical commercial or hospital environment Voltage dips short interruptions and voltage variations on power supply input lines IEC 61000 4 11 0 UT 100 dip in UT for 0 5 cycle at 0 45 90 135 180 225 270 and 315 70 UT 30 dip in UT for 25 cycles 70 UT 30 dip in UT for 25 cycles 0 UT 100 dip in UT for 5 secs 0 UT 100 dip in UT for 0 5 cycle at 0 45 90 135 180 225 270 and 315 70 UT...

Страница 114: ...e calculated from the equation applicable to the frequency of the transmitter Recommended separation distance d 1 17 P d 1 17 P 80 MHz to 800 MHz d 2 33 P 800 MHz to 2 7 GHz where P is the maximum output power rating of the transmitter in watts W according to the transmitter manufacturer and d is the recommended separation distance in meters m The EMG channel is fairly sensitive to conducted and r...

Страница 115: ...AM and FM radio broadcast and TV broadcast cannot be predicted theoretically with accuracy To assess the electromagnetic environment due to fixed RF transmitters an electromagnetic site survey should be considered If the measured field strength in the location in which the NXT is used exceeds the applicable RF compliance level above the NXT should be observed to verify normal operation If abnormal...

Страница 116: ...tion of the performance of this equipment could result Rated Maximum Output Power of Transmitter W Separation Distance According to Frequency of Transmitter m 150 kHz to 80 Hz d 1 17 𝑷𝑷 80 MHz to 800 MHz d 1 17 𝑷𝑷 800 MHz to 2 5 GHz d 2 33 𝑷𝑷 0 01 0 12 0 12 0 23 0 1 0 37 0 37 0 74 1 1 17 1 17 2 33 10 3 70 3 70 7 37 100 11 70 11 70 23 30 For transmitters rated at a maximum output power not listed a...

Отзывы: