background image

Operating instructions DuMaster D-480 

©BÜCHI Labortechnik AG 


7 - Using the instrument 

136 


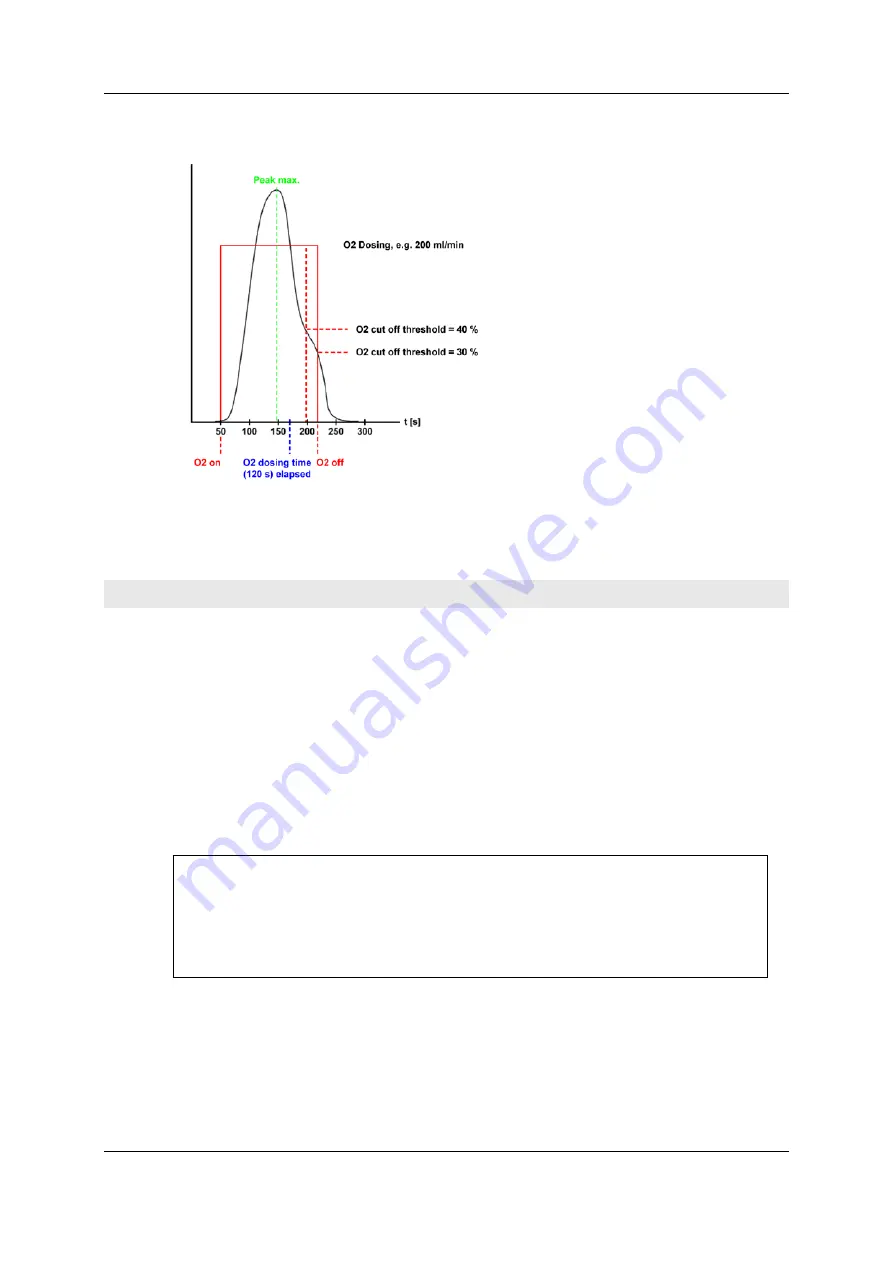
Example for optimization of oxygen dosing 


O

2

 cut off threshold = 30 %, total O

2

 amount = 589 ml 

O

2

 cut off threshold = 40 %, total O

2

 amount = 478 ml 


Performing measurements 

What you need to know 

You must have read the Oxygen dosing values section so you can set the correct values for 

measuring. 

When is routine measuring work necessary? 

You must perform routine measuring work before measuring real samples: 

  if you have not performed any routine measuring work today 

  if measuring breaks exceed a duration of 2 hours. 

Measuring real samples with preceding routine measuring work 

Please observe the following instruction: 

Caution


Inserting multiple samples into the ball valve (for solids mode only) 
If there are samples in the carousel while you are changing the position of the 

carousel via 

System > Sample Position

, multiple samples may fall into the ball 

valve at the same time. In this case, a service technician is required. 
Before changing the position of the carousel, always remove all samples from the 

carousel. 

Proceed as follows: 

  Move the empty carousel to zero position. To do so, open the "Set carousel position" dialog in 

the operating software by selecting 

System > Sample Position

  Select the radio button next to "Reference run" and click 

OK

. The carousel moves to zero 

position. 

  Prepare the samples. 

Содержание DuMaster D-480

Страница 1: ...DuMaster D 480 Operation Manual 11593626C en...

Страница 2: ...the right to make changes to the manual as deemed necessary in the light of experi ence especially in respect to structure illustrations and technical detail This manual is copyright Information from...

Страница 3: ...D 480 B CHI Labortechnik AG Copyright Note 3 Copyright B CHI Labortechnik AG All rights reserved Windows Windows XP und Windows 7 are trademarks of Microsoft Corporation MS Excel und MS Access are tra...

Страница 4: ......

Страница 5: ...rument design 35 Front view 36 Rear view 37 Right side view 37 Left side view 38 Top view 39 Peripherals and their function 40 CHAPTER 4 Understanding the instrument and planning its use 41 Layout and...

Страница 6: ...nalysis data 86 When does it make sense to edit analysis data 87 Limits for modifying analysis data 87 Consequences of modifying analysis data 87 Performing checks 88 Checking documents for authentici...

Страница 7: ...howing or hiding the toolbar 128 Waking up the instrument 128 Viewing method settings 129 Defining custom methods 129 Defining the Kjeldahl factor 130 Copy methods 130 Settings for sample input 131 Im...

Страница 8: ...e 185 Installing the ash crucible 188 Refill the Regainer 190 Purpose and frequency of refilling of the Regainer 191 Refill the Regainer 191 Replacing sealing elements 194 When to replace sealing elem...

Страница 9: ...0 Export peak graphics Dialog 261 Configure report Dialog 261 Print Dialog 263 Print preview Dialog 264 Printer setup Dialog 265 Open Dialog 266 Load balance file Dialog 267 Configure backup Dialog 26...

Страница 10: ...roup Command 299 Statistics Clear statistic Command 299 Statistics Include Exclude sample Command 300 Statistics Include Exclude value Command 300 Statistics Create Excel sheet Command 300 Calibration...

Страница 11: ...tent Command 336 Help Find Command 336 Help B CHI Labortechnik AG on the WEB Command 336 Product registration Dialog 336 Help About Command 337 CHAPTER 11 Appendix 339 Revision history 340 Warranty 34...

Страница 12: ......

Страница 13: ...r D 480 B CHI Labortechnik AG Purpose This chapter contains general topics of the document In this chapter About this document 14 Display conventions 15 General information on the operating instructio...

Страница 14: ...tions The status of the operating instructions is 16 10 2014 Identification number The operating instructions identification number is 11593627 Validity The operating instructions are valid for all in...

Страница 15: ...mbolic name e g Element stands for the corresponding name of an element General information on the operating instructions Pictures The instruments of B CHI Labortechnik AG underlie a permanent develop...

Страница 16: ......

Страница 17: ...ructions 18 Representation of safety instructions 18 Instructions for disposal of consumables 18 Intended use of the instrument 19 Warning residual risks 19 Safety devices in the analyzer 20 Warning s...

Страница 18: ...oo Representation of safety instructions Safety signs This is a safety sign Instructions with this sign contain warnings about risks of injury and even death These instructions must always be observed...

Страница 19: ...risks Hot components inside the instrument During operation the furnaces inside the instrument heat certain components to very high temperatures Even after switching off the instrument these component...

Страница 20: ...nformation about a chemical in the R Phrases and safety information in the S Phrases Safety devices in the analyzer Note The analyzer may only be operated if all of the safety devices indicated in thi...

Страница 21: ...trical area arrow The third protective earth conductor is located intside the cover of the electrical area arrow If the protective earth conductor connections need to be detached they must be re conne...

Страница 22: ...rnace heat protection cladding Warning sign electrical area The following picture shows the warning sign on the electrical section cover Meaning of the warning signs The following table explains the m...

Страница 23: ...instrument Distortion of analysis results Loss of warranty Only use original spare parts and original consumables that you have purchased from B CHI Labortechnik AG or authorized dealers Required user...

Страница 24: ...h the instrument you need Sturdy shoes Cotton apron Hair tie to tie back long hair Obedience of general rules for safe work in the laboratory Warning notes during operation Note Always pay attention t...

Страница 25: ...sharp or aggressive cleaners Gas pressure Please observe the following instruction Warning Gas pressure and caustic substances in the instrument Consumables may escape under pressure and cause chemic...

Страница 26: ...ing Sharp pieces of broken glass When cold quartz or glass components break there is a risk of cut injuries Wear the enclosed protective leather gloves and protective glasses when handling cold quartz...

Страница 27: ...own Disconnect the power supply plug Risk High voltage Using the wrong fuses can pose a risk of electrocution or fire Only use fuses matching the indicated type and the indicated voltage on the fuse h...

Страница 28: ...rating mode Overheated tube fillings melt run into the furnace area and destroy the furnace Make sure that the tube fillings correspond to the selected operating mode Working with the database Please...

Страница 29: ...off the gas supply To do so execute the Options Maintenance Replace parts command Warning Hot components in the instrument When working inside the instrument there is a risk of burning as many parts o...

Страница 30: ......

Страница 31: ...AG Target group Personnel working with the instrument Purpose This section provides general information about the instrument In this chapter Analytical characteristics and technical specifications 32...

Страница 32: ...ption 32 Analytical characteristics and technical specifications Target group Personnel working with the instrument Purpose This section lists the analytical characteristics and technical specificatio...

Страница 33: ...eight approx 250 mg Recovery rate Larger than 99 5 for test substances Duration of analysis Self optimizing 3 to 6 minutes depending on substance and sample weight Calibration Linear and non linear cu...

Страница 34: ...ed load 1 4 kVA Connected electrical loads and frequency of the complete analysis unit Connected electrical load Voltage Frequency 16 A 100V AC 10 120V AC 10 230V AC 10 50 60 Hz Supply gases Carbon di...

Страница 35: ...description 35 Instrument design Target group Personnel involved with the instrument Purpose This section describes the design of the instrument In this section Front view 36 Rear view 37 Right side v...

Страница 36: ...view Front view closed The following picture shows the front view of the instrument with the front door closed Front view open The following picture shows the front view of the instrument with the fr...

Страница 37: ...lyzer Legend 1 Rear wall 2 Air baffle 3 PC PC connector USB 4 Reserve reserve 5 mains connector 6 CO2 IN CO2 gas inlet 7 O2 IN O2 gas inlet 8 Gas drying 9 WASTE Gas outlet Right side view Right side v...

Страница 38: ...ollowing picture shows the right side of the analyzer with the side door open as seen from the front Legend 1 Mainboard 2 Furnace 3 Main switch Left side view Left side view closed The following pictu...

Страница 39: ...the left side of the analyzer with the side door open as seen from the front Legend 1 Thermal conductivity detector TCD 2 Water condenser 3 Gas drying Top view Top view of the instrument The followin...

Страница 40: ...shows the analyzer and its peripherals Legend 1 Instrument 2 Balance 3 Printer 4 PC Functions of the peripherals The following table lists the functions of peripherals Peripheral Function Requirement...

Страница 41: ...the applications of the instrument and subsequently plan the use of the instrument In this chapter Layout and mode of functioning 42 Processes in the instrument during a measurement 46 Basic facts ab...

Страница 42: ...d mode of functioning Target group Personnel with basic chemical knowledge and basic computer knowledge Purpose This section describes what the instrument does what the analysis parameters mean and wh...

Страница 43: ...its use 43 Functional units Introduction The following section describes what units comprise the instrument and what functions the individual units perform in the analysis procedure Functional diagra...

Страница 44: ...Furnace area and reaction zone II The following table describes the components of the unit and their functions Part Name Function 3 Furnace holds the combustion tube post combustion tube and reductor...

Страница 45: ...wo chambers through which the analysis gas mixture measuring cell and the pure carriage gas reference cell simultaneously flow through during the analysis The chambers form a measuring bridge Working...

Страница 46: ...ic computer knowledge Purpose The following section is designed to help you understand the processes that take place during a measurement In this section Sample insertion and initiation of measurement...

Страница 47: ...ic field The sample drops into the ash crucible 5 of the combustion tube 4 and is heated up to the combustion temperature Oxygen dosing into the ash crucible begins The integrator reset resets integra...

Страница 48: ...ivity detector TCD on page 45 In the PC the measuring signal is recorded dependent on time and displayed as an integral The integral value is assigned to an absolute nitrogen content of the sample via...

Страница 49: ...computer knowledge Purpose The following section provides basic facts about working rationally and appropriately with the instrument In this section Instrument equipment 50 Background knowledge requir...

Страница 50: ...ion tube Legend 1 Ash crucible 2 Corundum balls 10 mm 3 80 g CuO 20 g Corundum balls 87 mm 4 Corundum balls 26 mm 5 Wire mesh ronde 6 Spacer Filling the post combustion tube The following picture show...

Страница 51: ...utes the calibration factors on the basis of the known element contents and the sample weights of the calibration samples Conditions for perfect calibration In order to be able to calibrate the instru...

Страница 52: ...for calibration curve calculation method criteria You get to the calibration view after performing or loading a series of defined calibration samples by selecting Calibration Calibrate and then the Co...

Страница 53: ...hows an example in which the calibration curve exhibits acceptable quality by means of a linear calculation in the low concentration range and a polynomial calculation in the higher concentration rang...

Страница 54: ...n Weight Absolute element content is computed according to this formula where a absolute element content in mg w sample weight in mg c element concentration in Computing calibration coefficients Once...

Страница 55: ...ere q quality ssq sum of error squares acti actual absolute content computed respectively theoi theoretical absolute content respectively n number of samples i index from 1 to n Routine measuring work...

Страница 56: ...ermine the daily factor additionally at the end of the series Formulae for blank value determination and compensation Blank samples and blank values Blank samples are samples that do not contain sampl...

Страница 57: ...he daily factor Standard samples are analyzed to determine the daily factor The known element concentration of the standard samples is correlated with the actual element concentration computed Daily f...

Страница 58: ...ledge Purpose This section describes the layout of the user interface what instrument functions are controlled by the software what current information is displayed during the analysis process and how...

Страница 59: ...e Blank values Processing measuring data Measuring data processing functions Measurement and numerical output of element contents in absolute values and percentages Statistical evaluation of analysis...

Страница 60: ...f the menu tree You can access dialogs and input windows etc from the menubar for the following Saving editing and managing analysis data Defining and entering sample data and instrument parameters Sp...

Страница 61: ...In calibration window view it displays a diagram of the calibration factors for the series under review and the calibration curves of the individual elements For details on the combi view and its vari...

Страница 62: ...the reserved names see Defining standard substances as factor and monitor samples on page 120 and Defining standard substances as calibration samples on page 120 Method Assignment of an analysis meth...

Страница 63: ...is entered in the Info column see Interpreting PC error messages on page 238 Sample at which the series was stopped Further information in the sample view Depending on the selected operating mode the...

Страница 64: ...f the sample selected in the sample view You can recognize the current sample by the green border around the graph display You can display the following individual parameters and measured values The C...

Страница 65: ...nd or values of a group from the calculation of statistical values or include them again Calibration view If your series includes samples previously defined as calibration samples you can use them to...

Страница 66: ...he condition of the instrument is displayed in the status view View The following screenshot shows the status view in offline status Meaning of the colored background On the basis of the color of the...

Страница 67: ...is displayed numerically and as a bar chart The colors of the chart indicates the progress of the the next due maintenance interval green less than 80 yellow 80 to 99 red more than 99 When a maintena...

Страница 68: ...raph view In dialogs In dialogs you can also press the right mouse button to display certain commands In the Configure view dialog right click to display the Properties command that opens the Column p...

Страница 69: ...sonnel with basic chemical knowledge and basic computer knowledge Purpose This section describes what options the system offers with regard to data administration and data security In this section Lab...

Страница 70: ...r manually by selecting the appropriate menu command File name structure The file name generated for LIMS has the following format dddsssss xxx consisting of the following elements ddd Days since Janu...

Страница 71: ...The data recorded during the analysis process are converted into the respective element contents with the aid of algorithms and reliably saved Generation of exact results is therefore ensured Protect...

Страница 72: ...of the document is created as soon as an analyzed sample is changed Version identification Every version is identified as follows with an index number with the date of creation and with the name of th...

Страница 73: ...em administrator tasks In this chapter Installing and updating the software 74 Configure analyzer 75 Defining LIMS export settings 78 Setting up user administration 80 Defining interfaces 83 Editing a...

Страница 74: ...trol Panel Power Options The following options must be set to Never Turn off monitor Turn off hard disks System stand by System hibernates Power management must also be disabled in the PC s BIOS The P...

Страница 75: ...t group Personnel with basic chemical knowledge and basic computer knowledge Purpose This section describes what the instrument does what the analysis parameters mean and what happens in the instrumen...

Страница 76: ...es under Warning notes during operation on page 24 Defining logon timeout Proceed as follows Open the Device configuration dialog by selecting Options Configuration Select the DEVICE INI tab Select th...

Страница 77: ...dification dialog is displayed Enter a justification in the Comment modification dialog and click Close Click Insert in the dialog Device configuration to insert an entry into the section just created...

Страница 78: ...e system administrator 78 Defining LIMS export settings Target group Personnel with good knowledge of the operating system and administrative settings Purpose This section enables you to define export...

Страница 79: ...performed by the system administrator 79 LIMS export settings What is set The following are set for LIMS What data to send Whether the data is transferred via interface or network The interface settin...

Страница 80: ...p user administration Target group Personnel with good knowledge of the operating system and administrative settings Purpose This section enables you to set up the user administration as system admini...

Страница 81: ...the software searches the user groups for the user starting with the administrator group If a user belongs to multiple user groups he is therefore always offered the higher user group when he logs in...

Страница 82: ...the command 2 Only superuser and administrator are authorized to execute the command 3 Only the administrator is authorized to execute the command In the field Items select the command whose authoriz...

Страница 83: ...interfaces Target group Personnel with good knowledge of the operating system and administrative settings Purpose This section enables you to define various interfaces as system administrator In this...

Страница 84: ...Edit The Configure key value dialog is displayed Enter the name of the serial port e g COM2 in the Value field and click OK The Comment modification dialog is displayed Enter a justification in the C...

Страница 85: ...you want to change and click Edit The Configure key value dialog is displayed Enter the desired value in the Value field and click OK The Comment modification dialog is displayed Enter a justification...

Страница 86: ...up Personnel with good knowledge of the operating system and administrative settings Purpose This section describes when it makes sense to edit analysis data and to what extent this is possible In thi...

Страница 87: ...inished samples by simply clicking on the respective fields You can recognize finished samples by the fact that they are above the current sample which is highlighted by a green bar in the sample view...

Страница 88: ...tor 88 Performing checks Target group Personnel with good knowledge of the operating system and administrative settings Purpose This section enables you to perform various checks as system administrat...

Страница 89: ...e signature is authentic Signing documents What signature is allocated The signature that is enabled in the Sign dialog and whose radio button is checked is allocated for example the created signature...

Страница 90: ...ook Proceed as follows Open the logbook by selecting Options Logbook Select the period for which to view the logbook Open the Select period dialog by selecting File Load In the Select period dialog us...

Страница 91: ...knowledge of the operating system and administrative settings Purpose This section enables you to perform various database tasks as system administrator In this section Database 92 Administrative wor...

Страница 92: ...mple data Data distortion Authorized individuals can add an electronic signature to data documents the authenticity of this signature can be verified In addition the activities of the indivdiual users...

Страница 93: ...a justification in the Comment modification dialog and click Close Click OK in the Device configuration dialog Your settings are saved and the dialog is closed A message window appears which informs...

Страница 94: ...ropriate intervals in order to allow to restore the damaged database file without major data losses Backups should not be performed on the local harddisk but a safer strategie should be used e g backu...

Страница 95: ...safety instruction Working with the database under Warning notes during operation on page 24 Reloading an old database file Proceed as follows Open the Restore Database dialog by selecting File Backu...

Страница 96: ...el with good knowledge of the operating system and administrative settings Purpose This section gives an overview of the ways in which you can optimize the use of the analyzer for your own particular...

Страница 97: ...er a set number of non critical errors and this number has been reached the analyzer is stopped after the analysis See Error handling on page 328 Defining custom methods Depending on what sample subst...

Страница 98: ...a generated and saved with the Balance program can then be imported to the control PC via File Import The condition is that the analyzer is back in standby mode or sleeping Cf Balance weighing data in...

Страница 99: ...he weighing data are saved there starting from sample No 1 The current open document must be saved and then closed Optimizing data evaluation Optimizing the view The user can customize the view to his...

Страница 100: ...inistrator 100 Performing other administrator tasks Target group Personnel with good knowledge of the operating system and administrative settings Purpose This section enables you to perform various t...

Страница 101: ...alyzer This number should match the serial number of the installation CD cover when installing for the first time Enter the software ID in the field Software ID of the Software section If installing f...

Страница 102: ......

Страница 103: ...Labortechnik AG and having undergone training Purpose This section enables you to start up or shut down the instrument according to instructions In this chapter Setting up and starting up the instrum...

Страница 104: ...section enables you to set up and commission the instrument according to instructions In this section Rules for first time start up 105 Instructions for operating the furnace 105 Installation site req...

Страница 105: ...atory will draw up specific work instructions at the customers request and against payment Requirements for installing the instrument software In order to install the software correctly administrator...

Страница 106: ...Maximum 35 C Mains voltage 100 230 Volt AC 10 50 60 Hz Connection 1 4 kVA Mains voltage and frequency must match the specifications on the instrument s type plate Power connections 2 power sockets and...

Страница 107: ...e proper working order of the instrument the work processes described in this section must be performed precisely the basic instrument and the peripherals must be switched on in the sequence described...

Страница 108: ...rement settings on page 118 The instrument is then ready to measure Phase 3 Performing instrument checks Proceed as follows Perform a leak test See Performing a leak test If the leak test reveals any...

Страница 109: ...PC If you wish connect a balance to the PC Configuring the balance The serial interface parameters of a connected balance must match the parameters of the PC s serial interface If you have not entered...

Страница 110: ...the oxygen supply line to the oxygen gas inlet 2 Connecting waste gas lines Proceed as follows Connect the waste gas line to the gas outlet 3 Install the other end of the waste gas line so it discharg...

Страница 111: ...ted Removing the furnace transport protection Proceed as follows Open the front door of the instrument Push the right side door open from inside magnetic lock The transport protection is now visible i...

Страница 112: ...rtup before switching on must have already been performed See Start up Switching on Proceed as follows If not done so far plug the power supply plugs of the analyzer and the peripherals into the socke...

Страница 113: ...y shows approx 700 ml min for the measuring gas outlet During standby the MFC O2 display shows 0 ml min Only during the combustion the corresponding O2 value will be displayed During standby the Flow...

Страница 114: ...ent Target group Personnel authorized by B CHI Labortechnik AG and having undergone training Purpose This section enables you to shut down the instrument according to instructions In this section Shut...

Страница 115: ...increased again and the instrument is flushed with gas Choose one of the following options Enter Date and Time when to wake up the instrument and select the box next to One time wake up at above time...

Страница 116: ...rating instructions DuMaster D 480 B CHI Labortechnik AG 6 Starting up and shutting down the instrument 116 In case the analyzer has to be transported mount the corresponding transport protection s ag...

Страница 117: ...work e g chemistry laboratory workers Purpose This section enables you to perform measurements with the instrument In this chapter Measurement settings 118 Preparing samples 123 Preparing measurement...

Страница 118: ...the necessary settings for measurements In this section Defining keywords for blank and conditioning samples 119 Viewing list of defined factor monitor and standard samples 119 Defining custom standar...

Страница 119: ...re by selecting Options Settings Standards The list box displays all currently defined standards By checking the requested standard sample the settings are displayed in the right area of the dialog De...

Страница 120: ...factor and monitor samples Defining standard substances as factor and monitor samples Proceed as follows Open the Standard samples display dialog in the operating software by selecting Math Standard...

Страница 121: ...n checked Then click OK to save your settings Defining the daily factor calculation method Proceed as follows Open the Configure Calculations dialog in the operating software by selecting Options Sett...

Страница 122: ...rticular sample A critical error occurs The analyzer is stopped after the analysis A non critical error occurs If you have set the analyzer to stop after a set number of non critical errors and this n...

Страница 123: ...Personnel with basic knowledge of chemistry and experience with laboratory work e g chemistry laboratory workers Purpose This section enables you to prepare samples properly In this section Sample pr...

Страница 124: ...nd homogenization Refer to the relevant literature concerning the problem of sampling and homogenization Sample crushing and drying When crushing and drying samples you may lose highly volatile consti...

Страница 125: ...wing or hiding the weight window Showing or hiding the weight window Select View Weight window to show or hide the weight window If Weight window is checked the weight window is displayed If Weight wi...

Страница 126: ...s 300 mg aspartic acid Proceed as follows Shape the paper into a cup shape Tare the paper to zero Fill in the sample Twist the paper edges above the sample together Place the packet into the pressing...

Страница 127: ...Purpose This section enables you to prepare measurement work In this section Software usage rules 128 Starting the operating software 128 Showing or hiding the toolbar 128 Waking up the instrument 12...

Страница 128: ...g software Proceed as follows Launch the operating software by double clicking the appropriate icon on your screen or by launching the program via Start Programs or by executing the program via the ap...

Страница 129: ...ethods or define new methods View existing methods Proceed as follows Open the Methods dialog in the operating software by selecting Options Settings Methods In the left field select the appropriate m...

Страница 130: ...e methods allows users to specify different factors for different types of samples Defining Kjeldahl factor in a method Proceed as follows Open the Methods dialog in the operating software by selectin...

Страница 131: ...stion autom Auto increment the number in the sample name If a sample name ends with a number e g Name001 this figure is automatically incremented by a certain amount and suggested for the next sample...

Страница 132: ...samples Prioritizing urgent samples Proceed as follows Open the Swap samples dialog in the operating software by selecting Edit Swap Enter the numbers of the samples to swap in the textboxes in the d...

Страница 133: ...e Wake up section enter the time and days on which to wake up the instrument To do so check the checkbox next to Continue after wake up if there are samples Click OK This closes the dialog and saves t...

Страница 134: ...urpose This section enables you to perform all measurement work In this section Values for oxygen dosing 135 Performing measurements 136 Performing routine measuring work 138 Checklist for blank value...

Страница 135: ...rcentage of the O2 cut off threshold is referred to the peak maximum e g 10 30 The software automatically scans the course of the peak the peak maximum will be registered The O2 dosing cuts off after...

Страница 136: ...hours Measuring real samples with preceding routine measuring work Please observe the following instruction Caution Inserting multiple samples into the ball valve for solids mode only If there are sam...

Страница 137: ...work For real samples cd Values for oxygen dosing Go through the measuring start checklist Cf Checklist for blank value conditioning and daily factor measurements Start the analysis process in the op...

Страница 138: ...p and printing on page 156 Performing routine measuring work Overview This section provides information about types of routine measuring work the purpose of routine measuring work and how to perform t...

Страница 139: ...factor additionally at the end of the series Performing routine measuring work Proceed as follows If desired perform a blank value determination For details see Types of blank value determination and...

Страница 140: ...value conditioning and daily factor samples Checklist for real sample measurement Purpose The checklist helps you to check whether the instrument is ready to measure real samples Checklist Go through...

Страница 141: ...n 50 repeat the blank value determination with methods which is associated with an oxygen dosing time If the N integral values are then normal the oxygen was contaminated Otherwise the system has prob...

Страница 142: ...ditives or packing materials place a blank sample on the carousel Cf Types of blank value determination and their settings Enter the following for the sample in the sample view text view on the PC Nam...

Страница 143: ...llows Measure any substance that need not be defined in Options Settings Standard samples Compute the daily factor Daily factor theoretical content actual content Allocate the daily factor to the real...

Страница 144: ...ctuations of results If the tolerance define in Options Settings Standards is exceeded continuous analysis is stopped Enabling Standard tolerance monitoring Proceed as follows Open the Error handling...

Страница 145: ...DuMaster D 480 B CHI Labortechnik AG 7 Using the instrument 145 Use the arrow buttons to set the sample number at which to set a stop marker Click OK This closes the dialog and moves the stop marker t...

Страница 146: ...Configuring the sample view 147 Determine measuring units and number of decimal places 147 Saving the sample view 148 Loading a sample view 148 Configure statistics view 148 Generating statistical dat...

Страница 147: ...s Proceed as follows Select cells in the sample view Optimize sample view by selecting View Gridview Auto align This optimizes the sample view Determine measuring units and number of decimal places De...

Страница 148: ...k on Statistic field in the menu bar above the combi view Klick on the statistic view to highlight it Specify what you want to have displayed in the view Open the Configure Statistic Pane dialog by se...

Страница 149: ...The sample is discarded and the calculation updates automatically Generating statistical data manually Proceed as follows Select all samples that you want to combine in a group in the sample view text...

Страница 150: ...eviation c Mean value of concentrations Delta Delta is computed according to this formula whereas Delta cmax Highest element concentration in a group cmin Lowest element concentration in a group Manua...

Страница 151: ...ows Superimposed peaks These are two peaks where one superimposes the other Peak 1 is designated as socket and peak 2 is designated as superimposed The following picture shows such a run Melted peaks...

Страница 152: ...ak integration create a copy of the actual loaded document and only perform the manual peak integration there A copy can be created via File Save As with subsequent input of a suitable different docum...

Страница 153: ...Type Note The menu command is only accessible if the grafic view is activated Activate superimposed peak and straight baseline and subsequently click OK to leave the dialog Select the requested sampl...

Страница 154: ...ck the appropriate checkbox In the Zero line section specify which of the horizontal grid lines to take as the zero line for the graph view A value of 0 means that the zero line is at the bottom edge...

Страница 155: ...t preview Display print preview Proceed as follows Open the Configure report dialog in the operating software by selecting File Print preview Define your report settings See Configure report on page 1...

Страница 156: ...ables you want to display in the graph Open the Configure Graphic Pane dialog by selecting View Graphic Configure Define your settings Check the measuring variables to display You can select up to 4 m...

Страница 157: ...cal information is deleted if a file of the same name exists dat yes no Balance file Files with weighing data generated by the Balance program product from B CHI Labortechnik AG can be imported It is...

Страница 158: ...send section Click OK in the LIMS settings dialog Your settings are saved and the dialog is closed Auto exporting LIMS data Proceed as follows Open the LIMS settings dialog by selecting Options Settin...

Страница 159: ...nd experience with laboratory work e g chemistry laboratory workers Purpose This section enables you to work with database documents In this section Creating new documents 160 Editing documents 160 De...

Страница 160: ...have been completely processed Deleting cell contents Proceed as follows Select the cell whose contents you want to delete Delete the contents by selecting Edit Cut The cell now contains its default c...

Страница 161: ...o show the document search filter criteria Decide If you want to look for documents beginning from a certain date Enter a date in the From textbox and check the checkbox next to it look for documents...

Страница 162: ...rrent coefficients A message appears Go to the next step A message appears which informs that the coefficients included in the document are different and the current coefficients will be overwritten d...

Страница 163: ...is enabled in the Sign dialog and whose radio button is checked is allocated for example the created signature is allocated The following rules apply The created signature is assigned to a document fi...

Страница 164: ...e to check Note Note the following The signature program must be installed Signatures can only be checked or created if 21 CFR Part 11 functionality is enabled Checking a signature Proceed as follows...

Страница 165: ...ration 173 Calibration tables 182 Replacing the ash crucible 184 Refill the Regainer 190 Replacing sealing elements 194 Ball valve maintenance 197 Maintaining the Ni flap and the O2 lance 206 Removing...

Страница 166: ...ik AG and having undergone training Purpose This section provides important information about maintenance In this section Maintenance work to be performed by the customer 167 Viewing the status of mai...

Страница 167: ...9 and 1 1 but not later than every 2 years Performing calibration Clean ball valve possibly replacing seals Every 1500 analyses Ball valve maintenance Replace sealing elements o rings quad rings half...

Страница 168: ...llows Open the Maintenance intervals dialog in the operating software by selecting Options Maintenance Intervals Click New The fields in the right area are set to their default values Enter the follow...

Страница 169: ...s also prevents the instrument from sending an error message and shutting down automatically It is also necessary to perform follow up work after maintenance in order to get the instrument ready to me...

Страница 170: ...CO2 Decide If approximately the same flow and pressure values as prior to maintenance work are displayed The instrument is ready to measure again distinctly different flow and pressure values to those...

Страница 171: ...is successful Performing blank value determinations See Determining blank values on page 141 Allocate the method Blank with O2 to the samples Only stop blank value determination when the N blank value...

Страница 172: ...mbustion and Reductor Close all open ends of the reaction tubes again Set the carrier gas intake pressure on the cylinder manometer so that the Pressure display shows 1300 1350 mbar on screen the meas...

Страница 173: ...g undergone training Purpose This section provides facts about calibration and also enables you to perform calibration In this section Viewing list of defined factor monitor and standard samples 174 D...

Страница 174: ...sample view Required substances The instrument needs standard substances which represent the sample matrix to be measured By means of the dialog opened by Options Settings Standards you can define an...

Страница 175: ...t old tube fillings from distorting results Checking and optimizing the condition of the instrument Proceed as follows Replace all tube fillings See Emptying and filling reaction tubes Filling the dry...

Страница 176: ...tion Inserting multiple samples into the ball valve only for solid operation If there are samples in the carousel while you are changing the position of the carousel via System Carousel position multi...

Страница 177: ...bration dialog appears Define the following settings Check the box next to Two calibration ranges Enter 1 as the polynomial degree for the lower and upper range This corresponds to linear calculation...

Страница 178: ...deleted Select a sample to delete Then click the Include Exclude button The deleted sample is highlighted red Compare r new value and r_old old value of the calibration curve and check whether deletin...

Страница 179: ...relating to the calibration curve as displayed in the above picture Characteristic Description Zoom Shows the current graph zoom factor a e Coefficients of the current polynomial r Quality factor for...

Страница 180: ...e buttons and This displays the characteristics of the sample Assessing the calibration curve The following are used to assess the calibration curve Process standard deviation Proc SD Quality factor r...

Страница 181: ...Operating instructions DuMaster D 480 B CHI Labortechnik AG 8 Maintaining the instrument 181...

Страница 182: ...G and having undergone training Purpose This section contains specific rules for the calibration If you want to use these rules you must define the standard substances used there as calibration sample...

Страница 183: ...type Substance Sample weight Absolute content Name Method 2 Conditioning Aspartic acid 300 mg 10 mg RunIn CalibrationLow 1 Conditioning Aspartic acid 10 mg RunIn CalibrationLow 2 Conditioning Asparti...

Страница 184: ...ing the ash crucible Target group Personnel authorized by B CHI Labortechnik AG and having undergone training Purpose This section enables you to replace the ash crucible In this section Purpose and f...

Страница 185: ...n analyzing liquid samples mandatory Removing the ash crucible Note The following section describes the first part of replacing the ash crucible The topic is continued in Installing the ash crucible P...

Страница 186: ...en the front door Unscrew the combustion tube connector To do so turn the bayonet catch handle 2 slowly to the right Remove the ground in clamp on the reductor 3 Remove the O2 supply tube 6 by opening...

Страница 187: ...tion 3 down lightly and pull the furnace out of the instrument to the front Pull the combustion tube connection 3 out of the combustion tube 4 with careful jiggling motions Place the combustion tube c...

Страница 188: ...into the following phases Installing the ash crucible Follow up instrument preparation Gas pressure gas tightness Safety instruction Strictly observe the safety instruction Replacing the ash crucible...

Страница 189: ...o as not to damage the seal on the combustion tube connection Close the bayonet catch by turning the bayonet catch handle 2 to the left Close the ground in clamp 5 3 on the Reductor again Connect the...

Страница 190: ...e instrument 190 Refill the Regainer Target group Personnel authorized by B CHI Labortechnik AG and having undergone training Purpose This section enables you to refill the Regainer In this section Pu...

Страница 191: ...tied When analyzing samples with extremely high mineral compound content a replacement becomes necessary earlier Refill the Regainer Note The following section describes the first part of refilling of...

Страница 192: ...5 on the reductor 3 Remove the O2 supply tube 6 by opening the two ground in clamps 5 Remove the ground in clamp 5 on the post combustion tube 7 Top view furnace The following picture shows a top view...

Страница 193: ...the post combustion tube 2 Push the furnace back Lift the bayonet catch 2 slightly so as not to damage the seal on the combustion tube connection Close the bayonet catch by turning the bayonet catch...

Страница 194: ...sonnel authorized by B CHI Labortechnik AG Purpose Replacing sealing elements prevents leaks As a result of chemical corrosion mechanical and thermal stress sealing elements in various components of t...

Страница 195: ...ngs when installing the quartz glass bridge Plug of Reductor O rings you can hardly feel any contact pressure when inserting the Reductor plug the o rings no longer protrude round out of the grooves o...

Страница 196: ...oves Note Please observe the following instruction Caution Cutting sealing elements apart out o rings quad rings half shells ferrules When cutting sealing elements apart out with a knife you may damag...

Страница 197: ...197 Ball valve maintenance Target group Personnel authorized by B CHI Labortechnik AG and having undergone training Purpose This section enables you to maintain the ball valve In this section Removing...

Страница 198: ...instrument Removing the ball valve Dismantling the ball valve Requirements Before starting work the following requirements must be met Remove all samples from the carousel Keep acetone ready to clean...

Страница 199: ...ound in clamp 5 on the reductor 3 Remove the ground in clamp 5 on the post combustion tube 7 Remove the O2 supply tube 6 by opening the two ground in clamps 5 Top view furnace The following picture sh...

Страница 200: ...ng 8 Bayonet catch Phase 4 Dismantling the ball valve Please observe the following instruction Caution Cutting sealing elements apart out o rings quad rings half shells ferrules When cutting sealing e...

Страница 201: ...ng instructions DuMaster D 480 B CHI Labortechnik AG 8 Maintaining the instrument 201 Remove the drive bearing Remove the ball and top half shell by means of the knock out Loosen and remove the bayone...

Страница 202: ...ells and ball Assembling the ball valve Mounting the ball balve Preparing the Instrument for measurements Requirements Before starting work the following requirements must be met Keep the following to...

Страница 203: ...f shells 2 and the ball 3 with acetone Check the half shells 2 for grooves If there are any grooves replace the half shells Check the ball 3 for grooves If there are any grooves replace the ball Phase...

Страница 204: ...all valve For installation of the ball valve proceed in reversed sequence as it is described for its removal Furnace area The following picture shows the details of the furnace area Legend 1 Bayonet c...

Страница 205: ...t The instrument is only ready to measure when the leak test is successful To be observed after maintenance If you have performed maintenance work that has a defined maintenance interval you must manu...

Страница 206: ...ersonnel authorized by B CHI Labortechnik AG and having undergone training Purpose This section enables you to maintain the Ni flap and the O2 lance In this section Purpose and frequency of maintainin...

Страница 207: ...ng error message will be displayed Further information about this topic Error handling on page 328 Removing and cleaning the Ni flap Note The following section describes the first part of the maintena...

Страница 208: ...catch handle 2 to the right Remove the ground in clamp 5 on the reductor 3 Remove the ground in clamp 5 on the post combustion tube 7 Remove the O2 supply tube 6 by opening the two ground in clamps 5...

Страница 209: ...ning the Ni flap itself use a soft brush e g toothbrush In case of heavy contamination both sides must be cleaned For this purpose remove the o rings and the O2 lance Place the complete combustion tub...

Страница 210: ...as pressure under Warning notes during operation on page 24 To prepare the instrument for maintenance work follow the instructions in Preparing the instrument Cool down the furnace gas pressure in Pre...

Страница 211: ...eparation gas pressure gas tightness After completing all maintenance work put the instrument back into a state ready for measurement See Follow up preparation of the instrument Gas pressure tightness...

Страница 212: ...lance Proceed as follows Wipe any soot with a dry cloth Replace the seal made of sealing hose Check the lance for patency Installing the O2 lance Proceed as follows Pull on the lance connector 2 at t...

Страница 213: ...installing the quartz glass bridge Target group Personnel authorized by B CHI Labortechnik AG and having undergone training Purpose This section enables you to remove clean and install the quartz gla...

Страница 214: ...essure under Warning notes during operation on page 24 To prepare the instrument for maintenance work follow the instructions in Preparing and following up maintenance work Phase 2 Removing the quartz...

Страница 215: ...bridge under Warning notes during operation on page 24 Phase 1 Cleaning the quartz glass bridge Proceed as follows Remove the o rings from the ground in connection of the quartz glass bridge Check wh...

Страница 216: ...cessary follow up work Proceed as follows Perform blank value determinations to test complete combustion See Determining blank values on page 141 Allocate an oxygen dosing time of 90 s to the sample O...

Страница 217: ...ment 217 Removing cleaning and installing the carousel Target group Personnel authorized by B CHI Labortechnik AG and having undergone training Purpose This section enables you to remove clean and ins...

Страница 218: ...h or bottle brush some water with a mild laboratory cleaner Cleaning the carousel Safety instruction Strictly observe the safety instruction Damaged base panel under Warning notes during operation on...

Страница 219: ...he plastic top section and use a wrench to turn the hexagon head screws so the tips of the screws prevent you from lifting off the ring tighten the screws only slightly The metal ring will be held wit...

Страница 220: ...ng reaction tubes Target group Personnel authorized by B CHI Labortechnik AG and having undergone training Purpose This section enables you to empty and refill reaction tubes In this section Emptying...

Страница 221: ...the wire mesh ronde and the spacer out of the combustion tube Remove the CuO dust out of the combustion tube by means of a damp cloth Dispose of the chemicals according to the relevant disposal catego...

Страница 222: ...illing reaction tubes under Warning notes during operation on page 24 Combustion tube filling The following picture shows the fillings and filling heights of the combustion tube Legend 1 Ash crucible...

Страница 223: ...ing reaction tubes under Warning notes during operation on page 24 Filling the post combustion tube The following picture shows the fillings and filling heights of the post combustion tube Legend 1 Pl...

Страница 224: ...ll in the quartz wool Fill in the Regainer Insert the plug at the top filled with brass wool Reductor replacing Note The top and bottom plug of the Reductor are no consumables and therefore have to be...

Страница 225: ...B CHI Labortechnik AG 8 Maintaining the instrument 225 Removing installing and conditioning the reaction tubes In this section Removing the reaction tubes from the furnace 226 Installing reaction tube...

Страница 226: ...Preparing the instrument gas pressure In order to be able to prepare the instrument for maintenance works follow the instructions Preparing the instrument Gas pressure in Preparing and following up ma...

Страница 227: ...Reductor 6 Reductor Phase 2 Removing reaction tubes continued Proceed as follows Press the reductor plug 5 the combustion tube connection 3 and the post combustion tube connector 1 down lightly and pu...

Страница 228: ...tect the hot parts from unauthorized access Installing reaction tubes in the furnace and conditioning Note The following section is a continuation of Removing reaction tubes from the furnace All steps...

Страница 229: ...uctor 6 with the plug 5 and well as with the bottom plug Close the combustion tube 4 with the combustion tube connector 3 Close the post combustion tube 2 with the plug 1 Insert the reaction tubes int...

Страница 230: ...Reductor 4 Ball valve fastening 5 Ground in clamp 6 O2 supply tube 7 Post combustion tube connection Phase 1 Installing the reaction tubes continued Proceed as follows Push the furnace back Lift the...

Страница 231: ...the CO2 flow meter Flow CO2 displays approx 700 ml min on screen Decide If approximately the same flow and pressure values as prior to maintenance work are displayed The instrument is ready to measure...

Страница 232: ...ing and installing the absorption and drying tubes Target group Personnel authorized by B CHI Labortechnik AG and having undergone training Purpose This section enables you to fill remove and install...

Страница 233: ...wall with a piece of wood or cork when filling the tubes If the Sicapent cannot be tapped properly also a glass rod for slight compacting can be used Since the life time depends on the amount of Sicap...

Страница 234: ...ss tube Detach the screw on caps Leave approx 5 mm space 1 at the end of the tube Plug approx 10 mm of cotton 2 into the tube so that it comes to rest above the empty space 3 Fill in enough Sicapent 3...

Страница 235: ...impair both the detector signal and the lifetime of the IR detector Location of the drying tubes The following picture shows the location of the drying tubes 1 2 with the front door open Process The s...

Страница 236: ...n clamps Install the large drying tube Screw the large drying tube 2 tightly on top with the red cap Close the front door Close the Replace part dialog in the operating software To do so click Finish...

Страница 237: ...instrument In this chapter Interpreting PC error messages 238 Performing a system test 239 Performing a leak test 240 Leak test procedure 241 Replacing fuses 241 What to do after a computer crash 245...

Страница 238: ...r is detected the Error information window is displayed on screen Here the name of the module which has detected the error as well as the error number is displayed Interpreting error code Proceed as f...

Страница 239: ...rnace again Press pin Then restart the instrument and the software Cf last step in Replacing fuses If unsuccessful please contact the service department Illustrations may vary in instrument type and m...

Страница 240: ...device dialog appears The leak test begins On the left the arrow indicates the current stage of the leak test The result of the leak test is displayed at the bottom If the leak test has passed the sy...

Страница 241: ...ll open Here the test run can be observed Each leak test stage takes place in the following phases Pressure build up Stabilization Test Pressure build up During this stage the valves are switched to p...

Страница 242: ...trictly observe the safety instruction Replacing fuses under Warning notes during operation on page 24 Phase 1 Allow instrument to cool down and disconnect from the mains Proceed as follows Set the fu...

Страница 243: ...t unscrew the rear wall retaining screws and pull the protective earth conductor connector out of the rear wall The following picture shows the protective earth conductor connector Then remove the rea...

Страница 244: ...inuity Make a decision for the further proceeding If the fuse wire is broken Insert a new fuse of the same type no continuity was measured on the fuse Insert a new fuse of the same type the fuse wire...

Страница 245: ...ormal temperatures as the setpoint temperature of the furnaces under System Furnace Once the setpoint temperatures have been reached the instrument is ready to measure again What to do after a compute...

Страница 246: ...arousel Proceed as follows If the analyzer is still switched on switch it off and wait for a moment Switch the analyzer on again If the ball valve audibly does perform a reference run Go to the next s...

Страница 247: ...f the most recent document is loaded All measuring results exist except for the most recent sample A message appears which informs that the sample position is not definied and a reference run has to b...

Страница 248: ...Stop tag Use the arrow buttons to set the sample number at which to set a stop marker Click OK This closes the dialog and moves the stop marker to the desired position Re weighing after sample loss S...

Страница 249: ...carousel always remove all samples from the carousel Proceed as follows Remove all samples from the carousel Open the Set carousel position dialog via System Sample Position Once you have removed all...

Страница 250: ...DuMaster D 480 B CHI Labortechnik AG 9 Repairing the instrument 250 Select the SQLite Files sqlite file type from the File type dropdown listbox and click Save The document is exported and saved under...

Страница 251: ...t corresponds to the menu structure of the instrument software If the invokation of a menu command opens a dialog the corresponding dialog wil be described directly instead of describing the menu comm...

Страница 252: ...riptions key Element types The following list provides pictures of element types that feature in the dialog descriptions Element type Example picture Label Dropdown listbox Checkbox Listbox Radiobutto...

Страница 253: ...lete Command 258 Comment modification Dialog 258 Sign Dialog 259 Verify digital signature Dialog 259 Export to LIMS Dialog 260 Export peak graphics Dialog 261 Configure report Dialog 261 Print Dialog...

Страница 254: ...s opened via File Save or File Save as you can select a file to save from the sample memory into the database Open Open the dialog via Menu command Button Hot key Datei Export Import Export CTRL E Fil...

Страница 255: ...cuments from the selected author are displayed Wildcards such as and are also allowed OK Button Depending on how the dialog was opened Loads the selected document in the current version File Open or s...

Страница 256: ...ts on page 161 Creating new documents on page 160 Export analysis data for support Select version Dialog Function In this dialog you can select a version of a document and load it from the database in...

Страница 257: ...is displayed Elements The following describes the elements of the dialog Label Element type Meaning Save Dropdown listbox Field in which you select the directory to save in Listbox Field displaying a...

Страница 258: ...her with information on the action This allows you to track actions performed by various users Open The dialog opens automatically if the user makes any changes that have to be commented and if 21CFR...

Страница 259: ...he created signature released Radiobutton The released signature is assigned to the document A document may only be given the released signature if it has already been given the created and checked si...

Страница 260: ...Opens a dialog displaying the results of verification Cancel Button Aborts the process Further information Further information includes instructions in which the dialog is used and knowledge articles...

Страница 261: ...r sample no 1 etc If a file with the same name already exists the content of this file will be overwritten with the new graphic information Open Open the dialog by selecting File Export Import Export...

Страница 262: ...only Checkbox Only samples that are highlighted in the text field will be printed Print colors Checkbox The printout is in color If you are using a black white printer and the gray values correspondi...

Страница 263: ...e computer Properties Button Opens a dialog in which you can define the properties of the printer selected on the left in the Name field Status Label Displays the status of the selected printer Type L...

Страница 264: ...u command Button Hot key File Print preview First the Configure report dialog is displayed in which you can select the headers and type of printing before the Print preview dialog is displayed Element...

Страница 265: ...plays the type of the selected printer Location Label Displays the location of the selected printer Comment Label Displays a comment on the printer Note Use the Windows control panel to install printe...

Страница 266: ...eaning Search in Dropdown listbox In this field you can select the directory containing the import file Listbox This field displays files in the selected directory that match the specified file type F...

Страница 267: ...the open document Create new document Radiobutton Creates a new document and inserts the weighing data OK Button Inserts the weighing data in the selected document Cancel Button Aborts the process Fu...

Страница 268: ...adiobutton The backup is started automatically once a day You can set the time in the textbox next to the button Every Radiobutton The backup is started automatically several times a day In the textbo...

Страница 269: ...e logbook from the database file but retains the other data such as settings coefficients etc Open Open the dialog by selecting File Backup Restore Clean Elements The following describes the elements...

Страница 270: ...tion Further information includes instructions in which the dialog is used and knowledge articles concerning the dialog Reloading an old database file on page 95 Administrative work on the database on...

Страница 271: ...inistration File Logoff Command What is the command used for The current user will be logged off This allows a log on of a different user while the program is running The logon dialog appears in which...

Страница 272: ...dialogs for this menu In this section Edit Undo Command 273 Edit Redo Command 273 Edit Cut Command 273 Edit Copy Command 273 Edit Paste Command 274 Edit Insert line Command 274 Edit Delete line Comma...

Страница 273: ...to actions immediately connected with editing sample data Edit Redo Command What is the command used for This command restores an action that you have previously undone Short cuts Invocation via the...

Страница 274: ...ion Short cuts Invocation via the toolbar Invocation via hot key CTRL V Note This command is not available if the clipboard is empty Edit Insert line Command What is the command used for This command...

Страница 275: ...nts of the dialog Label Element type Meaning Swap sample No Textbox Field to input the number of the sample to swap with sample No Textbox Field to input the number of the sample to swap OK Button Swa...

Страница 276: ...can also set the sample number in the textbox using the arrows OK Button Saves the setting Cancel Button Aborts the process Further information Further information includes instructions in which the...

Страница 277: ...ouse button function on page 67 Set current weighed sample Dialog Function You set the number of the current weighed sample in the dialog The current weighed sample is the sample that receives a weigh...

Страница 278: ...279 Zoom in out Dialog 279 Configure sample view Dialog 279 Save sample pane Dialog 280 Load sample pane Dialog 281 Delete sample pane Dialog 281 View Gridview Auto align Command 282 Configure graph v...

Страница 279: ...View Zoom in out Elements The following describes the elements of the dialog Label Element type Meaning Zoom factor Dropdown listbox Field to select the zoom factor You can choose between zoom factors...

Страница 280: ...s new settings Cancel Button Discards settings not yet saved Number of decimal places You can specify the number of decimal places used in columns in the Column properties dialog Open this dialog from...

Страница 281: ...was saved in the same operating mode as the current mode in which the analyzer is running Open Open the dialog via View Gridview Load configuration Elements The following describes the elements of the...

Страница 282: ...ialog via View Graphic Configure Progression view graph view must be enabled in order to open the dialog Elements The following describes the elements of the dialog In section Y axis configuration Lab...

Страница 283: ...mmand optimizes the graph view The graph is scaled so that it is completely visible Configure statistics view Dialog Function In this dialog you can define the appearance of the statistics view Open O...

Страница 284: ...Command What is the command used for This command optimizes the statistics view The individual columns are automatically widened or narrowed to make the headers and entries completely visible Select c...

Страница 285: ...the dialog is used and knowledge articles concerning the dialog Specifying the number of decimal places on page 147 Right mouse button function on page 67 Configuring the sample pane on page 147 Weig...

Страница 286: ...Operating instructions DuMaster D 480 B CHI Labortechnik AG 10 Menu and dialog descriptions 286...

Страница 287: ...on describes commands and dialogs for this menu In this section System Auto run Command 288 System Single run Command 288 System Stop Command 288 System Auto zero Command 289 Furnace switch off on Dia...

Страница 288: ...ystem Single run Command What is the command used for This command starts a single analysis i e the next sample in sample memory current sample is processed After processing the single sample the syst...

Страница 289: ...essible thus allowing the abortion System Auto zero Command What is the command used for This command causes to set the current output values of the dectors to zero The purpose is to reset the signals...

Страница 290: ...he sample carousel Make sure that the setting here matches to the actual size of the sample carousel Open Open the dialog by selecting System Feeding Elements The following describes the elements of t...

Страница 291: ...mple at position 26 in the next analysis Therefore select position 25 The carousel moves so far that position 25 is above the insertion opening When the next analysis starts the carousel moves one pos...

Страница 292: ...is section describes commands and dialogs for this menu In this section Math Blank values Calculate Command 293 Blank values Dialog 293 Math Factor Command 294 Define type of peak Dialog 294 Define pe...

Страница 293: ...ows you to apply the blank values just computed Open Open the dialog either via Math Blank Value Input You can only open the dialog if you have set the total blank value calculation method or via Math...

Страница 294: ...peaks can be edited in the manual integration process An integration process is executed by setting a start and end tag each Superimposed peak Radiobutton Sets the behavior in such a way that superim...

Страница 295: ...Allows the assignment of the manually integrated peak areas to one element component Close Button Closes the dialog Clicking a symbol button results in an activation of the corresponding function Recl...

Страница 296: ...s the assignment and closes the dialog After the assignment the assigned area and the resulting new element content are displayed in the sample view Cancel Button Closes the dialog without assignment...

Страница 297: ...ed for This command recomputes the results of all samples in sample memory This makes sense for example if you have analyzed a calibration series and then a measuring series immediately afterwards e g...

Страница 298: ...ds and dialogs for this menu In this section Statistics Via names Command 299 Statistics Group Command 299 Statistics Sort group Command 299 Statistics Delete group Command 299 Statistics Clear statis...

Страница 299: ...e if at least two samples are selected When you execute this command the statitsical group and its results are displayed in the combi view statistics view Statistics Sort group Command What is the com...

Страница 300: ...ed sample of a calibration series is displayed as a full circle eliminated and is excluded from the calibration calculation Executing this command again displays the sample as uneliminated and include...

Страница 301: ...ection describes commands and dialogs for this menu In this section Calibration coefficients Dialog 302 Configure calibration Dialog 303 Specify lower and upper calibration range Dialog 304 Calibratio...

Страница 302: ...bration Coefficients Elements The following describes the elements of the dialog On the respective tab Label Element type Meaning Coefficient x Textbox The respective field displays for the selected c...

Страница 303: ...Element type Meaning One calibration range Radiobutton Only one calibration curve is computed over the entire measuring range for the respective element Polynomial degree Textbox Field to input the p...

Страница 304: ...ement type Meaning Button Moves the dividing line between the upper and lower calibration range to the left in larger intervals Button Moves the dividing line between the upper and lower calibration r...

Страница 305: ...is command moves the sample marker to the previous sample in the calibration graph Short cuts Invocation via the toolbar Invocation via hot key CTRL Calibration Next Command What is the command used f...

Страница 306: ...est Test phases Dialog 311 System test Dialog 312 Error buffer Dialog 314 Error display Dialog 314 Options Diagnostics Baseline recording Command 315 Input options Dialog 315 Standard samples Dialog 3...

Страница 307: ...after which the maintenance must be performed or The field displays the interval of the event selected in the adjacent list box Status Textbox label Field to input the number of samples already analyz...

Страница 308: ...ly is reactivated and any atmospheric nitrogen is flushed out with carrier gas Safety instruction Strictly observe the safety instruction Gas pressure under Warning notes during operation on page 24 O...

Страница 309: ...moves the next sample position above the insertion opening and drops the sample Therefore it makes sense to select the previous position when moving the carousel Example You want to move the carousel...

Страница 310: ...s for selection and or execution of the certain test stages Open Open the dialog by selecting Options Diagnostics Leak test First a dialog is displayed in which you must confirm that you want to perfo...

Страница 311: ...in a certain section of the system first stage of the test Stabilization Label The gas inlet valve is closed The system waits for a set time to allow stable pressure conditions in the subsequent test...

Страница 312: ...ibration Start up Reacting to a power failure on page 245 Maintenance work to be performed by the customer System test Dialog Function In this dialog you can test the system components of the analyzer...

Страница 313: ...s setpoint flow MFC O2 Textbox label This field displays the current flow of the oxygen Field to input a target flow value This field displays the flow progression of the oxygen towards setpoint flow...

Страница 314: ...of events currently in the error buffer show deleted items Checkbox If activated all events which have been deleted previously will be displayed again This element is not enabled at the lowest access...

Страница 315: ...tes too strongly Select this command again to hide the base line Input options Dialog Function In this dialog you can define what the program should do when you input the same name This allows you to...

Страница 316: ...entered for all subsequent samples Fill blank values to last sample Checkbox The blank value input for the first sample is entered for all subsequent samples OK Button Saves new settings Cancel Button...

Страница 317: ...alog Function In this dialog you specify keywords for conditioning samples and blank value samples A key word is a reserved sample name that the software recognizes and interprets in a special way Not...

Страница 318: ...a connected balance transmits a weighing value to the PC OK Button Saves new settings Cancel Button Discards settings not yet saved Further information Further information includes instructions in wh...

Страница 319: ...calculation of the blank value starts automatically after the end of every analysis Remaining elements Label Element type Meaning OK Button Saves new settings Cancel Button Discards settings not yet s...

Страница 320: ...ning none Radiobutton No data are sent to LIMS via serial port Radiobutton Data are transferred via the serial port via network Radiobutton The data to send to the LIMS are written to a file The file...

Страница 321: ...l PDF file Note You only need to edit the Network section if you have selected the via network radio button in the Data transfer section Identifier tab On this tab Label Element type Meaning Instrumen...

Страница 322: ...the dialog by selecting Options Settings Methods Elements The following describes the elements of the dialog Label Element type Meaning Listbox This field lists all methods already defined Identifier...

Страница 323: ...he default method If during input of sample data no method has been specified then the program suggests the name of the default method Save Create Button Saves changes of an existing method or creates...

Страница 324: ...u command Closes the dialog In the Edit menu Label Element type Meaning Edit Copy Menu command Copies the selected text to the clipboard You can then insert this text in a text documennt for example E...

Страница 325: ...behavior The individual tabs represent the respective initialization files There are various sections in an initialization file Each section contains entries whose values influence the behavior of th...

Страница 326: ...es all entries which are included in the activated tab OK Button Saves new settings DEVICE INI tab The following table describes the entries under the AnalyzerPort section Entry Standard Description N...

Страница 327: ...Defines what parameters must be sent to the signature program when signing Verify Parameters Defines what parameters must be sent to the signature program when verifying The following table describes...

Страница 328: ...Checkbox Every finished sample which is not a blank sample is checked for its peak area If its value does not exceed a minimum threshold the program assumes that the sample has not been thrown in whic...

Страница 329: ...Checkbox Shuts off the carrier gas when the analyzer goes into sleep mode Switch of combustion tube Checkbox The heater of the combustion tube will be turned off Switch of post combustion tube Checkb...

Страница 330: ...s during operation on page 24 Open Open the Configure instrument dialog by selecting View Configuration Click Edit to edit a selected entry in a section Insert to create a new entry in a section Eleme...

Страница 331: ...aster D 480 B CHI Labortechnik AG 10 Menu and dialog descriptions 331 Creating new sections on page 77 Defining the analyzer PC interface on page 84 Defining the autoexport directory on page 93 Device...

Страница 332: ...d dialog descriptions 332 Windows menu Purpose This section describes commands and dialogs for this menu In this section Windows Toolbar Run Bar Command 333 Toolbar 333 Windows Recent sample Command 3...

Страница 333: ...s displayed a check will appear next to the menu item See Toolbar on page 333 Toolbar Toolbar The individual buttons on the toolbar correspond to the following commands Icon Command File New File Open...

Страница 334: ...d used for This command shows or hides the enhanced display of the sample analyzed most recently If the most recently sample is displayed a check will appear next to the menu item Windows Status view...

Страница 335: ...d dialog descriptions 335 Help menu Purpose This section describes commands and dialogs for this menu In this section Help Content Command 336 Help Find Command 336 Help B CHI Labortechnik AG on the W...

Страница 336: ...log you can input your registration data to unlock the operating software Open This dialog is automatically displayed when you launch the operating software for the first time if you forgot any import...

Страница 337: ...on the installation DVD cover If installing and upgrading you must send the registration details in this dialog to B CHI You will then receive an identification code to be entered here It is not possi...

Страница 338: ......

Страница 339: ...D 480 B CHI Labortechnik AG Target group Personnel involved with the instrument In this chapter Revision history 340 Warranty 341 Accessories spare parts and consumables 343 Declaration of conformity...

Страница 340: ...uMaster D 480 B CHI Labortechnik AG 11 Appendix 340 Revision history List of modifications in this document up to now Date Modification 29 09 2014 Creation 16 10 2014 made small text correction in the...

Страница 341: ...instructions DuMaster D 480 B CHI Labortechnik AG 11 Appendix 341 Warranty Target group Personnel involved with the instrument In this section Warranty of the overall instrument 342 Warranty on the fu...

Страница 342: ...ser must ensure that the furnace is operated according to the instructions The furnace must not be heated in excess of the maximum temperature indicated in the operating instructions The furnace must...

Страница 343: ...cessories spare parts and consumables Target group Personnel involved with the instrument Purpose This secton contains information about ordering accessories spare parts and consumables In this sectio...

Страница 344: ...stem software available in German or English Basic instrument product numbers Product numbers for the basic instrument with initial set initial chemical set replacement chemicals and consumables set a...

Страница 345: ...and 1 x RS 232 balance DVD ROM drive Printer Article no 50 031 857 Printer with printer cable for 230 V 50 60 Hz other voltages on request Electronic microbalance There are two different microbalances...

Страница 346: ...the material from the initial set is used up The following table lists consumables for solid samples Consumable material set product number Number of analyses 16 02 5051 Reagent kit approx 4000 16 02...

Страница 347: ...ctions DuMaster D 480 B CHI Labortechnik AG 11 Appendix 347 Declaration of conformity Purpose This section includes the declaration of conformity of B CHI Labortechnik AG In this section Declaration o...

Страница 348: ...ng newly installed tubes 170 Conditions for operating the LIMS 70 Configure analyzer 75 76 97 Configure backup Dialog 94 267 Configure Calculations Dialog 318 Configure calibration Dialog 303 Configur...

Страница 349: ...ae for blank value determination and compensation 56 294 Formulae for generating statistical data 149 Formulas for determining element concentration of analysis samples Solids 48 Front view 36 Functio...

Страница 350: ...dministration 81 Reductor replacing 224 Refill the Regainer 190 191 Reloading an old database file 95 270 Removing and cleaning the Ni flap 207 Removing and dismantling the ball valve 198 Removing and...

Страница 351: ...f blank value determination and their settings 141 U Understanding the instrument and planning its use 41 Understanding the operating software 58 User administration 81 Using the instrument 117 V Valu...

Страница 352: ......

Страница 353: ......

Страница 354: ...www buchi com cn India BUCHI India Private Ltd IN Mumbai 400 055 T 91 22 667 75400 F 91 22 667 18986 india buchi com www buchi in Indonesia PT BUCHI Indonesia ID Tangerang 15321 T 62 21 537 62 16 F 6...

Отзывы: