background image

DK40i Configuration

Worksheet 1 – System PCB Assignment Guide

2-14

Strata DK I&M    6/00

Example Configuration Tables

Note

One TBSU circuit is configured as a station-side BRI and one circuit is line-side BRI.

Note

Two RBSU circuits are configured as line-side BRI and two RBSS circuits are station-side 
BRI.

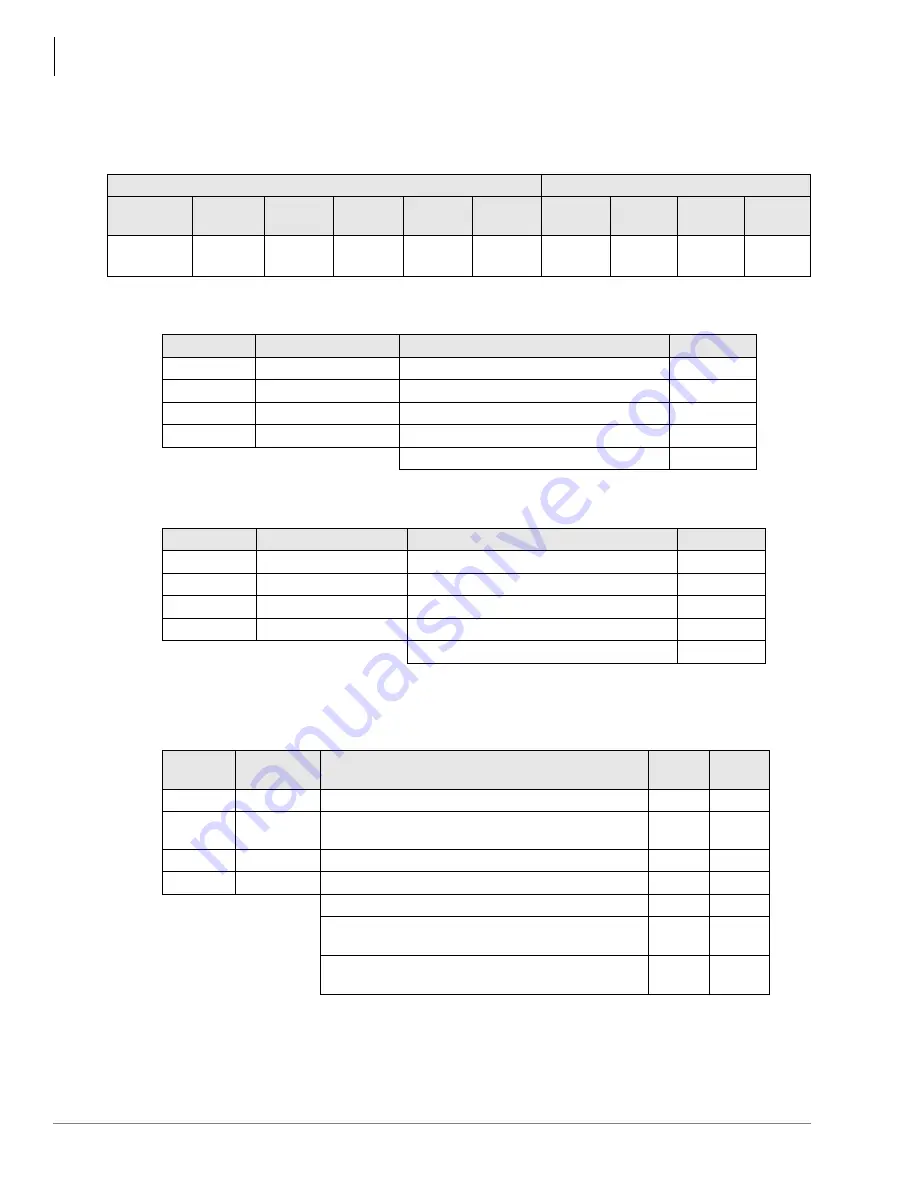
Table 2-15

Hardware Configuration Example

Base Cabinet

Expansion Cabinet

Slot 

Number

00

11

12

13

14

15

16

17

18

PCB Type

K5RCU2

8 DKTs

TBSU

KSTU2

4 SLT

None

PDKU2

RBSU/
RBSS

RCOU

PIOU

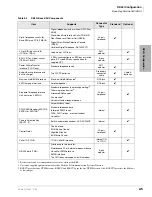
Table 2-16

Strata DK40i Base Cabinet Station Port Configuration Example

Installed

PCB Type

Port Type 

Port Total

Yes

Motherboard

Digital Telephone (8 ports)

8

Yes

KSTU2

Standard Telephone (4 ports)

4

Yes

TBSU circuit #1

ISDN station side (2 ports)

2

Yes

TBSU circuit #2

ISDN station side (configured as lines)

Total Base Ports (16 ports max.)

 =

14

Table 2-17

Strata DK40i Base Cabinet Line Configuration Example

Installed

PCB Type

Number of Line Types

Line Total

No

TCOU

Loop start (4 lines)

No

TDDU

Direct Inward Dial (4 lines)

Yes

TBSU circuit #1

ISDN line side (configured as stations)

Yes

TBSU circuit #2

ISDN line side (2 lines)

2

Total Base Lines (4 lines max.) =

2

Table 2-18

Strata DK40i Base and Expansion CO Line Configuration Example

Exp.

Slot No.

PCB 

Installed

Port Type or Line Type

Ports

Lines

15

PDKU

8 Ports

8

16

RBSU/

RBSS

4 Ports and 4 Lines

4

4

17

RDDU

4 Lines

4

18

PIOU

None

Total Ports & Lines in Expansion slots (15~18)

12

8

Total Base Unit ports and lines 
(from 

Tables 2-16

 and 

2-17

)

14

2

Total DK40i Base/Expansion ports & lines 
(28 ports/12 lines max.)

26

10

Summary of Contents for Strata AirLink DK40i

Page 1: ...726 Telecommunication Systems Division June 2000 Digital Business Telephone Solutions Installation and Maintenance Manual Software Release 4 3 and ACD Software Release 3 1 ...

Page 2: ...on and or the appropriate FCC registration number contact your local Toshiba telecommunications distributor for assistance DK14 and DK40i Key system CJ6MLA 74479 KF E Hybrid CJ6MLA 74478 MF E DK424 Hybrid CJ69XA 10243 MF E Key system CJ69XA 10242 KF E PBX CJCHN 22757 PF E DK424i Key system CJ69XA 10242 KF E Hybrid CJ69XA 10243 MF E PBX CJ6JPN 22758 PF E 3 Ringer equivalence number 0 3B The ringer ...

Page 3: ...round 1 4 KSU Mounting Considerations 1 5 Pre installation 1 5 Mounting the KSU 1 6 Power Supply Removal and Replacement 1 8 Power Supply Removal 1 8 Power Supply Replacement 1 9 Printed Circuit Board PCB Installation 1 9 PCB Installation Considerations 1 10 KSU Option PCBs 1 10 PCB Option Considerations 1 10 PCB Installation Power Supply Considerations 1 10 Built in CO Line Digital Telephone and ...

Page 4: ... DK14 Wiring Diagrams 1 23 Chapter 2 DK40i Configuration Feature Capacities 2 2 Base Key Service Unit KSU 2 4 Station and CO Lines 2 4 Peripherals 2 4 Expansion KSU 2 6 Peripherals 2 8 Telephone Circuit Port Types 2 9 Digital Telephone Circuit Connections 2 9 Electronic Telephone Circuit Connections 2 10 Standard Telephone Circuit Options 2 10 ISDN Station Devices 2 10 Worksheet 1 System PCB Assig...

Page 5: ...tallation 3 18 Power Failure Emergency Transfer Option 3 18 Installing Power Failure Emergency Transfer 3 18 Testing Power Failure Emergency Transfer 3 18 Power Supply Removal and Replacement 3 19 Power Supply Removal 3 19 Power Supply Replacement 3 20 Printed Circuit Board PCB Installation 3 20 Base KSU PCBs 3 20 Expansion KSU PCBs 3 21 PCB Hardware Software Options 3 21 PCB Installation Power Su...

Page 6: ... DSS Consoles and Door Phones MDFBs 4 18 AC and Reserve Power Hardware 4 19 Floor Mount Installation Hardware 4 19 Worksheets 4 20 Worksheet 1 System PCB Slot Requirements 4 21 Digital Ports Required 4 21 Electronic Ports Required 4 21 Standard Ports Required 4 22 Station PCBs Slots Required 4 23 CO Line PCBs Slots Required 4 24 Attendant Console Slots Required 4 26 PIOU PIOUS RSIU RSSU Option Slo...

Page 7: ...tercabinet Ground 5 30 AC Power Cabling Installation 5 30 AC Power for One or Two Cabinets Wall Mount 5 30 AC Power for Three or More Cabinets Wall Mount 5 31 AC Power for Three or More Cabinets Floor Mount 5 31 Reserve Power Installation 5 32 Reserve Power for One or Two Cabinets Wall Mount 5 33 Reserve Power for Three or More Cabinets Wall Mount 5 33 Reserve Power AC Wiring for Three or More Cab...

Page 8: ... 6 23 Worksheet 3 Standard Telephone 6 24 Worksheet 4 CO Line 6 25 Worksheet 5 Feature Option PCB 6 26 Worksheet 6 DK424i Cabinet Slot Configuration 6 27 PCB Placement Guidelines 6 27 Worksheet 7 System Power Factor Check 6 33 Telephone Device Power Factors 6 35 Cabinet Power Factor Check 6 37 Worksheet 8 Cabinet AC Reserve Power Components 6 38 Power Considerations 6 38 Reserve Power 6 39 Primary...

Page 9: ...ion Considerations 7 40 PCB Option Considerations 7 40 BCU Processor PCBs 7 41 PCB Installation Power Supply Considerations 7 41 Maximum Capacities 7 41 Internal Hardware Options 7 42 BCU Installation 7 44 BCU Programming 7 45 Remote Expansion Cabinet Unit 7 53 Remote Cabinet Installation Instructions 7 54 Status Indicators 7 58 Monitor Port Communication Parameters 7 59 Monitor Port Pin Assignmen...

Page 10: ...Unit 9 12 Speaker Off hook Call Announce Unit EOCU Installation onto the PEKU Internal Option 9 12 External Options 9 12 PEKU Configuration to Support an HDSS Console Option 9 12 PEKU Installation 9 13 PEKU Programming 9 13 PEPU2 External Page Interface Unit 9 15 PEPU2 Installation 9 15 PEPU2 Programming 9 15 PESU Standard Electronic Telephone Interface Unit 9 17 DK40i General Information 9 17 Ins...

Page 11: ...EMU Installation 9 43 PEMU Installation 9 44 PEMU REMU Programming 9 44 RGLU2 Loop Ground Start CO Line Interface Unit 9 47 RGLU2 Installation 9 47 RGLU2 Programming 9 47 RSIU RSIS RMDS RS 232 Modem Interface Unit 9 49 RSIS RMDS Piggy Back Installation 9 50 RSIU Installation 9 50 RSIU RSIS RMDS Programming 9 53 RSSU PC Interface Unit 9 55 RSSU Installation 9 55 RSSU Programming 9 55 RSTU2 Standard...

Page 12: ...Upgrade HHEU 11 18 Carbon Headset Handset Straps 11 20 Beep Strap 11 21 Microphone Speaker Sensitivity Adjustment Speakerphones Only 11 21 Busy Override and Camp on Ring Tone Over Handset Headset Option 11 21 External Power Straps 11 22 DKT2000 ADM Installation 11 22 Electronic Telephone Upgrades 11 23 Off hook Call Announce Upgrade HVSU2 or HVSU HVSI 11 23 Loud Ringing Bell Headset Upgrade HHEU 1...

Page 13: ...58 Chapter 12 Peripheral Installation Power Failure Options 12 1 Reserve Power 12 1 DK14 DK40i Single line Power Failure Emergency Transfer 12 1 DK40i DK424 Power Failure Transfer Unit 12 1 Power Failure Emergency Transfer DPFT Installation 12 2 Music on Hold MOH Background Music BGM Options 12 3 MOH Option 12 3 BGM Options 12 6 Alternate BGM Source Installation 12 9 External BGM Installation 12 1...

Page 14: ...IU DS to Modem Installation 12 62 Modem Setup Recommendations 12 64 PDIU DS Disassembly and Assembly 12 64 RPCI DI PDIU DI PDIU DS Data Communication Installation Tests 12 65 DK Alarm Sensor 12 73 Auto Attendant 12 74 Strata DK Built In Auto Attendant AA 12 74 Non built in Auto Attendant 12 80 Multiple PIOU PIOUS RSSU Installation 12 81 Enhanced 911 Service E911 12 83 E911 System Installation 12 8...

Page 15: ... Clearing Procedures 14 1 Parts Return 14 2 KSU Processor PCB Fault Isolation 14 3 Fault Isolation Procedure 14 3 DK424 RPSU280 Power Supply Test 14 4 Station Cable Continuity Check 14 7 Voltmeter Test 14 7 Ohmmeter Test 14 8 Cable Installation Test 14 9 Fault Isolation Flowcharts 14 10 Chapter 15 Computer Telephony Integration About Strata DK and TAPI 15 1 Requirements 15 1 StrataLink and TAPI Se...

Page 16: ...16 17 Modular Jack Pin Configurations 16 22 TBSU and RBSU RBSS Premise Wiring Guidelines 16 22 Connecting TBSU and RBSU to Network Side TE Mode 16 25 Connecting TBSU and RBSU RBSS Station Devices NT Mode 16 26 TBSU and RBSU RBSS Passive Bus Configurations 16 28 RBUU RBUS and TBUU Interface Unit 16 30 RBUU and TBUU Installation 16 30 TBUU and RBUU RBUS Wiring Guidelines 16 33 ISDN Testing and Troub...

Page 17: ...re and station devices that make up the system Chapter 3 DK40i Installation covers site requirements and cabinet installation information Defines the installation site requirements necessary to ensure a proper operating environment for the Strata DK40i Also included are input power requirements cable lengths network requirements and grounding requirements Explains how to install both the Base Key ...

Page 18: ...s can be found in the installation chapter for the system e g Chapter 3 DK40i Installation Chapter 11 Station Apparatus provides instructions on how to connect telephones to the Strata DK systems and how to configure and upgrade them for optional features Procedures for installing direct station selection consoles PC and conventional attendant consoles and door phones also appear Chapter 12 Periph...

Page 19: ...ary appearance of a PDN A PDN which appears on another telephone is considered an SDN PhDN Represents any Phantom Directory Number button an additional DN ULDO ROG Represents telephone buttons Courier Shows a computer keyboard entry or screen display Type Indicates entry of a string of text Press Indicates entry of a single key For example Type prog then press Enter Plus Shows a multiple PC keyboa...

Page 20: ...anagement Information System HMIS Installation Guide Insight DK Installation Guide Voice Over Internet Protocol Installation Maintenance Manual Feature Description Strata DK Feature Description Manual User Guides Digital Telephone Digital Single Line Telephone Electronic Telephone Standard Telephone DKT2004 CT Cordless Telephone DKT2104 CT Cordless Telephone Strata AirLink External Wireless Handse...

Page 21: ... Keyprint 2000 Quick Reference Guides Digital Telephone Electronic Telephone Strata AirLink External Wireless Strata AirLink Integrated Wireless PC Attendant Console Insight DK inView CD ROMs Strata DK Library Strata DK HMIS StrataControl DKi Quote DKi Admin DKi Backup Strata DK424 Insight DK Insight works with the DK424i also For authorized users Internet site FYI http fyi tsd toshiba com contain...

Page 22: ...Introduction Related Documents Media xx Strata DK I M 6 00 ...

Page 23: ... missing or damaged contact your supplier immediately 3 Be sure to retain original packaging materials for re use when storing or transporting system hardware Packaging and Storage CAUTION When handling installing removing examining PCBs do not touch the back soldered side or edge connector Always hold the PCB by its edges When packaging and storing the system remove PCBs from the system cabinet t...

Page 24: ...ource two customer supplied 12 volt batteries may be connected to the system to serve as a power failure backup Clearance and Location The minimum clearance requirements for the DK14 KSU are shown in Figure 1 1 The HPFB should be mounted directly above the D14 KSU Consider the following conditions when selecting a location for the KSU s The location must be Dry and clean Well ventilated Well illum...

Page 25: ...pply Specification AC frequency Power AC Current 85 135VAC 50 60 Hz 75 watts maximum 0 7 amps maximum Environmental Specifications Operating temperature Operating humidity Storage temperature 32 104 F 0 40 C 20 80 relative humidity without condensation 4 158 F 20 70 C Power Supply DC voltage output specification 24VDC 26 3 27 8VDC 5VDC 4 5 5 5VDC 5VDC converter on KSU PCB QSTU2 Circuits 1 and 2 Ri...

Page 26: ...CAUTION 5 If a reading of zero volts on one terminal and a reading of 105 125VAC on the other terminal is obtained remove both probes from the outlet 6 Set the meter to the OHMS Rx1 scale Place one probe on the ground terminal and the other probe on the terminal that produced a reading of zero volts The reading should be less than 1 ohm CAUTION If the reading is more than one ohm then the outlet i...

Page 27: ...n to provide a 3db level loss to avoid excessive loudness 4 Install all optional PCBs per instructions later in this chapter Figure 1 4 DK14 Interior View AC DC 6 87 10 Front Cover Screws 4 16 3 6 7 Wall Mount Screws 4 2361 Figure 1 3 DK14 Dimensions J15 QRCU J11 J14 J10 QCDU 2 QCDU 1 J9 0 PAD 3 NOR BNPAD 0 PAD 3 NOR BNPAD SW401 SW451 QSTU J12 QSTU J13 VR701 J19 J21 WSIU J20 WSIU J2 C01 J7 J8 QSTU...

Page 28: ... the bottom two screws into the wall 8 Ground system according to previous AC Power and Grounding Requirements instructions on Page 1 3 9 Connect applicable wiring modular CO line cords 25 pair amphenol connector cable etc to the KSU Route the wiring as shown in Figure 1 6 and then fasten wiring to the unit with the tie wraps that come with the KSU See Figures 1 16 1 17 for additional wiring detai...

Page 29: ...FG screw to the DK14 QPSU8 screw labeled HPFB6 The ground wire can be fed through the opening by the AC power cord Note The DK14 should be plugged into AC power and the DC power switch should be turned On The HFPU will not start to operate if AC power is not available during the initial installation 7 The 24VDC LED on the HPFB should light If it does not light press the battery Off switch with a p...

Page 30: ...estored to the DK14 KSU Figure 1 7 DK14 Reserve Power Installation Power Supply Removal and Replacement The power supply comes factory installed in the KSU if necessary it can be removed and replaced Power Supply Removal 1 Make sure that the power supply switch is Off and that the AC power cable is not plugged into an outlet Confirm that green AC LED is not lit See Figure 1 8 2 Loosen the screws o...

Page 31: ... Fault Finding DK14 Hardware Fault Isolation procedure 8 Plug HPFB cable into BATT connector of power supply and reconnect the HPFB ground wire 9 Reinstall the cover on the KSU Printed Circuit Board PCB Installation This section provides procedures for installation of Strata DK14 system optional printed circuit boards PCBs into the KSU This includes installation instructions optional configuration...

Page 32: ...1 9 PCB Option Considerations PCBs may be configured for a variety of hardware and software options Hardware options are defined as either internal generally related to optional PCB subassemblies or external related to connection of peripheral equipment such as background music voice mail etc Hardware and software options for each PCB are identified in the individual PCB installation procedures in...

Page 33: ...DU2A QKYS J2 J10 J20 J3 J21 J4 J1 SW101 CO4 SIO 1 SIO 2 DC BATT QRCU3A Component Side CO2 J6 25 Pair Amphenol Jack female for Telephone Tip Ring and Relay Contact CO3 CO1 PFT RJ11 Modular Jack 6 wire RJ11 Modular Jacks 6 wire RJ11 Modular Jack 1 or 2 HPFB reserve power units System Frame Ground Bar AC DC QCDU2A MOH Jack MOH Volume Control 600 ohm Page Not Used F G J9 J1 0 PAD 3 SW101 SW1 190 130 J...

Page 34: ...e motherboard in the KSU These circuits are identical to the digital circuits found on the QCDU2 The motherboard does not have to be configured for the digital circuits to operate KSU Motherboard CO Line Digital Station Circuit Wiring See Figures 1 14 1 16 for details Power Failure Telephone Installation 1 Remove the RJ11 cover Figure 1 11 from the PFT jack and store the jack cover 2 Connect the p...

Page 35: ... loss QCDU2 Installation A maximum of two QCDU2 PCBs can be installed in the KSU To install the QCDU2 1 If the system is located within one mile of the CO or PBX telephone system set db PAD switch SW101 to the PAD position 2 Make sure that the power supply switch is Off 3 Slide QCDU2 s front edge and FG wire under the System Frame Ground Bar align and insert the QCDU2 connector J1 into the motherb...

Page 36: ...ributes to the CO line Program 16 Assigns CO line to groups 81 84 and dial 9 group Program 40 Assigns stations access to CO line incoming and outgoing access Program 50 Assigns Caller ID CO lines to Caller ID interface CO line Program 51 Assigns station to Caller ID Lost Call memory Modular Jacks C02 Cover C01 PFT Knock out PFT jack cover when QCDU SMDR TTY is installed Take out jack cover when PF...

Page 37: ...TU2 port a QRCU3 must be installed The QSTS2 PCB is factory installed on the QSTU QSTU2 Configuration The QSTU2 does not require configurations for the ring generator voltage level Most standard telephones and two wire devices require 190 however some devices may experience ring trip at 190 and should be set at 130 QSTU2 Installation 1 Make sure the power supply switch is Off 2 Align the QSTU2 con...

Page 38: ...for voice mail installation Program 10 2 Used to set standard telephone ringing option and separate BGM assignment Note QSTU2 ports are fixed They are assigned even if a QSTU2 is not installed QSTU2 Wiring Refer to DK14 MDF to KSU Amphenol Wiring in Figure 1 16 for QSTU2 wiring The QSTU2 must be connected to a OL13A or equivalent type lines for off premises stations 300 ohms loop resistance max in...

Page 39: ...em Access DISA calls The QRCU3 circuits are also used to detect busy tone for the Automatic Busy Redial ABR feature and must be installed to allow ABR to operate QRCU3 Configuration The QRCU3 does not have to be configured for operation QRCU3 Installation 1 Make sure that the power supply switch is Off 2 Align and insert the QRCU3 connectors J1 and J2 see Figure 1 13 into the motherboard connector...

Page 40: ... installing a QKYS1 Key chip onto the QRCU3 PCB To install the QKYS1 Key 1 Make sure that the DKSU14 power supply switch is Off 2 Install the QKYS1 into the QKYS1 connector on the QRCU2 PCB see Figure 1 13 3 The QKYS1 does not require Program 03 assignments Programming Refer to Auto Attendant Built in in the Overview section of the Strata DK Programming Manual ...

Page 41: ...O Box 4087 Huntsville AL 35815 4087 Phone 256 881 4000 The communication parameters for TTY and Caller ID WSIU1 SI01 or SI02 ports are Data word bits 7 Parity even Stop bits 1 The communication parameters for SMDR WSIU SI01 or SI02 are Data word bits 8 Parity None Stop bit 1 WSIU1 Installation 1 Make sure that the power supply switch is Off See Figure 1 14 2 Slide the front edge under the System F...

Page 42: ...to operate at a specified transmission rate Where X identifies the WSIU1 Port number 1 2 Z identifies the WSIU1 port transmission rate in bits per second bps Z 1 9600 Z 2 4800 Z 3 2400 Z 4 1200 Note The sum of WSIU1 port 1 and port 2 bps rate cannot exceed 9600 bps WSIU Wiring Note Refer to Chapter 12 Peripheral Installation SMDR and TTY for WSIU wiring interconnecting details See Figure 1 17 for ...

Page 43: ...Control 2 Loop Start CO Lines and 4 Digital Telephones Interface Unit QPSU8A2 Yes X Power Supply QCDU2A Yes X 1 Loop Start CO Line and 2 Digital Telephones Interface Unit QRCU3A Yes X 3 DTMF ABR Tone Detection Receiver Unit QSTU2A Yes X 2 Standard Telephones Interface Unit WSIU1A No X 2 Serial I O Interface Unit QKYS1A Yes X Auto Attendant Feature Key DK8 PCBs Compatibility Use in DK14 Standard Op...

Page 44: ...secondary protectors for communication circuits UL497A Care must be taken to ensure that they are very well grounded to a reliable earth ground Recommended protectors are available in the fast Series 6 line from ONEAC Corp Libertyville Illinois 60048 800 327 8801 Install and test the secondary protectors precisely to the installation instructions of thee manufacturer Figure 1 14 DK14 Secondary Pro...

Page 45: ...o Base Unit P5 With Female Connector Circuit 2 to DKT23 or PDIU DS or DDCB Circuit 3 to DKT33 or PDIU DS or DDCB Circuit 4 to DKT43 or PDIU DS Circuit 6 to DKT64 or PDIU DS Circuit 7 to DKT74 or PDIU DS Circuit 5 to DKT54 or PDIU DS T1 Voice Data 3 GND R1 Voice Data PT1 Add Power GND PR1 Add Power T2 R2 PT2 PR2 T3 R3 PT3 PR3 T4 R4 PT4 PR4 T5 R5 PT5 PR5 T6 R6 PT6 PR6 T7 R7 PT7 PR7 Not Used Station ...

Page 46: ...3 2 1 Y BL R BK W 2 3 4 5 R4 T4 6 1 CO1 6 1 PFT bottom CO4 4 3 R T 4 3 R T Power Failure Standard Telephone 1 2 3 4 5 6 7 8 9 10 11 12 13 14 15 16 17 18 19 20 21 22 23 24 25 26 27 28 29 30 31 32 33 34 35 36 37 38 39 40 41 42 43 44 45 46 47 48 49 50 66M150 Split Block 1 2 3 4 5 6 7 8 9 10 11 12 13 14 15 16 17 18 19 20 21 22 23 24 25 26 27 28 29 30 31 32 33 34 35 36 37 38 39 40 41 42 43 44 45 46 47 ...

Page 47: ... 2 3 4 5 R1 T1 CO1 GN 6 5 4 3 2 1 Y BL R BK W 2 3 4 5 R2 T2 2 3 4 5 6 1 CO3 Same connections as above Same connections as above CO2 4 3 R T 4 3 R T 6 1 CO3 CO2 2 3 4 5 6 1 CO1 Base QCDU2 DK14 KSU Telco RJ21X QCDU2 6 1 PFT bottom CO4 4 3 R T 4 3 R T Power Failure Standard Telephone 2430 5 Front View DB 9 Plug male Front View 6 pin Modular Jack Modular Adaptor Wiring Diagram AC Adaptor supplied with...

Page 48: ...DK14 Installation DK14 Wiring Diagrams 1 26 Strata DK I M 6 00 ...

Page 49: ...vide an extensive number of features for a telephone system of its size A list of the DK40i features and capacities is provided in Tables 2 2 2 3 Important System configuration can be complex and time consuming For best results Use DKi Quote version 4 3 1 to provide easy fast automated configuration of DK40i without the T1 PRI and ACD features See the DKi Quote User Guide for more information If t...

Page 50: ...outing Numbers 100 DNIS Numbers 200 DTMF receivers 5 External Page Zones 4 Call Park Orbits general 20 Call Park Orbits individual 28 Personal LCD Messages per DKT2 2 Personal Messages includes timed reminder memo and station speed dial memo 10 Personal Message DKTs 16 PhDNs per System 28 PDNs per System 28 Ring Tones 3 Simultaneous Party Conferencing 4 party 3 Simultaneous Two CO Line conferencin...

Page 51: ...dules DADM 12 Attendant consoles 0 DKT2004 CT and DKT2104 CT Cordless Telephones simultaneous calls 9 DKT2004 CT and DKT2104 CT Cordless Telephones1 1 The DKT2004 CT and DKT2104 CT cordless telephone connects as either a stand alone or to a digital 2000 series telephone 28 Door locks 3 Door phones 9 DSS consoles 3 Handset OCA stations 28 Off premise stations 20 PDIU DS2 2 Speaker OCA PDIU and RPCI...

Page 52: ... The DK40i Base KSU comes standard with built in interfaces for connecting the following dealer supplied equipment an amplifier and speaker for paging and night ringing Music on Hold MOH source reserve power batteries and emergency standard telephone for system power failure occurrences when using loop start lines in the base cabinet A relay contact is also provided to control one of the following...

Page 53: ...ack 600 Ohm page Interface Amplifier speaker RCA jack Standard Telephone Interface Unit four circuit KSTU2 Standard telephones no message waiting 2 Other single line devices2 Alternate BGM source2 Fax machine2 Voice mail auto attendant devices 25 pair Amphenol DTMF ABR Receiver K4RCU3 K5RCU or K5RCU2 3 Automatic busy redial Standard telephone ports Interprets DTMF tones DISA DID Tie lines or auto ...

Page 54: ...s Standard same as RSTU no MW Electronic same as PEKU except PESU does not support HDSS console 25 pair Amphenol PIOU PIOUS RSSU A PIOU or PIOUS can use an IMDU See Table 2 6 for details 25 pair Amphenol PIOU PEPU Spring clip terminal PIOUS IMDU Remote maintenance 300 bps or 1200 bps full duplex modem for DKi Admin or DKi Backup 1 per PIOU and PIOUS None RBSU 2 ISDN BRI S T circuits station or lin...

Page 55: ... Signaling Type II Signaling Immediate start Wink start REMU 8 wire modular jack USOC RJ1CX modular 2 or 4 wire Type I or II R48S 8 standard telephone circuits Optionally interfaces to the RSTU2 and RDSU to extend loop length of standard telephones from 600 ohms to 1200 ohms 25 pair Amphenol RGLU2 4 Line circuits Loop or ground start lines RJ14C modular RSTU2 8 Standard telephone circuits Standard...

Page 56: ...t support SMDR or IMDU Any device that connects to the PIOU PIOUS or RSSU should not be considered a station and does not affect the system s station capacity 1 Amplified page output single zone 3 watts 8 ohms on the PIOU and PEPU is not available on the DK40i 2 These functions are standard built in to the DK40i Base KSU Table 2 6 DK40i Interface PCB Options Interface Options1 RSSU PIOU PIOUS PEPU...

Page 57: ...ts Required Comments Digital telephones 2000 and 1000 series Cordless Digital Telephone DKT2004 CT 1 Each digital telephone circuit can support a digital telephone Only one of the following options can be installed on a 2000 series digital telephone RPCI DI DVSU SP OCA or ADMs Note The RPCI DI and the Add on Module ADM do not require a dedicated circuit They share a circuit with the telephone Stan...

Page 58: ...s include ISDN telephones modems terminal adaptors video cards etc A maximum of 10 BRI circuits can be provided for ISDN stations BRI station circuits do not use up line capacity in DK40i Release 4 3 Table 2 8 Electronic Telephone Circuits Electronic Device Circuits Required Comments Electronic telephones 6500 6000 3000 2000 series 1 Each electronic telephone circuit can support an electronic tele...

Page 59: ...t the worksheet tables After configuring the system use Worksheet 2 to ensure that the system power factors are not exceeded Be sure to consult Example Configuration Tables on Page 2 14 when filling out these tables Customer Location Table 2 10 Hardware Configuration Base Cabinet Expansion Cabinet Slot No 00 11 12 13 14 15 16 17 18 PCB Type None or K4RCU3 K5RCU or K5RCU2 8 DKTs None None None Univ...

Page 60: ...ports 8 KSTU2 Standard Telephone 4 ports TBUU or TBSU circuit 1 ISDN station side 2 ports TBUU or TBSU circuit 2 ISDN station side 2 ports Total Base Ports 16 ports max Table 2 12 Strata DK40i Base Cabinet Line Configuration Installed Yes No PCB Type Number of Line Types Line Total TCOU Loop start 4 lines TDDU Direct Inward Dial 4 lines TBUU or TBSU circuit 1 ISDN line side 2 lines TBUU or TBSU ci...

Page 61: ... RWIU Strata AirLink Wireless Interface 8 or 16 0 Stratagy DK Built in Voice Mail System 8 0 RDSU 2 Standard 4 Digital Telephone Ports 8 0 RDSU RSTS 4 Standard 4 Digital Telephones ports 8 0 PEKU Electronic Telephone Ports 8 0 PESU 2 Standard 4 Electronic Telephone Ports 8 0 RBSU 2 ISDN BRI S T circuits Both circuits line side 0 4 Both circuits station side 4 0 1 station and 1 line circuit 2 2 RBS...

Page 62: ...elephone 4 ports 4 Yes TBSU circuit 1 ISDN station side 2 ports 2 Yes TBSU circuit 2 ISDN station side configured as lines Total Base Ports 16 ports max 14 Table 2 17 Strata DK40i Base Cabinet Line Configuration Example Installed PCB Type Number of Line Types Line Total No TCOU Loop start 4 lines No TDDU Direct Inward Dial 4 lines Yes TBSU circuit 1 ISDN line side configured as stations Yes TBSU c...

Page 63: ...tagy DK standard telephone ports Tie lines DISA or DID Lines 8 KKYS1 3 is required for built in AA KKYS2 for AA and ACD KKYS3 for AA ACD MIS 9 TSIU can be used for an RS 232 Maintenance TTY port SMDI ACD MIS or SMDR port RSIU cannot be used Expansion Cabinet 1 Each RDDU provides four DID lines and does not use station ports This is different from the DK40 and DK16e in which each DID circuit used a...

Page 64: ... TSBU TCOU or TDDU can be installed in the DK40i base cabinet for a given DK40i configuration 3 RBSU or RBUU installs in any expansion unit slot to provide 2 BRI circuits which can be station side or line side in any combination 4 RBSS installs on an RBSU and RBUS install on an RBUU in any expansion unit slot each PCB combination provides 4 BRI circuits total RBSS can be station side only RBSU can...

Page 65: ... Telephone Device Power Factor PF and add it to Table 2 24 See Table 2 10 for PCB quantity and type The TBSU RBSU RBSS and RWIU PCBs require more power from 5VDC than other PCBs therefore it is necessary to calculate the 5VDC and 24VDC PF on DK40i Important A system PF check must be performed for all configurations See Table 2 19 for the power supply 5VDC and 24VDC PFs for the DK40i system Note AC...

Page 66: ... RBSS 0 6 0 3 RSTU2 3 5 0 5 RBSU R40S 2 5 3 8 RDSU 24V 1 5 0 3 RBSU RBSS R40S 3 1 4 1 RDSU 48V 1 5 0 5 RBUU NR 0 75 RCOU 2 5 2 0 RBUS NR 0 25 RCOU RCOS 4 5 4 0 RBUU RBUS NR 1 0 PCOU1 2 2 0 2 0 RDTU 1 8 1 0 PIOU 2 5 6 5 RPTU 2 6 1 0 PIOUS 2 0 4 0 BVPU 0 7 0 Table 2 21 DK40i Telephone Device Power Factors Telephone Devices X 24VDC PF 2000 series Digital Telephone any series X 1 0 Cordless Digital Te...

Page 67: ...nic Telephone X 2 5 6000 series Electronic Telephone X 2 0 6005 series Electronic Telephone X 2 0 6500 series Electronic Telephone X 1 0 DDCB HDCB w MDFB X 1 2 DDSS HDSS Console X 0 8 Add on Module X 0 4 RPCI DI 8 X 0 5 4 0 PDIU DI2 and PDIU DS X 0 8 Standard Telephone 48VDC X 1 0 Standard Telephone 24VDC X 0 5 Power Failure Unit DPFT X 3 0 HHEU X 0 1 Stratagy DK X 1 0 Total 24VDC PF all Telephone...

Page 68: ...lectronic Telephone X 2 0 3000 series Electronic Telephone X 2 5 6000 series Electronic Telephone X 2 0 6005 series Electronic Telephone X 2 0 6500 series Electronic Telephone X 1 0 DDCB HDCB w MDFB X 1 2 DDSS HDSS Console X 0 8 Add on Module X 0 4 RPCI DI X 0 5 PDIU DI2 and PDIU DS X 0 8 Standard Telephone 48VDC X 1 0 Standard Telephone 24VDC X 0 5 Power Failure Unit DPFT X 3 0 HHEU X 0 1 Stratag...

Page 69: ...or DK40i The Strata DK40i is not a modification of the DK40 but rather a completely new system The DK40i uses the DK40 expansion cabinet The DK16e can be upgraded to DK40 by changing a ROM chip but not to a DK40i The DK40 base cabinet cannot be upgraded to a DK40i DK16 DK16e DK40 DK40i Component Compatibility The original DK16 two loop start CO line and four digital station interface unit KCDU1A i...

Page 70: ...s Compatible Part Description DK16 DK16e DK40 DK40i TCOU1A 4 Loop CO Line Interface Unit X X X TDDU1A 4 DID CO Line Interface Unit X X X TCIU2A Caller ID Interface Unit X X X TSIU1A 2 I O Serial Interface Unit X X X KSTU2A 4 Standard Telephone Interface Unit X X X X K4RCU3A K5RCU1A or K5RCU2A1 1 For 9 12 DID and or Tie lines use K5RCU1A or K5RCU2A not the K4RCU3A 4 or 5 DTMF ABR Tone Receiver only...

Page 71: ...quipment for damage If equipment is missing or damaged contact your supplier immediately 3 Be sure to retain original packaging materials for re use when storing or transporting system hardware Packaging and Storage CAUTION When handling installing removing examining PCBs do not touch the back soldered side or edge connector Always hold the PCB by its edges When packaging and storing the system re...

Page 72: ... power source two customer supplied 12VDC batteries may be connected to the system to serve as a power failure backup Clearance and Location The minimum clearance requirements for the Strata DK40i Base and Expansion KSUs are shown in Figures 3 1 and 3 2 Refer to Page 3 5 for DK40i KSU mounting instructions Consider the following conditions when selecting a location for the KSU s The location must ...

Page 73: ... temperature Operating humidity Storage temperature 32 104 F 0 40 C 20 80 relative humidity without condensation 4 158 F 20 70 C Power Supply DC voltage output specification 24VDC 25 94 28 66VDC 5VDC 4 5 5 5VDC 5VDC 4 5 5 5VDC Expansion KSU only Battery Charger Characteristics Charger current limiting Nominal float voltage 2 275 volts cell Charge current 0 7 amps maximum Battery discharge cut off ...

Page 74: ... reading of up to 250VAC 2 Connect the meter probes between the two main AC voltage terminals white and black wires on the wall outlet The reading obtained should be between 100 125VAC 3 Move one of the meter probes to the third terminal green wire ground Either the same reading or a reading of zero volts should be obtained 4 If the reading is zero volts leave one probe on the ground terminal and ...

Page 75: ...nted on a wall or other vertical surface Toshiba recommends using method 1 or 2 see Figure 3 4 Prior to Installation 1 Loosen the screws on the front cover and the side cover of the Base KSU remove the covers see Figure 3 5 Figure 3 6 on Page 3 11 details the interior 2 Place the BATT jumper plug to the On position 3 Install a CO line board either the TDDU or TCOU onto the TMAU board see Figure 3 ...

Page 76: ... KSU Figure 3 23 on Page 3 37 If the TSIU is used for SMDR or TTY then the PIOU PIOUS SMDR TTY output is not active Testing the System s Power Supply If the AC or DC LEDs fail to light in Steps 1 or 3 see TPSU16 Circuit Breaker Reset Procedure on Page 7 Case 1 1 Plug the AC power cable into an outlet see Figure 3 8 The AC LED on the power supply lights green 2 Turn On the DC power switch for the T...

Page 77: ...ly see Power Supply Removal and Replacement on Page 3 19 Case 2 If the TPSU16 power supply AC and DC LEDs light but the system does not operate the TPSU16 DC output overcurrent circuit breaker may have opened because of a DC short circuit To reset the DC output overcurrent circuit breaker 1 Turn the DC power switch Off for 15 seconds and then turn it back on The system will go back to normal opera...

Page 78: ...ure the screws completely into the mounting surface 5 Finish securing the unit to the mounting surface by completely screwing the bottom two screws into the wall 6 Ground system according to AC Power and Grounding Requirements on Page 3 4 7 Connect applicable wiring e g modular CO line cords 25 pair amphenol connector cable see Figure 3 25 on Page 3 42 to the Base KSU and then fasten wiring to the...

Page 79: ...KSU is flush against the mounting surface mark the location of the Expansion KSU mounting screw hole 8 Swing the Expansion KSU away from the mounting surface and drill a hole at the mark made in Step 7 9 Install the PCBs per Worksheet 1 System PCB Assignment Guide on Page 2 11 and slide the slot lock to the lock position 10 Swing the Expansion KSU back to the mounting surface and secure it to the ...

Page 80: ...Base KSU Exterior Method 1 Method 2 Stud Plaster Board Stud Plaster Board Hard Board 1 2 Inch Plywood Expansion KSU Base KSU Base KSU Expansion KSU 1614 Base Cover Side Cover AC DC POWER Cover Screws 6 4237 Six cover screws to be removed before mounting KSU Model DKSUBI40A Strata DK40i Label on edge of Base KSU ...

Page 81: ...WARNING Hazardous voltage inside If servicing required remove A C plug 1 2 BATT PN2 1 2 AC DC DC POWER TMAU2A OFF ON 4238 Connect Expansion Unit TB1 TO FG2 Expansion KSU Cable Receptacle Important Notice Battery Jumper 24 Volt Circuit Breakers Reserve Power Battery Jack Base Telephone Tip Ring and Relay Contact Music on Hold Input Music on Hold Sensitivity Adjustment IMPORTANT DKSUE16A is incompat...

Page 82: ...Installation into DK40i Base KSU Install a TCOU TBSU Install a TCOU TBSU or TDDU here Install a TCOU TBSU TBUU or TDDU here TCOU1A V1 TC1U2A Optional with TCOU provides Caller ID FG Screw TDDU1A V1 5220 TBSU1A FS LOS TS BSY FS LOS TS BSY TBUU1A BSY CO14 TS CO15 PSI CO16 FS CO17 CO10 CO11 CO12 CO13 ...

Page 83: ...nectors AC DC POWER Self Adhesive Rubber Pad Supplied in plastic bag with Base KSU Modular Connector RCA Plug Amphenol Connector Tie Wrap Holder Base KSU PIN Jack Cord X2 Amphenol Cord X1 Modular Cord X5 Tie Wrap1 Amphenol Clamp Supplied in plastic bag with Base KSU AC Power Cord Do not route power cord with other cords 2161 ...

Page 84: ...SU Connection Hinge Mount PULL LOCK PUSH UNLOCK Safety Lock Supplied with Expansion KSU Ribbon Cable from Expansion KSU Plugs into Expansion Connector P3 of Base KSU Expansion KSU Green Yellow FG2 Wire and Plug From Expansion KSU Plugs into TB1 of Base KSU TB1 FG2 P3 Ribbon Connector Lock 2162 Base KSU ...

Page 85: ...Mounting Hole and Screw Base KSU Expansion KSU Tie Wrap Holder FG Screw AC Cord 4 4 4241 FG2 Wire FG2 POWER SUPPLY ASSEMBLY MODEL INPUT AC127V 2 2A 60 HZ OUTPUT 27 3V 2 8A 27 3V 0 2A V 1A 1996 05 00001 TOSHIBA CORPORATION TPSU16A MADE IN WARNING Hazardous voltage inside If servicing required remove A C plug 1 2 BATT PN2 1 2 AC DC DC POWER TMAU2A PULL LOCK PUSH UNLOCK Model DKSUE40A Label on edge o...

Page 86: ...t The DK16e and DK40i Expansion Cabinet slot labels are different from the Program 03 slot numbers Table 3 3 provides the slot labels and Program 03 slot numbers Table 3 3 DK16e and DK40i Expansion Cabinet Slot Names DK40i Slot Label DK40i Program 03 Slot Number S04 S15 S05 S16 S06 S17 S07 S18 Expansion KSU Slot Lock PCB S06 S07 S04 S05 Lock Side Cover 4242 Slot label ...

Page 87: ...e batteries in a fire The cells may explode Check with local codes for possible special disposal instructions Do not open or mutilate the batteries Released electrolyte is corrosive and may cause damage to the eyes or skin It may be toxic if swallowed Exercise care in handling batteries in order not to short the battery with conduction materials such as rings bracelets and keys The battery or cond...

Page 88: ...n Off switch in the On position The system should continue to operate without any interruption 6 Plug the AC power cable into PN2 7 Plug the AC power cable into an outlet and turn On the power supply switch 8 See Prior to Installation to confirm that the power supply is working properly 9 Plug reserve battery cable into BATT connector of power supply Power Failure Emergency Transfer Option To enab...

Page 89: ... AC power cable is not plugged into an outlet Confirm that the green AC LED is not lit see Figure 3 14 Figure 3 14 Power Supply TPSU16A 4 3 5 2 MOD Jack CO1 Base KSU MDF TCOU CO Line MOD Jack PF1 Base KSU R T MDF PFT Standard Telephone T R Power Fail Connection Power Available Connection TCOU CO Line 1 2155 FG2 POWER SUPPLY ASSEMBLY MODEL INPUT AC127V 2 2A 60 HZ OUTPUT 27 3V 2 8A 27 3V 0 2A V 1A 1...

Page 90: ...g terminal and building ground wire to the left side of the power supply with the FG screw 6 Plug the Expansion KSU green yellow ground wire into FG2 Printed Circuit Board PCB Installation This section details Strata DK40i system PCBs installation into the Base and Expansion KSUs Also described are optional configuration information and programming considerations for each PCB Base KSU PCBs The Str...

Page 91: ...r 9 Universal Slot PCBs for detailed descriptions installation instructions Toshiba recommends that PCBs which support electronic digital or wireless telephones be installed into slots 15 and 16 because slots 17 and 18 cannot support speaker Off hook Call Announce OCA or Data Interface Units DIUs or more than 8 wireless handsets See the section titled Expansion KSU on Page 2 6 for configuration in...

Page 92: ...more detailed programming instructions PCB Installation Power Supply Considerations Before installing any PCBs make sure the power supply has been tested and the ground has been checked See AC Power and Grounding Requirements on Page 3 4 PCB Wiring See MDF Wiring Diagrams on Page 3 42 in this chapter for DK40i Base KSU wiring and Chapter 10 Universal Slot PCB Wiring for Expansion KSU wiring See Ch...

Page 93: ...mper settings for A law and Mu law which makes it applicable to more countries Configuration The K4RCU3 K5RCU or K5RCU2 does not have to be configured for operation If built in auto attendant is required see auto attendant KKYS installation K4RCU K5RCU or K5RCU2 Installation 1 Make sure that the power supply switch is Off 2 Make sure SW1 is set for Mu law if installing K5RCU2 The jumper must be se...

Page 94: ...em DK40i Base KSU Circuits per PCB one Interfaces with optional built in auto attendant Older Version s none The KKYS installs onto the K5RCU2 card in the Base KSU See Figure 3 16 KKYS Installation Install the KKYS onto the K5RCU2 to add the optional built in auto attendant feature Figure 3 16 K5RCU2 Printed Circuit Board K4RCU3 K5RCU or K5RCU2 2165 KKYS Connector 3799 KKYS SW1 K5RCU2A MU A ...

Page 95: ...er supply switch is Off 2 Before installing the KSTU2 in the Base KSU set the SW1 ring generator to 130V P P or 190V P P Note Most standard telephones and two wire devices require 190 however some devices may experience ring trip at 190 and should be set at 130 3 Plug the KSTU2 cable into the P4 connector on the motherboard in the Base KSU The red wire on the cable should match up with pin 1 on th...

Page 96: ...ion KSU shift by four ports if KSTU2 or TDDU is installed or removed after it is installed This determines whether or not the DDCB can be connected on the KCDU in slot 15 Figure 3 17 Standard Telephone Interface Board KSTU2 Figure 3 18 Standard Telephone Interface Subunit KSTS2 KSTU2A 1629 SW1 UP KSTS2A reverse 1630 ...

Page 97: ...Type of Component Description Ring voltage jumper plug SW1 3 terminal jumper Sets ring generator voltage level for all circuits H 190V P P L 130V P P Connector cable P504 Cable Connects to P4 connector on the motherboard P10 connects to KSTS2 P20 7 pin connector Interface connector for optional KSTS2 The KSTS2 arrives installed onto the KSTU2 from the factory P11 connects to KSTS2 P21 9 pin connec...

Page 98: ...the TCIU2 is installed and power is turned on Note TCIU2 Caller ID circuits are numbered automatically in numerical order starting from 01 04 when the TCIU2 is installed Slots with code 81 will increment the Caller ID circuit numbers by four circuits on the DK40i Program 50 Assigns TCOU lines that will receive Caller ID to the associated TCIU2 Caller ID circuit number TCIU2 circuits 1 4 must be as...

Page 99: ...es that store Caller ID and or ANI abandoned call telephone numbers A user can scroll through the stored abandoned call phone numbers and auto dial the selected number using this button Program 60 1 Key 01 Determines which information will be sent out the system SMDR port e g system Account Codes or CLID and or ANI telephone numbers Turn LED 01 On if CLID and or ANI information should be sent out ...

Page 100: ...sure proper connection See Figure 3 6 for installation information and Figure 3 27 on Page 3 44 for wiring 3 Secure the three plastic stand off tabs and install screws in upper right and lower left corners 4 Set decibel dB PAD switches SW101 SW201 SW301 and SW401 to the appropriate position In most cases set to the normal position NOR Switches are factory set at the 0 0 dB signal level drop positi...

Page 101: ...rogram 39 Assigns line access buttons to digital and electronic telephones Program 40 Assigns station access to lines incoming and outgoing Program 41 Assigns station access to lines outgoing only Programs 45 48 Defines Toll Restriction for any line Programs 50 56 Defines Least Cost Routing assignments Program 78 Assigns special ringing of lines includes Night Ring Over Page DISA Remote Maintenanc...

Page 102: ...escription CO line connectors 1 4 Modular connector Interface connector for CO line circuits PF1 Modular connector Power Failure Telephone Interface PAD switch SW202 SW302 SW402 circuits 1 4 2 position slide switch Enables 3 dB signal level drop for CO line circuit P120 6 pin connector To P20 of TCIU2 P121 10 pin connector To P21 of TCIU2 P122 10 pin connector To P22 of TCIU2 TCOU1A V1 1447 CO4 CO...

Page 103: ...W401 to the appropriate position Switches are factory set at the 0 0 dB signal level drop position If CO lines are connected to a PBX or are in close proximity to the central office set to the PAD positions to 3 to provide a 3 dB signal level drop between the PBX and CO 5 Sensitivity jumpers SW102 SW402 are used mostly for dial pulse operation to adjust for dial pulsing at different loop lengths I...

Page 104: ...utgoing only Program 42 0 1 8 Assigns behind PBX Centrex operation to each line Programs 45 48 Defines Toll Restriction for any line Programs 50 56 Defines Least Cost Routing assignments Programs 71 1 5 Assigns DNIS or ANI option to DID lines Programs 71 73 Assigns telephone to ring called DN Program 93 Assigns names to lines The TDDU provides four DID lines and does not use four station ports whe...

Page 105: ...tors Control Indicator Connector Type of Component Description CO line busy LEDs 1 4 DID1 DID4 Red LED Lights to indicate DID line circuit is operating Trunk indicator will not light unless TDDU is connected to a DID line CO line connector DID Modular connector Interface connector for CO line DID circuits PAD switch SW202 SW302 SW402 circuits 1 4 Two position slide Enables 3dB signal level drop fo...

Page 106: ...Program 76 1 code 1 and Port 02 is disabled Program 76 1 code 0 If the same function is programmed for an TSIU port and a PIOU or PIOUS port only the TSIU port functions The communication parameters for all TSIU TTY ports are Data word bits 7 Parity even Stop bits 1 The communication parameters for a TSIU SMDR port is Data word bits 8 Parity none Stop bits 1 TSIU Installation See Figure 3 23 for i...

Page 107: ...to operate at a specified transmission rate Where X identifies the TSIU Port number 1 2 Z identifies the TSIU port transmission rate in bits per second bps Z 1 9600 Z 2 4800 Z 3 2400 Z 4 1200 Note The sum of TSIU port 1 and port 2 bps rate cannot exceed 9600 bps Figure 3 23 Serial Interface Board TSIU Installation TSIU1A 1634 SIO 1 SIO 2 SIO 1 SIO 2 ...

Page 108: ... Dialing DID lines Each line can have one office code and a block of extensions 9 37 RDSU Digital Standard Telephone Interface Unit Provides two standard telephone circuits and four digital telephone circuits 9 41 REMU E M Tie Line Unit Provides four Tie line circuits 9 43 RGLU2 Loop Ground Start CO Line Interface Unit Provides four line circuits 9 47 RSSU PC Interface Unit Provides two RS 232 con...

Page 109: ...hannels 1 D channel DK40i 8 or 12 B channels 1 D channel 16 9 RDTU T1 DS1 Interface Unit DK424 or DK424i provides 1 8 1 12 1 16 or 1 24 channels lines depends on system programming DK401i provides 8 or 12B channels 8 8 BVPU Voice Over IP Gateway Combines fucntsions of a 4 circuit REMU E M Tie line card and a Voice Over Internet Protocol IP gateway on a single PCB H 323 standard for Voice over Inte...

Page 110: ...able runs must not have the following Cable splits single or double Cable bridges of any length High resistance or faulty cable splices DKT or Cordless base Ringing Volume Max DK40i KSU 1000 303 1000 303 1000 feet 303 meters Battery Backup 675 204 DKT with DVSU OCA DK40i KSU 1000 303 Battery Backup 495 150 DKT with HHEU or Carbon Handset DK40i KSU 1000 303 Battery Backup 330 100 DKT with PDIU DI P...

Page 111: ...Care must be taken to ensure that they are very well grounded to a reliable earth ground Recommended protectors are available in the fast Series 6 line from ONEAC Corp Libertyville Illinois 60048 800 327 8801 Install and test the secondary protectors precisely to the installation instructions of thee manufacturer Standard Telephone Building 1 Building 2 TCOU PCOU RCOU RCOS RGLU RCIU RCIS RBUU RBUS...

Page 112: ... V 26 1 27 2 28 3 29 4 30 5 31 6 32 7 33 8 34 9 35 10 36 11 37 12 38 13 39 14 40 15 41 16 42 17 43 18 44 19 45 20 46 21 47 22 48 23 49 24 50 25 Bridging Clips To Base Unit P5 W Female Connector 25 Pair Cable with Male Amp Connector 66M150 Split Block Circuit 2 to DKT24 or PDIU DS Circuit 3 to DKT3 or PDIU DS or DDCB Circuit 4 TO DKT4 or PDIU DS or DDCB Circuit 6 to DKT6 or PDIU DS Circuit 7 to DKT...

Page 113: ...1 OR 2 PAIR SEE NOTE 2 STATION CABLING GN 6 5 4 3 2 1 Y BL R BK W R1 PT1 T1 PR1 RJ11 DIGITAL TELEPHONE WITH OR WITHOUT PDIU DI PDIU DI2 OR PDIU DS or DDCB 2 OR 4 WIRE MODULAR CORD TO RJ11 JACK ON BOTTOM OF PDIU DI GND PR 5 T 4 GND R 3 PT 2 1 2 3 4 5 6 7 8 9 10 11 12 13 14 15 48 49 50 1 2 3 4 5 6 7 8 9 10 11 12 13 14 15 48 49 50 BRIDGING CLIPS 66M150 SPLIT BLOCK GN 6 5 4 3 2 1 Y BL R BK W 2 3 4 5 M...

Page 114: ... 47 48 49 50 Bridging Clips 66M150 SPLIT BLOCK GN 6 5 4 3 2 1 Y BL R BK W 2 3 4 5 Modular Cords 6 1 T1 R1 T2 R2 T3 R3 T4 R4 T1 R1 T2 R2 T3 R3 T4 R4 To Network R1 T1 Power Failure Standard Telephone GN 6 5 4 3 2 1 Y BL R BK W 2 3 4 5 R2 T2 GN 6 5 4 3 2 1 Y BL R BK W 2 3 4 5 R3 T3 GN 6 5 4 3 2 1 Y BL R BK W 2 3 4 5 R4 T4 4 3 6 1 6 1 6 1 6 1 PFT DID or CO1 DID or CO2 DID or CO3 DID or CO4 DID or CO4 ...

Page 115: ...tation ports With Release 4 0 and higher processors these lines do not use station ports allowing larger capacity systems when Tie and DID lines are required System Configuration Important System Configuration can be complex and time consuming For best results Use DKQuote to provide easy fast automated configuration See the DKQuote User Guide for more information If you do not have DKQuote use the...

Page 116: ...t DK424 Expansion Cabinets DK424 Expansion Cabinets provide eight slots but only when connected to a DK424 Base Cabinet controlled by an RCTUE3 F3 processor with the MBJU removed No DK424 Expansion Cabinets are allowed when connected to the DK424 Base Cabinet with an RCTUA processor installed One DK424 Expansion Cabinet provides six universal slots when connected to the DK424 Base Cabinet with an ...

Page 117: ...cessor can be installed DK280 Expansion Cabinets provide six universal slots maximum in any configuration DK424 Expansion Cabinets provide six universal slots maximum in any configuration with a DK280 Base Cabinet including a DK280 Base Cabinet with an RCTUE F processor Table 4 2 DK280 Base with DK280 and or DK424 Expansion Cabinets Processor in DK280 Base Cabinet Expansion Cabinets Allowed Univer...

Page 118: ...see RCTU installation for details RCTUA in a DK424 Base allows no Expansion Cabinets RCTUB or RCTUBA BB in a DK424 Base allows one DK424 or DK280 Expansion Cabinet with six universal slots RCTUC D in a DK424 Base allows up to five DK424 and DK280 Expansion Cabinets in any combination These Expansion Cabinets provide six universal slots Designated Speaker OCA DIU Data and T1 slots DK424 systems req...

Page 119: ...inet Total Universal Slots PDKU2 Data and Speaker OCA Slots RDTU1 Vacant Slots No 2 Type 1 DK424 base 6 11 12 13 14 15 16 13 143 15 163 2 DK280 6 21 22 23 24 25 26 21 223 23 243 25 263 2 DK424 8 21 22 23 24 21 223 23 243 25 274 265 3 DK280 6 31 32 31 323 33 354 345 3 DK424 8 31 32 37 38 31 323 33 354 345 37 383 4 DK280 6 41 42 41 423 43 454 445 4 DK424 8 41 42 47 48 41 423 43 454 445 47 483 5 DK28...

Page 120: ...eceivers 3 5 12 12 24 24 External Page Zones 0 4 4 4 4 8 Call Park Orbits general 20 20 20 20 20 20 Call Park Orbits individual 10 28 32 80 240 336 Personal LCD Messages per DKT2 2 Personal Messages includes timed reminder memo and station speed dial memo 10 10 10 10 10 10 Personal Message DKTs 8 16 16 32 96 96 PhDNs per System 10 28 32 80 240 336 PDNs per System 10 28 32 80 240 336 Ring Tones 3 3...

Page 121: ...POTS FX and DIL Table 4 8 Station and Peripherals Capacities DK424 Stations DK14 DK40i RCTUA RCTUBA BB RCTUC D RCTUE F Add on modules DADM 8 12 12 40 120 200 Attendant consoles 0 0 0 2 4 4 DKT 2004 CT Cordless Telephones 8 28 32 80 240 336 DKT 2004 CT simultaneous calls 8 9 9 9 9 9 Door locks 2 3 4 5 5 5 Door phones MDFB 6 9 9 12 12 12 DSS consoles 0 3 3 4 8 8 ISDN BRI station circuits TE 1 and TA...

Page 122: ...tions CO Lines Stations CO Lines Stations CO Lines Stations CO Lines Stations CO Lines Stations CO Lines Stations 16 32 48 40 72 64 96 88 120 112 144 136 200 224 44 40 68 64 92 88 116 112 140 136 196 224 40 48 64 72 88 96 112 120 136 144 192 232 36 48 60 72 84 96 108 120 132 144 188 232 32 56 56 80 80 104 104 128 128 152 184 240 28 56 52 80 76 104 100 128 124 152 180 240 24 64 48 88 72 112 96 136 ...

Page 123: ... RCTUC D 5 Cabinets RCTUC D 6 Cabinets RCTUC D 7 Cabinets RCTUE F Lines Stations Lines Stations Lines Stations Lines Stations Lines Stations Lines Stations Lines Stations 8 16 20 24 32 40 44 48 56 64 68 72 104 112 16 40 28 48 40 64 52 72 64 88 100 120 8 64 24 64 36 72 48 88 60 96 96 136 16 88 32 88 44 96 56 112 92 144 12 96 28 96 40 112 52 120 88 160 24 112 36 120 48 136 84 168 20 120 32 136 44 14...

Page 124: ...24 6 12 56 4 8 28 6 12 64 2 4 32 4 8 64 4 8 32 4 8 64 2 4 32 2 4 72 2 4 40 1 Each BRI circuit S T and or U type provides two B channels plus one D channel and reduces the system capacity by two station ports and two CO lines Each S T BRI station circuit allows up to eight TE 1 and TA devices to share the BRI B channels two simultaneous calls maximum per BRI circuit Each BRI U circuit supports one ...

Page 125: ...16 32 288 8 16 152 8 16 304 8 16 168 8 16 312 4 8 176 8 16 312 2 4 180 4 8 320 4 8 184 4 8 320 2 4 188 2 4 328 2 4 192 1 Each BRI circuit S T and or U type provides two B channels plus one D channel and reduces the system capacity by two station ports and two CO lines Each S T BRI station circuit allows up to eight TE 1 and TA devices to share the BRI B channels two simultaneous calls maximum per ...

Page 126: ...A 568A RBUU DK424 only 2 ISDN BRI U point circuits 2B D each Host for the RBUS R4 3 Network and or station side RJ45 ISDN TIA 568A attachesto RBUU RBUS 2 ISDN BRI U point circuits 2B D each subassembly for the RBUU R4 3 Network and or station side 1 RBUS subassembly per RBUU RJ45 ISDN TIA 568A RDTU2 Applies to DK424 only 1 8 1 16 or 1 24 channels lines depends on system programming Loop start line...

Page 127: ... machine PC or maintenance terminal local or remote 25 pair amphenol PIOU or PEPU Spring clip terminal PIOUS Two 3 pair modular TTY SMDR SMDI SMIS All PCB amphenol connectors are female attachesto PIOU and PIOUS IMDU Provides remote maintenance 300 bps or 1200 bps full duplex modem for DKi Admin or DKi Backup 1 per PIOU PIOUS None RSTU2 8 standard telephone circuits Standard telephones Voice mail ...

Page 128: ...out RPCI DI DVSU DADMs or digital cordless telephone Stand alone digital cordless telephone DDSS console PDIU DS DDCB 25 pair amphenol Stratagy DK 2 4 6 or 8 VM ports All of the above Stratagy DK systems use 8 station ports in the DK40i and DK424 software None None PEKU 8 electronic telephone circuits Electronic telephones HDSS console Alternate BGM source EOCU PCB for OCA External conference ampl...

Page 129: ... with RMDS 1200 or 2400 bps Voice Mail SMDI ACD SMIS SMDR Local or Remote Maintenance for DKi Admin or DKi Backup PC One 3 pair modular per RSIS RS 232 RMDS Modem RS 232 RWIU 4 RJ11 jacks to support 4 Strata AirLink Integrated Base Stations Digital Wireless Handsets same as PDKU except no DDSS console Stand alone cordless telephone PDIU DS or DDCB None Table 4 17 PCB Circuits Interface Options and...

Page 130: ...ACD Insight DK or SMDI features 4 Insight DK Call Center Viewer and SMIS for ACD requires that the system processor RCTU PCB must be equipped with an RKYS3 or higher feature key Feature s Provided RKYS1 RKYS2 RKYS3 Common Control Unit Built in Auto Attendant X X X Applies to all RCTUs ACD X X RCTUBA BB RCTUC D or RCTUE F ACD with a SMIS application X RCTUBA BB RCTUC D or RCTUE F Table 4 19 DK424 I...

Page 131: ...options per RCTU processor See Table 4 20 for configuration considerations PC Attendant Console used for medium to heavy traffic systems where an attendant must answer and transfer incoming calls The PC Attendant Console requires a customer provided PC plus the RATU PCB Up to two consoles can be connected on systems with RCTUB or RCTUBA BB or four with RCTUC D Release 2 and 3 and RCTUE F PCBs The ...

Page 132: ...one Lock control DDCB interfaces with up to three door phones MDFBs or two MDFBs and one door lock DDCBs HDCBs can only be connected to Ports 004 012 020 and 028 normally in slots 11 12 13 and 14 respectively Always install DDCB HDCB station PCBs PDKU RDSU PEKU or PESU in slots that have lower slot numbers than RDDU PEMU REMU2 RATU or RDTU PCBs HDCB PEKU or PESU Circuit 5 4 per system RCTUBA BB an...

Page 133: ...om system 0 RPSB1 0 RPSB2 0 RPSB1 0 RPSB2 1 RPSB1 0 RPSB2 1 RPSB1 0 RPSB2 2 RPSB1 0 RPSB2 2 RPSB1 0 RPSB2 2 RPSB1 1 RPSB2 Only one AC power cord allowed from system 0 RPSB1 0 RPSB2 1 RPSB1 0 RPSB2 1 RPSB1 0 RPSB2 1 RPSB1 1 RPSB2 1 RPSB1 1 RPSB2 2 RPSB1 1 RPSB2 N A Table 4 22 Cabinet Power Reserve Power and Floor Mount Hardware Assemblies Assembly Description Function RBTC1A 2M Reserve Power Cable ...

Page 134: ...wall mount cabinets RCCB1 up to 6 cabinets or RCCB2 7 cabinets Conduit Connection Box Conduit box required for AC and battery power connection to three or more floor mounted cabinets Not required for mounting two cabinets on a table or any number of cabinets on a wall RCCB2 is required instead of RCCB1 for seven cabinet floor mount installations A licensed electrician must install this item to ret...

Page 135: ...rt per Digital DDCB 1 X Total Total Digital Ports Notes Digital telephones equipped with RPCI DI PDIU D12 or ADM only require one digital port See Table 4 10 One door phone control box DDCB supports three door phones MDFBs See Table 4 20 WRLS HS is the same part number for Digital or Analog depends on the type installed Electronic Telephones EKTs 6510 S 6510 H 6520 S 6520 SD Total Electronic Telep...

Page 136: ...al Voice Mail Ports 1 port per Voice Mail Port 1 X Total Total Fax or Modem Devices 1 port per fax modem device 1 X Total Total ACD Auto Attendant Digital Announcement Devices 1 port per device 1 X Total Total Alternate BGM Source 1 port per Alternate BGM Source 1 X Total Total Other Devices 1 port per device 1 X Total Total Standard Ports Notes Isolation transformer may be required for the Altern...

Page 137: ...200 ohms see Table 4 17 RSTU2 is required to operate message waiting lamps on a standard telephone 3 Are four or less digital or standard ports needed If so RDSU RSTS can be used Total RDSU PCB slots required Total RSTS PCB slots required Note RDSU provides two standard telephone ports circuits and four digital ports circuits in its basic configuration The optional RSTS can be attached to the RDSU...

Page 138: ...uirements Total ground start lines with without Caller ID divided by 4 round up Total analog ground start line PCB slots required Note RGLU2 provides four CO lines that can be individually configured as loop start or ground start 3 Determine E911 CAMA line PCB slot requirements Total RMCU RCMS CAMA PCBs 1 slot required RMCU existing Note The RMCU supports two subassemblies RCMS that provide a tota...

Page 139: ...d start lines channels Total Tie lines with without ANI DNIS channels Total DID lines with without ANI DNIS channels Total RDTU lines required Note Contact the T1 provider Telco or Carrier company to determine exact T1 channel line needs 8 Determine RDTU PCB slot requirements Total 8 channel RDTU PCB slots include skipped slots Total 16 channel RDTU PCB slots include skipped slots Total 24 channel...

Page 140: ...llowing subassembly PCBs do not required additional cabinet slots The IMDU subassembly plugs onto PIOU or PIOUS to provide a remote maintenance modem The RMDS subassembly plugs onto the RSIU to provide a remote maintenance modem Up to three RSIS subassemblies can plug onto RSIU to provide any option listed in this Step Enter total number of PEPU PCBs needed Total PEPU PCB slots required Note PEPU ...

Page 141: ...The only system considerations are OCA RPCI configuration requirements Channel 8 16 and 24 RDTU T1 DS 1 interface slot configuration requirements Number of system slots required See System Slots Required on Page 4 26 See Tables 4 9 and 4 10 for OCA RPCI and T1 DS 1 configuration requirements Cabinet Type DK424 or DK280 Number of Slots Available 1 2 3 4 5 6 7 Total Number of Slots Available Number ...

Page 142: ...ole and ground loop start line PCBs are recorded write in all DID and Tie line PCBs starting from the first numbered empty slot to the highest needed in left to right order Record the line numbers Do not leave empty slots except when installing RDTU PCBs The maximum number of station ports used by station PC attendant console Tie and DID PCBs can not exceed the following quantities In some rare co...

Page 143: ...5 S16 PCB Type Port Nos Line Nos Option Note Cabinet 2 Type 1 S21 S22 S23 S24 S25 S26 S272 S282 PCB Type Port Nos Line Nos Option Note Cabinet 3 Type 1 S31 S32 S33 S34 S35 S36 S372 S382 PCB Type Port Nos Line Nos Option Note Cabinet 4 Type 1 S41 S42 S43 S44 S45 S46 S472 S482 PCB Type Port Nos Line Nos Option Note Cabinet 5 Type 1 S51 S52 S53 S54 S55 S56 S572 S582 PCB Type Port Nos Line Nos Option ...

Page 144: ...sion Cabinets 5 Calculate the total number of RRCU1A cards required at all remote locations Add the same number of RRCU1A cards to the configuration of the base cabinet If necessary add a cabinet at the base location to hold the cards displaced by the RRCU1As in the base cabinet 6 Check the validity of the configuration A valid configuration will generate positive answers to the following question...

Page 145: ...e built in remote maintenance modem for the Strata DK424 system RSIS Up to three RSIS PCBs may be installed on the RSIU PCB to provide one or more of the following RS 232 interface ports MIS for ACD SMDR SMDI and or Local Maintenance TTY Port for DKi Admin Backup PC HESC 65A One HESC 65A modular connecting cable is required to connect the HESB to the HHEU in each digital telephone and 6500 series ...

Page 146: ... Three pairs of wall brackets RWBF are supplied with RFIF Wall brackets are needed to secure floor mounted systems to the wall for safety purposes RPSB1 RPSB2 Three outlet AC Power Strip one RPSB1 required when installing three or four cabinets wall or floor mount Two RPSB1s required when installing five six or seven cabinets wall or floor mount Two AC cords will exit the cabinets in some configur...

Page 147: ...ceive telephone speaker OCA Not required for Handset Headset Speaker OCA HVSU2 6500 series Electronic Telephones equipped with one HVSU2 to receive Speaker OCA calls HVSU HVSI Electronic Telephones equipped with the older HVSU and HVSI subassemblies one per telephone to receive OCA calls HHEU One HHEU PCB must be installed in each digital 2000 1000 series and electronic telephone 6500 6005 series ...

Page 148: ...st not exceed the values provided on Page 4 38 Table 4 23 shows the PF for PCBs and the RPSU280 PF numbers for telephones and devices are shown on the following page Note The maximum number of RWIUs must not exceed one for the Base Cabinet and two for the Expansion Cabinets Table 4 23 PCB and Power Supply Power Factors PCB Type 5VDC 24VDC Notes IMDU 0 1 0 16 PCOU1 2 1 9 2 0 PDKU1 2 0 8 0 3 With 8 ...

Page 149: ...DS1A 0 35 0 16 2400 bps MODEM RPTU 2 6 1 0 RRCS 12 1 5 1 0 RRCS 4 0 4 0 3 RRCS 8 1 0 0 5 RRCU1A 4 5 0 RSIS1A 0 35 0 15 2400 bps RSIU1A 1 0 0 3 9600 bps RSSU 0 7 0 3 RSTU RSTU2 24VDC 1 4 0 5 With 8 SLTs RSTU1 R48S 48VDC 1 4 1 0 With 8 SLTs RSTU2 R48S 48VDC 4 0 2 3 With 8 MWs RWIU 9 2 0 0 With 8 16 24 or 32 handsets PCB Quantity 5VDC 24VDC PDKU2A 2 1 6 0 3 RBSU1A RBSS1A 1 3 2 0 3 RCOS1A 1 3 6 4 0 8 ...

Page 150: ...es 1 120 Telephones x 1 0 x 1 0 x 1 0 x 1 0 121 240 Telephones x 0 6 x 0 6 x 0 6 x 0 6 2000 series Electronic Telephone EKT x 2 0 x 2 0 x 2 0 x 2 0 3000 series EKT x 2 5 x 2 5 x 2 5 x 2 5 6000 series EKT x 2 0 x 2 0 x 2 0 x 2 0 6005 series EKT x 2 0 x 2 0 x 2 0 x 2 0 6500 series EKT 1 120 Telephones x 1 0 x 1 0 x 1 0 x 1 0 121 240 Telephones x 0 6 x 0 6 x 0 6 x 0 6 DDCB HDCB with MDFB x 1 2 x 1 2 ...

Page 151: ...x 0 6 2000 series Electronic Telephone EKT x 2 0 x 2 0 x 2 0 3000 series EKT x 2 5 x 2 5 x 2 5 6000 series EKT x 2 0 x 2 0 x 2 0 6005 series EKT x 2 0 x 2 0 x 2 0 6500 series EKT 1 120 Telephones x 1 0 x 1 0 x 1 0 121 240 Telephones x 0 6 x 0 6 x 0 6 DDCB HDCB w MDFB x 1 2 x 1 2 x 1 2 DDSS HDSS Console x 0 8 x 0 8 x 0 8 Add on Module x 0 4 x 0 4 x 0 4 Integrated PDIU DI x 0 5 x 0 5 x 0 5 Integrate...

Page 152: ...or PF numbers The Total Cabinet PF must not exceed the limits shown in Max PF Allowed at the bottom of this chart Note Cabinets 2 7 Last two slots are available on the DK424 RCTUE F Cabinets 1 2 3 4 5 6 7 PCB Type PF PCB Type PF PCB Type PF PCB Type PF PCB Type PF PCB Type PF PCB Type PF Slots 1 2 3 4 5 6 7 8 Power Factor Cabinet PF subtotal Telephone Device PF Page 4 36 Cabinet PF total Max PF Al...

Page 153: ...er claims After unpacking and before installing check the system against the packing list and inspect all equipment for damage If equipment is missing or damaged contact your supplier immediately Be sure to retain original packaging materials for re use when storing or transporting system hardware Packaging and Storage CAUTION When handling installing removing examining PCBs do not touch the back ...

Page 154: ...atteries may be connected to the DK424 to serve as a backup in case of power failure Separate reserve power may be required for remote expansion cabinets Clearance and Location The Base and optional Expansion Cabinets may be either floor or wall mounted Figure 5 1 shows the minimum clearance requirements See Wall Mounting on Page 5 11 and AC Power Distribution for Six Cabinets on Page 5 36 for det...

Page 155: ...all Wall Front View Top View 23 6 Cabinets 36 23 6 Minimum Clearance Requirements Floor Mounting 3 Floor Mount Stands RFMF 2 Brackets RWBF 1451 Expansion Cabinet Expansion Cabinet Expansion Cabinet Expansion Cabinet Expansion Cabinet Expansion Cabinet Base Cabinet Expansion Cabinet Expansion Cabinet Expansion Cabinet Expansion Cabinet Expansion Cabinet Expansion Cabinet Base Cabinet Figure 5 1 DK4...

Page 156: ...6 3 27 8VDC 5VDC 4 5 5 5VDC 5VDC 4 5 5 5VDC Expansion Cabinet only Battery Charger Characteristics Charger current limiting Nominal float voltage 2 275 volts cell Charge current 0 7 amps maximum Battery discharge cut off voltage 20 5 0 5VDC PESU Circuits 1 and 2 Ring voltage Square wave output with high low option jumper Low position 130 20VDC peak to peak no load High position 190 25VDC peak to p...

Page 157: ...r Data Interface Unit PDKU 1 8 or RDSU 5 8 1 pair 40 ohms 1000 ft 303 m DDSS consoles PDKU 8 PDIU DS PDKU 1 8 or RDSU 5 8 DDCB PDKU or RDSU 5 Attendant Console RATU 1 4 2 pair HDCB PEKU 5 or PESU 5 2 2 PESU circuits 3 and 4 are not used Electronic telephones PEKU or PESU 2 pair 3 pair required for OCA RPCI DI or PDIU D12 PDKU 1 8 or RDSU 5 8 Shares digital telephone wire pair1 DADM PDKU 1 8 or RDS...

Page 158: ...nts are normally 8 12 or 16 channels full service is 24 channels Unused channels must be bit stuffed Type of CO line assigned to each channel Loop Start Ground Start Tie Wink or Immediate Start DID Wink or Immediate Frame Format Type Super Frame SF or Extended Super Frame ESF The T1 provider normally specifies the Frame Format to be used either is adequate for DK424 CO digital voice lines ESF prov...

Page 159: ...inches Weight approx 30 5 lbs 14 kg Note The weight approximates a cabinet completely filled with PCBs Weight may vary slightly depending on PCBs Recommended Installation Sequence Note Each cabinet requires four wood screws 12X 1 25 inch size for wall mount installation Wood screws are not provided with the system Step Reference Information 1 Install power supplies in cabinets Power Supply Install...

Page 160: ...with the FG screw 6 Secure the power supply to the cabinet with the four provided screws 7 If the cabinet is the Base Unit a standalone Remote Expansion Cabinet or the first in a stack of Remote Expansion Cabinets plug the Base Jumper Plug into the DKSUB jumper connector on the power supply see Figure 5 3 8 If the cabinet is an Expansion Unit DKSUE plug the jumper plug that does not have a wire co...

Page 161: ...sen two screws to remove the side covers right and left side covers Loosen four screws to remove the top cover Note Do not remove the top cover if the Base Cabinet is the top cabinet Shift cover left to remove front cover Intercabinet Power Supply Ground Wire Supplied with each Expansion Cabinet Plastic Bag with Four Power Supply Mounting Screws Supplied with each Cabinet 1452 Figure 5 2 DK424 Cab...

Page 162: ... Circuit Breaker Assignments DC Voltage Specification 5V 4 5 5 5 5V 4 5 5 5 Expansion Cabinet only 24V 26 3 27 8 BATT Volts 0 26 3 27 8 24V 1 24V 2 24V 3 SX1 SX2 SX3 SX4 SX5 SX6 SX7 SX8 EXP Cabinet 24V 1 24V 2 24V 3 S15 S16 S13 S14 S11 S12 Base Cabinet Base Jumper Plug Expansion Jumper Plug Red Wire 5V No Wire 0V Blue Wire 5V White Wire 5V Green Wire 0V Green Wire Green Wire 0V Yellow Wire 24V Yel...

Page 163: ...e board should be at least 6 1 2 feet high completely expanded systems with seven cabinets require this much height and two feet wide minimum Secure the board to the wall with wood screws with the bottom edge of the board is six inches above the floor If there are wall studs make sure the screws align with the studs 2 Remove the front back and side covers from the Base Cabinet or first Remote Expa...

Page 164: ...r against the wall so that its top locating parts align with the bottom locating parts of the Base Cabinet back cover To secure the Expansion Cabinet back cover to the wall or wall board repeat Steps 5 11 from Base Cabinet DKSUB424 or First Remote Expansion Cabinet Installation on Page 5 11 3 To install additional Expansion Cabinet back covers repeat Step 2 above 4 Starting with the top Expansion ...

Page 165: ...ta DK I M 6 00 5 13 DK424 Installation 10 Reinstall covers onto cabinets Back Cover Front Up Wall 16 in Dealer Supplied 12 X 1 25 Wood Screws 4 Screws per Cabinet 1455 Figure 5 4 DK424 Cabinet Mounting Surface Diagram Directly on the Wall ...

Page 166: ...nches between bottom cabinet and floor Plaster Board Wall Dealer Supplied 12 X 1 25 Wood Screws 4 Screws Per Cabinet 12 X 1 25 Wood Screws As many as necessary to secure plywood backboard 3 4 Plywood Backboard Floor 1456 Locating Parts Figure 5 5 DK424 Cabinet Mounting Surface Diagram with Plywood Backboard ...

Page 167: ...er right and left covers R i g h t F r o n t Right Side Cover Top Cover Base Cabinet Only Front Cover Remove this screw to remove the front cover Loosen three screws to remove front cover Loosen two screws to remove the side covers right and left side covers Loosen four screws to remove the top cover Note Do not remove the top cover if the Base Cabinet is the top cabinet 1457 Figure 5 6 DK424 Cabi...

Page 168: ...ing Hole 1459 Figure 5 7 DK424 Back Cover Mounting Holes 1460 Important After mounting cabinet to back cover use two screws to fasten cabinet to back cover Hanger Back Cover Mounting Strip Hanger Hole Back Cover Hang cabinet on back cover then slide to right Figure 5 8 DK424 Mounting Cabinet on Back Cover ...

Page 169: ...nding Connection Plates Required for all wall mounted expansion cabinets on both right and left sides AC Power Cables Front RPSB1 or RPSB2 Power Strip 1462 Figure 5 9 Right Side View of Cabinet Interior Note See Outlet Strip RPSB1 and RPSB2 Installation on Page 5 34 for RPSB1 and RPSB2 cabinet locations ...

Page 170: ...for all wall mount expansion cabinets Remote Cabinet Cable feed through hole PCB Cable Front Data Cables CAB 2 CAB 3 CAB 4 CAB 5 CAB 6 CAB 7 Cable Guard Screw Cable Guard Data Cable Door shown open Base Cabinet Expansion Cabinet Expansion Cabinet Cab 2 Cable 5342 Figure 5 10 Left Side View of Cabinet Interior ...

Page 171: ...ounting Strata DK I M 6 00 5 19 DK424 Installation 1848 1848 R11 RCTU S11 S12 S13 S14 S15 S16 CABINET NO 2 3 4 5 6 7 S_1 S_2 S_3 S_4 S_5 S_6 S_7 S_8 Printed Circuit Board Cables Figure 5 11 Front View of DK424 Cabinet Interior ...

Page 172: ...t Plastic To MDF Top To MDF To MDF 25 Pair Amphenol Cables 25 Pair Amphenol Cables 25 Pair Amphenol Cables 1464 B Cables Run Out of Side of Cabinet s C Cables Run Out of Bottom of Cabinet s A Cables Run Out of Top of Cabinet s Figure 5 12 DK424 Cabinet Cable Routing ...

Page 173: ... in Figure 5 41 on Page 5 62 6 Install ground wiring AC and reserve power cabling and PCB cabling per the Recommended Installation Sequence on Page 5 7 7 Fill out cabinet slot identification labels on cabinet s Figure 5 11 8 Reinstall covers on to cabinet s Three or More Cabinets This section shows you how to mount three or more cabinets to a concrete wood or computer room floor Use the General St...

Page 174: ...ets RWBF1 are installed on both sides of the top cabinet in addition to cabinet three 11 Check to make sure the cabinets are parallel to the wall Secure the floor fixtures attached to the bottom cabinet to the floor with the customer provided floor anchors 12 Connect the data cable of each Expansion Cabinet to the applicable data cable connector on the Base Cabinet Figures 5 10 and 5 28 The data c...

Page 175: ...by either anchor bolts or wall by RWBF wall brackets see Figures 5 14 and 5 15 A B Front 2 Mounting Screws Provided with RFIF Kit Top Cabinet Wall Securing Brackets RWBFIA Left and Right Side Back 2 Mounting Screws Provided with RFIF Kit B B B B A Bottom Wall Securing Bracket RWBF1A Third Cabinet Wall Securing Bracket RWBF1A Left and right side B B B B A A A A A B B RFMF Mounting Screws RFMF is in...

Page 176: ...right sides wherever indicated B B RWBF RWBF RFMF A B A B A B A B A B A B RWBF 2705 Figure 5 14 Floor Mounting Cabinets Bolted to the Floor Note RWBF1A 3 pairs and RFMF1A 1 pair are supplied with floor installation kit RFIF RFMF RFMF RFMF RFMF RWBFs are used on left and right sides wherever indicated RFMFs are used on left and right sides wherever indicated A Front two screws left and right sides ...

Page 177: ...n on the equipment room floor 8 Secure the Base Cabinet to the floor using bolts lock washers and flat washers Bolt Cabinets to a Wooden Floor 1 Mount the DK424 Base Cabinet on Floor Mount Fixtures RFMF See Figures 5 13 and 5 17 2 Position the Base Cabinet at the selected installation location 3 Mark the floor where holes will be drilled Move the Base Cabinet prior to drilling Note Cover the Base ...

Page 178: ...t anchors 7 Install the bolt anchors with plugs in the drilled holes 8 Using the driving tool and a hammer drive each bolt anchor into the floor 9 Screw threaded rods into each bolt anchor 10 Install a hex nut lock washer and flat washer on each threaded rod Screw the nuts down far enough to allow floor tiles to be replaced over the threaded rods 11 Replace tiles over threaded rods in their origin...

Page 179: ...ets to the wall with customer provided wood screws and wall anchors 5 Place a cabinet on top of the bottom cabinet and connect the cabinets together at points A and B with the screws provided 6 Install wall brackets RWBF1 on the top of cabinet three and secure them to the wall with customer provided wood screws and wall anchors 7 Add remaining cabinets making sure that the cabinets are connected t...

Page 180: ...se Cabinet data cable connector 5 If the cabinet to be replaced is an Expansion Cabinet DKSUE424 disconnect the data cable of the cabinet from the data cable connector on the Base Cabinet Repeat this procedure for all Expansion Cabinets above the cabinet to be replaced 6 Disconnect any intercabinet ground wiring or system ground wiring connected to the cabinet Repeat this procedure for any cabinet...

Page 181: ... 5 If a reading of zero volts on one terminal and a reading of 100 125VAC on the other terminal is obtained remove both probes from the outlet 6 Set the meter to the OHMS Rx1 scale Place one probe on the ground terminal and the other probe on the terminal that produced a reading of zero volts The reading should be less than one ohm CAUTION If the reading is more than one ohm then the outlet is not...

Page 182: ...ets Wall Mount Refer to the following instructions to install AC power cabling to floor or wall mounted systems with just one or two cabinets 1 Make sure all power supply RPSU280 switches are in the Off position 2 If two cabinets are installed and local electrical code allows only one AC power cord from the system install the RPSB2 in the bottom cabinet per Figures 5 19 and 5 20 3 For AC power cor...

Page 183: ... Plug the power strip power cord into a wall outlet Note Power Supply testing procedures are provided in Chapter 14 Fault Finding which should be referred to if it is suspected that the power supply does not work properly AC Power for Three or More Cabinets Floor Mount UL specifies that floor mounted systems with three or more cabinets require the installation of a Conduit Connection Box RCCB1 or ...

Page 184: ...as an estimate Table 5 4 Typical Reserve Power Duration Estimate The procedure for installing reserve power varies depending on the number of cabinets in the system and the mounting method employed in installing the cabinets The following text details reserve power battery installation requirements Number of Cabinets 1 2 3 4 5 6 7 Estimated operation time Two battery configuration 16 0 hr 8 0 hr 5...

Page 185: ... Box RBDB1A or RBDB2 to the bottom cabinet 2 Connect two Cable C jumper wires from the positive terminal of one 12VDC battery to the negative terminal of the second 12VDC battery Cable C is supplied with the RBTC1A 2M cable 3 Ensure that a serviceable 12 amp fuse is installed in the in line fuse holder of the RBTC1A 2M battery cable 4 Connect the white lead of the RBTC1A 1 5M or RBTC2A 1 7M batter...

Page 186: ...med by the regular system installer 3 Install the Battery Distribution Box on the second cabinet the cabinet directly above the bottom cabinet 4 Plug the two Conduit Connection Box cables coming from the left side of the RCCB box into the Battery Distribution Box Important The cabinets must be connected to the live AC power source and the power supply On Off switches set to On prior to the final s...

Page 187: ...No 2 PBTC 3M Cable to BATT Connector of Power Supply in Cabinet 1 PBTC 3M Cable to BATT Connector of Power Supply in Cabinet 2 AC Power Cord White Wire DKSUB DKSUE One AC Cord see Important note below RPSB2 see Important note below 1474 Two AC Power Cords from RPSU280 Power Supplies Cabinet 1 and 2 115VAC 10VAC 11 5 Amps Max Figure 5 20 AC and Reserve Power One or Two Cabinets Wall or Floor mounte...

Page 188: ...p max Insulated Ground Wire B Earth Ground Cold Water Pipe Or Ground Rod AWG 6 Wire Maximum Length 60 Feet Per General Rules of Article 250 Of The National Electric Code NFPA70 ONEAC 6 AP or 6 DP Solid State Secondary Protectors Third Wire AC Ground Building Main Power Panel Electrical Ground A 115VAC 10VAC 50 60 Hz Dedicated 15 Amp Branch Circuit Third Wire Ground to AC Power AC Cable Intercabine...

Page 189: ... 115VAC 10VAC 50 60 Hz 7 5 Amp max Insulated Ground Wire B Earth Ground Cold Water Pipe or Ground Rod AWG 6 Wire Maximum Length 60 Feet Per General Rules of Article 250 of the National Electric Code NFPA70 ONEAC 6 AP or 6 DP Solid State Secondary Protectors Third Wire AC Ground Building Main Power Panel Electrical Ground A 115VAC 10VAC 50 60 Hz Dedicated 20 Amp Branch Circuit 115VAC 10VAC 50 60 Hz...

Page 190: ...unting Hole Top Mounting Hole Bottom Mounting Hole Right Side View Remove three side screws to remove cover RBDB1 or RBDB2 shown with cover on Bottom Cabinet wall mount installation Second Cabinet Up floor mount installation Remove three side screws to loosen cover Bottom Mounting Screw PSU 1475 BATT RBDB2 only Figure 5 23 Battery Distribution Box RBDB Installation Wall Floor Mount Three or More C...

Page 191: ...s to connect batteries to RBDB distribution box 6 5 ft cables RBDB To BATT Connector RPSU 280 Bottom Cabinet To BATT Connector RPSU 280 Cabinet 5 To BATT Connector RPSU 280 Cabinet 4 To BATT Connector RPSU 280 Cabinet 3 To BATT Connector RPSU 280 Cabinet 2 To BATT Connector RPSU 280 Top Cabinet 1 2 3 24V POWER 5V 5V AC IN FG DC OUT ON OFF BATT RBTC1A 1 5M Cable AC Power Cord RPSU280 Power Supply F...

Page 192: ...istribution box 6 5 ft cables RBDB2 To BATT Connector RPSU 280 Bottom Cabinet To BATT Connector RPSU 280 Cabinet 6 To BATT Connector RPSU 280 Cabinet 5 To BATT Connector RPSU 280 Cabinet 4 To BATT Connector RPSU 280 Cabinet 3 To BATT Connector RPSU 280 Cabinet 2 To BATT Connector RPSU 280 Top Cabinet Cable supplied with RC7C1A 1 7M cable kit 1 2 3 24V POWER 5V 5V AC IN FG DC OUT ON OFF BATT RBTC1A...

Page 193: ... 16 AWG minimum To RPSU280 BATT Connectors 6 max White Wire Black Wire 2 Batteries 1 7 Cabinets with RBDB2 1 12 Volt4 Batteries 80 AMP HR Each RBTC1A 1 5M Cables 6 max Cable for 7th cabinet order number RC7C1A 1 7M 12A Fuse 4 Batteries 1 7 Cabinets with RBDB2 RBTC1A 2M Cable 6 5 ft 2 To RPSU280 BATT Connectors 6 max 2 Batteries 1 Cabinet without RBDB 12 Volt4 Batteries 80 AMP HR Each 12 Volt4 Batt...

Page 194: ...B2 Shown with cover on Side View of RCCB Conduit Holes to 1 2 Inch Tradesize Conduit To RBDB or RBDB2 Battery Distribution Box Battery Wires 12 AWG minimum 24 AMPS Max AC Power Wire 14 AWG minimum 11 5 AMPS Max RCCB1 17 5 AMPS Max RCCB2 RCCB1 3 6 Cabinets or RCCB2 7 cabinets 1473 Third cord is on RCCB2 only Fuse Ratings AC BAT F1 F3 250V 12A F4 F6 250V 15A Figure 5 26 Conduit Connection Box RCCB R...

Page 195: ...les One to Each Power Supply BATT Connector 6 max RCCB to RBDB Battery Connecting Cables Connectors are Factory Wired on RCCB RCCB 1A AC DC Conduit Connection Box Shown mounted with cover off 12 AWG Wire Minimum RFMF Floor Mount Fixture 14 AWG Wire Minimum L Line Wire Hot N Neutral Wire FG Ground Wire AC Receptacles AC Power Cords Plugs from RPSB No 1 and No 2 RBDB1A Battery Distribution Fuse Box ...

Page 196: ...nsion Cabinet 3 Expansion Cabinet 4 Expansion Cabinet 5 Expansion Cabinet 6 Expansion Cabinet 7 Expansion MBJU Jumper Unit BATT AC IN RPSU280A External Battery 27 3VDC 35A max AC Input 115VAC 10VAC 17 5A max BATT AC IN RBTC1A 1 5M 6 cables supplied with RBDB unit RBDB2A 7 cabinets RBDB1A 6 cabinets RCCB2A 7 cabinets RCCB1A 6 cabinets Data Cable 7 supplied with RC7C1A 1 7M Data Cable 1 6 supplied w...

Page 197: ...abinets have eight universal slots labeled S_1 S_2 S_3 S_4 S_5 S_6 S_7 S_8 where the blank space of the label represents the number of the Expansion Cabinet Like the universal slots in the Base Cabinet these universal slots are capable of hosting any of the station line and option interface PCBs except RSIU which can only be installed in slot 11 The DK424 Expansion Cabinet slots labeled S_7 and S_...

Page 198: ...ustom time switch and conference Large Scale Integration LSI circuitry The processor operating software is programmed on four read only memory ROM chips on the RCTUA3 or RCTUA4 BB3 or BB4 and D3 or D4 PCBs and on the Flash Memory PCB RMMS on the RCTUF3 or F4 PCBs The operating software ROM or RMMS is factory installed The RCTU PCBs also provide busy tone detection as a standard feature for Auto Bu...

Page 199: ...imum Lines Stations RCTUA one Cabinet Base Cabinet 16 32 RCTUBA BB up to two Cabinets Base Cabinet plus one six slot Expansion Cabinet 48 80 RCTUC D up to six Cabinets Base Cabinet plus up to five more six slot Expansion Cabinets 144 240 RCTUE F up to seven Cabinets Base Cabinet plus up to six more eight slot Expansion Cabinets 200 336 RCTUBB RCTUA or RCTUD RCTUD only To RSIU if installed RCTUBA o...

Page 200: ...DTMF receiver circuits RCTUBA has up to 12 circuits the RCTUC D has up to 24 circuits one RRCS on RCTUC and one RRCS on RCTUD and the RCTUE F has up to 24 circuits one RRCS on RCTUE and one RRCS on the RCTUF RKYS Feature Key Upgrades The system can be upgraded for built in AA ACD and MIS for ACD with the following feature keys that attach to the common control unit Table 5 6 RKYS Features To insta...

Page 201: ...PESU or other BGM source interfaces To install the MOH BGM source to common control unit Adjust the VR1 potentiometer to the desired volume level while listening to MOH or BGM see Chapter 12 Peripheral Installation RRCS The DTMF receiver subassembly RRCS translates DTMF signals to data signals and attaches to common control units with 4 8 or 12 receiver circuits RRCS 4 8 or 12 Installation onto RC...

Page 202: ...38 Note The RRCS connectors on these PCBs are positioned to allow installation of the RRCS only in the proper position The combined RCTUC D and RCTUE F common control unit can support up to 24 DTMF receiver circuits Both the RCTUC or RCTUE and the RCTUD or F PCBs can be equipped with the RRCS 4 8 or 12 RRCSs can be installed on both the RCTUC or RCTUE and the RCTUD or RCTUF at the same time If onl...

Page 203: ...e of the RCTU PCB is facing right when installing it in the Base Cabinet 4 Insert the RCTUBA RCTUC or RCTUE PCB into slot R11 5 After installing the RCTU PCBs gently pull it outward If the connectors are properly mated a slight resistance will be felt 6 Connect the supplied ribbon cables between RCTUA RCTUBA and BB and RSIU if installed or RCTUC D RCTUE F and RSIU if installed Note Do not adjust t...

Page 204: ...fter Program 03 If there are no options on the RCTU Program 03 can be skipped and Program 91 1 or 91 9 can be run instead Program 03 For RCTUE F only Run program to identify DK424 and DK280 cabinets Program 12 Select the seize time of the RRCS circuits Program 90 91 92 RCTU initialization programs DK280 to DK424 Base Cabinet Upgrade Considerations 1 Remove MBJU from the DK424 Base Cabinet motherbo...

Page 205: ...nal jumper Interface connector for on board lithium battery that protects configuration data stored in system RAM MOH BGM Source Connector RCA jack Interface connector for MOH BGM source Future Feature Upgrade Connector P11 P12 Connector for ribbon cable Connector for connection with future feature upgrade PCB MOH BGM Source Volume Control VR1 Trim potentiometer Adjusts volume for MOH BGM source c...

Page 206: ...P4 and P6 DTMF Receiver Connector P6 6 pin male connector Used in conjunction with P3 P4 and P5 BATT Battery Jumper P9 3 terminal jumper Interface connector for on board lithium battery that protects configuration data stored in system RAM MOH BGM Source Connector RCA jack Interface connector for MOH BGM source RCTUBA ribbon cable Connector P11 Connector and ribbon cable Ribbon cable connector for...

Page 207: ...2 Connector P3 Connector for ribbon cables Connector for RCTUBA and RSIU ribbon cable Used with P11 Heart Beat indicator CD11 Red LED Flashes to indicate operation 1 4 second On 1 4 second Off Figure 5 34 RCTUBB PCB Backplane Connector IC10 P1 Program ROMS IC9 10 11 and 12 To RCTUBA RSIU Connectors CD5 RCTUBB4 CBRUK Heart Beat LED P3 P2 IC9 U3 RKYS Key Socket Ribbon Cable to RCTUBA and RSIU if ins...

Page 208: ...TMF Receiver Connector P6 6 pin male connector Used in conjunction with P3 P4 and P5 BATT Battery Jumper P9 3 terminal jumper Interface connector for on board lithium battery that protects configuration data stored in system RAM MOH BGM Source Connector RCA jack Interface connector for MOH BGM source RCTUC ribbon cable Connector P11 Connector and ribbon cable Ribbon cable connector for RCTUD and R...

Page 209: ...5 6 pin male connector Interface connector for optional DTMF receiver subassembly RRCS Used in conjunction with P6 P7 and P8 DTMF Receiver Connector P6 10 pin male connector Used in conjunction with P5 P7 and P8 DTMF Receiver Connector P7 10 pin male connector Used in conjunction with P5 P6 and P8 DTMF Receiver Connector P8 6 pin male connector Used in conjunction with P5 P6 and P7 Heart Beat Indi...

Page 210: ...ale connector Interface connector for optional DTMF receiver subassembly RRCS Used in conjunction with P6 and P9 RRCS Connector P6 6 pin male connector Interface connector for optional DTMF receiver subassembly RRCS Used in conjunction with P7 and P9 MOH BGM Source Connector RCA jack Interface connector for MOH BGM source RCTUF Connector P11 Connector and ribbon cable Ribbon cable connector to RCT...

Page 211: ... to RCTUE and RSIU Used in conjunction with P3 DTMF Receiver Connector P8 10 pin male connector Interface connector for optional DTMF receiver subassembly RRCS Used in conjunction with P6 P7 and P9 DTMF Receiver Connector P9 6 pin male connector Used in conjunction with P5 P7 and P9 DTMF Receiver Connector P10 10 pin male connector Used in conjunction with P5 P6 and P9 Heart Beat Indicator CD5 Red...

Page 212: ...nd applies it to a ribbon Data Cable connected to the Remote Expansion Cabinet See Figure 5 39 This is a hardware solution and has no effect on software or administration Remote cabinets support all line and trunk interfaces Network clock signals can only be derived from digital trunks installed in the Base Cabinet Master location RRCU1A cards are used at both the Base Master and Remote Slave Cabi...

Page 213: ...1A cards are installed must be modified to protect the routing of the cables through the cabinet Remove the existing data cable door as shown in Figure 5 40 Replace the original data cable door with the data cable door provided with the RRCU1A card It has a protected opening through which the remote data cables can pass Attach the clamps bracket to the inner wall of the cabinet See Figure 5 41 4 I...

Page 214: ...Cabinet attach an RDCL1A data cable from the data cable connector at the left of the cabinet to Connector M1 on the RRCU1A card See Figures 5 39 5 41 and 5 42 The cabinet connected to M1 in the base emerges on Connector S1 of the RRCU1A at the Remote Expansion Cabinet Connect data cable to S1 The cabinet connected to Connector M2 of the RRCU1A in the base emerges on connector S2 of the RRCU1A at t...

Page 215: ...Run Command Program 91 1 Automatic PCB Recognition and Port Renumber The RRCU PCB and its controls and connectors are shown in Figure 5 42 and Table 5 14 Figure 5 42 Remote Expansion Cabinet Printed Circuit Board RRCU1A Table 5 14 RRCU Controls The ROMS subassembly and fiber optic cable connectors is shown in Figure 5 43 Table 5 14 lists the fiber optic cable specifications Control Indicator Conne...

Page 216: ...h 3 km or 1 86 miles 500 1000 MHz km fiber 2 km or 1 24 miles 200 400 MHz km fiber Optical Budget Loss 9 dB one way Minimum Bend Radius 30 mm 1 18 inches Round Trip Delay Time 30 micro seconds Transmit Power 23 5 dBm Receiver Sensitivity 30 dBm TX Side RX Side 4379 ROMS1A SD RDER SYCF SYCS RST CD1 CD2 CD3 CD4 CD5 J3 J1 1 15 1 10 J2 J4 1 11 11 1 24v DG PFT CONTROL Optical Module Plastic Cap Remove ...

Page 217: ...ted in received data 0 Code rule violation not detected in received data 0 D2 SYCF 1 Frame synchronization of received data not established 0 Frame synchronization of received data established 0 D3 SYCS 1 System synchronization between cabinets not established 0 System synchronization between cabinets established 0 D4 RST 1 Reset signal from CTU detected 0 Reset signal from CTU not detected 0 D5 N...

Page 218: ...Monitor Port Pin Assignments 1 RD 2 TD 3 DSR 4 DTR 5 DCD 6 SG The monitor port pin connection and pin assignments are shown in Figure 5 44 Figure 5 44 RRCU1A Monitor Jack Monitor jack RJ 12 pin numbering Dealer supplied 6 wire telephone modular cord cross pinned Monitor jack PC with communication software such as ProComm PC DB9 or DB25 Com port Toshiba PPTC9 or PPTC25F RRCU1A 4439 ...

Page 219: ...FB T1 Span Line or ISDN PRI Line Earth Ground Earth Ground CSU PSTU RSTU RSTU2 RDSU RSTS 2077 Important To protect against transient voltages and currents solid state secondary protectors must be installed if there is outside wiring and on all DID and E M Tie lines These protectors which contain fast semiconductors in addition to fuses shall comply with the requirements for secondary protectors fo...

Page 220: ...DK424 Installation Remote Cabinet Installation Instructions 5 68 Strata DK I M 6 00 ...

Page 221: ...access to each other as well as to the public network A modular design and a choice of four processors also called common control units enables the system to fit a variety of customer needs and capacities The DK424i can be configured as a single cabinet system that provides capacity of up to 64 CO lines and stations combined and can grow to a five cabinet system that provides capacity for up to 43...

Page 222: ...iversal slots Each processor provides a MOH BGM source interface and connectors to mount optional DTMF receiver PCBs required for some CO line types and peripherals as described below Each processor provides an interface for connecting an optional feature key RKYS as described below B3CAU B3CBU and B5CAU B5CBU require a remote maintenance PCB usually installed in slot S101 the remote maintenance P...

Page 223: ... The system can be upgraded for built in AA Automatic Call Distribution ACD Software Management Information System SMIS Call Center Viewer and Insight DK with the following feature keys that attach to the processor See Table 6 3 for features provided by RKYS1 3 Table 6 3 RKYS Features Cabinet Slots Base Cabinet The Base Cabinet has two slots reserved for the system processor PCBs and eight univers...

Page 224: ...nfiguration Configurations for a fully expanded system can range from 200 lines or 336 stations One universal slot is required for Remote Maintenance PCB with B3CAU B3CBU and B5CAU B5CBU but is optional for B1CU and B2CAU B2CBU A summary of the maximum number of lines and stations by processor is shown in Table 6 4 Table 6 4 Strata DK424i Maximum Capacities Cabinets B1CU B2CAU B2CBU B3CAU B3CBU B5...

Page 225: ...ions Max 120 CO Lines Max 216 Stations Analog Lines 5 Cabinets 48 Universal Slots 336 Stations Max 200 CO Lines Max 376 Stations Analog Lines Stations Lines Stations Lines Stations Lines Stations Lines 56 0 112 0 192 24 336 40 56 8 104 0 184 32 328 48 48 8 104 8 176 40 320 56 48 16 96 8 168 48 312 64 40 16 96 16 160 56 304 72 40 24 88 16 152 64 296 80 32 24 88 24 144 72 288 88 32 32 80 24 136 80 2...

Page 226: ...inets 28 Universal Slots 192 Stations Max 120 CO Lines Max 248 Stations Digital Lines 5 Cabinets 48 Universal Slots 336 Stations Max 196 CO Lines Max 432 Stations Digital Lines Stations T1 PRI Lines Stations T1 PRI Lines Stations T1 PRI Lines Stations T1 PRI Lines 56 0 112 0 192 0 336 0 56 8 8 104 0 192 16 16 336 16 16 48 16 16 104 16 16 192 24 23 336 24 23 40 24 23 96 16 16 192 40 40 336 40 40 32...

Page 227: ...ous calls maximum per BRI circuit Each BRI U station circuit supports one TE 1 or TA device 4 In Tables 6 7 6 10 other stations include Toshiba digital and electronic telephones or attendant consoles standard telephones and devices 5 In Tables 6 7 6 10 other lines include analog and digital T1 or PRI loop start ground start DID and Tie lines 6 RBSS can only be used for BRI stations All other BRI P...

Page 228: ...BRI Circuits 2B 1D channel each Other Stations Lines Combined see Guidelines 4 5 on 6 7 48 56 44 72 40 88 36 104 32 120 28 136 24 152 20 168 16 184 12 200 8 216 4 232 0 248 B5CAU B5CBU 5 Cabinets 48 Universal Slots 336 Stations max 200 CO Lines max 432 Stations Lines Max BRI Circuits 2B 1D channel each Other Stations Lines Combined see Guidelines 4 5 on 6 7 72 144 68 160 64 176 60 192 56 208 52 22...

Page 229: ...300 300 DNIS Numbers 350 500 500 500 DTMF receivers 12 24 24 24 External Page Zones 4 4 4 8 Call Park Orbits general 20 20 20 20 Call Park Orbits individual 80 240 240 336 Personal LCD Messages per DKT2 2 Personal Messages includes timed reminder memo and station speed dial memo 10 10 10 10 Personal Message DKTs 32 96 96 96 PhDNs per System 80 240 240 336 PDNs per System 80 240 240 336 Ring Tones ...

Page 230: ...nes DIL 5 PRI lines provide CO line services including Calling Party Number DID Tie POTS FX and DIL Table 6 13 Station and Peripherals Capacities DK424i Capacities Stations B1CU B2CAU B2CBU B3CAU B3CBU B5CAU B5CBU Add on modules DADM 40 120 120 200 Attendant consoles 0 4 4 4 DKT2104 CT Cordless Telephone 56 104 192 328 DKT2104 CT simultaneous calls 30 30 30 30 DKT2004 CT Cordless Telephone 56 104 ...

Page 231: ...ne with 20 or 40 with two DADMs additional feature buttons for DSS System or Station Speed Dial or CO line appearances 1 or 2 Table 6 15 PCB Circuits Interface Options and Connectors PCB Subassembly Circuits Interface Options Connector RPTU DK40i and DK424i 1 circuit ISDN PRI DK424i 23 B channels 1 D channel DK40i 8 or 12 B channels 1 D channel POTS FX Tie senderized Tie cut through OUTWATS intra ...

Page 232: ...ional Loop Start CO lines 1 RCOS subassembly per RCOU RCIU2 4 circuits With RCIS 8 circuits Loop or Ground Start Lines with Caller ID Requires RCOU RGLU2 or PCOU RJ14C modular attaches to RCIU2 RCIS Used with RCOU RCOS PCOU and RGLU2 CO line PCBs to provide 4 Caller ID circuits 1 RCIS subassembly per RCIU2 RDDU 4 DID circuits DID Lines RJ14C modular RGLU2 4 line circuits Loop or ground start lines...

Page 233: ...taches to RSTU2 and RDSU RSTS Provides two additional standard telephone circuits 1 maximum per RDSU None PESU 2 standard telephone circuits 4 electronic telephone circuits standard electronic telephone ports Standard same as KSTU2 Electronic same as PEKU except PESU does not support HDSS console 25 pair amphenol RATU DK424i only 4 PC Attendant PC Console circuits PC Attendant Console Conventional...

Page 234: ... Provides up to four interface ports RS 232 and modem for system interface with RMDS 1200 or 2400 bps Voice Mail SMDI ACD SMIS SMDR Local or Remote Maintenance for DKi Admin or DKi Backup PC One 3 pair modular per RSIS RS 232 RMDS Modem RS 232 RWIU 4 RJ11 jacks to support 4 Strata AirLink Integrated Base Stations Digital Wireless Handsets same as PDKU except no DDSS console Stand alone cordless te...

Page 235: ...zone 3 watts 8 ohms X X Night transfer or Music on hold control relay X X X Door lock or external amplifier control relay X X X Alarm Sensor X X Remote maintenance modem subassembly IMDU or RMDS disables TTY output when they are piggy backed onto the PIOU PIOUS or RSIU RSIS cards 2 X IMDU X IMDU X RMDS Remote Maintenance using customer provided external modem requires TTY output port 2 X X X X SMD...

Page 236: ...le X X DK424 PC Attendant X X RPCI RS 232C Data X X RPCI RS 232C TAPI X X DKT1000 X X DKT2000 X X Base Cabinet DKSUB424A X NC CHSUB672A NC X Expansion Cabinet DKSUE 424A X NC CHSUE672A NC X Data Cable for Expansion Cabinet DK424 X NC Data Cable for Expansion Cabinet DK424i NC X Power Supply Unit RPSU424A1 X NC BPSU672A 120VAC 208VAC 240VAC power supply NC X Conduit Connection Box RCCB2A1 X NC BCCB...

Page 237: ...rnal Zone Page Relays 4 Zones External Page Amplifier 600Ω Output Music Source Background Music and or Music on hold MOH BGM Volume Control Main Distribution Frame MDF MOH BGM RCA Jack Alarm Relay Sensor Night Bell or MOH Control Relay Battery Charger 12V Battery 12V Battery Twisted Pair 1 Customer supplied equipment RKYS Option Key AA ACD MIS 2 or 4 Batteries CBRUK ABR Tone Detector Standard BPSU...

Page 238: ...a RPRI CBL KIT Channel Service Unit CSU 8 wire Modular Jacks 2 ISDN BRI U 2 Circuits NT 1 Voice Data 2B D RBUU RBUS ISDN BRI U 2 Circuits NT 1 Voice Data 2B D U 4 U 4 8 wire Modular Jacks 8 wire Modular Jacks 3 3 ISDN BRI S T 2 Circuits TE Voice Data 2B D RBSU NT1 per circuit 2 U 4 T 4 8 wire Modular Jacks RMCU Trunk Circuits for E911 RCMS 2 Trunk Circuits RCMS 2 Trunk Circuits CAMA Line 2 wire Mo...

Page 239: ...inter Sharing Digital Telephone with DSS Console 1 Pair Modular Cord RS 232 Cable PC 1 pair Modular Cords DPFT Voice Mail Base Station 1 Strata AirLink Wireless Base Stations 4 Handsets Handsets Base Station 2 Modem RS 232 Cables HESB Loud Ringing Bell Strata AirLink Base Station Interface Adapter BSIA Electronic Telephone EKT Door Phones and Lock Controls Standard Telephone Alternate BGM source t...

Page 240: ... card for the remote location 4 If necessary adjust the number of cabinets required The maximum number of Expansion Cabinets per system is four The maximum number of locations is five The maximum number of cabinets supported by one fiber connection is two 5 Determine the total number of RRCU PCBs required at all remote locations see Table 6 17 on Page 6 28 in Worksheet 6 Add the same number of RRC...

Page 241: ... Doorphones DT15 Pre wired Digital Telephone Ports allocates spare hot wired PDKU2 Ports DT16 DKT2004 CT Digital Cordless Phone spread spectrum sharing port with DKT 1 1 Do not count into DT20 total PDKU ports required DT17 DKT2004 CT Digital Cordless Phone spread spectrum stand alone DT18 DKT2104 CT Digital Cordless Phone narrow band spread spectrum sharing port with DKT 1 DT19 DKT2104 CT Digital...

Page 242: ...delines W07 WRL RWIU MGR Strata AirLink Wireless RWIU Manager Software W08 WRLS ALM Analog Line Module ALM W09 WRLS BS Strata AirLink Wireless Base Station W10 WRLS BS PS CORD Strata AirLink Wireless Base Station Power Supply Cord W11 WRLS BS TEST Strata AirLink Wireless Base Station Test Stand W12 WRLS BSIA Strata AirLink Wireless Base Station Interface Assembly W13 WRLS BSIA PWR Power Supply for...

Page 243: ...ess Telephone on Page 6 22 and ST09 in Worksheet 3 Standard Telephone on Page 6 24 2 Refer to the Strata AirLink System Installation Guide to determine the number of BSIA interfaces needed The wireless Base Station Interface Adapter BSIA can support up to 32 wireless handsets 3 Refer to the Strata AirLink System Installation Guide to determine the number of Base stations required Each BSIA can sup...

Page 244: ...orts ST7 Pre wired Standard Telephone ports to allocate spare hot wired standard tel ports ST8 Digital Announcers Required ACD or Built in Auto Attendant ST9 Strata AirLink Handsets supported by external Base Station Interface Adapter BSIA from Worksheet 2 ST10 Total RSTU2 PCBs Slots required ST1 ST9 QTY 8 ST11 Total RDSU2 PCBs Slots required to add 4 DKT 2 SLT Devices ST12 Total RDSU RSTS PCBs Sl...

Page 245: ...U 16 RPTU 1 Slot RPTU CO11 ISDN BRI Circuit1 U type with RBUU 2 RBUU 1 Slot RBUU CO11 ISDN BRI Circuits1 U type with RBUU RBUS 4 RBUU RBUS 1 Slot RBUU US CO13 ISDN BRI Circuits1 S T type with RBSU 2 RBSU 1 Slot RBSU CO14 ISDN BRI Circuits1 S T type with RBSU RBSS 4 RBSU RBSS 1 Slot RBSU RBSS CO15 E911 CAMA Circuits RMCS RCMS 2 circuits add another RCMS for 4 circuits 4 RMCU RCMS 1 Slot RMCU RMMS C...

Page 246: ...e RSIS for SMDR HMIS Interface PIOUS for SMDR HMIS Interface FO5 PIOU for SMDR HMIS Interface Remote Maintenance HMIS Interface RSIU RMDS Admin HMIS 2400 bps modem PIOUS IMDU Admin HMIS modem PIOU IMDU Admin HMIS modem FO6 System Paging and Relay Contact Option Interface Paging Night Transfer NT Relay Alarm Sensor Options PEPU Amplified Paging NT PIOUS Unamplified Paging NT Alarm Sensor One PIOU P...

Page 247: ...ause they have special placement rules After all PCBs are placed in cabinets the processor PCB that meets the requirements of the configuration can be selected Use the numbered step sequence as a guide beginning with 1 Programming Telephone Interface Main Location _______________ Remote Location 1___ 2___ 3___ 4____ DK424i Cabinet Slots Base B1011 1 B101 B102 processor slots S101 RSIU PDKU or PEKU...

Page 248: ...alled if needed in Slot S101 only If RSIU is installed in S101 then a PDKU or PEKU must be installed in S102 to accommodate the programming telephone PIOUS PIOU RSSU PEPU each requires one slot These PCBs should be installed after all other PCBs are installed They cannot occupy any slot that is left vacant to provide RDTU RPTU or RWIU capacity as shown in Tables 6 19 6 21 However the PIOUS PIOU RS...

Page 249: ...es and Connectors Data Cables RRCU Connectors M1 S1 M2 S2 BDCL1A MS1 X X BDCL1A M2 X BDCL1A S2 X X applies to connector Table 6 19 RDTU PCB Cabinet Slot Configuration T1 Lines Needed Slots Needed RDTU PCBs Needed1 1 RDTU PCBs do not have to be installed in the order shown in this table Example If only one RDTU is needed it can be installed in any RDTU slot shown in the table so long as the slot is...

Page 250: ...t These PCBs cannot occupy a slot that is left vacant to provide capacity for RDTU RPTU or RWIU as shown in Tables 6 19 6 21 Each RSTU PCB provides circuits for up to eight Strata AirLink Handsets each RDSU RSTS provides circuits for four Strata AirLink Handsets Table 6 20 RPTU PCB Cabinet Slot Configuration PRI Lines Needed Slots Needed RPTU PCBs Needed1 1 RPTU PCBs do not have to be installed in...

Page 251: ...y one RWIU is needed it can be installed in any RWIU slot shown in the table so long as the slot is supported by the installed processor RWIU Cabinet Slot Placement1 Base Cabinet with Any Processor 1 8 1 1 S103 RWIU1 9 16 2 S104 vacant2 2 The slot occupied by RWIU supports eight handsets for each additional eight handsets an additional slot s adjacent to RWIU must be vacant 17 24 3 2 S105 RWIU2 24...

Page 252: ... combination requires one slot These PCBs can not occupy a slot that is left vacant to provide capacity for RDTU RPTU or RWIU as shown in Tables 6 19 6 20 and 6 21 Each PCB provides up to four circuits for the type of lines it supports except RCOU with RCOS which provides eight circuits 10 ISDN BRI Digital Line PCBs See Worksheet 4 CO Line to determine ISDN BRI line PCB requirements RBUU RBUU with...

Page 253: ... to calculate that each cabinet PF is within limits Important Power Factor Considerations The individual PCB and telephone power factors can be found on Pages 6 34 and 6 35 The sum of all PCB and telephone 24VDC PFs in a given cabinet cannot exceed 85 The sum of all PCB 5VDC PFs in a given cabinet cannot exceed 40 telephones do not have 5VDC PFs It is only necessary to check the 5VDC PF of a cabin...

Page 254: ...3CAU B3CBU 4 5 1 9 PEKU 1 6 0 7 B5CAU B5CBU 10 0 1 9 PEPU 1 1 6 5 RDDU 2 6 7 0 PESU 1 5 0 5 RDSU 24VDC 1 1 0 3 PIOU 2 0 6 5 RDSU R48S 48VDC 1 1 0 5 PIOU2 1 1 6 5 RDTU 1 8 1 0 PIOUS 0 75 4 0 REMU2 PEMU 1 0 7 5 R40S1 0 0 2 8 RGLU1A 2A 2 1 2 5 RATU 1 7 0 3 RMCU1A 0 7 0 3 RBSS1 0 6 0 3 RMDS1A 0 35 0 16 RBSS2 0 0 0 3 RPTU 2 6 1 0 RBSU RBSS 3 1 0 3 RRCS or BRCS 12 1 5 1 0 RBSU1 2 5 1 0 RRCS or BRCS 4 0 ...

Page 255: ...x 1 0 x 1 0 1 120 Telephones x 1 0 x 1 0 x 1 0 121 240 Telephones x 0 6 x 0 6 x 0 6 2000 seriesElectronic Telephone EKT x 2 0 x 2 0 x 2 0 3000 series EKT x 2 5 x 2 5 x 2 5 6000 series EKT x 2 0 x 2 0 x 2 0 6005 series EKT x 2 0 x 2 0 x 2 0 6500 series EKT x 1 0 x 1 0 x 1 0 1 120 Telephones x 1 0 x 1 0 x 1 0 121 240 Telephones x 0 6 x 0 6 x 0 6 DDCB HDCB with MDFB x 1 2 x 1 2 x 1 2 DDSS HDSS Consol...

Page 256: ... Telephone DKT any series x 1 0 x 1 0 1 120 Telephones x 1 0 x 1 0 121 240 Telephones x 0 6 x 0 6 2000 series Electronic Telephone EKT x 2 0 x 2 0 3000 series EKT x 2 5 x 2 5 6000 series EKT x 2 0 x 2 0 6005 series EKT x 2 0 x 2 0 6500 series EKT x 1 0 x 1 0 1 120 Telephones x 1 0 x 1 0 121 240 Telephones x 0 6 x 0 6 DDCB HDCB w MDFB x 1 2 x 1 2 DDSS HDSS Console x 0 8 x 0 8 Add on Module x 0 4 x ...

Page 257: ...es must be less than 85 for each cabinet It is only necessary to check the 5VDC PF when installing RWIU PCB s Cabinet 1 base Cabinet 2 Slot PCB Type PCB 5VDC PF PCB 24VDC PF Slot PCB Type PCB 5VDC PF PCB 24VDC PF B101 S201 B102 S202 S101 S203 S102 S204 S103 S205 S104 S206 S105 S207 S106 S208 S107 S209 S108 S210 Total PCB PF Total PCB PF Total Phone PF Total Phone PF Total Cabinet PF Total Cabinet ...

Page 258: ...pare Power Supply BPSU672 AC Power Strips RPSB2 BPSB240 208 240VAC Power Supply Cord BACL240A Battery Cables PBTC 3M BBTC1A 2 0M Conduit Box BCCB120 BCCB240 Floor Mount Stand BFIF Table 6 25 DK424i Electrical Characteristics DK424i Primary AC Power Voltage Input Voltage AC Frequency Watts per cabinet continuous Watts for five cabinet system 115VAC 10V or 208VAC 20V or 240VAC 20V 50 60 Hz Single ph...

Page 259: ...cted after during an actual power failure Table 6 27 Typical Reserve Power Duration Estimates in hours Table 6 26 Reserve Power Characteristics Battery Charger Characteristics Charger current limiting Nominal float voltage 2 275 volts cell Charge current 0 7 amps maximum Battery discharge cut off voltage 20 5 0 5VDC Maximum Battery Consumption 24VDC 1 cabinet 2 cabinets 3 cabinets 4 cabinets 5 cab...

Page 260: ...wer supply and must be ordered separately RPSB2 Cabinet power strip for 120VAC primary power provides three standard 120VAC 15A outlets NEMA5 15R and nine ft AC power cord with standard 120VAC 15A plug NEMA5 15P This unit is field installed inside system cabinet side panels The system can use 12 amps max One RPSB2 is required for two cabinet systems if the local electric code allows only one AC po...

Page 261: ... distribution cables to connect reserve power from the BDDB box to each individual cabinet power supply One or two BBTC1A 2 0M must be ordered separately when using the BBDB battery distribution box BBTC1A 2 0M A two meter battery cable used to connect reserve power batteries to the BBDB battery distribution box One reserve power cable is required in a three or four cabinet system and two cables a...

Page 262: ...DK424i Configuration Primary Reserve Power Cabinet Hardware 6 42 Strata DK I M 6 00 ...

Page 263: ...oper claims After unpacking and before installing check the system against the packing list and inspect all equipment for damage If equipment is missing or damaged contact your supplier immediately Be sure to retain original packaging materials for re use when storing or transporting system hardware Packaging and Storage CAUTION When handling installing removing examining PCBs do not touch the bac...

Page 264: ...e of power failure Separate reserve power may be required for remote expansion cabinets Clearance and Location The Base and optional Expansion Cabinets may be either floor or wall mounted Figure 7 1 shows the minimum clearance requirements for up to five cabinets For future expansion of up to seven cabinets the top cabinet should be positioned 20 inches higher than shown in Figure 7 1 Notes Floor ...

Page 265: ...inets 78 is required for future growth of up to 7 cabinets 24 24 55 3 Wall Floor Wall Wall Front View Top View 26 5 Cabinets 36 26 5 55 is minimum height requirements for Floor Mounting 5 cabinets 75 is required to allow for future growth of up to 7 cabinets 3 Floor Mount Stands BFIF 2 Brackets RWBF 5005 Expansion Cabinet Expansion Cabinet Expansion Cabinet Expansion Cabinet Base Cabinet Expansion...

Page 266: ... Electrical Characteristics DK424i Primary AC Power Voltage Input AC AC Frequency Watts per cabinet continuous Watts for five cabinet system 115 10VAC or 208 20VAC or 240 20VAC 50 60 Hz Single phase 180 900 DK424i Primary Power Current Consumption Rating in Amperes 120VAC 208VAC 240VAC 1 cabinet 2 cabinets 3 cabinets 4 cabinets 5 cabinets 3 2 amps 6 4 amps 9 6 amps 12 8 amps 16 0 amps 2 2 amps 4 4...

Page 267: ...prenant un dispositif de protection Oneac Corp type 6 AP Voir le manuel d instructions Complies with part 68 FCC rules FCC Registration number CJ69XA 10242 KF E CJ69XA 10243 MF E CJ6JPN 22758 PF E Ringer equivalence0 2B ac 0 0 dc 0 3B ac 0 0 dc This device complies with Part 15 of the FCC rules Operation is subject ot the following two conditions 1 This device may not cause harmful interference an...

Page 268: ...xpansion Cabinets are factory shipped without the power supply installed The DK424i cabinets use the BPSU672 power supply which is different from the DK280 or DK424 To install power supplies in cabinets of new or installed systems 1 Remove the power supply from its box The power supply AC power cord for 120VAC and the power supply mounting screws are provided with the KSU cabinet If the system is ...

Page 269: ...r power supplies which are designated as slaves If the master power supply is turned Off or On all other power supplies will automatically turn Off or On Individual slave power supplies must be turned On 9 See Figure 7 3 to ensure that the power supply is properly installed 10 Install power supplies in all cabinets using Steps 1 9 of this procedure 11 Install the Base and optional Expansion Cabine...

Page 270: ...2 the BATT output is 0 volts unless connected to good batteries Power Factor PF alarm LED indicates the cabinet PF was exceeded Correct the problem and press the RESET button to clear the alarm 24V Circuit Breaker Assignments 24V 1 24V 2 24V 3 24V 4 EXP Cabinet 24V 1 24V 2 24V 3 24V 4 S101 S102 S103 S104 S105 S106 S107 S108 S_01 S_02 S_03 S_04 S_05 S_06 S_07 S_08 S_09 S_10 Base Cabinet Mounting Ho...

Page 271: ... the Base Cabinet back cover against the wall or backboard so that its two top mounting holes are approximately 6 1 2 feet 78 inches above the floor This allows up to seven cabinets to be installed top down with a six inch clearance between the floor and bottom cabinet see Figures 7 6 and 7 7 4 Use a level to make sure that the back cover is held level 5 Trace the upper arch of the top mounting ho...

Page 272: ... and secure the cabinet to the back cover with two screws to the right side of the back cover Repeat for all other Expansion Cabinets 5 Loosen the bonding connection plates fastened on both sides of the first Expansion Cabinet see Figure 7 9 then fasten the plates between the Base Cabinet and the first Expansion Cabinet Repeat to connect the first Expansion Cabinet to the second Expansion Cabinet ...

Page 273: ...ttom cabinet and floor Plaster Board Wall Dealer Supplied 12 X 1 25 Wood Screws 4 Screws Per Cabinet 12 X 1 25 Wood Screws As many as necessary to secure plywood backboard 3 4 Plywood Backboard Floor 5040 Locating Parts 5 0 ft minimum for 5 cabinets or 6 5 ft for 7 cabinets Figure 7 4 Cabinet Mounting Surface Diagram ...

Page 274: ...screws to remove back cover Loosen two screws to remove the side cover right and left covers 5041 5038 R i g h t F r o n t Right Side Cover Top Cover Base Cabinet Only Front Cover Loosen two screws to remove front cover Loosen two screws to remove the side covers right and left side covers Loosen four screws to remove the top cover Note Do not remove the top cover if the Base Cabinet is the top ca...

Page 275: ...per Arch Marking Hole 1459 Figure 7 6 DK424i Back Cover Mounting Holes 1460 Important After mounting cabinet to back cover use two screws to fasten cabinet to back cover Hanger Back Cover Mounting Strip Hanger Hole Back Cover Hang cabinet on back cover then slide to right Figure 7 7 DK424i Mounting Cabinet on Back Cover ...

Page 276: ...G 5002 POW 5V 5V P F RESET EXP BASE AC IN BATT DC OUT 27V1 27V2 27V3 27V4 POWER ON OFF FG 5002 S201 S202 S203 S204 S205 S206 S207 S208 S209 S210 CABINET NO 2 S201 S202 S203 S204 S205 S206 S207 S208 S209 S210 3 4 5 6 7 POW 5V 5V P F RESET EXP BASE AC IN AC IN DC OUT 27V1 27V2 27V3 27V4 POWER ON OFF FG 5002 POW 5V 5V P F RESET EXP BASE AC IN BATT DC OUT 27V1 27V2 27V3 27V4 POWER ON OFF FG 5002 S201 ...

Page 277: ...igure 7 9 Figure 7 9 Data Cables Shown in Cabinet Interior Side View To MDF Left Side Bonding Connection Plate required for all wall mount expansion cabinets Remote Cabinet Cable feed through hole PCB Cable Front Data Cables CAB 2 CAB 3 CAB 4 CAB 5 CAB 6 CAB 7 Cable Guard Screw Cable Guard Data Cable Door shown open Base Cabinet Expansion Cabinet Expansion Cabinet Cab 2 Cable 5342 ...

Page 278: ...e Shield B50MT 1 Attach lead to grounding screw 2 Wrap mesh around communication cables 3 Secure with velcro strap CAUTION Mesh strap should not touch cabinet metal surfaces Part No B50MT comes with the Base Cabinet It must be ordered separately for each Remote Cabinet pair 25 Pair Amphenol Cables 5045 To MDF Knock Out Plastic To MDF Top 25 Pair Amphenol Cables Figure 7 10 Cabinet Amphenol Cables ...

Page 279: ... from the primary AC power outlet must be dedicated and must be routed through the same conduit as the phase conductors serving the system The conductor connected to the frame ground FG screw on the system power supply must be insulated and comply with the general rules for grounding contained in Article 250 of the National Electrical Code NFPA 70 but must not depend on the cord and plug of the sy...

Page 280: ...5 ohms Note The ground must be routed through the same conduit as the phase conductors serving the system Single Point Ground SPG Cold Water Pipe or Ground Rod Note The SPG cannot be structural steel members or conduit A A Note The impedance of the link between point A and B must be less than 0 25 ohms Note The impedance of the link between point A and B must be less than 0 25 ohms 120VAC System P...

Page 281: ...irements vary depending on The method of cabinet installation floor or wall mount AC power source voltage 120VAC 208VAC or 240VAC and the number of cabinets Requirements for distribution of AC power within the cabinets of the DK424i are as described in cabinet AC power distribution below Cabinet AC Power Component Description The table shown below identifies the cabinet parts required to distribut...

Page 282: ...n the BPSB240 AC power cord NEMA 6 20P may have to be changed by a certified electrician depending on local electric codes BACL240A AC208V or AC240VAC nine ft 10 amps max power supply cord This cord must be used when the system is powered by 208VAC or 240VAC One cord is required for each cabinet power supply and must be ordered separately only if using 208VAC or 240VAC as the system primary AC pow...

Page 283: ... BATT AC IN BPSU672A BATT AC IN BPSU672A BATT AC IN CHSUB672A Cabinet 1 base CHSUE672A Cabinet 2 expansion CHSUE672A Cabinet 3 expansion CHSUE672A Cabinet 4 expansion CHSUE672A Cabinet 5 expansion Data Cable supplied with expansion cabinet 7 BBTC2A 2M battery cables supplied with BBDB 5046 Power Strip RPSB2 for 120VAC only Battery Distribution Box BBDB Power Strip Cables to Primary AC Power outlet...

Page 284: ...l these parts Primary AC power components required for Wall Mounted systems Important The plugs and wall receptacles required by the local electrical code might differ for 208VAC and 240VAC Thus in some areas of the U S the plug used on the Toshiba 240VAC power strip and 240VAC power supply cord NEMA code 6 20P can not be used for 208VAC installations In this case when using 208VAC the AC plugs on...

Page 285: ...AC or 240VAC only BPSB240 Receptacle Pass Seymour 5858 NEMA No 6 20P 16A max Cable Length 3 m Approx 9 ft Cabinet Right Side Panel Cabinet Bonding Plate 5219 Power Strip for 120VAC only RPSB2 Receptacle NEMA No 5 15R Plug NEMA No 5 15R 12A max Plug Pass Seymour 5466 X NEMA No 6 20P 16A max WARNING To prevent serious injury always mount power strips with provided screws before inserting plug into A...

Page 286: ...system Cabinet 1 Power Supply Cabinet 2 Power Supply Cabinet 3 Power Supply Cabinet 4 Power Supply Cabinet 5 Power Supply Notes 1 2 208VAC or 240VAC only Notes 1 2 120VAC only Note 2 120VAC only Note 2 120VAC only Note 2 120VAC only Notes 1 2 120 208 240VAC Notes 1 2 120 208 240VAC Cabinet 1 Power Supply Cabinet 2 Power Supply Cabinet 3 Power Supply BPSB240 208 240VAC or RPSB2 120VAC Right side pa...

Page 287: ... mounted expansion cabinets on both right and left sides AC Power Cables Front RPSB2 or BPSB240 Power Strip All Power Strip cords are 9 feet long 5233 120VAC power supply cord is shipped with each cabinet A special AC power supply cord BACL240 must be ordered separately for each power supply if using 208VAC or 240VAC power Figure 7 15 AC Power Strips in Cabinet Interior ...

Page 288: ...oad traffic with LCD phones Batteries used for this test are gel cell and maintenance free Reserve duration will vary depending upon battery type age and manufacturer These figures should only be used as an estimate Table 7 7 Typical Reserve Power Duration Estimate The procedure for installing reserve power varies depending on the number of cabinets in the system and the mounting method employed i...

Page 289: ...power operation disconnect system AC power plugs with power supply On Off switches in the On position The system should continue to operate without interruption Note If connecting four batteries follow the wiring diagram in Figure 7 16 Table 7 8 Reserve Battery Cabinet Components Cables Option Description PBTC 3M A three meter battery cable used to connect reserve power batteries to the system pow...

Page 290: ...tery 5 Connect a second BBTC1A 2 0M in parallel to the first BBTC1A 2 0M cable per Steps 2 3 and 4 instructions 6 Plug the two BBTC1A 2 0M battery cables into the Battery Distribution Box Important The cabinets must be connected to the live AC power source and the power supply On Off switches set to On prior to the final step of connecting the reserve power batteries to the power supplies via the ...

Page 291: ...ATT connnector BPSU672 BATT connnector 4 Batteries 2 Cabinets without BBDB 2 Batteries 2 Cabinets without BBDB 10A Fuse PBTC 3M Cables 9 ft 10A Fuse Expansion Cabinet Base Cabinet Base Cabinet Expansion Cabinet Base Cabinet PBTC 3M Cables 9 ft 12 Volt Batteries 80 AMP HR Each 12 Volt Batteries 80 AMP HR each BATT BBDB C Cable supplied with BBTC1A 2M Cable C Cables supplied with BBTC1A 2M Cable Fus...

Page 292: ...all ground wiring AC and reserve power cabling and PCB cabling per the Recommended Installation Sequence on Page 7 6 8 Fill out cabinet slot identification labels on cabinet s Figure 7 8 9 Reinstall covers on to cabinets Figure 7 5 Table 7 9 Floor Mount Hardware Option Description BCCB120 or BCCB240 DK424i conduit connection box that is installed in the base cabinet side panel It is used to hardwi...

Page 293: ... brackets to the wall with customer provided wood screws and wall anchors as required 7 For systems with just three cabinets secure the floor fixtures already attached to the bottom cabinet to the floor with the customer provided floor bolts 8 Refer to the sub sections that follow the appropriate procedure to anchor the system to concrete wood or computer room floor 9 Add remaining cabinets making...

Page 294: ...r fixture BFIF must be fixed to floor by either anchor bolts or wall by RWBF wall brackets see Figures 7 17 and 7 18 A B Front 2 Mouting Screws Provided with BFIF Kit Top Cabinet Wall Securing Brackets RWBF Left and Right Side Back 2 Mounting Screws Provided with BFIF Kit B B B B Bottom Wall Securing Bracket RWBF Third Cabinet Wall Securing Bracket RWBF Left and right side B B A A A B BFIF Mountin...

Page 295: ...all the bolt anchors with plugs in the drilled holes 5 Using the driving tool and a hammer drive each bolt anchor into the floor 6 Move the Base Cabinet into position on the equipment room floor 7 Secure the Base Cabinet to the floor using bolts lock washers and flat washers Note RWBF 3 pairs and BFIF Stands 1 pair are supplied with floor installation kit BFIF BFIF BFIF BFIF RWBFs are used on left...

Page 296: ...Cover the Base Cabinet with a drop cloth to protect the power equipment from dust created during drilling 4 Drill holes through tile for 3 8 inch threaded rods 5 After the tiles have been drilled insert threaded rods through the holes in the tile and mark the concrete floor directly beneath the holes in the tiles 6 Remove the tiles Use a hammer drill to make holes for 3 8 inch bolt anchors 7 Insta...

Page 297: ... RWBF to both floor fixtures with the screws provided Secure the wall brackets to the wall with customer provided wood screws and wall anchors 21 Place a cabinet on top of the bottom cabinet and connect the cabinets together at points A and B 17 with the screws provided 22 Install wall brackets RWBF on the top of cabinet three and secure them to the wall with customer provided wood screws and wall...

Page 298: ... BCCB1201 1 BFIF 1 BCCB1201 1 RPSB2 1 BFIF 1 A BCCB120 conduit connection box must be installed and wired by a certified electrician per the local electrical code see Figure 7 22 1 BCCB1201 1 RPSB2 1 BFIF Table 7 11 Floor Mount Cabinet Component Requirements for 208VAC or 240VAC Primary Power Local Electrical Code 1 Cabinet 2 Cabinets 3 Cabinets 4 Cabinets 5 Cabinets Three or more cabinets require...

Page 299: ... Power Supply BATT Jack BBTC2A 2M Seven Cables Supplied with BBDB BCCB120A or BCCB240 Conduit Connection Box AC Power Battery Cables to BBDB1A Floor Mounted Bottom Cabinet Bottom Cabinet Wall Mount Second from Bottom Cabinet Floor Mount RPSB2 or BPSB240A Power Strips BBDB1A Battery Distribution Box BCCB120 or 240 Conduit Connection Box Conduit Primary AC Power Pannel Reserve Batteries BFIF Floor M...

Page 300: ... F1 F4 Battery Fuses 250VAC 15A BCCB BATT AC N L Battery Wire Specifications 10 AWG minimum 2 pairs 42A max AC Wire Specifications BCCB120 10 AWG 29A max BBCB240 12 AWG 18A max BCCB120 top view 3 outlets NEMA 5 15R Fused 250VAC 15A Rated 125VAC 15A BCCB240 top view 2 outlets NEMA 6 20R Not Fused Rated 250VAC 20A 5047 F3 F1 F4 F2 F3 F1 F4 F2 Conduit Holes to 1 2 inch trade size WARNING BCCB conduit...

Page 301: ...n Box BBDB Important The cabinets must be connected to the live AC power source and the power supply On Off switches set to On prior to the final step of connecting the reserve power batteries to the power supplies via the BATT receptacle If the batteries are connected after AC power is lost reserve power will not function 5 Connect cables from the BBDB Battery Distribution Box to the BATT recepta...

Page 302: ...ered from 1 to 5 The Base Cabinet is numbered 1 the first Expansion Cabinet number 2 the second Expansion Cabinet number 3 etc See the DK424i Configuration and Universal Slot PCB section for details regarding PCB installation PCB Option Considerations DK424i PCBs can be configured for a variety of hardware and software options Hardware options are defined as either internal generally related to op...

Page 303: ...Automatic Call Distribution ACD Management Information System MIS for ACD Toshiba proprietary RS 232 and SMDI voice mail interfaces PCB Installation Power Supply Considerations 1 The power supply must be Off whenever removing or installing the processor PCB B1CU B2CAU B2CBU B3CAU B3CBU and B5CAU PCBs see Figure 7 3 2 It is recommended that the power supply be Off whenever possible when removing or...

Page 304: ...lled However configuration programs for AA and ACD must be run for the feature to operate Music on hold Background Music Volume Control External Options Each of the common control units except B2CBU B3CBU and B5CBU has a trim potentiometer VR1 to adjust the volume of the MOH BGM source connected to the Music on hold MOH Background Music BGM RCA jack interface which is also on the common control un...

Page 305: ...8 or 12 receiver circuits To install an BRCS onto B1CU B2CAU B2CBU B3CAU B3CBU or B5CAU B5CBU Mate BRCS connectors see Figure 7 24 with the applicable BCU PCB Apply firm even pressure to the BRCS to ensure proper mating of the connectors Connectors for each BCU card are shown on Figures 7 24 7 32 One BRCS 4 8 or 12 can be installed on each processor allowing up to 12 DTMF receivers on B1CU and 24 ...

Page 306: ... Insert the B1CU B2CBU B3CBU or B5CBU 1 2 or 3 into the B101 slot in the Base Cabinet If B1CU and RSIU is installed you must also install a ribbon cable between them Figure 7 25 Ensure the component side of the BCU PCB is facing right when installing it in the Base Cabinet 4 Insert the B2CAU B3CAU or B5CAU PCB into slot B102 5 After installing the BCU PCBs gently pull it outward If the connectors ...

Page 307: ...ation or feature data from previous programming that should be retained do not run Program 91 9 See the Strata DK Programming Manual If installing a BCU PCB perform a processor RAM test with Program 00 part 2 On new BCU installations run the RAM test after BCU initialization before entering the customer database The following parameters can be specified through programming for the BCU PCB Program ...

Page 308: ...tor P5 6 pin male connector Interface connector for optional DTMF receiver subassembly BRCS BATT Battery Jumper P8 3 terminal jumper Interface connector for on board lithium battery that protects configuration data stored in system RAM MOH BGM Source Connector RCA jack Interface connector for MOH BGM source MOH BGM Source Volume Control VR1 Trim potentiometer Adjusts volume for MOH BGM source conn...

Page 309: ... Connector P10 Connector for ribbon cables Ribbon cable connector for connection to B2CBU Connector P11 Connector for ribbon cables Ribbon cable connector for B2CBU and RSIU BATT P9 3 terminal jumper Interface connector for on board lithium battery that protects configuration data stored in system RAM MOH BGM Source Connector RCA jack Interface connector for MOH BGM source MOH BGM Source Volume Co...

Page 310: ...e connector for connection to B2CAU Connector P3 Connector for ribbon cables Ribbon cable connector for B2CAU and RSIU Heart Beat indicator CD5 Red LED Flashes to indicate operation 1 4 second On 1 4 second Off BATT P9 3 terminal jumper Interface connector for on board lithium battery that protects configuration data stored in system RAM MOH BGM Source Connector RCA jack Interface connector for MO...

Page 311: ...bbon cables Ribbon cable connector for connection to B3CAU Used in conjunction with P2 Connector P11 Connector for B3CBU ribbon cables Ribbon cable connector for connection to B3CBU Used in conjunction with P2 BATT P9 3 terminal jumper Interface connector for on board lithium battery that protects configuration data stored in system RAM MOH BGM Source Connector RCA jack Interface connector for MOH...

Page 312: ...ector and ribbon cable Ribbon cable connector for connection to B3CAU Connector P11 Connector and ribbon cable Ribbon cable connector for B3CAU and RSIU BATT Battery Jumper P9 3 terminal jumper Interface connector for on board lithium battery that protects configuration data stored in system RAM MOH BGM Source Connector RCA jack Interface connector for MOH BGM source MOH BGM Source Volume Control ...

Page 313: ...bassembly BRCS Connector P3 Connector and ribbon cable Ribbon cable connector to B5CBU Connector P4 Connector and ribbon cable Ribbon cable connector to B5CBU and RSIU BATT P9 3 terminal jumper Interface connector for on board lithium battery that protects configuration data stored in system RAM MOH BGM Source Connector RCA jack Interface connector for MOH BGM source MOH BGM Source Volume Control ...

Page 314: ...ssembly BRCS Connector P2 Connector and ribbon cable Ribbon cable connector to B5CAU Used in conjunction with P2 Connector P3 Connector and ribbon cable Ribbon cable connector to B5CAU and RSIU Used in conjunction with P3 Heart Beat Indicator CD5 Red LED Flashes to indicate operation 1 4 second On 1 4 second Off BATT Battery Jumper P5 3 terminal jumper Interface connector for on board lithium batt...

Page 315: ...applies it to a ribbon Data Cable connected to the Remote Expansion Cabinet See Figure 7 33 This is a hardware solution and has no effect on software or administration Remote cabinets support all line and trunk interfaces Network clock signals can only be derived from digital trunks installed in the Base Cabinet Master location RRCU1A cards are used at both the Base Master and Remote Slave Cabinet...

Page 316: ...ets in which RRCU cards are installed must be modified to protect the routing of the cables through the cabinet Attach the plastic guide to the bracket provided with the RRCU1A card See Figure 7 35 Attach the bracket to the inner wall of the cabinet 4 Install the RRCU Card Select correct jumper options see Figure 7 36 On the Master side both option plugs connect the center pin to the upper pin M1 ...

Page 317: ...es At the Base Cabinet attach an BDCL1A data cable from the data cable connector at the left of the cabinet to Connector M1 or M2 on the RRCU card Cables are provided according to the connectors on the RRCU card to which they are attached see Table 7 20 The cabinet connected to M1 in the base emerges on connector S1 of the RRCU1A at the Remote Expansion Cabinet The cabinet connected to connector M...

Page 318: ...thin the cabinet for ease of maintenance Observe the minimum bend radius of 30mm 9 Restore power 10 Run Command Program 91 1 Automatic PCB Recognition and Port Renumber The RRCU PCB and its controls and connectors are shown in Figure 7 36 and Table 7 21 Figure 7 36 Remote Expansion Cabinet Printed Circuit Board RRCU1A Table 7 20 Remote Cabinet Data Cables and Connectors Data Cables RRCU Connectors...

Page 319: ...ns Jumper Plug P10 Slave Mode S connections Table 7 22 Fiber Optic Specification Item Specification Transmission Speed 155 52 Mbps Optical Source LED 1300 nm Fiber Type Multi mode Graded Index Fiber GIF Core Diameter 62 5 micrometers Cladding Diameter 125 micrometers Connector Type SC 2 pin transmit and receive TX Side RX Side 4379 ROMS1A SD RDER SYCF SYCS RST CD1 CD2 CD3 CD4 CD5 J3 J1 1 15 1 10 J...

Page 320: ...ber Length 3 km 500 1000 MHz km fiber 2 km 200 400 MHz km fiber Optical Budget Loss 9 dB one way Minimum Bend Radius 30 mm Round Trip Delay Time 30 micro seconds Transmit Power 23 5 dBm Receiver Sensitivity 30 dBm Table 7 23 RS 232C Binary Code Output BIT Label Function Normal Condition D0 SD 1 Optical signal not detected 0 Optical signal detected 0 D1 RDER 1 Code rule violation detected in receiv...

Page 321: ...supplied Off Power is not supplied Blinking SD On Optical signal not detected Off Optical signal detected Off RDER On Code rule violation detected in received data Off Code rule violation not detected in received data Off SYCF On Frame synchronization of received data not established Off Frame synchronization of received data established Off SYCS On System synchronization between cabinets not esta...

Page 322: ...n connection and pin assignments are shown in Figure 7 38 Figure 7 38 RRCU1A Monitor Jack Monitor jack RJ 12 pin numbering Dealer supplied 6 wire telephone modular cord cross pinned Monitor jack PC with communication software such as ProComm PC DB9 or DB25 Com port Toshiba PPTC9 or PPTC25F RRCU1A 4439 ...

Page 323: ...nnel RDTU The system will assign 16 CO lines to the RDTU even though only 12 CO lines will be used To busy out unused RDTU channels see System Programming for T1 on Page 8 3 Step 4 Use Program 03 to set the quantity of RDTU channels Slot Assignments Up to eight RDTU PCBs can be installed in a DK to provide up to 192 lines RDTU PCBs can be installed in the same cabinets that have analog type CO lin...

Page 324: ...or CSU installation Testing procedures local loop back and remote loop back are in Loop Back Testing on Page 8 14 SW1 Equalizer Switch and Loop Back Jumpers Internal Option The distance between the DK cabinets and the CSU or other customer premise T1 circuit determines the setting of the SW1 Equalizer Switch The SW1 switch consists of a bank of smaller switches S1 S7 Set the SW1 switch as follows ...

Page 325: ...am 41 2 record sheet unused channels can remain as initialized loop start 3 Turn system power supply Off five seconds and On to activate Program 03 and 41 2 program data Note These are the only programs relating to RDTU operation that require system power to be cycled Off and On 4 Run Programs 16 40 39 If an RDTU is connected to a fractional T1 circuit and all the RDTU channels 8 16 or 24 are not ...

Page 326: ... T1 DS 1 transmission Framing As of this writing D3 D4 Superframe SF or Type I and Extended Superframe ESF or Type II T1 DS 1 is offered by most all local Telcos and Long Distance Providers Normally the local Telco will provide SF which is adequate for DK voice and modem type data transmission Long distance providers may offer either SF or ESF ESF provides a more enhanced method of error checking ...

Page 327: ... clock source then blanks should be entered in Program 42 In this case the DK clock runs free and is considered the Master Synchronization provider The DK can be assigned as the Master free run clock provider if the far end equipment connected to the RDTU T1 span is a Customer Premise type equipment and it is not synchronized to some other T1 provider i e PBX Channel Bank Key Hybrid or other DK In...

Page 328: ...the DK must be synchronized to the same clock source as the AT T span line If a T1 span line is not synchronized with the primary clock provider AT T for this example then DK lines assigned to this T1 span line RDTU may experience slip problems 9 The programs in Steps 1 8 are described for specific RDTU application programming Also refer to System Programming for T1 on Page 8 3 Run the programs as...

Page 329: ...ines incoming and outgoing Program 41 Use to assign station access to lines outgoing only Program 41 Series Run to assign RDTU channel line operation and coding and framing modes Program 42 0 1 8 Use to assign behind PBX Centrex operation to each line Program 42 Series Use to assign timing reference for RDTUs Programs 45 48 Use to define Toll Restriction for any line Programs 50 51 52 Use to defin...

Page 330: ...CB per instructions Page 8 3 Note Ensure the RDTU s component side is facing right when installing it in the cabinet Table 8 1 RDTU Controls Indicators and Connectors Control Indicator Connector Type of Component Description SW1 Equalizer Setting Switch 8 2 position slide switches Sets line length between RDTU and CSUs or other T1 max 655 ft P3 not used 3 terminal jumper plug This jumper plug is r...

Page 331: ...ter loop back testing is complete and synchronized with the far end T1 circuit perform test calls on all RDTU lines Use the troubleshooting procedures in T1 Fault Isolation on Page 8 18 to help correct problems 9 Check T1 performance periodically for transmission errors using the T1ERR test This requires a local or remote maintenance terminal connected to the PIOU or PIOUS PCB local and IMDU or Ha...

Page 332: ...ar end PBX T1 is specified by the CSU manufacturer see the CSU installation documentation Toshiba does not supply cables or connectors to connect CSU to CSU Cable A or CSU to the far end PBX Cable B RDTU to PBX T1 Separated Less Than 655 ft If the RDTU is within 655 ft of the far end PBX T1 circuit a CSU is not required However connecting a RDTU T1 span to another PBX or Key Hybrid T1 in a Tie lin...

Page 333: ...r CPE T1 RDTU transmit equalization impedance matching is accomplished by setting RDTU SW1 for the proper cable length see Figure 8 5 for SW1 location and SW1 Equalizer Switch and Loop Back Jumpers Internal Option on Page 8 2 for SW1 setting instruction RDTU Loop Back Jumper Plugs The RDTU PCB provides jumper plugs for loop back testing Loop back tests are described in Loop Back Testing on Page 8 ...

Page 334: ...rn to the RDTU the RDTU should turn on the YALM LED the YALM repeats the signal it receives from the far end flashing or steady If the RDTU does not receive the far end carrier signal the RDTU sends the Yellow alarm signal to the far end and causes the BSY and YALM LEDs to flash Blue Alarm BALM The Blue alarm also known as the Alarm Indication Signal AIS is detected by the RDTU This signal is sent...

Page 335: ...le Connections Notes Pins 2 and 4 of the DB 15 connector in most CSUs are frame ground No connection is required NDTU cable is supplied with RDTU PCB 30 ft maximum Set RDTU SW1 switch for proper loop length per DK14 Customer supplied span cables must be 22 AWG ABAM cable or if using standard 24 AWG twisted pair the transmit pair must be separated from the receive pair by at least 5 cable pairs Mos...

Page 336: ...P2 to On position see Figure 8 2 Remove NDTU cable from RDTU amphenol connector After about 12 seconds all RDTU LEDs except PRI SEC SYNC turn Off Appropriate primary or secondary sync LED flashes if RDTU is Primary or Secondary reference If RDTU is not a primary or secondary reference then the Primary and Secondary sync LEDs should turn Off Figure 8 8 RDTU Self Test Network CSU T1 Span Test This t...

Page 337: ... described in Figures 8 8 8 11 Note Loop back tests with CSU and Network equipment can also be performed when connecting the RDTU PCB directly to a customer premise PBX Key Hybrid Channel bank T1 circuit The RDTU Self Test is an active test of the RDTU circuit The Network CSU Test checks all cables the Network and CSU equipment RDTU is not active The Remote Loop Back RLB Test is an Active test of ...

Page 338: ... no time parameters given with this error report so the time between error count increments must be monitored manually Basically the error count of any error category should not increase within 24 hour periods see Table 8 2 on Page 8 19 RDTU RDTU TX Open MITEL Chip P4 MM8976B P1 P26 Transmit P2 P27 Receive NDTU Cable RDTU Amphenol Pin Nos Network CSU Network Interface Unit NIU 2581 Top LED Bottom ...

Page 339: ...T1ERR DTU NO 1 SYNCHRO BIT ERROR XXXX TIMES 1 TIME 1024 ERRORS BIPOLAR VIOLATION ERROR XXXX TIMES 1 TIME 256 X 256 ERRORS SLIP ERROR XXXX TIMES 1 TIME 256 ERRORS CRC ERROR XXXX TIMES 1 TIME 256 ERRORS DTU NO 2 SYNCHRO BIT ERROR XXXX TIMES XXXX 0 9999 BIPOLAR VIOLATION ERROR XXXX TIMES SLIP ERROR XXXX TIMES CRC ERROR XXXX TIMES DTU NO 3 XXXX TIMES SYNCHRO BIT ERROR XXXX TIMES BIPOLAR VIOLATION ERRO...

Page 340: ...result on a cutover when an RDTU does not synchronize or CO lines simply do not function the site technician can only check wiring and cabling Without proper test equipment there is very little that can be tested This section provides some procedures that can be done without T1 test equipment to help find the cause of a failure or at least determine if system hardware is functioning properly The D...

Page 341: ... they occur Flowchart Symbols Five symbols are used in the flowcharts which are identified in Figure 8 12 Customer _______________________________ Date Time Latest Strata DK Power Off On Reset Syncro Bit Error Bipolar Violation Error Slip Error CRC Error Progression TO or FROM another flowchart location Letters and numbers denote the exact entrance or exit points Important notes affecting the faul...

Page 342: ...blem is clicking or popping sounds on the talk path No The problem is no dial tone on CO lines No Yes The problem is no dial tone on CO lines No Yes Run DK programs per RDTU T1 Applications Note Remember to cycle power after Program 41 2 Contract your technical support group Run DK programs per RTDU T1 Applications Note MFALM only can indicate that RDTU is set for SF and the far end T1 is ESF or v...

Page 343: ...SU local loop back test In this test the RDTU loop back jumpers remain off and the CSU is placed in the local loop back mode The RDTU transmit signal is looped back to its receiver circuit See the CSU manufacturer s I M documentation Did the CSU local loop back test pass Go to 4 Recheck cables then replace CSU No 2 Perform the CSU network loop back test per Figure 8 2 Perform RDTU Network loop bac...

Page 344: ...all RDTUs should be set as the master and the PBX T1s should be slaves Program as required If RDTU is connected to a reliable clock source Telco AT T etc then it should be programmed as a slave primary reference to the provider Program 42 data 1 If RDTU is connected to a PBX or channel bank make sure that RDTU is programmed as the master clock provider Program 42 data blank or if the PBX is set up...

Page 345: ... DK40i Installation Paragraph headings identify information which is specific to a particular system and minor exceptions are mentioned in text Note Prior to PCB installation the power supply must be tested and the ground checked PCB Compatibility The following is a list of PCBs that appear in this chapter PCB Compatible with Function DK40i DK424 DK424i BVPU X X X Voice Over Internet Protocol IP G...

Page 346: ...ace Unit RDDU X X X Direct Inward Dialing Line Interface Unit RDSU X X X Digital Standard Telephone Interface Unit RDTU X X T1 Interface Unit REMU X X X E M Tie Line Unit RGLU2 X X X Loop Ground Start CO Line Interface Unit RMCU X X CAMA E911 Trunk Direct Interface card RMDS X X Optional built in modem See RSIU for installation programming instructions RSIS X X Optional RS 232 ports See RSIU for i...

Page 347: ...ion before attempting to use a PCB with your system application Type and number of circuits available on the PCB Type of line hardware the PCB can accept Interfaces with Describes older version or versions of the PCB Older Version s The RDDU provides four Direct Inward dialing DID lines each of which can have a single office code along with a block of extensions If an RDDU is installed an RRCS mus...

Page 348: ...MF Receiver Unit RRCS 4 8 or 12 must be installed on the DK40i Base KSU K4RCU3 or on any DK424 or DK424i processor PCB BVPU controls indicators and interface connectors are shown in Figure 9 1 and described in Table 9 1 BVPU Installation 1 Insert the BVPU component side facing right into the appropriate slot and apply firm even pressure to ensure proper mating of connectors For DK40i the BVPU can ...

Page 349: ...o route calls to the proper telephones see Program 17 LED 05 Program 10 1 Enables disables two line conference Program 15 Assigns tandem connections and dial pulse option to Tie lines Program 17 Assigns immediate or wink start to BVPU Tie lines Important Also used to turn on Tie line dial tone return Note When a BVPU is installed in a system it automatically assumes the next four consecutive CO li...

Page 350: ... On Tie trunk 4 active LED 2 Green LED On Tie trunk 3 active LED 3 Green LED On Tie trunk 2 active LED 4 Green LED On Tie trunk 1 active LED 5 Green LED Power On Off LED 6 Yellow LED Line Status On Busy Off Idle LED 7 Red LED Alarm On Abnormal LED 8 Green LED On Line On Operating Off Starting up or Off Slow Flash Detected error in BVPU Fast Flash Shut down mode LED 9 Yellow LED Link Indication On ...

Page 351: ...6 00 9 7 Universal Slot PCBs Figure 9 2 BVPU PCB BVPU1A VPIS1A UP BDM JTAG 0 1 2 3 4 5 6 LED7 5031 SPORT Line in Use LEDs 1 2 3 4 LAN LINK ONLINE ALARM BUSY POWER Serial Port LEDs 1 2 3 4 5 6 7 8 ON MSB LSB TBO Ground Terminal CN2 CN1 Backplane Connector ...

Page 352: ...ng a 3 dB signal level drop to or from the PBX or CO when set to the PAD position The switch comes from the factory set at NOR for normal meaning no PAD loss KCDU Installation 1 If the system is located within one mile of the CO or PBX telephone system set dB PAD switches SW501 and SW601 to the PAD position 2 Insert the KCDU into the appropriate slot in the Expansion KSU per tables in Chapter 2 DK...

Page 353: ...circuit is in operation CO line circuit 2 indicator SW601 Red LED J7 connectors Modular connector Interface connector for CO line circuits 1 and 2 PAD switch SW501 Two position slide Enables 3 dB signal level drop for CO line circuit 1 when set in PAD position PAD switch SW601 Two position slide Enables 3 dB signal level drop for CO line circuit 2 when set in PAD position Backplane Connector 25 Pa...

Page 354: ...Refer to Chapter 12 Peripheral Installation to connect the Stand alone Data Interface Unit PDIU DS to the PDKU Note DKT2001 telephones do not support HHEUs DADMs DDSSs RPCI DIs or DVSUs There are no controls or indicators on the PDKU Figure 9 4 PDKU2 Installation 1 Insert the PDKU2 component side facing right into the appropriate slot and apply firm even pressure to ensure proper mating of connect...

Page 355: ...tial off hook volume level for digital telephone handsets Programs 30 31 Enables OCA Programs 77 1 77 2 79 79 Digital Door Phone Lock Control Unit DDCB and door phone ringing assignments Program 92 5 Initializes initial ringing speaker and muted ring volume levels of digital telephones Figure 9 4 PDKU2 PCB Backplane Connector 50 Pin Female Amphenol Connector 1371 ...

Page 356: ...Mate EOCU connectors J10 J20 J40 J50 and J60 with PEKU connectors P10 P20 P40 P50 and P60 2 Apply firm even pressure to EOCU to ensure proper mating of connectors 3 Use a three pair cable for making connections between the PEKU and the speaker OCA electronic telephone 4 Refer to Electronic Telephone Upgrades on Page 11 23 for procedures to upgrade electronic telephones for Speaker OCA Note Electro...

Page 357: ...s been configured for the appropriate hardware options See previous pages for more information 2 Insert the PEKU component side facing right into the appropriate slot and apply firm even pressure to ensure proper mating of connectors For DK40i the PEKU can be installed only in place of the RSTU2 PDKU or RDSU See Chapter 2 DK40i Configuration 3 After installing the PEKU gently pull the PCB outward ...

Page 358: ...k call announce P50 Used with P10 P20 P40 and P60 Off hook call announce P60 Interface connector for optional Off hook Call Announce subassembly connector used with P10 P20 P40 and P50 DSS EKT HDSS Console Electronic Telephone SW1 Switch 2 position slide switch Configures PEKU for operation with an HDSS console or electronic telephones Door phone W9 jumper wire White jumper wire When cut configure...

Page 359: ...apter 12 Peripheral Installation for installation of external options PEPU2 Installation 1 Make sure P15 is in the Mu Law position for U S and Canada 2 Ensure the PEPU2 has been configured for the appropriate hardware options Refer to Chapter 12 Peripheral Installation 3 Insert the PEPU2 component side facing right into the last slot S16 of the Base KSU cabinet if the system has only a Base KSU ca...

Page 360: ... door lock control relay make or break jumper plug M B make break jumper plug P11 Night hold relay make or break jumper plug SPI SPO internal external amplifier switch SW4 2 position slide switch Selects built in 3 watt amplifier SPI or 600 ohm output SPO for external page BGM operation Volume control VR1 Trim potentiometer Adjusts volume of built in 3 watt amplifier Backplane Connector 50 Pin Fem...

Page 361: ...r any other device connected to a standard telephone port a DTMF receiver unit RRCS4 8 or 12 must be installed on the DK40i K4RCU3 DK424 or DK424i processor PCB PESU controls and interface connectors are shown in Figure 9 8 and described in Table 9 5 DK40i General Information The PESU must be installed in the DK40i Expansion KSU in place of RDSU RSTU or PDKU See Chapter 2 DK40i Configuration CAUTI...

Page 362: ...ESU 2 Refer to Chapter 12 Peripheral Installation for BGM installation procedures PESU Configuration for Square Wave Ring Generator Ensure the P90 jumper plug is set to the H 190V P P position for initial installation The L 130V P P position is used if devices connected to the PSTU1 or PSTU2 experience ring trip PESU Installation 1 Make sure that the PESU subunit ESTS is securely attached to the P...

Page 363: ...hook call announce P10 10 pin connector Interface connector for optional Off hook Call Announce subassembly connector used with P20 P40 P50 and P60 Off hook call announce P20 Used with P10 P40 P50 and P60 Off hook call announce P40 Used with P10 P20 P50 and P60 Off hook call announce P50 Used with P10 P20 P40 and P60 Off hook call announce P60 Used with P10 P20 P40 and P50 Ring voltage jumper plug...

Page 364: ...re Backplane Connector ESTS Standard Telephone Interface Always Equipped From Factory Ring Voltage Option Ports 1 2 L Low Level 130V P P H High Level 190V P P 50 Pin Amphenol Connector Female P90 L H Note Connect two ringers maximum per port H or L Cut W9 for Door Phone Option HDCB on Circuit 5 PESU W7 Cut W7 Only if BGM Is Connected to Port 07 Circuit 8 1378 ...

Page 365: ...not used on the DK40i PIOU2 controls indicators and interface connectors are shown in Figure 9 10 and described in Table 9 7 PIOUS2 information is provided in Figure 9 11 and Table 9 8 IMDU Compatibility with PIOU and PIOUS The compatibility of the IMDU1 and IMDU2A PCBs are shown in Table 9 6 IMDU2 Installation onto a PIOU2 or PIOUS2 Internal Option 1 Make sure IMDU2 P3 is set for PCM Mu Law opera...

Page 366: ...re details 3 Insert the PIOU2 or PIOUS2 component side facing right into the last slot S16 of the Base KSU cabinet if the system only has a Base KSU cabinet and no Expansion KSUs cabinets If there are Expansion KSUs cabinets install the PIOU2 or PIOUS2 in the highest slot number in any KSU cabinet Apply firm even pressure to ensure proper mating of connectors Note In DK40i PIOU2 or PIOUS2 can be i...

Page 367: ... PIOU2 Backplane Connector 600 600 P11 P10 P12 P13 SW1 SW3 SW4 SP1 SP0 MODEM M B M B CCITT BELL N C N O TTY TTY SMDR SW2 300 1200 ON OFF 300 1200 P15 Mu A 3719 PIOUS2 IMDU2 P11 P10 P12 P1 P2 P3 P13 Backplane Connector 600 600 PIOUS2 SW1 SW3 MODEM M B M B CCITT BELL N C N O TTY 300 1200 ON OFF 300 1200 SPT SW2 CD4 SPR DET DER NHT NHR ALMT ALMR P15 Mu A ...

Page 368: ...3 IMDU2 or external modem operating specification jumper plug SMDR baud rate switch SW1 2 position slide switch Selects baud rate 300 or 1200 bps for SMDR printer or call accounting device TTY baud rate switch SW2 2 position locking push button switch Selects baud rate 300 or 1200 bps for Remote Maintenance Modem piggy back module IMDU2 or external TTY jack Modem TTY switch SW3 2 position slide sw...

Page 369: ...ld relay make or break jumper plug Alarm sensor N O N C jumper plug P12 Alarm sensor normally open or normally closed jumper plug CCITT BELL jumper plug P13 IMDU2 or external modem operating specification jumper plug SMDR baud rate switch SW1 2 position slide switch Selects baud rate 300 or 1200 bps for SMDR printer or call accounting device TTY baud rate switch SW2 2 position locking push button ...

Page 370: ...sheets in DK424 or DK424i Configuration Chapters 4 or 6 for RATU slot assignment recommendations 2 After installing the RATU gently pull the PCB outward If the connectors are properly mated a slight resistance is felt Figure 9 12 RATU PCB Table 9 9 RATU Controls Indicators and Connectors Control Indicator Connector Type of Component Description Console 1 indicator CD3 Red LED Lights when a PC or c...

Page 371: ...es equipped with four caller ID circuits RCIS PCB An RCIS piggy back PCB can be installed onto the RCIU to provide an additional four caller ID circuits Hence an installed RCIU RCIS can provide a maximum of eight caller ID circuits per cabinet slot To provide up to eight circuits always install RCIS onto RCIU1 DK424 and DK424i only or RCIU2 DK40i DK424 and DK424i instead of installing two RCIU PCB...

Page 372: ...U PCOU RGLU Caller ID CO line can be assigned to any RCIU1 RCIU2 or RCIS caller ID circuit number Note After assigning CO lines to caller ID circuits turn system power Off for approximately five seconds and then back On or run Program 91 2 to activate Program 50 assignments Program 51 Sets the Caller ID CLID Automatic Dialed Number Identification ANI memory allocation for the appropriate stations ...

Page 373: ...0i RCIU2 RCIS PCB Figure 9 14 DK40i RCIU2 PCB R C I U 1 A V 1 R C I U 1 J2 J1 P11 P12 P13 20K 20K 20K 20K 20K 20K 20K 20K RCIS1A reverse RCIU1A or RCIU2A front Secondary Protectors J10 J11 J12 J4 J3 J13 P10 1392 R C I U 2 A V 1 R C I U 2 J2 J1 P11 P12 P13 20K 20K 20K 20K 20K 20K 20K 20K RCIU2A front Secondary Protectors P10 1862 ...

Page 374: ...he CLID ANI RVW DOO XWR LDO button to the attendant consoles that store Caller ID and or ANI abandoned call telephone numbers A console user can scroll through the stored abandoned call telephone numbers and auto dial the selected number using this button Program 10 3 Key 08 Determines if CLID and or ANI telephone numbers will be sent out the system SMDI port Turn LED 08 On if the CLID and or ANI ...

Page 375: ...ED 02 DK424 Release 3 2 and above and DK424i Enables CLID ANI and or Dialed Number Identification Service DNIS information to be sent from the RSIU Open Architecture OA port on ACD calls only Turn LED 01 On if the OA port should send CLID and or ANI information Turn LED 01 Off if the OA port should not send Caller ID ANI Turn LED 02 On if the off port should send DNIS information Turn LED 02 Off i...

Page 376: ... RCOS circuit has gas tube secondary protection Excessive loudness which is caused by close proximity to a CO or PBX telephone can be fixed through the RCOS and RCOU decibel dB PAD switches RCOS dB switches SW501 SW601 SW701 and SW801 and RCOU dB switches SW101 SW201 SW301 and SW401 provide a 3 dB signal level drop between the PBX and CO when set to position 3 Switches are factory set at the 0 0 d...

Page 377: ... slot that will support an RCOU equipped with an RCOS Note Program 03 can be skipped and Program 91 can be run instead Program 91 recognizes the RCOS Program 10 1 Enables or disables line to line Conference and Direct Inward System Access DISA Program 15 Assigns DTMF Dial Pulse dialing DISA and additional attributes to each line Automatic Release AR assignments only need to be made for loop start ...

Page 378: ... J1 connector Modular connector Interface connector for CO line circuits 1 and 2 J2 connector Modular connector Interface connector for CO line circuits 3 and 4 PAD switch SW101 circuits 1 2 position slide switch Enables 3dB signal level drop for CO line circuit PAD switch SW201 circuit 2 PAD switch SW301 circuit 3 PAD switch SW401 circuit 4 RCOS connector P11 P12 P13 P14 10 pin male connector Int...

Page 379: ...lar connector Interface connector for CO line circuits 5 and 6 J4 connector Modular connector Interface connector for CO line circuits 7 and 8 PAD switch SW501 circuit 1 2 position slide switch Enables 3dB signal level drop for CO line circuit PAD switch SW601 circuit 2 PAD switch SW701 circuit 3 PAD switch SW801 circuit 4 RCOU connector J11 J12 J13 J14 Female connector Interface connector for RCO...

Page 380: ...CD212 CO line circuit 3 CD312 CO line circuit 4 CD412 J1 connector Modular connector Interface connector for CO line circuits 1 and 2 J2 connector Interface connector for CO line circuits 3 and 4 PAD switch SW101 circuit 1 2 position slide switch Enables 3dB signal level drop for CO line circuit PAD switch SW201 circuit 2 PAD switch SW301 circuit 3 PAD switch SW401 circuit 4 J14 J13 J12 J11 J4 J3 ...

Page 381: ...an be set for either wink start or immediate All RDDU lines support DNIS and ANI features RDDU controls indicators and interface connectors are shown in Figure 9 20 and described in Table 9 13 RDDU Installation Note Switches are factory set to the 0 0 dB signal level drop position 1 If the KSU is located within one mile of the PBX or CO set dB PAD switches SW101 through SW401 to the 3 3 dB signal ...

Page 382: ...o wrong or vacant numbers Program 17 Assigns immediate or wink start to DID lines Also used to assign Auto camp on and no dial tone return for DID lines Program 17 also Assigns DID lines to route per DNIS and ANI options Program 71 and 72 or DID numbers Program 09 Program 30 Disables RRCS for dial pulse operation Program 39 Assigns line access buttons to digital and electronic telephones Program 4...

Page 383: ...n Interface connector for DID line circuits 1 2 J2 connector Modular connection Interface connector for DID line circuits 3 4 DID line circuit 1 CD122 Red LED top Lights to indicate line circuit is in operation Trunk indicator will not light unless RDDU is connected to a DID line DID line circuit 2 CD222 Red LED DID line circuit 3 CD322 Red LED DID line circuit 4 CD422 Red LED bottom Jumper plug P...

Page 384: ...nectors are described in Table 9 14 Note For the system to recognize the DTMF tones generated by incoming DID lines a DTMF Receiver Unit RRCS 4 8 or 12 must be installed on the DK40i Base KSU K4RCU3 or on any DK424 RCTU or DK424i BCU CAUTION To prevent system malfunction DO NOT install the RDSU in slot 18 of the DK40i system Installing R48S Ring Generator Internal Option An optional R48S unit can ...

Page 385: ...ing the RDSU gently pull the RDSU outward If the connectors are properly mated a light resistance is felt RDSU Programming Enter Code 27 in Program 03 for a non optioned RDSU or enter Code 28 for an RDSU that support off hook call announce and data interface units To program the RDSU standard telephone ports including the RSTS see RDSU Programming on Page 9 41 To program the RDSU digital telephone...

Page 386: ... RDSU RSTS Controls Indicators and Connectors Control Indicator Connector Type of Component Description RSTS connector P2 P3 10 pin connector Connector for RSTS subassembly that provides two standard telephone circuits RSTS connector P4 P5 R48S connector to P6 8 pin connector Interface connector for R48S R48S connector to P7 6 pin connector RSTS R48S RDSU1 P3 P4 P2 P5 P6 P7 P6 P3 P4 P2 P5 P7 1377 ...

Page 387: ...quired for REMU dial pulse operation see Program 30 LED 11 REMU controls indicators and interface connectors are shown in Figure 9 22 and described in Table 9 15 PEMU controls indicators and interface connectors are shown in Figure 9 23 and described in Table 9 16 REMU Installation Important Each REMU decreases the maximum system CO lines by four REMU circuits do not use station ports with DK40i D...

Page 388: ...424i in Release 4 0 and higher See Worksheets in the appropriate configuration chapter for recommended PEMU slot assignments 6 After installing gently pull the PEMU outward If the connectors are properly mated a slight resistance is felt PEMU REMU Programming Program 03 Specify Code 13 for slots that support PEMUs and make sure RRCS is enabled for DTMF operation Program 04 Specifies PDNs These are...

Page 389: ...witch SW201 circuit 2 PAD switch SW301 circuit 3 PAD switch SW401 circuit 4 TYP1 TYP2 jumper plugs P102 104 3 terminal jumper Enables line circuit to be set for Type 1 or Type 2 signaling TYP1 TYP2 jumper plugs P202 204 TYP1 TYP2 jumper plugs P302 304 TYP1 TYP2 jumper plugs P402 404 2W 4W switch 102 circuit 1 2 position slice switch Selects 2 or 4 wire configuration for E M Tie line circuit 2W 4W ...

Page 390: ...bles 3 dB signal level drop for line circuit GND BAT jumper P102 GND BAT jumper P201 3 terminal jumper Tie line 2 GND BAT jumper P202 GND BAT jumper P301 3 terminal jumper Tie line 3 M lead origination for Tie line must be in BAT position per FCC requirements GND BAT jumper P302 GND BAT jumper P401 3 terminal jumper Tie line 4 GND BAT jumper P402 2W 4W switch P103 203 303 and 402 circuit 1 4 3 ter...

Page 391: ... PAD switches SW101 SW201 SW301 and SW401 to the 3 3 dB signal level drop position 2 Set each line for ground start GND or loop start LOOP by setting the following jumper plugs SW103 for line 1 SW203 for line 2 SW303 for line 3 and SW403 for line 4 3 Insert the RGLU2 component side facing right into the appropriate slot and apply firm even pressure to ensure proper mating of connectors RGLU2 can b...

Page 392: ... configures line 1 3 terminal jumper Used to configure line for loop or ground start LOOP GND jumper SW203 configures line 2 LOOP GND jumper SW303 configures line 3 LOOP GND jumper SW403 configures line 4 Table 9 17 RGLU2 Controls Indicators and Connectors continued Control Indicator Connector Type of Component Description Backplane Connector 4 3 2 1 J1 J2 SW401 3 0 PAD SW301 SW201 SW101 RGLU Red ...

Page 393: ...e like an RSIS allowing it to support any one of the hardware devices listed above locally from its RS 232 modular jack or the RMDS can operate as a 1200 bps bits per second or 2400 bps system remote maintenance modem The RMDS PCB function modem or RS 232 port is set in a system program option The RMDS can be set for one function only it cannot support both functions simultaneously When configured...

Page 394: ...be installed on the RSIU PCB only one RMDS PCB can be installed on the RSIU The function and bit per second bps data rate of each RSIS and RMDS circuit port is set in Program 76 as described in the Programming Part that follows 2 After installing all RSIS RMDS PCBs install the RSIU into the DK424 or DK424i per the following instructions RSIU Installation 1 The RSIU must be installed only in slot 1...

Page 395: ...J1 UP UP J4 J3 J2 1 17 1 17 1 17 J1 UP UP J4 J3 J2 1 17 1 17 1 17 J1 UP UP Bottom View solder side Port 4 3 Pair Modular Jack Port 3 3 Pair Modular Jack Port 2 3 Pair Modular Jack Port 1 3 Pair Modular Jack Each position on the RSIU card can accept either an RSIS or RMDS Note 1 card Only one RMDS card can be used per RSIU See Note 1 RSIS or RMDS Note 1 RSIS or RMDS Note 1 RSIS or RMDS Note 1 1814 ...

Page 396: ...et for slot 11 of the PDKU in slot 12 6 Connect all PCB connectors that were removed back into the same PCBs they were removed from in Step 3 7 Turn the system power On and note that the programming telephone is on port 13 and all other ports are shifted up by eight ports Program slot 11 with Code 49 and all other slots with the appropriate codes using Program 91 1 and or 03 Next cycle system powe...

Page 397: ...apter 8 T1 6 Connect all PCB connectors that were removed back into the same PCBs from which they were removed 7 Turn the system power on and note that the programming telephone is on port 13 and all other ports are shifted up by eight ports Program slot 11 with Code 49 and all other slots with the appropriate codes using Program 91 1 and or 03 Next cycle system power Off 5 seconds and on or run P...

Page 398: ...i Admin customer database and any DK424 and DK424i RCTU If the bps rate is not the same in all three areas uploading will fail on Program 76 Program 77 1 LED 14 Enables the RMDS modem function If the RMDS should function as a modem turn On LED 14 If the RMDS should function as a RS 232 port turn Off LED 14 Program 77 1 LED 15 Sets the RMDS communications standard type to CCITT V 22bis 2400 bps or ...

Page 399: ...r DK424 or DK424i The RSSU controls indicators and interface connectors are shown in Figure 9 27 and described in Table 9 18 RSSU Installation 1 Insert the RSSU component side facing right into the last slot S16 of the Base KSU cabinet if the system only has a Base KSU cabinet and no Expansion KSUs cabinets If there are Expansion KSUs cabinets install the RSSU in the highest slot number in any KSU...

Page 400: ... RSSU PCB Table 9 18 RSSU Controls Indicators and Connectors Control Indicator Connector Type of Component Description TTY interface connector J3 Dual modular connector Interface connector for maintenance terminal external modem Backplane Connector TTY SMDR not used J3 1878 RSSU ...

Page 401: ...telephone or device is connected to a port ringing or message waiting may not function RSTU2 only provides a 90 volt square wave message waiting generator to drive standard telephone 90V message waiting lamps Notes For the system to recognize the DTMF tones generated by a standard telephone or any other device connected to a standard telephone port a DTMF Receiver Unit RRCS 4 8 or 12 must be insta...

Page 402: ...r tables in Chapter 2 DK40i Configuration 3 After installing the RSTU2 gently pull the RSTU2 outward If the connectors are properly mated a light resistance is felt Figure 9 29 PSTU and Subunit SSTU WARNING The shield on the back of the RSTU2 is designed to protect the installer from potentially hazardous ring voltage Do NOT remove this shield Table 9 19 RSTU2 Controls Indicators and Connectors Co...

Page 403: ...on Program 19 Used for BGM connection Program 21 Assigns standard telephone ports to modem pools Programs 10 3 23 24 25 26 Integrated Auto Attendant Digital Announcer assignments Program 31 Configures all RSTU RSTU2 and PSTU ports connected to voice mail or external Auto attendant devices Program 34 LED 01 Standard telephone Camp on Busy Override tone option Program 35 LED 03 Standard telephone me...

Page 404: ...ram 03 that slot assumes the next four consecutive CO line numbers in the system Only one RMCU PCB can be installed in a DK424 system If more than one slot is programmed with code 19 in Program 03 the lowest slot having code 19 will be the CAMA trunk active slot The controls indicators and connectors for the RCMS are listed in Table 90 Location of the RCMS LEDs are shown in Figure 76 Functions of ...

Page 405: ... Component Description SW101 Switch 3 dB PAD switch for circuit 1 or 3 SW201 Switch 3 dB PAD switch for circuit 2 or 4 J1 Connector Blocks Jacks to connect to RMCU J2 Jacks to connect to RMCU J3 Jacks to connect to RMCU RJ11 6 pin modular connector Network interface jack to CAMA trunk RMCU1A CM V 1 RMCU1A 2758 UP UP A B C D E F G H K RCMS1A RMCU1A UP UP A B C D E F G H K RCMS1A P6 P5 P7 P3 P2 P4 R...

Page 406: ...RCMS jacks J4 and J5 to the network CAMA trunks per Figure 10 27 on Page 10 29 4 Test the CAMA trunk and set the 3 dB PAD switches SW101 and SW 201 for the appropriate volume level Figure 9 33 RMCU Interface Card Figure 9 34 Location of the RCMS LEDs RMCU1A CM V 1 R MC U 1 A 3005 RMCU1A P6 P5 P7 P3 P2 P4 RMCUV 1 RMC21B TC35354F RMCU1A 2796 RCMS1A 2 2 LEDs indicate Trunk Condition Network Busy NB L...

Page 407: ...and by mode On Off 2 Network connected RMCU is in stand by mode Off1 1 If the NB LED stays On even if the modular connector of the network is connected check the following Tip and Ring could be reversed Network could be busy Off 3 Network is in stand by mode and the RMCU is off hook Network is connected and the RMCU MF sending dial tone Off On 4 Network is seizing and the RMCU is off hook Flashing...

Page 408: ... stuffed Type of CO line assigned to each channel Loop Start Ground Start Tie Wink or Immediate Start DID Wink or Immediate Frame Format Type Super Frame SF or Extended Super Frame ESF The T1 provider normally specifies the Frame Format to be used either is adequate for DK424i CO digital voice lines ESF provides a higher level of performance monitoring but requires trained personnel and the ESF CS...

Page 409: ...iated equipment as listed below Station Wiring Digital Stations Electronic Stations Attendant Consoles Analog Stations Power Failure Cut through DPFT Pin outs CO Line Wiring DID and Tie Line Wiring Option Interface PCBs Note Before using the Connect Record Sheets following each Wiring Diagram make copies for future use Diagrams which apply to only one system e g DK40i are in the installation chapt...

Page 410: ...00 ft 303 m DDSS consoles PDKU 8 PDIU DS PDKU 1 8 or RDSU 5 8 DDCB PDKU or RDSU 5 Attendant Console RATU 1 4 2 pair HDCB PEKU 5 or PESU 5 2 2 PESU circuits 3 and 4 are not used Electronic telephones PEKU or PESU 2 pair 3 pair required for OCA RPCI DI or PDIU D12 PDKU 1 8 or RDSU 5 8 Shares digital telephone wire pair1 DADM PDKU 1 8 or RDSU 5 8 RATI RATU 1 4 1 or 2 pair HDSS consoles PEKU 7 8 2 pai...

Page 411: ...pan Line or ISDN PRI Line Earth Ground Earth Ground CSU PSTU RSTU RSTU2 RDSU RSTS 2077 Important To protect against transient voltages and currents solid state secondary protectors must be installed if there is outside wiring and on all DID and E M Tie lines These protectors which contain fast semiconductors in addition to fuses shall comply with the requirements for secondary protectors for commu...

Page 412: ... Pair Cable W Male Amp Connector 66M150 Split Block Circuit 2 to DKT 2 or PDIU DS Circuit 3 to DKT 3 or PDIU DS Circuit 4 to DKT 4 or PDIU DS Circuit 6 to DKT 6 or PDIU DS Circuit 7 to DKT 7 or PDIU DS Circuit 5 to DKT 5 or PDIU DS or DDCB T1 Voice Data GND R1 Voice Data PT1 Add Power GND PR1 Add Power T2 R2 PT2 PR2 T3 R3 PT3 PR3 T4 R4 PT4 PR4 T5 R5 PT5 PR5 T6 R6 PT6 PR6 T7 R7 PT7 PR7 T8 Voice Dat...

Page 413: ...Circuit 8 to DKT8 or DDSS T8 R8 PT8 PR8 Not Used GN 6 5 4 3 2 1 Y BL R BK W T8 PR8 Jacketed Twisted Pairs 24AWG 1 or 2 Pair See Note 1 Station Cabling GN 6 5 4 3 2 1 Y BL R BK W R1 PT1 T1 PR1 GND PR T GND R PT T GND R PT RJ11 RJ11 Digital Telephone with or without PDIU or RPCI DI 2 Or 4 Wire Modular Cord to RJ11 Jack on Bottom of RPCI DI T7 Voice Data GND R7 Voice Data PT Add Power GND PR Add Powe...

Page 414: ...42 17 43 18 44 19 45 20 46 21 47 22 48 23 49 24 50 25 Bridging Clips To PDKU With Female Connector 25 Pair Cable W Male Amp Connector 66M150 Split Block Circuit 2 Circuit 3 Circuit 4 Circuit 6 Circuit 7 Circuit 8 Not Used GN 6 5 4 3 2 1 Y BL R BK W 2 3 4 5 Modular Cord GN 6 5 4 3 2 1 Y BL R BK W 3 4 Modular Cord 1 2 L1 L2 Not Used A B C Door Phone MDFB DDCB HKSU MDFB Door Phone B or Door Lock Cont...

Page 415: ... R3 PT3 PR3 T4 R4 PT4 PR4 T5 R5 PT5 PR5 T6 R6 PT6 PR6 T8 R8 PT8 PR8 Jacketed Twisted Pairs 24AWG 1 Pair Station Cabling GN Y BL R BK W R1 T1 T GND R RJ11 Digital 1000 or 2000 Series Telephone With Or Without RPCI DI or DDSS DDCB PDIU DS Not Used CKT 3 CKT 4 CKT 5 CKT 6 T7 R7 PT7 PR7 CKT 7 CKT 8 AC DC External Power Source 3 2 4 5 6 5 4 3 2 1 TR To 120VAC Commercial Power Outlet AC DC External Powe...

Page 416: ...ross Connect Record MDF Block Number KSU Slot Number Color Code Designation CKT Number Port Number Intercom Number Device Standard Telephone Electronic Telephone Location W Bl T 1 Bl W R W O PRW T O W PRW R W G T 2 G W R W Br PRW T Br W PRW R W S T 3 S W R R Bl PRW T Bl R PRW R R O T 4 O R R R G PRW T G R PRW R R Br T 51 Br R R R S PRW T S R PRW R Bk Bl T 6 Bl Bk R Bk O PRW T O Bk PRW R Bk G T 7 G...

Page 417: ...Clips To RDSU W Female Connector 25 Pair Cable With Male Amp Connector 66M150 SPLIT BLOCK Tip 1 Ring 1 GN Y BL R BK W 6 5 4 3 2 1 6 5 4 3 2 1 Voice Mail Port Or Similar Device Voice Mail Port Or Similar Device RJ11 RJ11 RING Tip TIP Ring Standard Telephone 2 Standard Telephone 1 Ring 2 Tip 2 GN Y BL R BK W Not Used Station Cabling Jacketed Twisted Pairs 24 AWG T3 R3 T4 R4 Not Used Not Used Standar...

Page 418: ...e Location W Bl T 1 Standard Bl W R W O Not Used O W Not Used W G T 2 Standard Indicate if separate BGM source connected to Circuit 2 G W R W Br Not Used Br W Not Used W S T 3 Standard RSTS S W R R Bl Not Used Bl R Not Used R O T 4 Standard RSTS O R R R G Not Used G R Not Used R Br T 5 Digital DDCBs connect only to Circuit 5 Ports 004 012 020 and 028 Br R R R S PWRT S R PWRR Bk Bl T 6 Digital Bl B...

Page 419: ...le amp Connector 1 2 3 4 5 6 7 8 9 10 11 12 13 14 15 16 17 18 19 20 21 22 23 24 25 26 27 28 29 30 31 32 33 34 35 36 37 38 39 40 41 42 43 44 45 46 47 48 49 50 1 2 3 4 5 6 7 8 9 10 11 12 13 14 15 16 17 18 19 20 21 22 23 24 25 26 27 28 29 30 31 32 33 34 35 36 37 38 39 40 41 42 43 44 45 46 47 48 49 50 W BL BL W W O O W W GN GN W W BR BR W W S S W R BL BL R R O O R R GN GN R R BR BR R R S S R BK BL BL ...

Page 420: ... 22 23 24 25 26 27 28 29 30 31 32 33 34 35 36 37 38 39 40 41 42 43 44 45 46 47 48 49 50 W BL BL W W O O W W GN GN W W BR BR W W S S W R BL BL R R O O R R GN GN R R BR BR R R S S R BK BL BL BK BK O O BK BK GN GN BK BK BR BR BK BK S S BK Y BL BL Y Y O O Y Y GN GN Y Y BR BR Y Y S S Y V BL BL V V O O V V GN GN V V BR BR V V S S V 26 1 27 2 28 3 29 4 30 5 31 6 32 7 33 8 34 9 35 10 36 11 37 12 38 13 39 ...

Page 421: ...4 50 25 Bridging Clips To PEKU or PESU w Female Connector 25 Pair Cable w Male amp Connector 66M150 Split Block Circuit 2 Circuit 3 Circuit 4 Circuit 5 Circuit 6 Circuit 7 Circuit 8 Not Used Circuit 2 Circuit 3 Circuit 4 Circuit 6 Circuit 7 Circuit 8 OCA T1 OCA R1 GN 6 5 4 3 2 1 Y BL R BK W 2 3 4 5 Modular Cord GN 6 5 4 3 2 1 Y BL R BK W 3 4 Modular Cord 1 2 L1 L2 Not Used A B C Door Phone MDFB HD...

Page 422: ...r Cable w Male amp Connector 66M150 Split Block Circuit 2 Circuit 3 Circuit 4 Circuit 2 to Electronic Telephone Port 001 Circuit 4 to Electronic Telephone Port 003 Circuit 5 to Electronic Telephone or HDCB Circuit 6 to Electronic Telephone Circuit 7 to Electronic Telephone or DSS Circuit 8 to Electronic Telephone or DSS OCA T1 OT OCA R1 or to Electronic Telephones that receive OCA Voice T1 VT Voic...

Page 423: ...R7 DT7 DR7 VT8 VR8 DT8 DR8 OT2 OR2 OT3 OR3 OT4 OR4 OT5 OR5 OT6 OR6 OT7 OR7 OT8 OR8 Circuit 8 Circuit 7 Circuit 6 Circuit 5 Circuit 4 Circuit 3 Circuit 2 OCA T1 OT OCA R1 OR Circuit 8 to EKT or DSS Circuit 7 to EKT or DSS Circuit 6 to EKT Circuit 5 to EKT or HDCB Circuit 4 to EKT Circuit 1 to EKT PEKU Circuit 2 Voice Pair PEKU Circuit 3 Voice Pair Port A CO Side Port B Subscriber side See Note 2 Cu...

Page 424: ...telephone or HDSS Console number 1 8 Figure 10 14 PEKU Station MDF Cross Connect Record MDF Block Number KSU Slot Number Color Code Designation CKT Number Port Number Intercom Number Device Standard Telephone Electronic Telephone Location W Bl VT 1 Bl W VR W O DT O W DR W G VT 2 See Note 1 G W VR W Br DT Br W DR W S VT 3 See Notes 1 and 2 S W VR R Bl DT Bl R DR R O VT 4 O R VR R G DT G R DR R Br V...

Page 425: ...KT Receives OCA Calls Voice Mail Port or Similar Device Voice Mail Port or Similar Device RJ11 RJ11 VT VR DT DR VT VR DT DR OT OR OT OR OT OR Voice T1 VT 5 Voice R1 VR 5 Data T1 DT 5 Data R1 DR 5 Ring Tip Tip Ring Standard Telephone 2 Standard Telephone 1 Ring 2 Tip 2 Circuit 7 to EKT 3 GN Y BL R BK W Strap Options W9 Cut if HDCB is connected to Circuit 5 P90 Ring Voltage Option Circuit 1 2 L Low ...

Page 426: ...wn see MDF to electronic telephone wiring Figure 10 16 PESU Station MDF Cross Connect Record MDF Block Number KSU Slot Number Color Code Designation CKT Number Port Number Intercom Number Device Standard Telephone Electronic Telephone Location W Bl T 1 Bl W R W O Not Used O W Not Used W G T 2 G W R W Br Not Used Br W Not Used W S Not Used 3 NA NA S W Not Used R Bl Not Used Bl R Not Used R O Not Us...

Page 427: ... 66M150 Split Block PC Attendant Console Cabling 3 PC Attendant Console 2 T2 R2 PT2 PR2 T3 R3 PT3 PR3 T4 R4 PT4 PR4 T1 Voice Data GND R1 Voice Data GND GN 6 5 4 3 2 1 Y BL R BK W 3 4 R1 PT1 T1 PR1 2 5 PR TR PT RJ11 GND PR T GND R PT Jacketed Twisted Pairs 24 AWG 2 Pair See Note 1 Customer supplied PC Attendant Console AUX IN REC OUT RJ45 RJ11 DB9 Female RATI Rear Connections 8 pair modular cord RJ...

Page 428: ...0 46 21 47 22 48 23 49 24 50 25 Bridging Clips To RATU PCB W Female Connector 25 pair Cable W Male Amp Connector 66M150 Split Block Console Cabling3 Attendant Console 2 T2 R2 PT2 PR2 T3 R3 PT3 PR3 T4 R4 PT4 PR4 T1 Voice Data GND R1 Voice Data T1 GND R1 GN 6 5 4 3 2 1 Y BL R BK W 3 4 R1 PT1 T1 PR1 2 5 PR TR PT RJ11 2 pair Modular Cord GND PR T GND R PT Jacketed Twisted Pairs 24 AWG 2 pair See Note ...

Page 429: ... 26 1 27 2 28 3 29 4 30 5 31 6 32 7 33 8 34 9 35 10 36 11 37 12 38 13 39 14 40 15 41 16 42 17 43 18 44 19 45 20 46 21 47 22 48 23 49 24 50 25 Bridging Clips To RSTU2 or PSTU or PSTU2 w Female Connector 25 Pair Cable w Male amp Connector 66M150 Split Block GN 6 5 4 3 2 1 Y BL R BK W 1 2 3 4 5 6 Jacketed Twisted Station Cable 24 AWG Modular Cord Tip 1 Ring 1 T2 R2 T3 R3 T4 R4 T5 R5 T6 R6 T7 R7 T8 R8...

Page 430: ...ber Port Number Intercom Number Device Standard Telephone Electronic Telephone Location W Bl T 1 Bl W R W O Not Used O W Not Used W G T 2 Indicate if separate BGM source G W R W Br Not Used Br W Not Used W S T 3 S W R R Bl Not Used Bl R Not Used R O T 4 O R R R G Not Used G R Not Used R Br T 5 Br R R R S Not Used S R Not Used Bk Bl T 6 Bl Bk R Bk O Not Used O Bk Not Used Bk G T 7 G Bk R Bk Br Not ...

Page 431: ...2 R O T TIP TEL 4 R 7 O R R RING TEL 4 8T 33 R G T TIP RSTU RSTU RDSU 4 R 8 G R R RING PSTU RSTU RDSU 4 9T 34 R Br T TIP TEL 5 R 9 Br R R RING TEL 5 10T 35 R S T TIP RSTU RSTU RDSU 5 R 10 S R R RING PSTU RSTU RDSU 5 11T 36 Bk BI T TIP TEL 6 R 11 BI Bk R RING TEL 6 12T 37 Bk O T TIP RSTU RSTU RDSU 6 R 12 O Bk R RING PSTU RSTU RDSU 6 13T 38 Bk G T TIP TEL 7 R 13 G Bk R RING TEL 7 14T 39 Bk Br T TIP ...

Page 432: ...RCOU 4 R 8 G R R RING PCOU RCOU 4 9T 34 R Br T TIP CO 5 R 9 Br R R RING CO 5 10T 35 R S T TIP PCOU RCOU 5 R 10 S R R RING PCOU RCOU 5 11T 36 Bk BI T TIP CO 6 R 11 BI Bk R RING CO 6 12T 37 Bk O T TIP PCOU RCOU 6 R 12 O Bk R RING PCOU RCOU 6 13T 38 Bk G T TIP CO 7 R 13 G Bk R RING CO 7 14T 39 Bk Br T TIP PCOU RCOU 7 R 14 Br Bk R RING PCOU RCOU 7 15T 40 Bk S T TIP CO 8 R 15 S Bk R RING CO 8 16T 41 Y ...

Page 433: ... 45 46 47 48 49 50 1 2 3 4 5 6 7 8 9 10 11 12 13 14 15 16 17 18 19 20 21 22 23 24 25 26 27 28 29 30 31 32 33 34 35 36 37 38 39 40 41 42 43 44 45 46 47 48 49 50 Bridging Clips 66M150 Split Block GN 6 5 4 3 2 1 Y BL R BK W 2 3 4 5 Modular Cord 6 1 1 2 3 4 5 6 6 1 T1 R1 T2 R2 T1 R1 T2 R2 To Network R1 R2 T1 T2 Telco provided Modular Block 625 Type or Equivalent PCOU 4 3 2 1 CO3 4 Same R4 R3 T3 T4 5 4...

Page 434: ...gure 10 24 CO Line RCOU RCOS RGLU2 RDDU PEMU REMU RDDU RDTU MDF Cross Connect Record MDF Block Number CO Line Number PCB Type and Cabinet Slot Number MDF Block Number CO Line Number PCB Type and Cabinet Slot Number MDF Block Number CO Line Number PCB Type and Cabinet Slot Number ...

Page 435: ... 2 3 4 5 6 7 8 9 10 11 12 13 14 15 16 17 18 19 20 21 22 23 24 25 26 27 28 29 30 31 32 33 34 35 36 37 38 39 40 41 42 43 44 45 46 47 48 49 50 Bridging Clips 66M150 Split Block GN 6 5 4 3 2 1 Y BL R BK W 2 3 4 5 Modular Cord 6 1 1 2 3 4 5 6 6 1 T1 R1 T2 R2 T1 R1 T2 R2 To Network R1 R2 T1 T2 Telco provided Modular Block 625 Type Or Equivalent RGLU or PCOU 4 3 2 1 CO3 4 Same R4 R3 T3 T4 5 4 3 2 R2 R1 T...

Page 436: ...0 21 22 23 24 25 26 27 28 29 30 31 32 33 34 35 36 37 38 39 40 41 42 43 44 45 46 47 48 49 50 Bridging Clips 66M150 Split Block GN 6 5 4 3 2 1 Y BL R BK W 2 3 4 5 Modular Cord 1 2 3 4 5 6 T1 R1 T2 R2 T1 R1 T2 R2 To Network R1 R2 T1 T2 Telco provided Modular Block 625 type or Equivalent Same R8 R7 T7 T8 5 4 3 2 R2 R1 T1 T2 5 4 3 2 Network Jack RJ14C FIC 02LS2 6 1 6 1 4 3 2 1 7 8 1 6 1 6 8 7 6 5 3 4 5...

Page 437: ...35 36 37 38 39 40 41 42 43 44 45 46 47 48 49 50 Bridging Clips 66M150 Split Block GN 6 5 4 3 2 1 Y BL R BK W T1 R1 T1 R1 To Network or PSAP R1 R2 T1 T2 RMCU1A RCMS1A 2 2 LEDs indicates trunk condition Network Busy NB LED Customer Busy CB LED RCMS1A 1 2 RJ11 2 Pin Modular Connector CAMA 4 CAMA 3 CAMA 2 CAMA 1 NB LED CB LED NB LED CB LED NB LED CB LED Ring Tip 4 3 Ring Tip 4 3 Ring Tip 4 3 Ring Tip ...

Page 438: ...6 1 6 1 6 1 CKT 3 4 RGLU RCOU RCOS PCOU TCOU Pin out Pin out CKT 1 2 1 2 3 4 5 6 Same R4 R3 T3 T4 5 4 3 2 1 2 3 4 5 6 Network RJ21X Network RJ14C RJ14C Telco Jacks Telco RJ21X 4 Wire Modular Cord Installer Cross Connect Customer Supplied Modular Jacks Duplex Modular Jack AA 104A 4 or Equivalent RCOU 4 Wire Modular Cord 1 4 Wire Single Modular Jack RJ14C from Telco RCIU RCIS 4 Wire Modular Cord 2 R...

Page 439: ...42 43 44 45 46 47 48 49 50 1 2 3 4 5 6 7 8 9 10 11 12 13 14 15 16 17 18 19 20 21 22 23 24 25 26 27 28 29 30 31 32 33 34 35 36 37 38 39 40 41 42 43 44 45 46 47 48 49 50 Bridging Clips 66M150 Split Block GN 6 5 4 3 2 1 Y BL R BK W 2 3 4 5 Modular Cord T1 R1 T2 R2 T1 R1 T2 R2 To Network R1 R2 T1 T2 Telco provided Modular Block 625 Type or Equivalent R2 R1 T1 T2 5 4 3 2 RDDU Pin out Network Jack RJ14C...

Page 440: ...1 8 1 Line 4 8 1 Line 1 8 1 Line 3 8 1 Line 2 Same Pinout as Line 1 Same Pinout as Line 1 Same Pinout as Line 1 To Network Jack LEAD PIN SB 8 M 7 SG 6 T 5 R 4 E 3 4WR1 2 4WT1 1 To Network Jack To Network Jack To Network Jack USOC RJ1CX 1600 Figure 10 30 MDF Wiring REMU 2 4 Wire Type I II ...

Page 441: ... 31 32 33 34 35 36 37 38 39 40 41 42 43 44 45 46 47 48 49 50 Bridging Clips 66M150 Split Block GN 6 5 4 3 2 1 Y BL R BK W 5 3 4 2 Modular Cord 1 2 3 4 5 6 T R E M T R E M To Network R E T M Telco provided Modular Block 625 Type or Equivalent PEMU 2 Wire 4 3 2 1 Same PEMU Pin out Network Jack RJ2EX FIC TL11M 6 1 6 1 6 1 6 1 6 5 4 3 2 1 E R T M Same 6 5 4 3 2 1 E R T M Same 6 5 4 3 2 1 E R T M 6 5 4...

Page 442: ...6 37 38 39 40 41 42 43 44 45 46 47 48 49 50 Bridging Clips 66M150 Split Block GN 6 5 4 3 2 1 Y BL R BK W 2 3 4 5 Modular Cord 6 1 1 2 3 4 5 6 6 1 T R T1 R1 E M To Network R E T M Telco provided Modular Block 625 Type Or Equivalent PEMU 4 Wire 4 3 2 1 Same PEMU Pin out Network Jack RJ2GX FIC TL31M 6 1 6 1 6 5 4 3 2 1 E R1 R T T1 M Same 6 5 4 3 2 1 E R1 R T T1 M Same 6 5 4 3 2 1 E R1 R T T1 M 6 5 4 ...

Page 443: ...le 10 2 shown below Table 10 2 External Paging Zones External Paging Zone Access Code External Paging Zone Access Code DK14 DK40 DK40i DK424 DK424i all processors Paging All Call Page Zone Paging All Call External Page Zone DK40i DK40 DK424 RCTUA RCTUBA BB RCTUC D and DK424i BCAU B2CAU B2CBU B3CAU B3CBU Zone A Zone C Zone B Zone D DK424 RCTUE F and DK424i B5CAU B5CBU Zone A Zone E Zone B Zone F Zo...

Page 444: ...Or Amp Control BREAK PI0 MAKE SW4 SP0 SP1 VR1 600 Duplex 8 3 WATT P12 N C N O Alarm Sensor P11 BREAK MAKE Alarm System Night Bell To Music on hold Input On PCTU PCB P6 Connector MDF Connections All Wires Should Be Jacketed 24 AWG Twisted Pairs Select Relay Function with Program 77 1 Night Relay Or MOH Control Tape Player 32 7 38 13 50 25 23 36 11 34 9 R O O R Bk Gn Gn Bk V S S V Gn V Bk Bl Bl Bk R...

Page 445: ...ngs SW1 Sets the SMDR baud rate to be 300 or 1200 BPS SW2 Sets the PIOU programming speed to be 300 or 1200 BPS for IMDU or TTY jack LED CO4 ON 300 BPS SW2 set IN LED CO4 OFF 1200 BPS SW2 set OUT SW3 Sets the PIOU to operate with the IMDU or an external device connected to the TTY modular jack For IMDU operation For ASCII terminal or external modem W4 Sets the IMDU and TTY jack for bell or CCITT s...

Page 446: ...US ALM NH DE 600 TBI HESB or Page Amplifier Door Lock Control MOH Source Unit Facility Alarm Unit Night Bell Relay Options K1 DE Door Lock or Amp Mute Control Program 77 1 LED 07 K2 NH Night Relay or Music on hold Control Program 77 1 LED 05 K1 K2 24 VDC 1 Amp Maximum Break Make Mute Control KSU Backplane MDF 1591 Notes All wiring connections must be 24 AWG twisted pairs Dotted lines show optional...

Page 447: ...Backup PC COM Port External RM Modem VM SMDI Port MIS Device SMIS PC COM Port CCV PC COM Port Insight DK PC COM Port PPTC connects to Call Accounting Device or Printer 2376 Station Message Detail Recording RS 232 Port Programmable RS 232 Port Notes See Figure 8 27 for futher details on the PPTC PIOU option settings SW1 Sets the SMDR baud rate to be 300 or 1200 BPS SW2 Sets the PIOU programming spe...

Page 448: ...l interface subassemly Port 1 Port 2 Port 3 Port 4 CAUTION Do not plug CO line or RSTU tip ring into RMDS or RSIU modular jack 4274 Notes 1 The RSIU can be configured with up to three RSIS or two RSIS and one RMDS in any position Use Program 76 to set RSIU RSIS RMDS port types 2 All RSIU RSIS RMDS ports are system programmable to allow up to four of any of the functions SMDR MIS CCV SMDI TTY and r...

Page 449: ...nal Modem male 2 3 20 6 8 7 6 5 4 3 2 1 RD TD DSR DTR DCD SG 6 5 4 3 2 1 SG DCD DTR DSR TD RD Modular Jack Pinout front view DB25 Pinout front view Jumper Pin 4 5 DK 2 3 4 5 6 7 20 8 RSIU RSIS RMDS WSIU TSIU PIOU PIOUS PPTC Connect to ASCII Terminal Printer Call Accounting Device male 3 2 6 20 8 7 6 5 4 3 2 1 RD TD DSR DTR DCD SG 6 5 4 3 2 1 SG DCD DTR DSR TD RD Modular Jack Pinout side view DB25 ...

Page 450: ...Universal Slot PCB Wiring Option Interface PCB Wiring Diagrams 10 42 Strata DK I M 6 00 ...

Page 451: ... instructions for digital telephones in this chapter and elsewhere in this manual apply only to the Toshiba 2000 and 1000 series digital telephones The 2000 series digital telephones consist of four models There are two 1000 series digital telephone models the DKT1020 S and DKT1020 SD DKT2010 S The DKT2010 S is a 10 Button Digital Speakerphone DKT2020 S The DKT2020 S is a 20 button Digital Speaker...

Page 452: ...es 500 and 2500 type standard telephones apply whenever standard telephones are mentioned in this manual Strata AirLink Wireless Handset Strata AirLink wireless systems add wireless telephone service to Strata DK16 and DK16e DK40 DK40i DK280 DK424 and DK424i and many non Toshiba telephone systems There is one handset model shown at right that stores up to eight system and handset IDs that are conf...

Page 453: ...r the international market The DIP switches are located underneath the flexible button key strip on the DKT2000 V 4 series telephones see Figure 11 1 On the DKT2001 the DIP switch is located on the base S Figure 11 1 DKT 2000 series V 4 DIP Switches WARNING Never install the telephone wiring during a lightning storm Never install the telephone jacks in wet locations unless the jack is specifically...

Page 454: ...ectional and should only be used in certain applications The telephone also provides half duplex full duplex manual selection The DKT2020 FDSP has three operational modes for enhanced microphone use Best Good and Normal These modes allow adjustments for different room acoustical characteristics Choosing either the Internal or External Microphone RFDM and proper operational mode should be pre selec...

Page 455: ... involve a delay such as wireless calls Voice Over Internet Protocol calls etc With these types of calls the quality can diminish When using the PDN or Intercom button the perfomance for internal calls is not as good as for external calls Dip Switches The DKT2020 FDSP has DIP switches that enable use for the External Microphone and the international market The DIP switches are located underneath t...

Page 456: ...High for proper operation Important The microphone has a narrow voice pick up range so the front of the microphone should always point toward the person speaking see Figure 11 5 Be sure to place the microphone at least one foot from the telephone spaker and do not point the microphone toward the telephone speaker grille To use the external microphone in a conference room setting place the micropho...

Page 457: ... adjusts to both the telephone line s and room s acoustic properties At the beginning of each speakerphone call the echo canceller must perform Speech Training by evaluating both the FDSP user and the far end user s voice background noise and line quality Figure 11 2 RFDM Plug on DKT2020 FDSP Figure 11 3 RFDM Unit 5218 EXT MIC EXT MIC LOW HIGH 5217 5352 RFDM Unit OFF Position RFDM Unit ON Position...

Page 458: ...elephone into Speech Training mode During a call momentarily press 9RO 9RO ROG or 0 During Speech Training mode the speakerphone operates in half duplex mode Tips for best results Avoid blocking the microphone or shuffling paper near the microphone Avoid placing the speakerphone where it can detect excessive background noise especially during Speech Training mode Avoid moving the telephone during ...

Page 459: ...call does not require a DVSU In a DK system with release 3 and above software a DVSU is not required to receive OCA in the telephone handset or headset An additional wire pair is not required for digital telephones that receive Speaker OCA calls The DVSU is compatible with both 2000 series and 1000 series digital telephones Notes Digital telephones cannot be equipped with a DVSU and integrated dat...

Page 460: ...cord the cable should be terminated in a modular station connector block RJ11 at the station location The standard two pair modular electronic telephone cord length is 7 feet the maximum allowed length is 25 feet See Chapter 10 Universal Slot PCB Wiring for more details If using 24 AWG cable the overall length of the station cable run from the DK40i Base KSU to the telephone must not exceed 1 000 ...

Page 461: ...r to Figures 11 7 11 8 and the following steps 1 Loosen the captive screws and remove the telephone base 2 Using a suitable cutter remove the handset hanger from the base 3 Insert the handset hanger in the slot on the front of the phone The hanger fits in the notch on the handset cradle 4 Rotate the telephone base 180 degrees and secure it to the telephone with its four captive screws 5 Connect th...

Page 462: ...e mode is changed by sending the appropriate control signal to the RPCI DI from the PC to which the RPCI DI is connected TAPI Mode In the TAPI mode the PC connected to the RPCI DI can place telephone calls The PC can also receive Caller ID ANI and DNIS information received by the RPCI DI telephone When in the TAPI mode the RPCI DI is designed to be compatible with Microsoft TAPI application progra...

Page 463: ...K40i all digital telephone circuits except those installed in slot 17 and 18 of the expansion unit DK424 see Tables 4 4 and 4 5 of the Chapter 4 DK424 Configuration DK424i see Chapter 6 DK424i Configuration RPCI DI PDIU DI2 Installation See Figures 11 7 11 10 and 11 11 and follow these steps 1 Loosen the four screws on the digital telephone base and remove the base 2 Insert the two integrated unit...

Page 464: ...a wire cutter to trim the top pieces of the stand offs at the center of the telephone base before mounting Do not cut the RPCI DI stand offs when installing on a DKT V 4 or higher Only RPCI DI V 2s have these stand offs 3751 To P2 of Bottom PCB Red Wire D K T O 2 0 K D D K T 1 0 S U B S P F T O S H I B A DVSU HHEU Digital Telephone Top Assembly PDIU To P1 of Bottom PCB RS 232 Female DB 25 Connecto...

Page 465: ...tion The standard single pair modular DKT2001 model standard telephone cord that is sent with the telephone is 7 ft the maximum allowed is 25 ft Digital telephone cable runs must not have cable splits single or double cable bridges of any length or high resistance or faulty cable splices To wall mount DKT2001 digital SLTs 1 Loosen the screws and remove the telephone base 2 Using a suitable cutter ...

Page 466: ...9 Specify button 01 as a PDN Important Do not program CO lines or secondary line appearances onto button 01 or in any other position Since the system assigns CO lines 01 17 by default be sure to remove any CO line appearances by programming them as Station Speed Dial buttons code Note If the 6SHHG LDO 6HOHFW button is removed the key becomes the 6SHHG LDO 6HOHFW button While on an outside call the...

Page 467: ...plugs to the DVSU connectors on the PCB inside the telephone or if installing the DVSU into a 1000 series digital telephone and connect the DVSU wire plugs to the DVSU connectors on the PCBs inside the telephone 5 Reinstall the telephone base and secure it with its four captive screws Figure 11 15 DKT2010 S Strap and Connector Locations Figure 11 16 DKT2010 SD DKT2020 S and DKT2020 SD Strap and Co...

Page 468: ... is identical to the V 4 HHEU1 except that the HHEU2 has longer wires to accommodate wall mounting A Toshiba HESC 65A cable is required to connect the HHEU in a digital telephone to the HESB 1000 series digital telephones cannot be equipped with the HHEU any type or version and the integrated data interface unit PDIU DI at the same time but 2000 series digital telephones can support an HHEU and a ...

Page 469: ...the Loud Ringing Bell option is required Refer to Chapter 12 Peripheral Installation for HESB installation procedures 5 For the V 3 HHEU1 If only the headset is connected to the HHEU cut both sides of the R607 resistor then remove the resistor to eliminate electrical contact Note Do not cut the R607 resistor if connecting an HESB to the HHEU for the Loud Ringing Bell even if a headset is also inst...

Page 470: ...adset will be connected to the HHEU locate and cut the HHEU strap on the upper PCB in the phone Note If the HHEU PCB is removed from the phone the HHEU strap must be replaced for proper telephone operation 10 Reinstall the telephone base secure with the four captive screws To adjust the volume of the HESB Loud Ringing Bell 1 Call the telephone connected to the HESB 2 Adjust the volume control on t...

Page 471: ...in the area surrounding the telephone 3 Reinstall the telephone base To make the 2000 series digital telephone models less sensitive to loud surrounding noise Hold down 0LF button then press the 9RO button The less sensitive level will be set after the third flash of the Mic LED To reset the sensitivity back to the normal level Hold down the 0LF button then press the 9RO button The normal level wi...

Page 472: ...ficiently at the maximum allowed distance from the KSU Two pair wiring or external power is also necessary for maximum cable run lengths for digital telephones that are connected to systems that must operate with reserve power Table 5 2 on Page 5 5 Each digital telephone has two external power straps which must be cut for external power when the cabling of the telephone is connected to an external...

Page 473: ... calls do not require an upgrade or extra wire pair Notes See Notes in Figure 11 11 on Page 11 14 Handset OCA is not available on electronic telephones HVSU2 Upgrade Installation See Figures 11 7 and 11 20 and follow these steps 1 Loosen the four captive screws on the telephone base and remove the base 2 Position the HVSU2 on the standoffs inside the base and secure with the two provided screws 3 ...

Page 474: ...ey should click Note Exercise care when assembling the HVSU to the HVSI to prevent damage to the connector pins also verify that the HVSU is aligned with the silk screened image on the HVSI 3 Position the HVSU HVSI subassembly on the standoffs inside the base and secure with the two screws provided 4 Connect the HVSU HVSI subassembly wire plug to the P2 connector on the electronic telephone PCB 5 ...

Page 475: ...these steps 1 Loosen the four captive screws on the telephone base and remove the base 2 Using a screwdriver or other suitable tool remove the plastic tab on the back of the base The HHEU modular connector for the headset will be accessed through this opening 3 If using a V 3 or earlier HHEU1 set the SW601 switch to the HEADSET position for HESB and or headset connection This switch is not on eith...

Page 476: ... the back of the HESB and the ring volume control on the telephone Carbon Headset Handset Straps If a carbon type handset or headset is connected to the handset jack on the side of the 6500 series electronic telephone two straps inside the telephone must be cut To cut the straps Note It is not necessary to cut these straps if the headset is connected to the HHEU See Figures 11 7 and 11 20 and foll...

Page 477: ... the telephone To cut the strap See Figures 11 7 and 11 20 and follow these steps 1 Remove the four captive screws on the telephone base to the telephone and remove the base 2 Locate the R UP strap on the PCB inside the telephone and cut it 3 Reinstall the telephone base and secure in place using the four captive screws Direct Station Selection DSS Console System Connection The Strata DK40i can su...

Page 478: ...DSS Console Configuration An RDSU will not support a DDSS DDSS Programming Program 03 Code 64 identifies the slots that support DDSS consoles Program 28 Assigns DDSS console s to telephones Program 29 Assigns button functions for DDSS consoles HDSS Console HDSS Console Connections The HDSS console must be connected to the data pairs of circuits 7 and 8 on a PEKU with standard two pair twisted jack...

Page 479: ...es installation instructions for the Door Phone MDFB Door Phones can be installed can also with Door Phone Lock Control Units see following section DK14 can have up to 6 door phones DK40i can have up to nine door phones DK424 and DK424i can have up to 12 door phones Lock Control Unit and Door Phone This section provides installation instructions for the Digital DDCB or Electronic HDCB Door Phone L...

Page 480: ...for Strata DK14 DK40i DK424 or DK424i secondary protection information and loop limits DDCB HDCB Wall Mounting The DDCB and HDCB is designed to be mounted on a wall or other vertical surface To mount the units 1 Locate the two mounting holes on the right hand side on the DDCB or HDCB see Figure 11 23 2 Remove the side cover from the DDCB or HDCB to expose the two left hand mounting holes 3 Positio...

Page 481: ...ing the MDFB or while on a call with it The volume level will change as the screw is turned Door Phone Lock Programming Program 39 Assigns door phone and door lock buttons to digital telephones Program 77 1 Assigns DDCBs or HDCB to ports door phone ringing over external page during the NIGHT mode and door lock activation time Program 77 2 Busy out unused MDFB positions identifies which DDCBs suppo...

Page 482: ... used as a stand alone DKT2004 CT The DKT2004 CT either attaches to a Toshiba DKT2000 series corded digital telephone or is used as a stand alone It provides many sophisticated Strata features 900 MHz Digital Spread Spectrum technology LCD provides information such as User Name DNIS and Caller ID Four programmable buttons for feature multiple line or feature access Headset jack headset optional Ha...

Page 483: ... CAUTION To power your Toshiba DKT2004 CT Cordless base unit use only UL Listed AC Adapter Model AD 9500 Class 2 Power Supply Ratings are Input 120VAC 14W Output 0VDC 500mA Important Charge your battery for 10 hours before using your new Cordless Digital Telephone DKT2104 CT The DKT2104 CT works with Strata DK telephone systems except Strata DK24 56 96 Release 3 and provides you with reliability l...

Page 484: ...20VAC outlet and within reach of the digital telephone line connection to your Strata DK system 3 Keep the base unit and handset away from sources of electrical noise motors fluorescent lighting etc Important Place the cordless telephone to the right of the DKT If placed on the left of the DKT the cordless antenna will pick up a tone due to its close proximity to the DKT speaker and electronic par...

Page 485: ...e desk telephone Connect and Apply Power to Base Unit The AC adapter furnished with this telephone may be equipped with a polarized line plug a plug having one blade wider than the other This plug fits into the power outlet only one way If you are unable to insert the plug fully into the outlet try reversing the plug If the plug still does not fit contact your facilities coordinator about replacin...

Page 486: ...r belt or pocket for convenient portability To remove the belt clip 1 Pry one tab at a time from the notch on the side of the handset 2 Carefully lift the belt clip off The belt clip is designed to fit snugly onto the handset Handset Battery Pack Installation 1 Place a charged battery pack onto the handset so that it slides easily along the ridges If your battery is not charged see Removing and Ch...

Page 487: ...rged for 10 hours 1 Place the handset in the Charger Unit shown at right 2 Ensure that charge 1 LED lights If it does not make sure that the AC adapter is plugged in and that the handset is making good contact with the Charger Unit 3 Slide the spare battery in the rear slot of the Charger Unit shown at right until it clicks into place 4 Make sure that the top marked with plus and minus signs faces...

Page 488: ...the battery for a short time To erase memory effect Operate the unit until the battery pack is completely discharged then recharge it fully Repeat this process at least three times LCD Low Battery Indicator When the battery pack in the handset is low and needs to be charged you see this message on the display and the handset beeps Table 11 4 shows symptoms To restore your battery capacity Return t...

Page 489: ...ave RPCI DI on OCA DVSU installed To install DADMs See Figure 11 27 and follow these steps 1 Loosen the four captive screws on the 2000 series digital telephone base and remove the base 2 Remove the base handset hanger 3 Loosen two captive screws on DADM and remove bases 4 Put the DADM supplied cable through the telephone and DADM bases 5 Connect DADM cable connectors to P1 of DADM and P1 of DKT20...

Page 490: ...a DK programming record sheets in the Strata DK Programming Manual for button defaults DIU ADM 1 Black Wire to Pin 1 Black Wire to Pin 1 1 1 10 12 P 1 P 2 DADM Cable Supplied with DADM P1 of Bottom PCB Telephone Base Remove Handset Hanger DADM Connection Plate provided with DADM 4 Screws 2000 Series Digital Telephone Larger Connector View of Bottom DADM2020 2000 Series DKT DADM2020 4 Screws DADM B...

Page 491: ...s folders See Table 11 5 below for Attendant Console Capacities Hardware Installation The RATU PCB can support up to four Attendant Consoles in any combination See RATU Installation on Page 9 26 Notes The maximum distance from the Strata DK to either attendant console is 1000 ft 303 m Attendant console cable runs must not have the following Cable splits single or double Cable bridges of any length...

Page 492: ...nstructions on PC Attendant Console Software Installation on Page 11 44 Figure 11 28 RATI Assembly Disassembly Notes Do not cut HEADSET jumper unless you are connecting two headsets Cut CARBON jumpers if a carbon handset is connected to the RATHC handset cradle REC OUT can be used to monitor or record the attendant console talkpath Both the attendant and connected party will be monitored or record...

Page 493: ...ts the console display for EL or CRT EGA and enables or disables console call waiting tone for each console Not used for the PC attendant console 58 4 Sets the console Answer key priority for each console 58 5 Sets the console overflow destination for each console Program 59 Assigns attendant console Flexible Buttons Keys for each console Attendant Console Load Share Programming Program 81 89 Assi...

Page 494: ...ant Console Software Installation Step 1 Install the Software The PC attendant console requires the installation of software on an IBM compatible PC which has been connected to the RATI See To install the PC attendant console on Page 11 42 To install the software 1 Turn on the PC and open the Windows Program 2 Insert Diskette 1 in drive A or B 3 Run A setup or B setup from Windows The installation...

Page 495: ...reen 4 From the Add Drivers dialog box if ATT Telephone Telephony SP is in the list then select it it should be highlighted and press Add 5 If ATT Telephone Telephony SP is not listed press Add and type c windows system att tsp in the edit box Click OK to return select it in the list and press Add Step 3 Set Up the Telephony Driver 1 From the Telephony Drivers dialog box click the Setup button 2 F...

Page 496: ...the DK424 PC Attendant Configuration screen To make changes select Setup again then continue Default Key Assignments From the DK PC Attendant Configuration screen the Configure Keys button takes you to the DK PC Attendant Key Configuration screen The default key assignments are defined for R2 and R3 These key assignments must match Program 59 of the DK The Default Config button on this screen sets...

Page 497: ...ss of Service settings should reflect the call states and features which are anticipated to be used the most often 1 From the DK424 PC Attendant Configuration screen click the Class of Service button These contain two items from Program 10 for setting the operation for Tone First or Voice First when calling a DN on the system and for setting the system to support two or three Night Transfer modes ...

Page 498: ...ange in the DK424 in order to function Most of these items are found under the Main Menu heading of Setup To access System Settings 1 From the Main Menu select Setup 2 Click OK or enter a password Initially you can click OK without entering a password Store a password if you need to ensure that these settings cannot be changed without authorization Once a password is entered you must enter that pa...

Page 499: ...mes that appear in the Active Call window The Active Call window names are different from the names that appear in the PC attendant console selection windows The Attendant can also define a default line or line group to make dialing more efficient The default line or line group can be used with the Directory to identify a Tie line group for easy transfer of calls See Setting up the Directory on Pa...

Page 500: ... and two selections on the left allow linking the prompts to a DNIS tag or CO line Note DNIS applies to R3 and up only The DK424 identifies calls to the Attendant position by using the default CO line indication It can also attach a tag that was recorded in Program 71 for each DNIS number translated by the system When lines are marked as DNIS in the Telephony Setup see PC Attendant Console Softwar...

Page 501: ...Answer Prompt 1 From the System Settings dialog box select Answer Prompt 2 From the Answer Prompt dialog select the Prompts button 3 Select the New button 4 Type in a new prompt message in the Prompt box 5 Select the New button again to enter another prompt or OK to save those entered 1035 1036 ...

Page 502: ...ntral part of the PC attendant console Information in the directory is used for the following Auto Dial Auto Transfer Transfers to Voice Mail Recording an individual s status Recording messages for people without phones or for transferring to Voice Mail Recording individual s work departments so that when a caller asks for someone in Sales a list of department members will appear This is also a pl...

Page 503: ...thin a group to show on the list together offering the Attendant a method to choose the person that can best serve the caller See the Strata DK PC Attendant Console User Guide for instructions on adding entries into the Directory Establishing the Speed Dial List The Speed Dialing list must be established before the list will show in the Dialing window This can be done in one of two ways Method 1 W...

Page 504: ...1 Enter each number and name from the console 2 Click the Save button Using LCD Messaging LCD Messaging uses the system messages and the personal messages if enabled To display the messages currently programmed in the DK system 1 Select each message number and press the Retrieve Msg button 2 Press the Modify or Save button 3 Press Close See the Strata DK PC Attendant Console User Guide for more in...

Page 505: ...e Color Dialog Box Windows allows the screen to use a variety of colors PC Attendant console uses the color settings to determine the highlight title bar and text color of many parts of the program Choose a color scheme that provides the type of contrast best suited to the user Action Description 1 Switch to Program Manager Alt Tab The screen will show each window currently open including the Prog...

Page 506: ... delay needed to hold a key down before the character will repeat and the second is the speed of repetition once the key repeats Action Description 1 Switch to Program Manager Alt Tab The screen will show each window currently open including the Program Manager 2 From the Main Program Group choose Control Panel 3 From the Control Panel choose Desktop 4 Look at Applications and make certain that Fa...

Page 507: ... to adjust the volume The slower the repetition the easier it is to distinguish level change This rate also affects scroll rate for the Arrow keys used in the directory and other lists Toshiba recommends starting at mid points of each setting before making adjustments 5 Press the OK button when done Action Description 1 Switch to Program Manager Alt Tab The screen will show each window currently o...

Page 508: ...cent EL or EGA Color CRT Installation Refer to Hardware Installation on Page 11 41 and the following steps To install the conventional attendant console 1 Plug in the EL or CRT display to the base with a nine pin cable which is supplied with the display 2 Plug in the EL or CRT display to a commercial three prong AC 117V outlet 3 Use two pair wiring to connect the MDF to an RJ11 jack at the attenda...

Page 509: ...on see the appropriate installation chapter DK14 DK40i Single line Power Failure Emergency Transfer DK14 and DK40i have a built in single line Power Failure Emergency Transfer requires loop start lines See Chapter 1 DK14 Installation and Chapter 3 DK40i Installation for detailed information DK40i DK424 Power Failure Transfer Unit An optional Power Failure Transfer Unit DPFT can be installed that a...

Page 510: ... for emergency use to the DPFT J1 block CO TIP and CO RING terminals 4 Connect the RCOU RCOS or PCOU circuits related to the emergency CO lines to the DPFT J1 block RCOU TIP and RCOU RING terminals 5 Connect the standard telephone stations selected for emergency use to the DPFT J2 block TEL TIP and TEL RING terminals J2 26 J2 1 J1 26 J1 1 Relay J1 25 J1 50 J1 2 J1 27 J2 2 J2 27 Telephone Current D...

Page 511: ...f BGM options are also provided See Figure 12 2 MOH Option The DK14 and DK40i KSU or DK424 and DK424i processor PCBs supports an external customer provided music source such as a tuner compact disc player digital music source cassette downloader digital source or tape player for MOH The DK14 KSU DK40i Base KSU PIOU PIOUS and PEPU each has a relay contact on it that can be configured to automatical...

Page 512: ...rol feature with a PIOU or PEPU set PIOU or PEPU jumper plug P11 to the MAKE or BREAK position as required MAKE M Shorts the normally open contacts pins 9 and 34 when MOH is activated BREAK B Opens the normally closed contacts pins 9 and 34 when MOH is activated or If using the MOH control feature with a PIOUS solder PIOUS jumper W2 to the MAKE or BREAK position as required MAKE M Shorts the norma...

Page 513: ...ptional Page Output Switch 600Ω OR 3 Watt 8Ω Backplane 9 34 External BGM Dial Code from Electronic Digital Telephones Port 000 Only 491 ON 490 OFF MOH over BGM B M P11 Select MOH Prog 77 1 05 Relay Contact Specification MOH NT Relay Contact Jumper Plug Make or Break PIN No s of PIOU PEPU Amphenol Connector Note BGM or MOH Source Specifications Input Impedance 600W OR 8W Input Voltage Recommended L...

Page 514: ...e users can turn on BGM at their station by pressing the 7HO 6HW 0XVLF 0 button or by pressing PDN turns BGM Off Configuration B Alternate Background Music Source This configuration enables the MOH source to be connected to the MOH RCA jack of the DK14 KSU DK40i KSU or RCTU as in Configuration A and a separate BGM source to be connected to a PEKU circuit 3 PESU circuit 8 or KSTU2 QSTU2 RSTU RSTU2 ...

Page 515: ...Bm Max 0 77 VRMS 0 dBm QSTU2 KSTU2 RSTU RSTU2 RDSU or PSTU CKT 2 CO Lines and Stations On Hold MOH DK14 DK40i 600Ω RCA Jack DK14 DK40i KSU or RCTU DK424 PIOU PIOUS PEPU VT VR BGM when Page is Idle 8Ω or 600Ω Output BGM 491 ON 490 OFF BGM PAGE BGM To External Page System MOH RCA Jack VR1 Volume BGM 481 ON 480 Off Electronic Digital Telephone Speaker Backplane Wiring Installation Wiring PEKU 25 Pair...

Page 516: ... not provide zone relays therefore Configuration C is not possible with these PCBs Figure 12 6 DK40i DK424 DK424i Alternate Music Source Configuration C CO Lines and Stations On Hold MOH VT VR VR1 Volume MOH SOURCE Electronic Digital Telephone Alternate BGM Source BGM Page DK424 backplane KSU BGM 600 RCA Jack Electronic Digital Telephone Speaker External Speaker BGM Source Amplifier PIOU Only P23 ...

Page 517: ...eparate from the MOH source connected to the DK424 or DK424i processor PCB An isolation transformer is needed to connect a music source to one of the above standard telephone circuits see Figure 12 4 To connect the BGM source to the QSTU2 KSTU2 RSTU2 PSTU RDSU PEKU or PESU See Figures 12 4 12 6 and follow these steps 1 Access Program 10 2 If the BGM source is connected to circuit 3 on a PEKU set L...

Page 518: ...ne of two possible control functions and as normally open MAKE or closed BREAK Electrical specifications for the relay contacts are as follows Voltage 24VDC maximum Current 1 amp maximum CAUTION To prevent relay damage do not connect relays directly to 120VAC power source Note See the Strata DK Programming Manual as necessary when instructed to program the PIOU PIOUS or PEPU in the following parag...

Page 519: ...n external page is activated 3 See Figures 12 7 and 12 8 for wiring interconnecting details Connect the PIOU PIOUS or PEPU to the MDF as required for the external paging function Figure 12 7 PIOU PEPU Relay Control Functional Wiring Diagram PIOU 25 PR Connectors PIN NO Color MDF 66M Block PIN NO s PIOU PEPU PCB Door Lock Control 8 ohm Speaker Page Amplifier Select Relay Function with Program 77 1 ...

Page 520: ...reak Make Mute Control KSU Backplane MDF 1508 Notes All wiring connections must be 24 AWG twisted pairs Dotted lines and solid lines differentiate optional connections where applicable do not connect both options simultaneously Relay Options K1 DE Door Lock or amp Mute Control Program 77 1 LED 07 K2 NH Night Relay or Music on Hold Control Program 77 1 LED 05 K1 K2 24VDC 1 amp Maximum Page Amplifie...

Page 521: ... station s door lock button is pressed BREAK Opens the normally closed contacts pins 7 and 32 when a station s door lock button is pressed or If using a PIOUS solder the W1 jumper plug on the PIOUS to the MAKE or BREAK position as required MAKE Shorts the normally open contacts DET and DER when a station s door lock button is pressed BREAK Opens the normally closed contacts DET and DER when a stat...

Page 522: ... Figures 12 9 and 12 10 DK14 connect applicable digital telephone circuit logical port 02 or 03 to the DDCB KSU modular jack See Figure 12 7 and Figure 10 2 2 Connect the door lock wire pair to the DDCB modular B jack pins 3 and 4 3 Set SW1 to the DOOR position 4 Set SW2 to the LOCK position 5 SW3 inside the DDCB can be set to open or close the door lock relay whenever a door lock button is presse...

Page 523: ...n 5 Set SW2 to the LOCK position 6 W3 inside the HDCB can be set to open or close the door lock relay whenever a door lock button is pressed if W3 is in the solid line position the relay will provide a closure when the button is pressed if in the dotted line position the door lock relay will open when the door lock button is pressed 7 In Program 77 1 set the door lock activation for three or six s...

Page 524: ...lay activates any time a CO line is on hold In this configuration the relay is normally used to control the MOH source DK14 KSU DK40i KSU PDKU RDSU PEKU or PESU See Chapter 8 Wiring Diagrams DDCB or HDCB A C 2 B 3 4 5 RJ11 3 4 2 5 Relay Contact to Customer Supplied Device MDFB 1 2 RJ11 3 4 MDFB 1 RJ11 3 4 MDFB 1 3 4 Door Phone A Door Phone B or Door Lock Control 2 2 Door Phone C 3 4 HDCB WIRING CH...

Page 525: ...at are to transfer the Strata DK system into the Night mode 6 If tenant operation is required set in Program 15 the CO lines for tenant 1 through tenant 4 operation DK40i and the DK424 RCTUA and RCTUB provides two tenant assignments RCTUC D provides four 7 If using a PIOU or PEPU set the P11 jumper plug on the PIOU or PEPU to the MAKE or BREAK position as required MAKE Shorts the normally open con...

Page 526: ...rmally open contacts NHT and NHR when any CO line is on hold BREAK Opens the normally closed contacts NHT and NHR when any CO line is on hold 3 Connect the PIOU PIOUS or PEPU to the MDF as required for the MOH Relay function DK14 KSU and DK40i KSU Relay The DK40i KSU Relay can be programmed for one of three options BGM mute Night transfer MOH source control These options are set in Program 77 1 LE...

Page 527: ...s Installing the HESB Loud Ringing Bell in Digital Telephones 1 Connect a jumper between terminals 2 and 10 on the HESB TB1 terminal block Figure 12 11 2 Connect a jumper between terminals 4 and 5 on the HESB TB2 terminal block 3 Install an HHEU PCB and HESC 65A cable in the telephone per Chapter 11 Station Apparatus before proceeding with Step 4 Note HESB connections made in Steps 4 6 can be acco...

Page 528: ...upply P601 HHEU V 3 or 4 Modular Station HESC 65A Cable Green Yellow Red OCA Strap R607 Do Not Cut 6 5 4 3 2 1 Not Used 6 5 4 3 2 1 Not Used Voice Door Phone 1 2 3 4 5 TB2 12V 0V 12V 0V 24 AWG Jacketed Twisted Pair from Digital Telephone to HESB Jumpers GN Y BL R BK W GN Y BL R BK W L2 6 5 4 3 2 1 1 2 3 4 5 6 6 5 4 3 2 1 1 2 3 4 5 6 TB1 L2 Jumper Wires TB1 2 10 TB2 4 5 HESB Rear View Internal Wiri...

Page 529: ...lead to terminal 2 9 Plug power cord into the power supply and to a 115VAC 10VAC 60Hz power source Important Make sure the AC power is within the specified limits shown in Step 9 If AC voltage is not within range have a qualified electrician correct the problem Cut the EX SP and HHEU straps on telephones and do not cut the OCA strap or R607 on the HHEU see Chapter 11 Station Apparatus for details ...

Page 530: ...block Jumper Wires 1 2 3 4 5 6 7 8 9 10 TB1 VOICE Tip VOICE Ring 6 5 4 3 2 1 6 5 4 3 2 1 Not Used Voice Door Phone Modular Connectors May Be Used TB1 5 8 6 7 TB2 4 5 HACU 120 115VAC to 12VDC 1 2 3 4 5 TB2 12V 0V 12V 0V 115VAC 10VAC maximum 24 AWG Jacketed Twisted Pair from Electronic Telephone to HESB HESB Rear View Voice Tip Voice Ring GN 6 5 4 3 2 1 Y BL R BK W 1 2 3 4 5 6 GN 6 5 4 3 2 1 Y BL R ...

Page 531: ... have a qualified electrician correct the problem To test the amplified speaker option 1 Make an external page The page should be heard over the HESB 2 Adjust the HESB volume control to the desired level Figure 12 13 HESB Amplified Speaker Wiring 50 Jumper Wires PIOU or PEPU 600Ω Page Output MDF 66 Block Block Pin NO s 1 25 26 SPT 38 BK GN SPR 13 GN BK 25 Pair Cable Jacketed Twisted Pair 24 AWG PI...

Page 532: ... 7 may be accomplished using the HESB VOICE and door phone modular jack instead of the TB1 terminal block 4 Connect terminal 7 of the HESB TB1 terminal block to Pin L1 of the MDFB 5 Connect terminal 8 of the HESB TB1 terminal block to Pin L2 of the MDFB 6 Connect terminal 9 of the HESB TB1 terminal block to Pin 1 of the MDFB 7 Connect terminal 10 of the HESB TB1 terminal block to Pin 2 of the MDFB...

Page 533: ...y available talkback amplifiers MDFB not required Only one interface PCB PIOU PIOUS or PEPU may provide talkback amplified speaker Jumpers Voice Door Phone 12V 0V TB2 1 2 3 4 5 6 7 8 9 10 TB1 6 5 4 3 2 1 6 5 4 3 2 1 Modular Connector May Be Used PIOU or PEPU 600Ω Page Output MDF 66 Block 1 25 26 SPT 38 BK GN SPR 13 GN BK 25 Pair Cable Duplex 1 2 L1 L2 Volume Control Jumper Wires TB1 1 2 TB2 3 4 5 ...

Page 534: ...n All paging connections are made via the PIOU or PEPU Amphenol connectors or the PIOUS TB1 terminal to the Main Distribution Frame MDF Paging Single zone with BGM Same Amplifier Paging and BGM are amplified by a common customer supplied paging amplifier When the external page access code is dialed the external page control relay is activated which applies a short or opens the contacts to the ampl...

Page 535: ...2 SPT 38 26 25 13 Input 1 Output External Paging Amp M 14 BGM Music Source Mute 2 Input 2 B P10 PIOU PEPU PIOU PEPU Pin Numbers 25 Pair Cable SPR 13 DER 7 66 Block Pin Numbers MDF External Page Door Lock Relay See Program 77 1 Night Ring and Page from KSU Backplane 600Ω DET SPT Input 1 Output External Paging Amp BGM Music Source Mute 2 Input 2 P10 PIOUS SPR DER MDF W1 K1 Break Make KSU Backplane T...

Page 536: ...nput from the paging amplifier to pins 13 SPR and 38 SPT of the PIOU see Figure 12 17 2 Connect the BGM music source to the music amplifier input 3 Connect the paging amplifier output to the M contact s PIOU relays K1 K4 and the C terminal of zone 1 through zone 4 or zone 5 through zone 8 speakers 4 Connect the BGM music amplifier output to terminal 23 PG COMMON of the PIOU and to C of zone 1 thro...

Page 537: ...Jacketed Twisted Pair 24 AWG 34 29 PGIN 1 40 30 66 Block Pin Numbers A A C Zone 1 Zone 51 Zone 2 Zone 6 Zone 3 Zone 7 Zone 4 Zone 8 1 Zones 5 8 are available only to DK424 systems equipped with a RCTUE F common control unit and more than one PIOU Set zones 1 4 first PIOU with Program 03 Code 41 and zones 5 8 second PIOU with Program 03 Code 42 or 43 if 42 is not used Notes See Programs 78 1 15 and...

Page 538: ...ple amplifiers 1 Connect the inputs from the paging amplifiers to pins 13 SPR and 38 SPT of the PIOU see Figure 12 18 2 Connect the music source to the music amplifier input 3 Connect the paging amplifier outputs to M of the PIOU Relays K1 K4 and to C of zone 1 through zone 4 speakers 4 Connect the music amplifier output to terminal 23 PG COMMON of the PIOU and to the C terminal of zone 1 through ...

Page 539: ...ne 8 PGOUT 2 17 PGIN 2 42 Jacketed Twisted Pair 24 AWG 66 Block Pin Numbers B M B M A C 30 Zones 5 8 are available only to DK424 systems equipped with a RCTUE F common control unit and more than one PIOU Set zones 1 4 first PIOU with Program 03 Code 41 and zones 5 8 second PIOU with Program 03 Code 42 or 43 if 42 is not used Notes See Table 12 2 on Page 12 28 for paging access codes See Programs 7...

Page 540: ... external page zones Program 39 Assigns appropriate 1LJKW 7UDQVIHU and 7HQDQW 3LFN XS for Tenant or Non Tenant systems buttons to electronic and digital telephones Note Any station can pick up CO lines that night ring over external page zones by pressing the PDN and dialing PIOU Zone Paging Installation See External Page Option Installation on Page 12 26 paragraph 4 and Figure 12 17 for installati...

Page 541: ...o one input of the customer supplied two way amplifier In the example in Figure 12 19 this is CKTA CO Side A of the amplifier See the Amplified Two CO Line Conference wiring diagram in Chapter 10 Universal Slot PCB Wiring 2 At the MDF connect the voice pair VT VR port B of circuit 3 on the designated PEKU PCB to the other input of the amplifier In Figure 12 19 this is CKTB subscriber side B of the...

Page 542: ...lifier All amplifier equipment is customer or dealer supplied Available in single and multiple configurations For information regarding the Tellabs 7206 two way amplifier http www tellabs com 1 800 445 6501 Install in accordance with tellabs technical manual Through Signalling Configuration Public Telephone Network 24AWG Twisted Pair VR 2 P3 GN W DT 2 DR 2 Not Used R CKT 2 CKT Y T R CO Line VT 3 P...

Page 543: ... printed or call accounting device is turned Off or when no device is connected to the SMDR port No further call records are stored after the buffer is filled When the printer or call accounting device is made operational ERROR BUFFER OVERFLOW prints out to indicate the buffer was full and that some call information may have been lost Note If PIOU PIOUS RSIU RSIS DK424 or DK424i or TSIU DK40i are ...

Page 544: ... then network disconnects A ISDN call established then DK disconnects ISDN call established then network disconnects S Start of E911 call E End of E911 call 4 Field Number 1 B CO Line Number 001 144 Field Number 2 4 3 C C Caller ID Call D ANI or DNIS Call Field Number 5 D PDN of the Station 1 4 digits 2 making answering a call Field Number 7 10 3 E Primary Secondary or Phantom Directory Number whi...

Page 545: ...9 00 00 32 00 06 Printout A Release 3 and above 003 MSS 04 59 00 00 25 00 05 Example 2 DISA Internal Station Call Call Sequence B Outside caller rings CO line 003 CO line 003 is programmed as a DISA line Line 003 returns intercom dial tone to caller after two ring cycles 5 6 seconds Caller dials 203 After 48 seconds from start of call station 203 answers Printout B prints after station 203 answers...

Page 546: ...2 22 00 02 01 outgoing 001 DISA 12 22 00 02 01 incoming Auto Release signal Release 3 and above 003 MSS 12 20 00 00 03 00 05 DISA outgoing 003 DISA 12 22 00 02 01 outgoing 001 DISA 12 22 00 02 01 incoming Disconnect Timer Release 1 and 2 001 DISA 12 24 00 04 57 incoming 003 DISA 12 24 00 04 57 outgoing Disconnect Timer Release 3 and above 001 DISA 12 24 00 04 57 incoming 003 DISA 12 24 00 04 57 ou...

Page 547: ...ments SMDR Printer Call Accounting Device Installation 1 Connect the interface cable and the PPTC or PPTC9 adapter from the WSIU DK14 TSIU DK40i PIOU PIOUS RSIU RSIS DK424 or DK424i or SMDR port to the SMDR printer or call accounting device DB25 or DB9 connector See Figure 12 21 and PIOU PIOUS RSIU or RSIS TTY and SMDR Wiring in Chapter 10 Universal Slot PCB Wiring for more details 2 Set the PIOU ...

Page 548: ...pin RS232 Modular Adapter DB25 or DB9 Plug Basic Wiring 3 2 6 20 8 7 4 Jumper to 5 RD TD DSR DTR CD SG RTS to CTS 50 ft max 24 AWG Wire Twisted Pair Modularized PPTC1A 5M Adapter 1 2 3 4 5 6 to to to to to to 6 5 4 3 2 1 to to to to to to Data Format ASCII 8 bits No parity 1 stop bit WSIU or TSIU or RSIU or RSIS or PIOU or PIOUS Printer or Call Accounting Device DK14 DK40i or DK424 4305 PIOU SMDR ...

Page 549: ...er of voice mail users To support voice mail DK14 KSU must have QCRU3 installed DK40i KSU must have K4RCU3 or K5RCU installed and a DK424 RCTU must have an RRCS installed Voice mail integration is provided by Strata in band tones and or on DK424 only the Simplified Message Desk Interface SMDI output of the PIOU PIOUS RSSU RSIU or RSIS SMDI port Program Number Port Number 1 1 1 1 1 1 1 0 0 0 0 1 1 ...

Page 550: ...tal and Electronic Telephones System Monitoring Feature Integration A block diagram of voice mail to QSTU2 KSTU2 RSTU2 RDSU RSTS or PESU connection is shown in Figure 12 23 Voice Mail Block Diagram Note The RRCS must be installed on the RCTU BRCS on the BCU and K4RCU3 on the DK14 KSU or DK40i Base KSU to allow VM DTMF dialing For installation procedures see Chapter 1 DK14 Installation for QSTU2 Ch...

Page 551: ... AR signal of some COs is not reliable and may occur during a CO line voice connection causing the call to disconnect If this occurs disable CPC AR Hold and CPC AR Voice Mail calls on all CO loop start lines with Programs 15 0 and 15 3 Recall B Tone Stations send a recall B tone to Stratagy or VP whenever Stratagy or VP answers a transfer camp on recall from stations that did not answer a Stratagy...

Page 552: ... overriding breaking in in progress VM calls Program 31 LED 18 End to End Signaling Enables VM port DTMF operation All VM ports should be set for end to end signaling Program 31 LED 17 Note The RRCS 4 8 or 12 must be installed on the DK40i or DK424 RCTU to enable End to End Signaling Receive Auto Call Forward ID Codes Provides auto digits from call forwarded stations to direct callers to station m...

Page 553: ...ogram 40 to set up a VMDA group Program 34 Turns Off LED 01 to disable camp on BOV tone to a VM port Program 35 LEDs 01 and 02 must be On for stations to receive the message waiting indication flashing LED from a VM device This program also turns On LED 03 for standard telephone ports that must support standard telephone message waiting lamps It is advisable to turn Busy Station Transfer LED 20 On...

Page 554: ...ns Interface Units The Strata DK supports two types of Data Interface Units DIUs that enable digital telephone users to simultaneously transmit and receive data on the same digital station port and wire pair while communicating on a voice call One unit called the integrated DIU RCPI DI PDIU DI PDIU DI2 becomes part of the digital telephone replacing the telephone s base the other unit is a small s...

Page 555: ...the RPCI to switch it to the Data Command mode In the TAPI mode a constant stream of data is sent from the RPCI to the PC COM port RPCI DI mode switching should be performed automatically by the application programs running on the PC connected to the RPCI DI See Chapter 15 Computer Telephony Integration for instructions on configuring your PC for TAPI software Common DIU Connections The block diag...

Page 556: ...03 Digital Port 000 Digital Port 001 TOSHIBA DIU POWER READY CONNECT TOSHIBA DIGITAL Port 004 DIU POWER READY CONNECT TOSHIBA DIU POWER READY CONNECT TOSHIBA Portable PC 1 RS 2321 DKT RPCI DI or DKT PDIU DI 200 MDF 2 MDF2 MDF2 MDF 2 MDF2 RS 232 1 RS 232 1 RS 232 1 RS 232 1 Portable PC 2 DKT RPCI DI or DKT PDIU DI 201 Serial Printer PDIU DS 203 MODEM 208 PDIU DS 204 Modem 1 219 PDIU DS 205 Modem Po...

Page 557: ...onded to the PDIU DI PDIU DS PCB If required by local codes the FG should be connected to external ground Signal Ground SG Pin 7 The SG signal EIA circuit AB establishes the common ground reference for all other PDIU and data device signals and must be wired for all applications Transmit Data TD Pin 2 DTE devices transmit and DCE devices receive data on the TD lead EIA circuit BA Before the DTE de...

Page 558: ...tch SW1 2 is set On to set the DCD On continuously If set Off the DCD signal will only be On when connection between two DIUs is established and Off when a connection is not established SW1 2 is set Off when the DTE DCE uses the DTR DSR signals for Ready Busy flow control Data Terminal Ready DTR Pin 20 The DTE device sends the DTR signal EIA circuit CD to the DCE device prompting the DCE device to...

Page 559: ...able not as a null modem cable 50 ft max 24AWG customer supplied Rear view of asynchronous serial communication interface connector DB9 of PC or Toshiba Portable Rear view of RPCI DI or PDIU DI DB25 RS 232 female connector Personal Computer or Toshiba Portable DTE RPCI DI or PDIU DI Functions like a DCE Notes Some RS 232 EIA leads may be called by other names by some manufacturers The computer rec...

Page 560: ...CII terminal DB25 RS 232 connector DB25 Male Connector Rear view of RPCI DI or PDIU DI DB25 RS 232 female connector DB25 Female Connector DB25 Male Connector DB25 Female Connector RS 232 Cable PC modem style serial DB25 to DB25 M F RS 232 cable 50 ft max 24 AWG customer supplied DB25 Pin 8 3 2 20 7 6 4 5 22 1 Name DCD RD TD DTR SG DSR RTS CTS RI FG DB25 Pin 8 3 2 20 7 6 4 5 22 1 Note The PC ASCII ...

Page 561: ...DS Pin Name 1 FG Printer Pin Name 1 FG 3 RD 4 RTS 5 N C 6 DSR 7 SG 8 DCD 20 DTR 22 RI 2 TD Rear view of printer or ASCII terminal DB25 RS 232 connector Rear view of PDIU DI DB25 RS 232 female connector DB25 Female Connector DB25 Female Connector DB25 Pin Designations DB25 Male Connector DB25 Male Connector DB25 Pin 8 3 2 20 7 6 4 N C N C 1 Name DCD RD TD DTR SG DSR RTS CTS RI FG DB25 Pin 8 3 2 20 ...

Page 562: ...D TD DTR SG DSR RTS CTS RI FG DB25 Pin 8 3 2 20 7 6 4 5 22 1 RS 232 Cable 1530 50 ft max 24 AWG customer supplied For PDIU DS port Program 20 LEDs 01 04 17 ON All other LEDs OFF LED 02 should be set ON after the AT commands The following commands should be sent to the modem ATS0 1 Auto Answer ATE0 Disable character echo in command state ATQ0 Modem returns result codes AT C1 Track presence of data ...

Page 563: ...ect to DTE mode P1 P9 strapped A B All modular cords and adapters are customer supplied Figure 12 29 RPCI DI PDIU DI PDIU DS Modular Cable RJ45 Adapter Connections Connection Example 1 IMPORTANT Will not function with applications that require the RI signal to PC Connection Example 2 IMPORTANT Will not function with applications that require the RI signal to PC Connection Example 3 Toshiba P321SL ...

Page 564: ...B9 Female Adapter TYPE 2 RJ45 TO DB25 Male Adapter TYPE 3 RJ45 TO DB25 Female Adapter TYPE A RJ45 Flat Modular Cord Straight RJ45 Straight Through RJ45 Cross Pinning TYPE B RJ45 Flat Modular Cord Crossed Modular Cords 50 ft max 24AWG customer supplied 8 DSR 6 7 RTS 7 6 RD 2 5 DCD 1 4 TD 3 2 GND 5 1 CTS 8 N C RI 9 Lead Name 8 CTS 5 7 SG 7 6 DTR 20 5 TD 2 3 RD 3 2 RTS 4 1 DSR 6 4 DCD 8 N C RI 22 RJ4...

Page 565: ...9 A B C A B DTE B C MODEM FG SG TD RD RTS CTS DSR DTR DCD RI P1 P2 P6 P7 P5 P4 P3 P8 P9 P1 P2 P6 P7 P5 P4 P3 P8 P9 Frame Ground Signal Ground Transmit DATA Receive DATA Request to Send Clear to Send Data Set Ready Data Terminal Ready Data Carrier Detect Ring Indicator 1 7 2 3 4 5 6 20 8 22 DTE DIU DTE DIU DTE DIU DTE DIU DTE DIU DTE DIU DTE DIU DTE DIU Modem DIU Modem DIU Modem DIU Modem DIU Modem...

Page 566: ...munications software program to establish data calls with AT commands and whenever PDIU DS is connected to a modem SW1 3 The RPCI DI or PDIU DI or PDIU DS configured as a DCE sends the Ring Indicate RI signal to the computer to tell the computer DTE that the RPCI or PDIU is receiving an incoming call SW1 3 should be On for the DIU to send RI steady and Off to send at one second On three seconds Of...

Page 567: ...OFF OFF OFF General Notes See Subsection EIA Interface Leads Signals and DIP Switch Options for more details regarding SW1 option settings When a PDIU DS is connected to a modem that tracks the DCD signal AT C1 SW1 4 must be ON If using Toshiba Personal Computers and Toshiba Printers using X ON X OFF flow control set SW1 4 ON on PDIU DIs and DSs SW1 2 should be off when PDIU DS is connected to a m...

Page 568: ...al communication port interface documentation for correct RS 232 pin requirements requirements vary with each manufacturer The number of EIA RS 232 signals required 8 9 or 10 wires depends on the application When EIA signal requirements are not known connect the 10 EIA signals listed in EIA Interface Leads Signals on Page 12 49 Figures 12 32 and 12 30 provide diagrams for connecting RS 232 cables ...

Page 569: ...al printers not parallel that conform to EIA RS 232 signaling requirements can be connected to PDIU DSs In rare applications it may be desired to connect printers to PDIU DIs See the printer s installation instructions 1 Consult the serial printer s documentation and determine if the printer operates as a DCE or DTE device Also see Figures 12 31 and 12 33 If the printer is a DCE device Disassemble...

Page 570: ...dems must be smart modems that respond to AT commands and return result codes Modems are customer supplied A modem s can be accessed internally for outgoing data calls or externally for incoming data calls Modems operate as DCE devices so PDIU DSs that are connected to them must be configured to operate like a DTE device In the example shown in Figure 12 24 on Page 12 48 the line side of the two m...

Page 571: ...ld be On for PDIU DS ports connected to modems enabling the use of AT commands and result codes when incoming calls are made from outside the system to modems connected to PDIU DSs LED 03 Should be set On for PDIU DS ports connected to modems LED 04 Should always be On for PDIU DS ports LED 05 Should be Off if the system is installed behind a PBX Centrex that uses access codes to place outgoing tr...

Page 572: ...igure 12 33 these screws are needed in Step 3 of the assembling procedure 2 Remove the bottom panel 3 Remove the PCB inside the PDIU DS by lifting the back panel from its side grooves 4 Turn the PCB over and set the jumper plugs P1 P9 If the PDIU DS is connected to a DTE set the plugs to the A B position If the PDIU DS is connected to a DCE device set the plugs to the B C position Note Do not cut ...

Page 573: ...onal information 1 Set RPCI or DIU programming Program 20 Ports 000 and 01 LEDs 01 02 05 and 17 On all other LEDs Off Program 39 Ports 000 and 01 DWD DOO 456 and DWD 5HOHDVH 454 buttons should be provided Default settings for PDIU DI S Registers 2 Make sure PC 1 and PC 2 are on line with communications software and that the parameters of each PC and its communication software are set to the same v...

Page 574: ...Manual Dialing Note See Figure 12 35 for additional information 1 Set the RPCI or DIU programming Program 20 Port 001 LEDs 01 02 05 and 17 On all other LEDs Off Program 20 Port 003 LEDs 01 04 and 17 On all other LEDs Off Program 39 Port 001 DWD DOO 456 and DWD 5HOHDVH 454 buttons should be provided Default settings for PDIU DI S Registers 2 Make sure the PC is configured to print data from its ser...

Page 575: ...the PC to the printer Press DWD DOO on the DKT CONNECT on the PDIU DS lights The connection between the PC and the printer is completed as shown in Figure 12 35 PDIU DS 203 is in the communication mode Note If busy tone is sent to the DKT the connection is not complete press DWD 5HOHDVH and Step 3 again Operate the PC to print data as required Figure 12 35 DK PC to Printer Test Call Using Manual D...

Page 576: ...n PC 1 displays CONNECT XXXX where XXXX is the data transmission speed set by the communications software 5 The PC 1 and PDIU DS 204 are connected PDIU DS 204 is in the communication mode PC 1 is now linked directly to the RS 232 side of the internal modem and can issue AT commands to the internal modem which is now in the command mode Note If Digital PDIU DS port 004 is the only DIU port connecte...

Page 577: ...turns result codes ATQ0 presence of data carrier AT C1 hang up and assume command state with DTR on to off transition AT D2 Settings for PDIU DS rear panel switches 1 2 and 4 On internal jumpers P1 P9 set to B C position 2 Make sure PC 1 and PC 2 are on line with a communications software package and that the communication parameters of each PC and communication software package are set to the sam...

Page 578: ...NNECT XXXX where XXXX is the data transmission speed set by the communications software 4 The PC 2 is connected to PDIU DS 204 as shown by the thick lines above PDIU DS 204 is in the command mode PC 2 can now issue AT commands to PDIU DS 204 5 From PC 2 s keyboard type ATDD200 and press Enter AT commands must be capital letters this prompts PDIU DS 204 to dial and connect to PDIU DI 200 The CONNEC...

Page 579: ...dent Starfish Sidekick It is used in this section for test explanation purposes only If you choose another auto dialer software package the detailed response may be different than that shown here To test a PC auto dial voice call Note See Figure 12 38 for additional information 1 Set the RPCI or DIU programming Program 20 Port 001 LEDs 01 02 05 and 17 On all other LEDs Off Digital Port 004 DIU POW...

Page 580: ...tion software include the appropriate Strata CO line access code prefixing each telephone number To auto dial using Sidekick from the PC keyboard 1 Press the Alt and Ctrl keys simultaneously The PC screen displays the Sidekick menu window 2 Press F5 twice Sidekick prompts search for INITIALS to display on the PC s screen 3 Type the initials or name of the person or organization you wish to auto di...

Page 581: ...tect an open or closed condition from the facility alarm system To detect an open or closed condition by the jumper plug P12 1 To detect a closed condition set P12 to the N O position 2 To detect an open condition set P12 to the N C position Jumper W3 on the PIOUS is used to set the alarm sensor to detect an open or closed condition from the facility alarm system To detect an open or closed condit...

Page 582: ...r United States Patent No 4 975 941 Strata DK Built In Auto Attendant AA A built in Auto Attendant feature is programmed into the Strata DK system software To enable the built in AA to function RRCS or BRCS 4 8 or 12 DTMF tone receiver PCB see Chapter 10 Universal Slot PCB Wiring for RRCS and RKYS installation instructions The customer must provide digital announcement device s on which the greeti...

Page 583: ...g transferred from the Auto Attendant and is routed to an alternate station s assigned in system programming ringing assignments Sequence D The call is not answered after being transferred from the Auto Attendant and is routed back to the primary announcement This is probably the least desirable of the four sequences since the caller hears a repeat of the announcement he just received seconds earl...

Page 584: ...t time which consist of the greeting along with the delivery of menu prompts when they first call they may also be rerouted back to the announcement after reaching a busy or ring no answer station Program 24 Transferred calls that are unanswered at stations can be routed to a secondary announcement device 60 secs maximum announcement time which typically first informs the caller that the option th...

Page 585: ...equires the installation of a feature key and customer supplied announcement devices to deliver announcements to callers The feature does not require the installation of any other devices To install the customer supplied digital announcement devices Note In Figure 12 41 and elsewhere in this manual announcement devices are referred to as A1 and A2 A1 designates a primary announcement device and A2...

Page 586: ...D Installation for ACD Auto Attendant programming options Flowchart 12 1 Auto Attendant ACD Application Flowchart To Standard Telephone Circuit MDF Digital Announcer Digital Announcer Digital Announcer Digital Announcer Digital Announcer Digital Announcer Digital Announcer Digital Announcer To Standard Telephone Circuit To Standard Telephone Circuit To Standard Telephone Circuit To Standard Teleph...

Page 587: ...Tone Before A1 Answers 1 No 1 Second Ringing Queue Wait Program 25 Wait Timer 12 24 Sec Answer Talk Ring Telephones per Program 81 89 A1 RRCS Becomes Available Ring A1 Program 23 Primary Annoucement Devices A1 A1 A1 A1 Assignments KSTU2 PSTU RSTU RDSU PESU A1 Answers Within 16 Seconds A1 Answers and Plays Announcement 60 secs maximum RRCS BRCS remains for 4 secs after announcement disconnects Faul...

Page 588: ...ash LCD Camp On Display Ring DN for 16 Seconds see Note Dial Idle DN Busy Station Becomes Idle 16 Seconds No Answer Note If the station has CF NA set the station will ring for the CF NA time duration and then it will forward to the forwarded destination The CF NA destination station will ring 16 secs and then route to if not answered A call will not forward a second time Program 24 Secondary Annou...

Page 589: ...terface assignments are made in Program 03 Code 41 42 and 43 PIOU and PIOUS Paging SMDR relay control alarm sensor and door lock functions will be active only on the PIOU or PIOUS PCB which is assigned the lowest Program 03 code 41 42 or 43 RSSU only provides the TTY interface for SMDI local maintenance or ACD MIS but not for SMDR built in maintenance modem or system OA If TSIU or RSIU RSIS is ins...

Page 590: ...rd COM Port PPTC 25F or PPTC9 Adapter 3 Pair Modular Cord PPTC 25F or PPTC9 Adapter 3 Pair Modular Cord RS 232 DB 25 or DB 9 Serial Port PIOU PIOUS or RSSU1 PIOU PIOUS or RSSU1 1546 Maintenance Terminal Personal Computer Modem or PDIU DS 1 Install PIOU PIOUS or RSSU PCBs in the last highest numbered slot in any cabinet s 2 SMDR Page Outputs Relay controls Alarm Sensor and other miscellaneous optio...

Page 591: ... to provide a unique number CESID for each station that is recognizable by the telephone company In order for this feature to be effective 911 and 9 911 calls must be dialed from a DKT DN or single line telephone 911 calls originating from a PhDN CO Line or Pooled Line button bypass the adjunct equipment and go directly to the CO exactly as dialed E911 System Installation 1 Ensure that the QSTU2 K...

Page 592: ...Peripheral Installation Enhanced 911 Service E911 12 84 Strata DK I M 6 00 ...

Page 593: ...p of ACD Agents Figure 13 1 shows an example of how a typical ACD call is handled The Strata DK System provides many ACD functions and custom keys on for Toshiba DKT2000 series telephones For instance the ACD Supervisor can monitor calls and assist Agents through use of an LCD telephone programmed especially for the Supervisor which shows ACD Agent and Group information Telephone instructions are ...

Page 594: ...ve on the installed PIOU PIOUS that is programmed with the lowest Program 03 code 41 42 or 43 Code 41 Enables Remote Maintenance Code 42 Enables MIS SMIS PIOU PIOUS or RSSU Slot The TTY port must have Code 42 set for its slot in Program 03 to support ACD MIS Code 43 Enables RS 232 Voice Mail Interface SMDI If the RSIU is to be used for ACD MIS the RSIU must be installed in the Strata DK Base Cabin...

Page 595: ...not designed to be connected to telephone line circuits like the Strata DK standard telephone circuits When connecting these devices to standard telephone circuits an isolation transformer may be required between the music source and the standard telephone circuit Figure 12 4 shows how to connect an isolation transformer Music sources to electronic telephone PCB ports PEKU PESU Music sources can b...

Page 596: ... PCB Read the section titled KKYS Installation on Page 3 24 and RKYS Feature Key Upgrades on Page 5 48 and Page 7 42 and refer to Figure 5 30 for installation instructions Important It is not necessary to run any special programs i e Program 03 when RKYS is installed RKYS can be installed before or after system initialization and before or after the customer database is entered The feature s provi...

Page 597: ...ment devices that are used for each ACD Group queue to the appropriate station ports Digital announcers can be connected to any RSTU RSTU2 RDSU RSTS PSTU or PESU standard telephone ports See Chapter 10 Universal Slot PCB Wiring for MDF wiring to appropriate standard telephone ports Use Program 14 3 Code 1 2 and 3 to assign digital announcers to standard telephone ports Use Program 14 3 Code 5 and ...

Page 598: ...ephone attendant console or built in or external AA Use the ACD programming guidelines and flowcharts provided in Chapter 6 of the Strata DK Programming Manual to configure the remaining ACD items per the customer s requirements The following paragraphs describe differences in the operation and programming of ground loop start lines versus DID Tie DNIS ANI lines used with an ACD system Direct Inco...

Page 599: ...ic ACD Groups by assigning one digit dialing prompts to each Group To transfer a call into an ACD Group from an external AA the user must hookflash and dial ACD Group number 01 16 Ground Loop Start Line Calls Calls can be assigned to ring external AA ports in Program 81 89 The external AA can be programmed to transfer calls to particular ACD Groups by assigning one digit dialing prompts to each Gr...

Page 600: ...ogram 14 2 This applies to overflow queue time out and overflow point destinations assigned in Programs 14 4 11 1 and 14 5 respectively If the overflow destination DN is busy when overflow time occurs the ACD call does not overflow but remains in the ACD queue until the overflow destination DN or an Agent telephone in the ACD Group becomes idle The first device Agent telephone or overflow destinat...

Page 601: ... s queue even if the overflow destination is busy If the All Agents Unavailable overflow destination is another ACD Group calls route to an idle Agent or are placed at the end of the overflow ACD Group s queue Agent Ring No Answer Call Treatment If an ACD call rings an Agent telephone for the time specified in Program 11 2 and the call is not answered the call is routed to ring another idle Agent ...

Page 602: ...amples Auto Attendant DNIS ANI DID and Tie line ACD calls can be identified on SMDR printouts Several SMDR printout examples noting ACD information are provided See Figures 13 3 through 13 10 However Toshiba recommends using SMIS to track ACD call data rather than SMDR SMIS is designed to track ACD PBX agent calls Loop and ground start line ACD calls can only be identified by line and station numb...

Page 603: ...t Announcement Answers Duration Program 11 4 4 seconds Time call is disconnected Agent Primary Directory Number PDN Agent Talk Time Duration Agent ACD call PhDN ACD Call goes to Queue then rings Agent Agent Answers Agent Telephone PDN CO Line Number 00 05 02 38 01 23 03 66 Total time call is connected to system is 4 minutes 6 seconds 2024 Figure 13 4 Ground Loop Start Incoming Call Example 009 ACD...

Page 604: ...non ACD call Example 003 203 203 13 10 00 00 10 00 03 ACD 003 ACD 204 13 10 00 00 06 204 003 204 500 13 10 00 00 26 203 Ring before Answer Time Duration 203 Transfer Time 203 Talk Time Duration Indicates Call Transfer to ACD Group 204 Talk Time PDN of telephone that answers the ACD transferred call 204 Ring before Answer Time or Queue Time 204 Discconnect Time A DN 203 Transfer Line 003 to ACD Gro...

Page 605: ...I DNIS does not enter ACD queue and is answered by Agent station 4403 on button PhDN 500 The information below prints on SMDR when the Agent hangs up Line Number Agent PDN ANI No DNIS No DNIS Name ACD Call Age nt Button PhDN 018D ACD 4414 02 34 00 00 03 00 17 7145833333 Direct ANI Caller ID Number call goes to queue and caller hangs up while in queue the information below prints on SMDR Lost or Ab...

Page 606: ...essages to Wall Boards The software works on a PC running Windows 2000 Windows 98 Windows 95 or Windows NT This section discusses various combinations of connections between the Strata DK System and the Call Center Viewer PC s The Call Center Viewer application can be configured to work directly with the Strata DK or with a SMIS PC and or with one Master PC plus additional PCs also running Call Ce...

Page 607: ... 100 MHz personal computer Windows 2000 64MB RAM Windows 98 and Windows NT 32MB RAM and Windows 95 16MB RAM 10MB available hard drive space for the application 3 5 1 44 MB floppy disk drive One available serial communication ports two if using Wall Boards Parallel printer port for activation key VGA color monitor Keyboard and mouse Windows Graphics Accelerator Increasing the PC s processor speed a...

Page 608: ... needed Connectors This section describes the various connectors used with the CCV Specific instructions for different types of configurations appear later in this section Call Center Viewer Y Connector CCVY The CCVY connector enables two way transmission between the Strata DK and a host PC or SMIS equipment and one way transmission to other PCs Use the CCVY to install multiple CCV PCs See Figure ...

Page 609: ...tem A suitable Line Driver is made by Black Box Corporation at 724 746 5500 Model ME764A MSP male or ME764A FSP female See Figure 13 14 To CCVY Standard Modular Telephone Cord 7 ft maximum PPTC 2511 25 or 9 Pin Connector Figure 13 12 PPTC 9 or PPTC 25F Connector 6 SG 5 DCD 4 DTR 3 DSR 2 TD 1 RD 1 SG 5 2 DCD 1 3 DTR 4 4 DSR 6 5 TD 3 6 RD 2 6 SG 5 DCD 4 DTR 3 DSR 2 TD 1 RD 6 SG 5 DCD 4 DTR 3 DSR 2 T...

Page 610: ...00 model number TL158A This unit is powered by AC If the Strata DK424 system is equipped with reserve power then a small PC type uninterrupted power supply can be used for full system operation in the event of a power failure Instructions for connecting multiple PCs to the CCV appear later in this section CCV Configuration Instructions Connecting the DK to a Stand alone CCV PC Connect the Strata D...

Page 611: ...MIS requires a dedicated PC The CCV provides the real time status displays and connection of electronic Wall Boards SMIS is used to provide historical ACD reports The CCV can run concurrently with other Windows applications on other ACD Supervisors PCs To connect the CCV to SMIS PC less than 50 feet from the DK 1 Install the CCVY connector into the Strata DK MIS port RSIU RSIS RMDS or PIOU PCBs Se...

Page 612: ...ord for the DK to CCVY connection One PPTC 9 or PPTC 25F pin connector per PC To connect up to three CCV PCs to the Strata DK 1 Install the CCVY connector into the Strata DK MIS port RSIU RSIS RMDS or PIOU PCBs See Figure 13 20 2 Use a six conductor twisted pair telephone cord to connect the DK MIS port to the DK MIS jack on the CCVY 3 Plug a six conductor modular cord into the MASTER port of the ...

Page 613: ... the CCVY Use a PPTC 9 or PPTC 25F at the other end of the cord to connect to the SMIS or Main Call Center Viewer PC 4 Make sure that the Data Distribution Box is strapped for DTE operation for every output port 8 By using multiple data broadcast units as many PCs as desired can be used provided each one has the Call Center Viewer application and key installed 5 Plug in a six conductor line cord t...

Page 614: ...PC1 or CCV Slave PC2 CCVY PCs can be connected with a PPTC and standard phone cord or an RS 232 cable PPTC 9 or PPTC 25F connector PPTC male connector 6 conductor twisted pair phone cord RS 232 cable 2232 CCVY Strata DK SMIS Master CCV PC CCV Slave PC1 CCV Slave PC2 CCV Slave PC3 CCV Slave PC4 Second LD can be up to four miles from DK Data Distribution Box Line Driver Modem Must be less than 50 fr...

Page 615: ... specorp com Spectrum provides technical support for their products Toshiba does not plan to sell stock or provide technical support for Spectrum Wall Boards Multiple Wall Boards Each Call Center Viewer PC can drive multiple electronic Wall Boards that function independently from other supervisor s Wall Boards Wall Boards connect to each other using a twisted pair Spectrum network Up to 255 slave ...

Page 616: ...ACD Installation Spectrum Electronic Wall Boards 13 24 Strata DK I M 6 00 ...

Page 617: ...owcharts assume that the fault was discovered and reported by a digital or electronic telephone user All faults therefore are classified according to the way they would appear at the digital or electronic telephone Fault Clearing Procedures Before attempting to clear any fault ensure that it is in the system and not caused by associated external equipment such as wiring MOH source etc Important Ma...

Page 618: ...s not cleared by substituting a PCB reinstall the original PCB in the KSU cabinet before trying another PCB Parts Return 1 Pack the part in a suitable container original box is highly recommended Use anti static containers for all PCBs and feature cartridges Use plastic bags for digital or electronic telephones KSU cabinet etc CAUTION To avoid damage never write on the part itself 2 Describe the n...

Page 619: ...pter 3 DK40i Installation DK424 or DK424i verify correct installation of the RRCS or RKYS options on the processor PCB per the Installation chapter 4 For the DK14 and DK40i skip to Step 6 For the DK424 make sure the system power is Off Then install an processor PCB in the appropriate slot of the Base Cabinet DK424 If RCTUD is installed install RCTUC in the R11 slot of the Base Cabinet If RCTUBB is...

Page 620: ...is supplied in a plastic bag attached to each power supply 2 Verify the power supply On Off switch is in the On position Note The Base Cabinet On Off switch must be On to allow expansion cabinet power supplies to operate Verify that the data ribbon cable is plugged into the base from all expansion cabinets Check AC power and ground per AC Power and Grounding Requirements in Chapter 5 DK424 Install...

Page 621: ... Step 7 7 Unplug the cabinet DC power connector from the power supply DC OUT jack Attempt to reset 24V breakers per Step 5 If breaker cannot be reset replace power supply if breakers reset go to Step 8 8 Check the power supply DC voltages measuring at the power supply DC OUT jack with the black meter lead on the BATT terminal If the DC voltages are within specification when the cabinet DC power co...

Page 622: ...LTAGE PINS Power Indicator LEDs Green 24VDC Circuit Breakers Third Wire Ground or Power Supply Daisy Chain Ground to Next Power Supply DC VOLTAGE SPECIFICATION 5VDC 4 5 5 5 5VDC 4 5 5 5 Expansion Cabinet only 24VDC 26 3 27 8 BATT VDC 0 26 3 27 8 24 1 24 2 24 3 SX1 SX2 SX3 SX4 SX5 SX6 SX7 SX8 EXP CABINET 24V 1 24V 2 24V 3 S15 S16 S13 S14 S11 S12 BASE CABINET Base Jumper Plug Expansion Jumper Plug R...

Page 623: ... for digital telephone ports Refer to Table 14 2 for electronic telephone ports The reading will be a plus or minus depending on meter lead placement 4 An improper reading indicates an open crossed or shorted wire See Power Supply Removal and Replacement on Page 1 8 Page 3 19 or Page 5 11 5 For the MDF to telephone digital or electronic cable use an ohmmeter to make a more precise check Table 14 1...

Page 624: ...ephones DDSSs DDCBs and Table 14 4 for electronic telephones and HDSSs 5 An improper reading indicates an open crossed or shorted wire Power Supply Removal and Replacement on Page 1 8 DK14 or Page 3 19 DK40i or Page 5 8 DK424 Table 14 2 Station Cable Continuity Check for Electronic Telephone Cables using Voltmeter From To Voltage Pair Wire Color Pair Wire Color 1 T Green1 1 The green red black yel...

Page 625: ...he options it supports ADM RPCI DI PDIU DI HHEU DVSU etc Table 14 3 Station Cable Continuity Check for Digital Telephone Cables using Ohmmeter From To Voltage Pair Wire Color Pair Wire Color 1 T Green1 2 T Black open 1 R Red 2 T Black open 1 T Green 2 R Yellow open 1 R Red 2 R Yellow open 1 T Green 1 R Red 40 ohms2 2 T Black 2 R Yellow 40 ohms2 Table 14 4 Station Cable Continuity Check for Electro...

Page 626: ...completely non operational Is it a station no dial tone fault Is it a CO line no dial tone fault Is a DSS console non operational Is it a voice mail auto attd fault Is it an SMDR fault 1 1 Call your technical support group No No No No No Is it a remote maintenance fault Is the fault classified on this page No No 1 1 No Yes Yes Yes Yes Yes Yes Yes Yes 1879 Go to Flowchart 14 2 Go to Flowchart 14 8 ...

Page 627: ... the fault re occur after entering customer database Reprogram customer database one program at a time and check to see if fault re occurs Tag the defective unit s and return for repair 2 1 2 2 2 5 2 6 2 8 2 3 Go to Flowchart 14 1 2 4 2 7 END END No Yes Yes No No Yes Yes No Test the Power Supply as described in the Installation Chapter Also perform Hardware Fault Isolation per this chapter 1880 Re...

Page 628: ...sion KSU or only one DK424 or DK424i cabinet Is the fault cleared 3 7 No Retest 3 5 Yes Is the fault cleared Yes 3 6 END Go to 3 4 Go to 3 4 Call your technical support group No Yes No No No 3 8 Yes Is the fault cleared No Yes 3 4 Replace the defective unit and return it to the repair center DK14 QCDU QSTU2 DK40i Base KSU KSTU2 and all PCBs in the DK40i Expansion Unit DK424 or DK424i PEKU PESU PST...

Page 629: ...ne DK424 DK424i Cabinet 4 10 4 5 Is the fault cleared 4 4 Yes START Is the fault cleared 4 1 4 2 END No Are all faulty CO lines on a replaceable PCB not including KSU motherboard Yes Change the PCB and retest 4 3 Yes 1 2 No Replace the defective unit and return it to the repair center END 4 9 Yes Change the expansion unit and retest 4 6 DK14 DK40i Base KSU DK40i only DK40i Expansion KSU DK424 DK42...

Page 630: ...10 and verify wiring Is the fault cleared Yes 5 4 Go to 5 3 HDSS No On PEKU connected to HDSS set SW1 to the DSS position 5 1 No 5 2 Is the fault cleared For DDSS circuit 8 of the base unit or PDKU KCDU does not support DDSS For HDSS circuit 7 and 8 of PEKU PESU does not support HDSS Correct as necessary Correct as necessary Is the fault cleared Yes 5 5 Call your technical support group No END END...

Page 631: ... in users digital or electronic telephones Use operating procedures in the manual for instructions 6 1 Check that the QRCU3 DK14 K5RCU DK40i or RRCS DK424 or DK424i is installed correctly and programmed with Code 92 in Prog 03 DK40i or Code 92 93 and 94 in Prog 03 DK424 or DK424i No Check that VM AA ports are connected to standard telephone station ports correctly Refer to QSTU2 DK14 KSTU2 DK40i o...

Page 632: ...fault cleared Yes 7 8 No END Is the fault cleared Yes 7 9 No END Call your technical support group No No other faults are classified Call your technical support group for assistance No DK40i DK424 DK424i The SMDR port is the bottom modular jack TTY is on top of WSIU DK14 or TSIU DK40i only PIOU PIOUS DK424 or DK424i SMDR can be any jack on RSIU or RSIS See Program 76 The modular cord connecting to...

Page 633: ...erminal or external modem must be 6 wires TTY can be any jack on RSIU RSIS see Program 76 Check that the baud rate switch SW2 push button switch on PIOU PIOUS is set to match the remote terminal baud rate 300 bps LED ON 1200 bps LED OFF DK40i check that the WSIU TSIU IMDU PIOU or PIOUS is installed correctly DK424 or DK424i check that the RSIU RMDS IMDU RSSU PIOU or PIOUS is installed correctly If...

Page 634: ...Fault Finding Fault Isolation Flowcharts 14 18 Strata DK I M 6 00 ...

Page 635: ...tem that the DKT RPCI DI is connected to Toshiba s TSPI is configured using the Telephony icon installed as part of TAPI in the Microsoft Windows Control Panel Windows Telephony is a component of Windows Open Services Architecture This architecture provides telephony services when connected to many different telephone switches Therefore an application needs to know only the definition of the API A...

Page 636: ...x select the Advanced Tab to select the devices 4 A confirmation box asks if you want to remove the driver Click Yes Windows 98 or Windows NT 1 Click on the Start Button Settings then Control Panel Double click on the Telephony Control Panel icon 2 Double click on the Double click on the Telephony Control Panel icon 3 Select Telephony Drivers to select the devices 4 A confirmation box asks if you ...

Page 637: ... Run 2 Enter A Setup exe then follow the Installation Wizard instructions 3 When the Package Selection menu appears select the appropriate option to install either software package or both software packages recommended 4 When the Automatic Startup menu appears make sure that Add StrataLink to the Startup Group is checked 5 Follow the remaining Installation Wizard instructions to complete the insta...

Page 638: ...w as the TAPI Service Provider is initialized and finally green when initialization is complete 3 Press Driver Setup to configure the TAPI Service Provider 4 Select the Com Port that will be used to make the connection to the desktop telephone 5 You may type a name in the Phone Name box This name appears in the application on the PC 6 Select phone type 10 or 20 key 7 Select the switch type from th...

Page 639: ...to match the name on the telephone Repeat for each button to be used see table Note Strata Link uses the label to create the customizing Trigger Rules Unique button names allows rules that apply individually to that button Buttons with the same name will have the same rule applied For example the two PDN buttons will follow any rule If Call Ringing on PDN then Pop Goldmine All other buttons will n...

Page 640: ...pplications using Microsoft Windows Open System Architecture capabilities for Dynamic Data Exchange DDE The specific messages are defined as Actions in StrataLink StrataLink contains a number of Actions for popular applications The user can select from this list or define new Actions for an application StrataLink also accepts DDE Execute commands These commands enable dialing calls answering calls...

Page 641: ...an be created for the desired Action Provides Outbound Calling and Call Control The Computer Telephony Software creates events for controlling the telephone The events are controlled using DDE exchanges originating from the application and received by StrataLink In some programs the application software must be configured for this operation Tests Debugs and Monitors StrataLink provides several imp...

Page 642: ...t be specified and can be different for the different types of calls Intercom Calls dialing numbers with less than five digits Local Calls calls that match the local area code specified or calls with only seven digits Long Distance Calls any call with 10 or more digits also indicate if a 1 needs to be added when missing When an Intercom or PDN button is used to initiate calls a prefix code is requ...

Page 643: ...n a code for H of 1 xxx xxx xxxx is entered When a number 6125551234 is received it will be presented as 1 612 555 1234 The Preferences dialog box is shown in Figure 15 3 Figure 15 3 Preferences Dialog Box DDE Commands StrataLink accepts a number of DDE commands for controlling calls StrataLink wherever necessary offers more than one format for each command The commands supported include Dial Answ...

Page 644: ...Triggering Rule for Call Ringing on a PDN with multiple appearances can be written to apply only to the PDN name such as 3351 Specific PDNs can be labeled for Call Ringing while other appearances may require a screen pop whenever a call is connected These other appearances could have the rule Call Connected using any button This prevents screen pops for calls which are directly ringing a particula...

Page 645: ...is present you need select none Required Trigger Delay a short delay expressed in tenths of a second that will occur prior to the action The delay is needed to allow the Caller ID or other information to be received prior to performing the action Appearance the Trigger can be used on any line or a specific line If the same Trigger applies to some lines but not to others the rule must be entered fo...

Page 646: ...when a specific event occurs The existing Actions can be displayed Figure 15 6 edited deleted or new Actions added Figure 15 6 Add Change Actions Important Deleting or adding Actions without instructions from Toshiba or knowledge of your program s DDE commands is not recommended Toshiba supports editing actions that are based on Application Notes Add Edit Action When adding or editing an Action th...

Page 647: ...eceive the DDE event DDE Execute String This is the command executed by the application receiving this DDE event Typically this command includes token s so that real time information is included in the command string Show Hide Test Params Button When you set up an Action it is always a good idea to make sure the Action works correctly The Show Test Params button exposes a set of parameters e g Cal...

Page 648: ...tact manager when a call rings in Pop TeleMagic parameters are Index Level Tells TeleMagic the level on which to perform the search e g 1 2 3 etc Leaving this parameter blank causes the search to occur on the level in present use Index Name Selects the TeleMagic index to be used for the search For Screen Pop this is typically TelePhone but since the Indexes within TeleMagic are programmable this c...

Page 649: ...he phone This information is not normally shown and can be activated by pressing Alt O See Figure 15 9 Figure 15 9 StrataLink Main Screen Show Events Show Events opens a Debug Events screen which shows real time events as they occur see Figure 15 10 The Display option enables you to choose which event you will monitor Figure 15 10 Debug Events Screen Telephone System Events Show Calls displays the...

Page 650: ...3 September 15 1997 Update for Using Goldmine 95 with StrataLink Replaces AB50 0008 April 1 1997 AB50 0012 September 15 1997 TSPI Description V2 26 AB50 0011 September 15 1997 Using ACT 3 0 with StrataLink AB50 0010 September 15 1997 Using ACT 2 0 with StrataLink AB50 0009 April 1 1997 Using TeleMagic Enterprise V2 2 with StrataLink AB50 0008 April 1 1997 Using Goldmine 95 with StrataLink use AB50...

Page 651: ... two BRI S T circuits to connect to the PSTN BRI line using an external UL listed NT1 or on the station side connect to S type ISDN telephones and Terminal Equipment TE 1 S S type Terminal Adapters TA S with non ISDN devices Each TE 1 S and TA1 S device can support voice and or RS 232 switched circuit data as shown in Figure 16 1 The station side BRI S T circuits are point to multipoint A subassem...

Page 652: ...ce see Figure 16 1 The station side BRI U circuits are point to point A subassembly RBUS can be attached to the RBUU for two additional BRIs for PSTN and or U type station connections The RBUU PCB and the RBUS subassemblies are shown in Figures 16 23 and Figure 16 24 on Page 16 31 The combination of RBUU and RBUS uses only one slot to provide up to four U type BRI circuits Notes In DK424 or DK424i...

Page 653: ...BU 6 120 B5CAU BU 8 188 DK40i DK424 DK424i NT2 R S U T U ISDN SWITCH Demarcation Point R SLT DKT EKT TE 1 S Voice or Data SLT TA S TE 1 U Voice or Data RSTU PDKU PEKU RBSU RBSU TBUS NT P MP RBUU RBSU TBUU NT 1 RBSU TBUS TE RPTU TE RBUU RBUS TBUU LT P P NT1 CSU NT1 RJ48C 8 wire RJ48C 8 wire RJ48C 8 wire Loop Termination Loop Termination Office Channel Unit BRI BRI PRI Office Channel Unit or OCR is ...

Page 654: ...ollowing B1CU Table 6 7 on Page 6 7 B2CAU BU Table 6 8 on Page 6 7 B3CAU BU Table 6 9 on Page 6 8 B5CAU BU Table 6 10 on Page 6 8 DK40i ISDN BRI Capacities Table 16 2 ISDN BRI Capacities PCBs Lines Stations TBSU1 1 TBSU and RBSU circuits can be NT or TE but RBSS circuits can only be NT RBSU RBSS TE Circuits TE Channels NT Circuits NT Channels 1 82 2 Maximum may not be achievable because of power f...

Page 655: ...e for D channel control for both systems The RPTU s in service bit rate is 1 544 mbps 4 6 ppm but during a maintenance session the rate may vary 32 ppm The RPTU provides Binary 8 Zero Substitution B8ZS and ESF with Framing Pattern Sequence FPS and Cyclical Redundancy Check CRC error checking in the framing bits Note The Embedded Operations Channel EOC which carries alarm notifications statistics a...

Page 656: ... B channels If RPTU PRI and RDTU T1 PCBs are installed in the same DK424 or DK424i the maximum combined PCBs cannot exceed the numbers provided in Table 16 1 The PCBs must be placed in designated slots in each of the DK424 or DK424i cabinets per Tables 16 3 16 5 The next highest slot adjacent to the RPTU slot must be vacant Program 03 defines which cabinet slots contain RPTU PCBs The maximum numbe...

Page 657: ...must be vacant if using more than 16 channels PRI Lines Needed Slots Needed RPTU PCBs Neededs1 1 RPTU PCBs do not have to be installed in the order shown in this table Example If only one RPTU is needed it can be installed in any RPTU slot shown in the table so long as the slot is supported by the installed processor RPTU cabinet slot placement1 Base Cabinet 1 16 1 1 S103 RPTU 17 23 2 S104 vacant2...

Page 658: ...et 6 in the Strata DK I M Manual Chapter 6 Also see Figure 16 2 and Table 16 7 To install an RPTU PCB 1 Set the jumper wire plugs JP1 and JP2 LB to the Off position 2 Turn the DK system power Off 3 Insert the RPTU component side facing right into the appropriate slot see Slot Assignments on DK424 Slot Assignments on Page 16 6 and apply firm even pressure to ensure proper seating of connectors 4 Af...

Page 659: ...tically revert to the Secondary Clock source PCB Program 42 2 Resets or initializes the RPTU firmware Press this switch to correct an out of service condition or just prior to connecting to the Network PRI JP1 JP2 Loop back jumpers Makes loop back tests of the cabling between the ISDN Network switch CSU and RPTU J1 8 pin Modular Connector RJ45 Connects the RPTU to the CSU network PRI ISDN line J2 ...

Page 660: ...e CO Off Circuit is working properly LOS Loss of Signal On IC signal cannot be detected Off Circuit is working properly RST Reset On CPU is resetting the software Off Circuit is working properly BSY Busy On One or more B channels are busy Off All B channels are idle TS Timing Signal On Circuit is secondary timing source Off Circuit is not used for system timing Flashing Circuit is primary timing s...

Page 661: ...network side of most CSUs and the equipment side of the CSU to the RPTU PCB Depending on the manufacturer the CSU may use DB15 or modular jacks If the CSU is equipped with the modular jacks the DB15 modular adapters are not used If this is the case make sure the CSU modular jacks are not shielded jacks Refer to Figure 16 3 for more information A detailed pinout diagram for the RJ45 jacks USOC RJ48...

Page 662: ...jack C One DB15 modular adapter CSU to RPTU D1 Thirty feet of CAT5 shielded cable E One Ferrite core 1 Cable A and D are straight pinned data cables not cross pinned telephony cables C S U 1 2 3 4 5 6 7 8 1 2 3 4 5 6 7 8 1 2 3 4 5 6 7 8 1 2 3 4 5 6 7 8 CSU Local Power Adapter Network Interface Jack RJ48 C or RJ48 X 8 pin Modular 1 T1 2 R1 3 4 R 5 T 6 7 Nu 8 Nu 1 T1 2 R1 3 4 R 5 T 6 7 Nu 8 Nu RPTU ...

Page 663: ...pe TE 1 or TA devices when connecting to ISDN station equipment Older Version s none The Strata DK424 or DK424i and DK40i Release 4 1 system supports the RBSU RBSS interface unit according to the common control units resident in the system shown in Table 16 1 The DK40i only supports the TBSU RBSU RBSS switches jumpers and connectors are shown in Figures 16 8 and 16 9 on Page 16 17 and described in...

Page 664: ...BRI lines using a NT1 As BRI NT circuits which connect to ISDN TEs or TAs These devices must be S type station devices Important The DK424 or DK424i and DK40i BRI circuits allocate line numbers and station ports differently In DK424 or DK424i each BRI circuit consumes two line numbers and two station port when configured as line side or station side In DK40i each BRI line circuit consumes two line...

Page 665: ...ination so long as the number of RBSU PCBs is the same or greater than the number of RBSS PCBs See Tables 6 7 6 10 beginning on Page 6 7 for the maximum BRI circuits allowed On DK40i TBSU and each RBSU and or RBSS contains two circuits Each circuit reduces the system capacity by two station ports or two CO lines If the BRI circuit is configured as NT the circuit assumes two station ports If the BR...

Page 666: ...gement Figure 14 6 shows the power limits of the R40S Figure 16 7 Power Limits of the Backup Power Supply 4774 RX TX Pin 3 Pin 6 Pin 4 Pin 5 Pin 3 Pin 6 Pin 4 Pin 5 RX TX TE Device Power sink R40S PS 1 Power Source RJ45 Pin Nos on RBSU or RBSS NT circuit RJ45 Pin Nos on TE device R40S Power Limits Voltage 33 3VDC to 38 85VDC maximum Current 100mA maximum 25mA maximum per each RBSU RBSS circuit TE ...

Page 667: ...Program 60 causes station port and CO line shifting on PCBs installed in slots that follow the BRI PCBs Step 2 Set Option Switches Jumpers Set all option switches and jumpers on the TBSU RBSU and RBSS PCBs before plugging the RBSS onto the RBSU or inserting the RBSU into the system RBSU RBSS switch jumper information and locations are shown in Figures 16 8 16 9 and Table 16 10 TBSU switch jumper i...

Page 668: ...o connectors carefully while observing the UP arrows on the R40S 2 Plug the R40S onto the RBSU PCB Circuit Option Switch Type Circuit Type Description TE NT RBSU All SW 1 Push button N A N A Resets firmware on all circuits of RBSU RBSS Drops calls off the RBSU RBSS 1 SW 2 Jumper X X Causes the circuit to operate as TE or NT1 1 Also requires Program 60 to set TE or NT 1 SW 3 Slide On Off Switches a...

Page 669: ...e positioned as shown in Figure 16 13 Table 16 11 RBSU RBSS LED Indications LED Indication BSY Circuit Busy On Any B channel is in use Off B channels are idle TS Timing Source Blinking On Off The RBSU is extracting the clock from the BRI line and is the Primary synchronization circuit for ISDN and T1 On The RBSU is the secondary backup synchronization circuit for the ISDN and T1 Off The RBSU is no...

Page 670: ...t Use the two supplied screws to secure the TBSU or TBUU to the motherboard Figure 16 10 shows the TBSU or TBUU mounting on the DK40i and Figure 16 12 shows the TBSU switch layout Table 16 12 shows the TBSU option switches The TBUU does not have option switches all options are controlled by programming Figure 16 11 Installation of TBSU or TBUU into DK40i Install a TCOU TBSU Install a TCOU TBSU or ...

Page 671: ... Slide On On Switches a 100 ohm resistor in out of the circuit 1 2 SW 200 Jumper X X Causes the circuit2 to operate as TE or NT1 2 SW2 is for factory use only 2 SW 201 Slide On On Switches a 100 ohm resistor in out of the circuit 2 Switch Type Circuit Description Short Cut remove W2 Jumper TBSU1A uses the internal CPU ROM IC20 TBSU1A uses the external ROM IC6 and 7 Future Use SW2 Jumper For factor...

Page 672: ...and 16 13 show the location of the TBSU and RBSU monitor jacks respectively TBSU and RBSU RBSS Premise Wiring Guidelines Power Failure Terminal Screws TB1 and TB2 are the connecting points that interface a pair of dry contacts that can be used for power failure switching purposes see Figure 16 13 for the locations When the DK system TBSU and RBSU has power from AC source or batteries there is a sh...

Page 673: ...round both ends of shielded cable runs Figure 16 13 RBSU RBSS Location of LEDs and Connector Locations TBSU and RBSU RBSS BRI Cable Jacks and Connectors In the U S the standard connector for ISDN equipment is the eight pin RJ jack Patch cables have eight pole plugs at both ends The same pinout applies to both ends of an ISDN cable which is the practice of the data world This means that a flat untw...

Page 674: ...tallation because mixing the two may cause certain wire pairs to be swapped which would result in line faults Table 16 14 TIA 568B RJ45 Jack ISDN Standard Interface Modular Connector Pinout RBSU NT mode Notes Pins are numbered left to right when looking into the jack cavity with the locking tab down TIA 568A swaps pair two with pair three changing only the color of the wires on the pins Electrical...

Page 675: ...via a customer provided NT1 as shown in Figure 16 17 The NT1 is necessary to convert the network BRI two wire U interface to the TBSU or RBSU BRI four wire T interface The NT1 must be UL listed U S or CSA certified Canada The NT1 is powered by local AC power via an AC adapter supplied with the NT1 The connection between the NT1 and the TBSU or RBSU TE circuit is a point to point connection so the ...

Page 676: ...data like data from a PC COM port to B channel 64 kbps sync TAs also enable you to connect standard telephones and non ISDN fax machines to receive and make calls over ISDN circuits TEs include any user device telephone fax PC video conference board that is designed to plug directly into the ISDN S T interface without the use of a TA There are two types of ISDN TA and TE 1 devices the U type and t...

Page 677: ...he delay can be In fact it can be much larger as long as the differences remain small To control electrical characteristics a 100 ohm terminating resistor TR is required at both ends of the passive bus One resistor should be across the Tx pair and one across the Rx pair at either end of the passive bus Branch type passive bus configurations shown in Figures 16 19 16 22 may only require a TR on the...

Page 678: ... TBSU and RBSU RBSS BRI circuit performance Figures 16 19 16 22 show four passive bus architectures that are known to work In all installations follow the guidelines of any of these passive bus models using the wire cables and jacks described in the previous paragraphs Figure 16 19 Simplified Short branched Passive Bus Figure 16 20 Branched Passive Bus RJ 45 TBSU or RBSU RBSS NT Mode 360 max 3338 ...

Page 679: ...a DK I M 6 00 16 29 ISDN Interfaces Figure 16 21 Extended Passive Bus Figure 16 22 Short Passive Bus 3340 TR 1650 82 RJ 45 TBSU or RBSU RBSS NT Mode TR ISDN Telephone TE 1 PC Card 3341 TR 640 490 RJ 45 TBSU or RBSU RBSS NT Mode TR ISDN Telephone TE 1 PC Card ...

Page 680: ... CO NT BRI circuits Program 60 causes port and line numbers to shift We recommend running these programs in the order listed before installation This allows the RBUU to function immediately upon insertion beginning with a self check loop back test and then normal operation Before you can begin installation of the RBUU you may have to install the subassemblies The TBUU PCB is shown in Figure 16 26 ...

Page 681: ...SY T S LOS F S 2799 RBUU1A RJ45 Modular for Circuit 1 Secondary Protectors RJ45 Modular for Circuit 2 LED Indicators RS 232C Monitor Output DIN Connector Circuit 2 J101 J201 P12 P13 RBUU1A J3 Circuit 3 Circuit 3 Circuit 4 P13 P12 P11 P10 Circuit 4 BSY T S LOS F S BSY T S LOS F S F 2800 RBUS1A LED Indicators RJ45 Modular for Circuit 3 RJ45 Modular for Circuit 4 Secondary Protectors J401 J301 RBSU1A...

Page 682: ...1 PSI is labeled LOS on Beta PCBs Port Status Indicator Port is in LT mode Port is in NT mode AIB is received by this port FS Frame Synchronization Frame alignment is established Frame Alignment error Port is trying to establish frame alignment RBUU1A RS 232C Monitor Output 4776 RBUS1A RJ45 Modular for Circuit 3 RJ45 Modular for Circuit 4 RJ45 Modular for Circuit 1 RJ45 Modular for Circuit 2 LED I...

Page 683: ...mpers are required on the PCBs Make sure you run this program along with Program 03 attempting to use the BRI circuits Program 60 may cause line or station ports to shift on circuits following the BRI PCBs Install the Toshiba supplied Ferrite core on each ISDN circuit card per Figures 16 15 and 16 16 on Page 25 The Ferrite core is not supplied with the ISDN circuit cards must be ordered separately...

Page 684: ... the demarc jack to the DK interface PCB with no bridge taps to different locations or should not have loading coils installed BRI line side cables should not be shielded Each line side BRI circuit requires a ferrite core as shown in Figures 16 15 and 16 16 In the USA most BRI U Demarc jacks are RJ11 but they may be RJ45 eight wire jacks In Canada the BRI U Demarc jack is usually RJ45 Polarity of ...

Page 685: ...Line 2 Power Black 2 Line 2 Power Conductor Color T56A Pin T56B Pin Use Pair 1 White Blue 5 5 Line 1 Blue 4 4 Line 1 Pair 2 White Orange 3 1 Line 2 Orange 6 2 Line 2 Pair3 White Green 1 3 PS3 plus power Green 2 6 PS3 minus power Pair 4 White Brown 7 7 PS2 plus power Brown 8 8 PS2 minus power Conductor Color Pin Use Pair 1 White Blue 4 Line 1 Blue 3 Line 1 Pair 2 White Orange 2 Line 2 Orange 5 Line...

Page 686: ...ritical The U interface pair should go directly from the DK interface PCB to the U type TE1 or TA with no bridge taps or loading coils to different locations The pin out of the TBUU and RBUU RBSU BRI jack is shown in Figure 16 26 Call Monitor Jack Cabling The pin out for the BRI U interface call monitor jack is provided in Figure 16 33 of this chapter ISDN Testing and Troubleshooting BRI U LT Inte...

Page 687: ...ype LBUU ss m and press Enter from the PC keyboard Where ss BRI PCB slot number and m BRI circuit number 1 4 Notes The U terminal must be idle and remain idle during the loop back test The DK sends 4 octets of data to the U terminal during the loop back test 0X00 0XFF 0XB2 and 0X4D These octets are sent to the B1 B2 and D channels 50 times If the DK receives 80 of the sent data back it assumes the...

Page 688: ...ure 16 30 The tests check that the CSU receives and transmits the PRI signal properly in both directions The test signals generated by the Network PRI provider pass through the CSU and loop around the RPTU The RPTU sends the received test signal back through the CSU to the Network and the Network detector checks for a valid signal Loop back Test 1 Remove the PRI modular cord from the RPTU RJ45 jac...

Page 689: ...d to the same clock provider the DK424 or DK424i could experience slip problems Timing reference assignments for PRI BRI and T1 are made with the Program 42 series The timing or synchronization program determines how the DK424 or DK424i digital voice or data transmission path is synchronized with the far end digital path For proper PRI BRI and T1 operation the equipment at each end of the line mus...

Page 690: ...ce or data path channels Figure 14 7 shows an unsynchronized signal from Line 3 The unsynchronized signal produces a clicking or popping sound that is heard by the people connected through this path or causes data errors on data transmissions 4773 PDKU Primary Reference PCB Secondary Reference PCB Other RDTU RPTU or RBSU DK424 Digital Transmission Voice Path Synchronization Circuit Synchronization...

Page 691: ...t be monitored manually The counter is reset after 15 registrations and begins again from zero Basically the error count of any error category should not increase within 24 hour periods To dump the data PRI ERROR DISPLAY from a terminal or PC local or remote 1 Establish communications between the DK TTY port and the terminal or PC using a communications software 2 Enter the security code and press...

Page 692: ...S SLIP ERROR XX TIMES CRC ERROR XX TIMES PRI NO 5 SYNCHRO BIT ERROR XX TIMES BIPOLAR VIOLATION ERROR XX TIMES SLIP ERROR XX TIMES CRC ERROR XX TIMES PRI NO 6 SYNCHRO BIT ERROR XX TIMES BIPOLAR VIOLATION ERROR XX TIMES SLIP ERROR XX TIMES CRC ERROR XX TIMES PRI NO 7 SYNCHRO BIT ERROR XX TIMES BIPOLAR VIOLATION ERROR XX TIMES SLIP ERROR XX TIMES CRC ERROR XX TIMES PRI NO 8 SYNCHRO BIT ERROR XX TIMES...

Page 693: ...s typical ISDN PRI start up and synchronization sequences that occur at connection and power on Figure 16 34 shows typical ISDN PRI outgoing call setup and release sequences BRI monitor data is similar to PRI monitor data The communication parameters for all call monitor jacks are 9600 bps 7 1 even Note The RPTU RBSU RBUU TBSU and TBUU ISDN interface PCBs each have a call monitor jack The pin numb...

Page 694: ...245 Tx SAPI 00 R TEI 000 FRAME UA F U1 00 11 754 LOS F3 U1 00 14 228 Act F1 U1 00 14 415 Tx SAPI 00 C TEI 000 FRAME SABME P U1 00 14 427 Rx SAPI 00 R TEI 000 FRAME UA F U1 00 14 753 Tx SAPI 00 C TEI 000 FRAME SABME P U1 00 14 765 Rx SAPI 00 R TEI 000 FRAME UA F U1 00 24 275 Tx SAPI 00 C TEI 000 FRAME INFO N S 000 N R 000 PD Q 931 08 CR 02 0002 MT SETUP 05 04 03 80 90 A2 18 03 A9 83 97 70 08 C1 35 ...

Page 695: ... 97 U1 01 19 932 Tx SAPI 00 R TEI 000 FRAME RR N R 004 U1 01 25 464 Rx SAPI 00 C TEI 000 FRAME INFO N S 004 N R 005 PD Q 931 08 CR 02 8003 MT CONN 07 18 03 A9 83 97 U1 01 25 476 Tx SAPI 00 R TEI 000 FRAME RR N R 005 U1 01 25 785 Tx SAPI 00 C TEI 000 FRAME INFO N S 005 N R 005 PD Q 931 08 CR 02 0003 MT CONN ACK 0F U1 01 25 799 Rx SAPI 00 R TEI 000 FRAME RR N R 006 U1 01 46 127 Rx SAPI 00 C TEI 000 ...

Page 696: ...SCII terminal to monitor the BRI D channel call setup layer 2 and layer 3 data refer to Figure 16 33 on Page 16 43 for information about connecting the monitor jack Figures 16 36 and 16 37 provide examples of BRI call setup message information that is available from the TBSU and RBSU call monitor jack Figure 16 36 Outgoing Call Setup Output of BRI Call Monitor ...

Page 697: ...ISDN Interfaces PRI BRI Call Monitoring Strata DK I M 6 00 16 47 ISDN Interfaces Figure 16 37 Incoming Call Setup Output of BRI Call Monitor ...

Page 698: ...ch telephone or console in Program 35 LED 08 LED 08 On enables Cause Code Display Previously CO LINE HANG UP or CALL TERMINATED displayed when an ISDN line disconnected This display no longer exists for ISDN calls with DK Release 4 3 software These messages do display if a non ISDN call is terminated The new cause code display function replaces this existing message with more specific and useful i...

Page 699: ...number is 0001 the call has been transmitted by the DK and if the call reference number is 8001 it means that the call was received by the DK Reason for call termination The reason is provided by a series of ISDN disconnection messages exchanged when the line is disconnected The cause value within the information element of cause included in these messages will be used C A L L T E R M I N AT E D C...

Page 700: ...ion when the line is disconnected in an unusual way At this time the busy tone that starts when the line is disconnected will also continue generating Call Termination Examples CALL TERMINATED CR 8004 DK NA This is an example of the call being terminated because layer 2 stopped operating during the call The call has be started by DK s reception through a PRI line CALL TERMINATED CR NA DK NA This e...

Page 701: ...alid number format 1D Facility rejected 1E Response to STATus ENQuiry 1F Normal unspecified 22 Circuit channel congestion 29 Temporary failure 2A Switching equipment congestion 2B Access information discarded 2C Requested channel not available 2F Resources unavailable unspecified 32 Requested facility not subscribed 39 Bearer capability not authorized 3A Bearer capability not presently available 3...

Page 702: ...ble 16 22 ISDN BRI Disconnect Cause Values DK Cause Values Disconnect Cause 01 Unallocated unassigned number 02 No route to specified transit network 03 No route to destination 06 Channel unacceptable 07 Call awarded and being delivered in an established channel 10 Normal Clearing 11 User busy 12 No user responding 13 User alerting no answer 15 Call rejected 16 Number changed 1A Non selected user ...

Page 703: ...l error unspecified 7F Interworking unspecified Table 16 23 BRI National Standardized Cause Values Values Disconnect Cause 04 Vacant Code 08 Prefix 0 dialed in error 09 Prefix 1 dialed in error 0A Prefix 1 not dialed 0B Excessive digits received call is proceeding 1A Misrouted call to a ported number 33 Call type incompatible with service request 35 Service operation violated 65 Protocol error thr...

Page 704: ...ISDN Interfaces ISDN Disconnect Cause Code 16 54 Strata DK I M 6 00 ...

Page 705: ...es BCU Represents all of the DK424i processors The DK424i processors are B1CU B2CAU B2CBU B3CAU B3CBU B5CAU B5CBU B2CAU BU Abbreviation for the B2CAU B2CBU B2CAU BU Abbreviation for the B3CAU B3CBU B5CAU BU Abbreviation for the B5CAU B5CBU B channel Used in ISDN Data or voice information is transmitted on the B channels of an ISDN line at 64kpbs The B channel refers to the frequency range of trans...

Page 706: ...dd on Module Optional device that connects to 2000 series digital telephones to provide the telephones with 20 flexible feature buttons that can be assigned individually for Direct Station Selection System and Personal Speed Dial and CO line access D channel Used in ISDN This channel transmits call control information out of band signaling for B channels The D channel is a logical not a physical c...

Page 707: ...DK over incoming DID or Tie lines This feature is provided by some long distance telephone companies DPFT Power Failure Emergency Transfer Unit An optional backup unit that provides emergency service during power failures by automatically connecting up to eight standard telephones to designated CO lines DSS Direct Station Selection Feature which allows a telephone user as well as a DSS console and...

Page 708: ...AU motherboard The K4RCU3A K5RCU1A or K5RCU2A must be installed to recognize Dual Tone Multi Frequency DTMF tones generated by a standard telephone or any other device connected to a standard telephone circuit and it is required for Direct Inward System Access DISA and DID The K4RCU and K5RCU circuits are also used to detect busy tone for the Automatic Busy Redial ABR feature and must be installed...

Page 709: ...Unit An optional PCB an older version of RCOU that provides the system with four loop start CO lines Supports Caller ID when used with RCIU RCIS circuits PDIU DI2 Integrated Data Interface Unit Replaces the normal digital telephone base so that the telephone can be used for the transmission and reception of data between a terminal personal computer connected to the telephone and devices connected ...

Page 710: ...sed to connect an SMDR device ASCII maintenance terminal or remote maintenance external modem PPTC A Toshiba supplied adapter An adapter that is used to connect the modular SMDR SMDI MIS for ACD Open Architecture OA maintenance ports of the PIOU PIOUS RSSU RSIU or RSIS to the DB 9 PPTC 9 connector of a call accounting machine DK Admin DK Backup personal computer PC SMIS personal computer or Open A...

Page 711: ...1 RBTC1A 2M Battery cable that connects reserve power batteries to RBDB battery distribution box 3 or more cabinet installations RBUU ISDN Basic Rate Interface BRI Unit Provides two BRI U circuits Each circuit provides two simultaneous voice and or data connections with a single interface BRI uses the 2B D transmission format which is defined as two 64 kbps bearer channels and one 16 kbps data con...

Page 712: ...es Supports ANI and DNIS RFIF Floor Mount Installation Kit Kit that is used to floor mount systems RGLU Analog Ground Loop Start CO Line Interface Unit Provides four CO line circuits that can be individually configured for loop start or ground start CO line operation Supports Caller ID when used with RCIU RCIS circuits RKYS Feature Key Upgrade Subassembly that attaches to the common control unit t...

Page 713: ...for ACD SMDR local or remote DK Admin DK Backup Personal computer built in RMDS or external system maintenance modem Open Architecture personal computer By itself the RSIU PCB provides one interface port With up to three RSIU RMDS subassemblies it can provide up to four interface ports RSTU Standard Telephone Interface Unit An optional PCB an older version of RSTU2 with a built in ring generator t...

Page 714: ...a DK40 TDDU Four Circuit DID Line Digital Telephone Interface Unit An optional PCB providing four DID line circuits in the Strata DK40 TE Terminal Equipment This refers to devices using ISDN service telephones faxes computers etc TE1 supports ISDN formats with S T or U type intefaces TSPI Telephony Service Provider Interface TSIU RS 232 Ports An optional PCB that provides up to two RS 232 interfac...

Page 715: ...6 DK424i feature key 6 3 simultaneous announcements 6 9 auto dial PC voice call 12 71 auto disconnect digital announcer 12 79 auto preference 11 34 automated attendant see auto attendant B B1CU PCB 7 46 B2CAU PCB 7 47 B2CBU PCB 7 48 B3CAU PCB 7 49 B3CBU PCB 7 50 B5CAU PCB 7 51 B5CBU PCB 7 52 background music see BGM 9 18 base cabinet 4 2 base cabinet installation 5 7 base KSU see key service unit ...

Page 716: ...bility DK8 DK14 1 21 conference two CO line 12 32 conferencing 6 9 connecting to network side TE mode 16 25 connecting to station devices NT mode 16 26 cordless digital telephones 6 10 cordless telephone 11 34 connect to base unit 11 35 cord connection 11 35 handset battery pack 11 36 installation 11 34 cross connect record RCOU RCOS RGLU RDDU REMU RDDU RDTU 10 26 station PDKU 10 8 PEKU 10 17 PESU...

Page 717: ...3 25 PCOU 3 30 RCIU2 installation 9 27 TCIU2 3 28 TDDU 3 33 TSIU 3 36 PCBs see Universal PCBs RCIU1 RCIU2 9 29 secondary protector diagram 3 41 system configuration 2 1 telephone circuits 2 9 DK424 base cabinet 4 2 DK280 compatibility 4 3 hardware 4 19 interface PCB options 4 16 network requirements 5 6 PCBs see Universal PCBs DK424 and DK424i hardware compatibility 6 20 DK424i architecture 6 2 ba...

Page 718: ...KSU components DK40i 2 6 external page zones 6 9 external page 12 10 installation 12 26 with BGM 12 26 interface unit 9 15 external speaker unit see HESB F fault finding 14 1 fault isolation 14 3 fault isolation flowcharts 14 10 catastrophic faults 14 11 CO line dial tone faults 14 13 DSS console faults 14 14 fault classification 14 10 remote maintenance faults 14 17 station dial tone faults 14 12...

Page 719: ...erview 16 14 passive bus configurations 16 28 premise wiring guidelines 16 22 16 23 RBUU installation 16 30 RBUU RBUS interface unit 16 34 LED indications 16 32 location of LEDs and connectors 16 32 station circuits TE 1 and TA 6 10 BRI PRI channel lines 6 10 DK424 reference model 16 3 modular jack pin configurations 16 22 performance monitoring 16 46 PRI RPTU overview 16 5 testing and troubleshoo...

Page 720: ... music on hold see MOH N network requirements DK424 5 6 night ringing selected page zones 12 32 non built in auto attendant see auto attendant non built in O OCA speaker 6 10 off hook call announce 6 10 unit EOCU 9 12 upgrade 11 23 off premises stations 6 10 option interface unit 3 38 9 21 P P90 ring generator switch 9 18 page single zone with BGM 12 26 paging external zones 6 9 groups 6 9 max sim...

Page 721: ...cators connectors 9 25 power failure DK40i transfer interface 2 5 options 3 17 12 1 power failure terminal screws 16 22 power supply DK14 PCB considerations 1 10 removal 1 8 replacement 1 9 DK40i removal 3 19 replacement 3 20 wiring 3 17 processor PCB subassemblies 6 3 processor PCBs 6 2 program checklist voice mail 12 44 programming considerations E911 12 83 Stratagy 12 42 voice mail 12 43 VP 12 ...

Page 722: ... programming 8 3 RDTU2 6 11 RDTU2 4 12 REBS 16 18 relay control options 12 10 remote expansion cabinet unit 5 60 6 15 remote expansion cabinets DK424i 7 53 REMU 2 7 3 38 connectors controls indicators 9 45 9 46 illustration 9 45 installation procedures 9 43 programming 9 44 reserve power DK40i 3 17 installation DK40i 3 18 RGLU2 2 7 3 38 9 47 connectors controls indicators 9 47 illustration 9 48 in...

Page 723: ... AirLink interface unit 4 15 Stratagy 12 42 programming considerations 12 42 StrataLink 15 6 StrataLink and TAPI for Windows 95 15 2 T T1 interface unit 8 2 9 42 T1 DS 1 lines 6 10 T1 DS 1 interfacing 8 1 talk path amplified 12 33 talkback amplified speaker see HESB TAPI see Telephony Application Programming Interface TAPI upgrade 11 12 TBSU 3 27 TBUU 16 30 TBUU Printed Circuit Board 16 33 TCIU2 2...

Page 724: ...re tie line PEMU 10 33 4 wire tie line PEMU 10 34 CO line to MDF PCOU 10 25 RCIU1 RCIU2 RCIS 10 30 RCOU RCOS 10 28 RDDU 10 31 REMU 2 4 Wire Type I II 10 32 RGLU2 or PCOU 10 27 CO tie line 10 25 DK40i CO lines 3 44 DK40i KSU amphenol station relay 3 42 DK40i secondary protector 3 41 external power to DKT 10 7 MDF 3 42 PDKU DDCB door phone lock 10 5 DKT DDSS 10 4 PIOU or PEPU peripherals 10 36 PIOUS...

Reviews: