
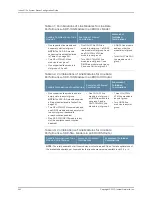
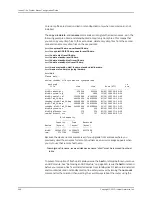


rebooting procedure. See “Booting the System” on page 495. Do not reboot the router by
switching it off and on.
Installing and Removing Flash Cards
For information about replacing flash cards, see
ERX Hardware Guide, Chapter 4, Installing
Modules
, or
E120 and E320 Hardware Guide, Chapter 4, Installing Modules
.
Before you remove the second flash card (disk1) on the SRP 120 module or the SRP 320
module, you must first unmount the card with the
no mount
command. This command
causes the file system to reject all subsequent requests for opening files on the flash
card and closes all open files. When this is accomplished, the disk is marked as safely
unmounted and a status message indicates that is safe to eject the disk. A status message
is displayed when you issue the
mount
or
no mount
command:
•
When you issue the
mount
command:
% Device is mounted
% Device is already mounted
% Device is not present
•
When you issue the
no mount
command:
% Device is dismounted
% Device is already dismounted
% Device is not present
% Command failed, files are open on device
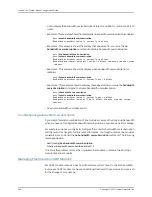
CAUTION:
When you eject a mounted disk 0 while the router is in an
operational state, the SRP module initiates a reload. When you eject a
mounted disk 1, data on the disk can be corrupted, but the router does not
reboot.
mount
•
Use to mount the disk. If the disk was not safely unmounted previously, then before
mounting the file system and permitting user access the command initiates disk and
file system integrity checks. These checks are the same ones that are automatically
performed when a disk is installed and the SRP module is reloaded.
•
This command applies only to the flash card installed in slot 1 on an SRP 320 module.
The command is rejected if you specify disk0, because that card is required for system
operation and cannot be unmounted.
•
Example
host1#
mount disk1
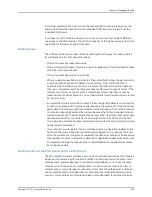
•
The
no
version prepares the flash card for safe removal. The router subsequently
behaves as if the second flash card is no longer present. To access the second card,
you must either eject and re-insert the card, or issue the
mount
command for the card.
367
Copyright © 2010, Juniper Networks, Inc.
Chapter 6: Managing Modules
Summary of Contents for JUNOSE 11.3
Page 6: ...Copyright 2010 Juniper Networks Inc vi...
Page 8: ...Copyright 2010 Juniper Networks Inc viii JunosE 11 3 x System Basics Configuration Guide...
Page 24: ...Copyright 2010 Juniper Networks Inc xxiv JunosE 11 3 x System Basics Configuration Guide...
Page 32: ...Copyright 2010 Juniper Networks Inc 2 JunosE 11 3 x System Basics Configuration Guide...
Page 146: ...Copyright 2010 Juniper Networks Inc 116 JunosE 11 3 x System Basics Configuration Guide...
Page 166: ...Copyright 2010 Juniper Networks Inc 136 JunosE 11 3 x System Basics Configuration Guide...
Page 432: ...Copyright 2010 Juniper Networks Inc 402 JunosE 11 3 x System Basics Configuration Guide...
Page 488: ...Copyright 2010 Juniper Networks Inc 458 JunosE 11 3 x System Basics Configuration Guide...
Page 524: ...Copyright 2010 Juniper Networks Inc 494 JunosE 11 3 x System Basics Configuration Guide...
Page 554: ...Copyright 2010 Juniper Networks Inc 524 JunosE 11 3 x System Basics Configuration Guide...
Page 566: ...Copyright 2010 Juniper Networks Inc 536 JunosE 11 3 x System Basics Configuration Guide...
Page 588: ...Copyright 2010 Juniper Networks Inc 558 JunosE 11 3 x System Basics Configuration Guide...
Page 613: ...PART 3 Index Index on page 585 583 Copyright 2010 Juniper Networks Inc...
Page 614: ...Copyright 2010 Juniper Networks Inc 584 JunosE 11 3 x System Basics Configuration Guide...
Page 632: ...Copyright 2010 Juniper Networks Inc 602 JunosE 11 3 x System Basics Configuration Guide...


