6. Setup and configuration
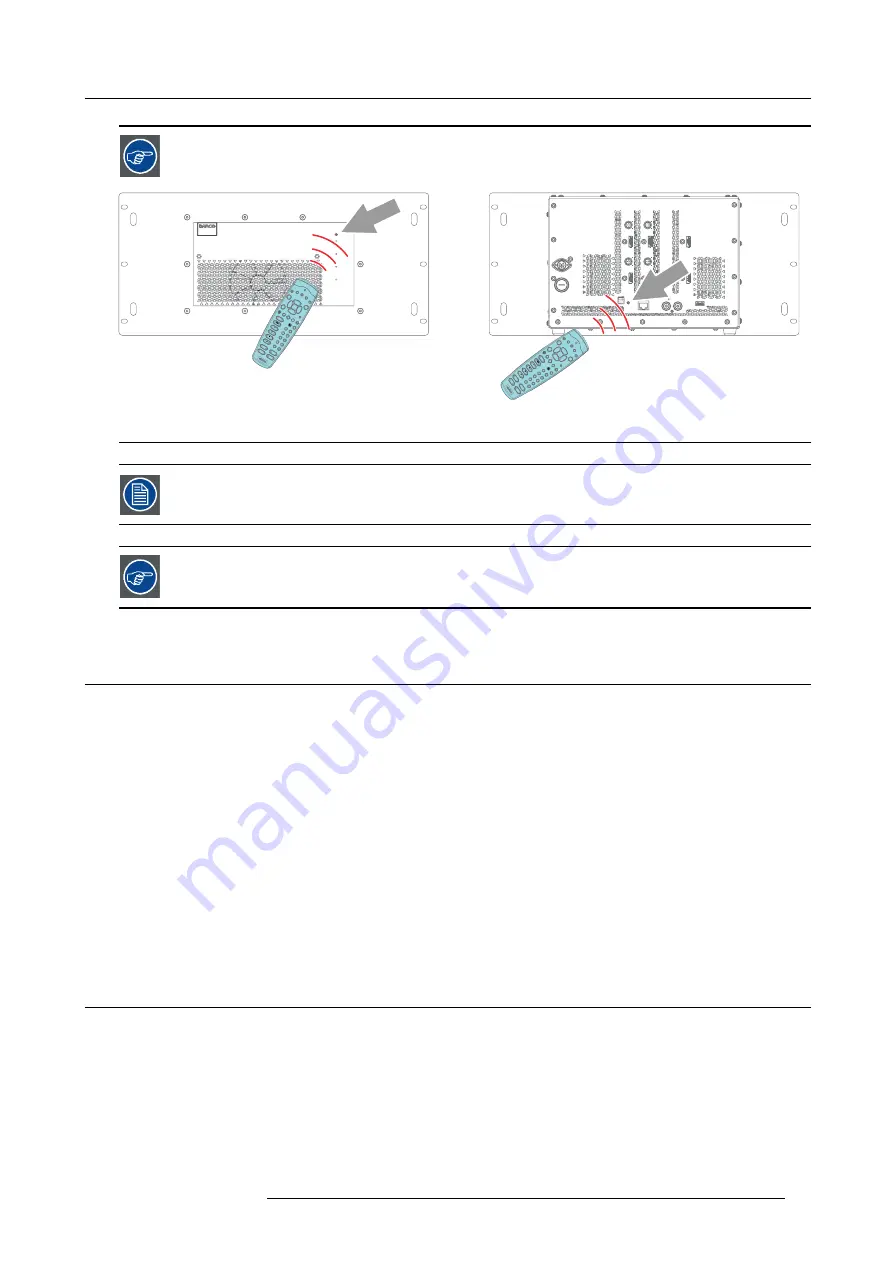
To guarantee good communication, point the RCU towards the one of the infrared receivers of the MCM-50.
IR
ERROR
ON
STANDBY
MCM-50
ME
NU
BA
CK
ENTER
1
2
+
-
+
-
+
-
+
-
+
-
3
4
5
6
7
8
9
PA
US
E
AU
TO
IM
AG
E
SDI
DV
I
VID
EO
RG
B
S-VI
DE
O
PC
LOG
O
PIP
0
CONTR
TINT
PHA
SE
CO
LO
R
BRIGHTN
PI
P
A DJ
UST
MENU
BA
CK
ENTER
1
2
+
-
+
-
+
-
+
-
+
-
3
4
5
6
7
8
9
PA
USE
AU
TO
IM
AG
E
SDI
DV
I
VI
DE
O
RG
B
S-
VI
DE
O
PC
LO
GO
PIP
0
CONTR
TI
NT
PH
ASE
CO
LO
R
BRIGHTN
PI
P
ADJ
US
T
Image 6-4
IR receiver
If no button is pressed within 5 seconds after the Address button has been pressed, the RCU serial address
remains unchanged.
Each MCM-50 has a common address (which by default is 0). So programming the RCU address to 0 will
establish communication to any brand new MCM-50 as it comes out of the box.
6.2
Powering the MCM-50
Introduction
As soon as the AC mains power adapter is connected to both the MCM-50 unit and the wall outlet, the MCM-50 starts con
fi
guring
and goes to active state. If the MCM-50 is part of a full display system - which will be the case - a speci
fi
ed power-on sequence
must be followed to allow EDID communication.
Powering the MCM-50
Connect the power supply to both the MCM-50 and the wall outlet.
Power-on sequence
1. Network switch (if present); allows IP address assignment to MCM-50 in case of a DHCP/DNS network;
2. Projector connected with the MCM-50. (F50 series projector).
3. MCM-50;
4. Sources; the sources can now read the EDID data on the MCM-50 inputs.
6.3
Activating the MCM-50
Introduction
The MCM-50 can be switched to standby and back to active state at any time.
Switching the MCM-50 from active state to standby?
Press the standby button on the RCU for 3 seconds.
R5909057 MCM-50 17/05/2016
27
Summary of Contents for MCM-50
Page 1: ...MCM 50 User Guide Optimized for F50 R5909057 02 17 05 2016...
Page 8: ...Table of contents 4 R5909057 MCM 50 17 05 2016...
Page 14: ...1 Safety instructions 10 R5909057 MCM 50 17 05 2016...
Page 20: ...3 Packaging 16 R5909057 MCM 50 17 05 2016...
Page 22: ...4 Facility and system requirements Image 4 1 18 R5909057 MCM 50 17 05 2016...
Page 28: ...5 Physical installation and connections 24 R5909057 MCM 50 17 05 2016...
Page 40: ...6 Setup and configuration Image 6 17 36 R5909057 MCM 50 17 05 2016...
Page 58: ...8 OSD Preferences 54 R5909057 MCM 50 17 05 2016...
Page 118: ...11 Expert operation 114 R5909057 MCM 50 17 05 2016...
Page 136: ...13 MCM 50 Tools 132 R5909057 MCM 50 17 05 2016...
Page 144: ...15 RCU Control 140 R5909057 MCM 50 17 05 2016...


