7
2
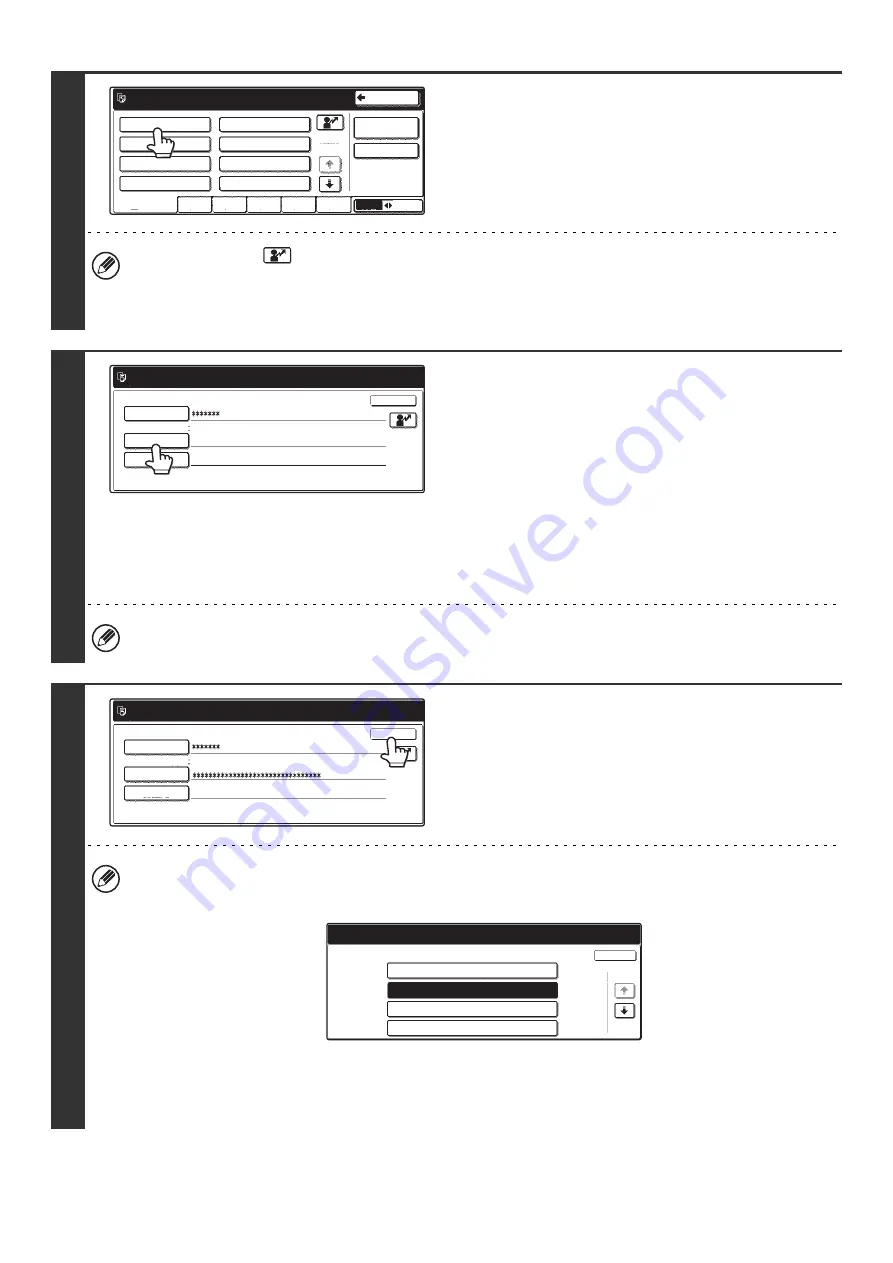
Select the user.
• You can touch the
key and enter a user registration number (see "
" (page 81)) with the
numeric keys to directly select the corresponding user.
• To specify a user not stored in the machine directly using the LDAP server, touch the [Direct Entry] key, enter the
login name that is stored on the LDAP server, and touch the [OK] key. (When LDAP is enabled.)
3
Enter a password.
(1) Touch the [Password] key.
(2) Enter a password on the text entry screen
that will appear.
When logging in locally to the machine, enter your
password that was stored as explained in "
If authentication is to the LDAP server, enter your
password that is stored on the LDAP server.
For the procedure for entering text, see "6. ENTERING
TEXT" in the User's Guide.
If a password has not been established, this step is not necessary.
Go to step 4.
4
Touch the [OK] key.
• When a user is selected that is stored on the machine, [Auth to:] is entered. To enter your login name directly or
change the login destination, touch the [Auth to:] key. The following screen appears when the key is touched. Select
the desired key and touch the [OK] key.
• "Authenticate to" cannot be changed when an LDAP server has not been stored.
• Users for which the authentication destination is LDAP cannot select "Login Locally".
• This completes the login procedure. After login, the system settings can be used.
For the procedure following login, see "
When User Authentication is not Enabled
" (page 5).
Please select a user
to be logged in.
Admin Login
Direct Entry
ABC
User
AAA AAA
CCC CCC
EEE EEE
GGG GGG
All Users
ABCD
EFGHI
JKLMN
OPQRST
UVWXYZ
BBB BBB
DDD DDD
FFF FFF
HHH HHH
25
1
Back
Please enter your login name /
password.
User Authentication
Login Name
AAA AAA
Login Locally
User Name
Password
Auth to:
OK
Please enter your login name /
password.
User Authentication
Login Name
AAA AAA
Login Locally
User Name
Password
Auth to:
OK
Select the authentication system of registered user.
Authenticate to:
Login Locally
Server 2
Server 3
Server 1
OK
1/2
Содержание MX 3501N - Color Laser - Copier
Страница 1: ...User s Guide MX 3500N MX 3501N MX 4500N MX 4501N MX 2300N MX 2700N MODEL ...
Страница 2: ...System Settings Guide MX 3500N MX 3501N MX 4500N MX 4501N MX 2300N MX 2700N MODEL ...
Страница 127: ...MX4500 US SYS Z2 System Settings Guide MX 3500N MX 3501N MX 4500N MX 4501N MX 2300N MX 2700N MODEL ...
Страница 173: ... mx4500_us_ins book 44 ページ 2005年10月31日 月曜日 午前11時57分 ...
Страница 174: ... mx4500_us_ins book 45 ページ 2005年10月31日 月曜日 午前11時57分 ...
Страница 176: ...Document Filing Guide MX 3500N MX 3501N MX 4500N MX 4501N MX 2300N MX 2700N MODEL ...
Страница 222: ...MX4500 US FIL Z1 Document Filing Guide MX 3500N MX 3501N MX 4500N MX 4501N MX 2300N MX 2700N MODEL ...
Страница 223: ...Scanner Guide MX 3500N MX 3501N MX 4500N MX 4501N MX 2300N MX 2700N MODEL ...
Страница 354: ...MX4500 US SCN Z2 Scanner Guide MX 3500N MX 3501N MX 4500N MX 4501N MX 2300N MX 2700N MODEL ...
Страница 355: ...Printer Guide MX 3500N MX 3501N MX 4500N MX 4501N MX 2300N MX 2700N MODEL ...
Страница 370: ...15 2 Select 2 sided printing 1 Select 2 Sided Book or 2 Sided Tablet 2 Click the OK button 3 Start printing 2 1 ...
Страница 415: ...MX4500 US PRT Z2 Printer Guide MX 3500N MX 3501N MX 4500N MX 4501N MX 2300N MX 2700N MODEL ...
Страница 416: ...Facsimile Guide MX FXX1 MODEL ...
Страница 605: ...MX FXX1 MODEL MX4500 US FAX Z2 Facsimile Guide ...
Страница 606: ...Copier Guide MX 3500N MX 3501N MX 4500N MX 4501N MX 2300N MX 2700N MODEL ...
Страница 775: ...MX4500 US CPY Z1 Copier Guide MX 3500N MX 3501N MX 4500N MX 4501N MX 2300N MX 2700N MODEL ...
Страница 843: ...MX4500 US USR Z1 User s Guide MX 3500N MX 3501N MX 4500N MX 4501N MX 2300N MX 2700N MODEL ...


