80
7
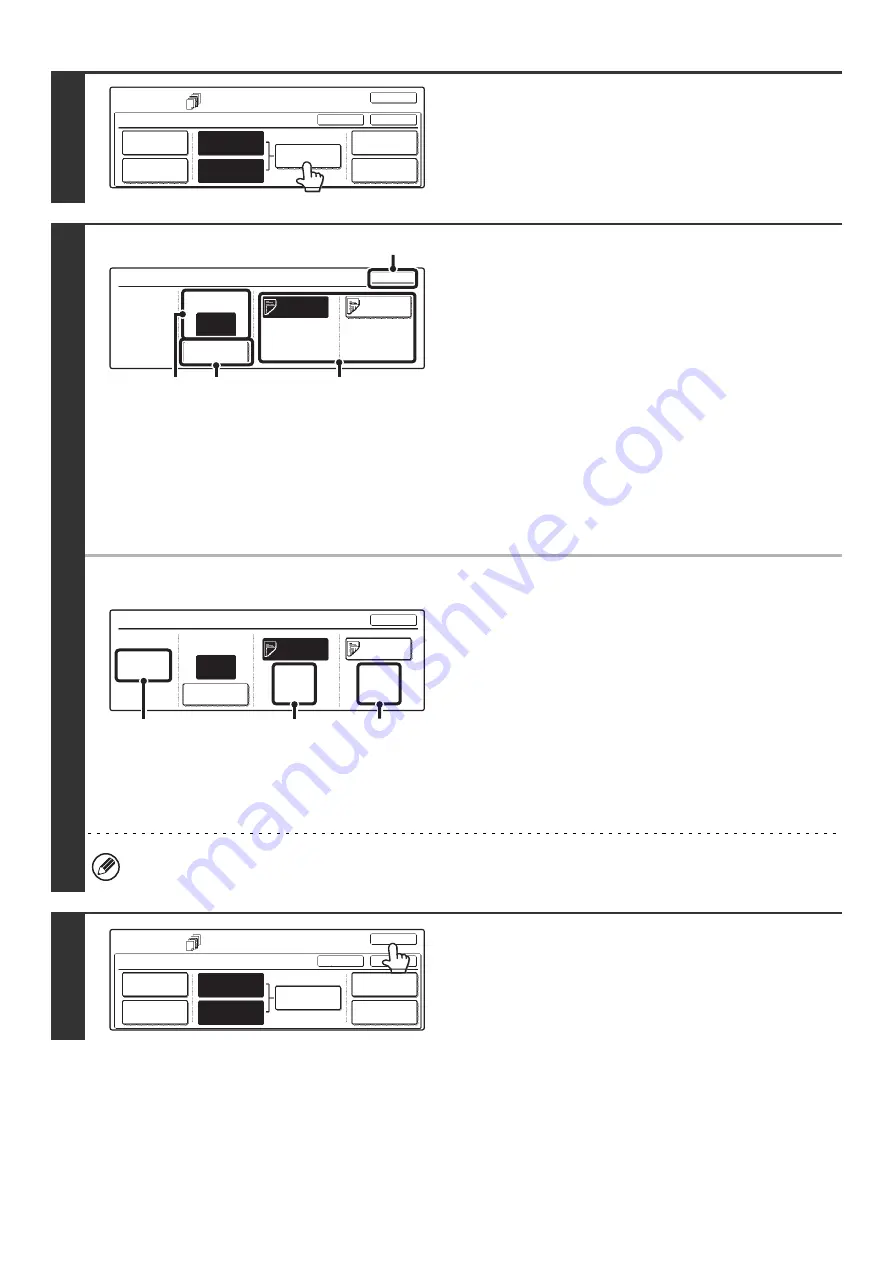
Touch the [Insertion Settings] key.
8
Specify the pages where inserts A and B
will be inserted.
(1) Touch the [Insertion Type A] key or the
[Insertion Type B] key.
Specify the page where the highlighted insert will be
inserted.
(2) Enter the page number where the insert
sheet will be inserted with the numeric
keys.
(3) Touch the [Enter] key.
(4) To insert another insert sheet, repeat steps
(1) to (3).
(5) Touch the [OK] key.
●
Insertion settings screen
(A) This shows the total number of inserts. Up to 100 insert
sheets can be inserted. To insert multiple inserts, touch the
[Enter] key after entering each insertion page number
(insertion position) with the numeric keys.
(B) This shows the tray selected for insert type A and the paper
size and type.
(C) This shows the tray selected for insert type B and the paper
size and type.
When the [Insertion Type A] key is highlighted, the insert
settings are applied to [Insertion Type A Setting]. When the
[Insertion Type B] key is highlighted, the insert settings are
applied to [Insertion Type B Setting].
If both sides of the insert will be copied on, label sheets, transparency film, and tab paper cannot be used. Tab paper
can only be inserted.
9
Touch the [OK] key.
You will return to the base screen of copy mode.
To check your settings, touch the [Page Layout] key.
☞
CHANGING COVER/INSERT SETTINGS (Page Layout)
(page 81)
Special Modes
Covers/Inserts
OK
OK
Cancel
Front Cover
Back Cover
Insertion
Settings
Insertion
Type A Setting
Insertion
Type B Setting
Page Layout
Paper Tray
Settings
Insertion Settings
OK
Insertion Page
Enter
Insertion
Type A
Insertion
Type B
Bypass
Tray
8 x11
Plain
Bypass
Tray
8 x11
Plain
Insertion
Total:2
4
1
/
2
1
/
2
(2)
(3)
(5)
(1)
Insertion Settings
Insertion Page
Enter
Insertion
Type A
Insertion
Type B
4
OK
Bypass
Tray
8 x11
Plain
Bypass
Tray
8 x11
Plain
Insertion
Total:2
1
/
2
1
/
2
(B)
(C)
(A)
Special Modes
Covers/Inserts
OK
OK
Cancel
Front Cover
Back Cover
Insertion
Settings
Insertion
Type A Setting
Insertion
Type B Setting
Page Layout
Paper Tray
Settings
Содержание MX 3501N - Color Laser - Copier
Страница 1: ...User s Guide MX 3500N MX 3501N MX 4500N MX 4501N MX 2300N MX 2700N MODEL ...
Страница 2: ...System Settings Guide MX 3500N MX 3501N MX 4500N MX 4501N MX 2300N MX 2700N MODEL ...
Страница 127: ...MX4500 US SYS Z2 System Settings Guide MX 3500N MX 3501N MX 4500N MX 4501N MX 2300N MX 2700N MODEL ...
Страница 173: ... mx4500_us_ins book 44 ページ 2005年10月31日 月曜日 午前11時57分 ...
Страница 174: ... mx4500_us_ins book 45 ページ 2005年10月31日 月曜日 午前11時57分 ...
Страница 176: ...Document Filing Guide MX 3500N MX 3501N MX 4500N MX 4501N MX 2300N MX 2700N MODEL ...
Страница 222: ...MX4500 US FIL Z1 Document Filing Guide MX 3500N MX 3501N MX 4500N MX 4501N MX 2300N MX 2700N MODEL ...
Страница 223: ...Scanner Guide MX 3500N MX 3501N MX 4500N MX 4501N MX 2300N MX 2700N MODEL ...
Страница 354: ...MX4500 US SCN Z2 Scanner Guide MX 3500N MX 3501N MX 4500N MX 4501N MX 2300N MX 2700N MODEL ...
Страница 355: ...Printer Guide MX 3500N MX 3501N MX 4500N MX 4501N MX 2300N MX 2700N MODEL ...
Страница 370: ...15 2 Select 2 sided printing 1 Select 2 Sided Book or 2 Sided Tablet 2 Click the OK button 3 Start printing 2 1 ...
Страница 415: ...MX4500 US PRT Z2 Printer Guide MX 3500N MX 3501N MX 4500N MX 4501N MX 2300N MX 2700N MODEL ...
Страница 416: ...Facsimile Guide MX FXX1 MODEL ...
Страница 605: ...MX FXX1 MODEL MX4500 US FAX Z2 Facsimile Guide ...
Страница 606: ...Copier Guide MX 3500N MX 3501N MX 4500N MX 4501N MX 2300N MX 2700N MODEL ...
Страница 775: ...MX4500 US CPY Z1 Copier Guide MX 3500N MX 3501N MX 4500N MX 4501N MX 2300N MX 2700N MODEL ...
Страница 843: ...MX4500 US USR Z1 User s Guide MX 3500N MX 3501N MX 4500N MX 4501N MX 2300N MX 2700N MODEL ...


