5
This chapter explains the basic procedures for making copies, including selection of the copy ratio and other copy settings.
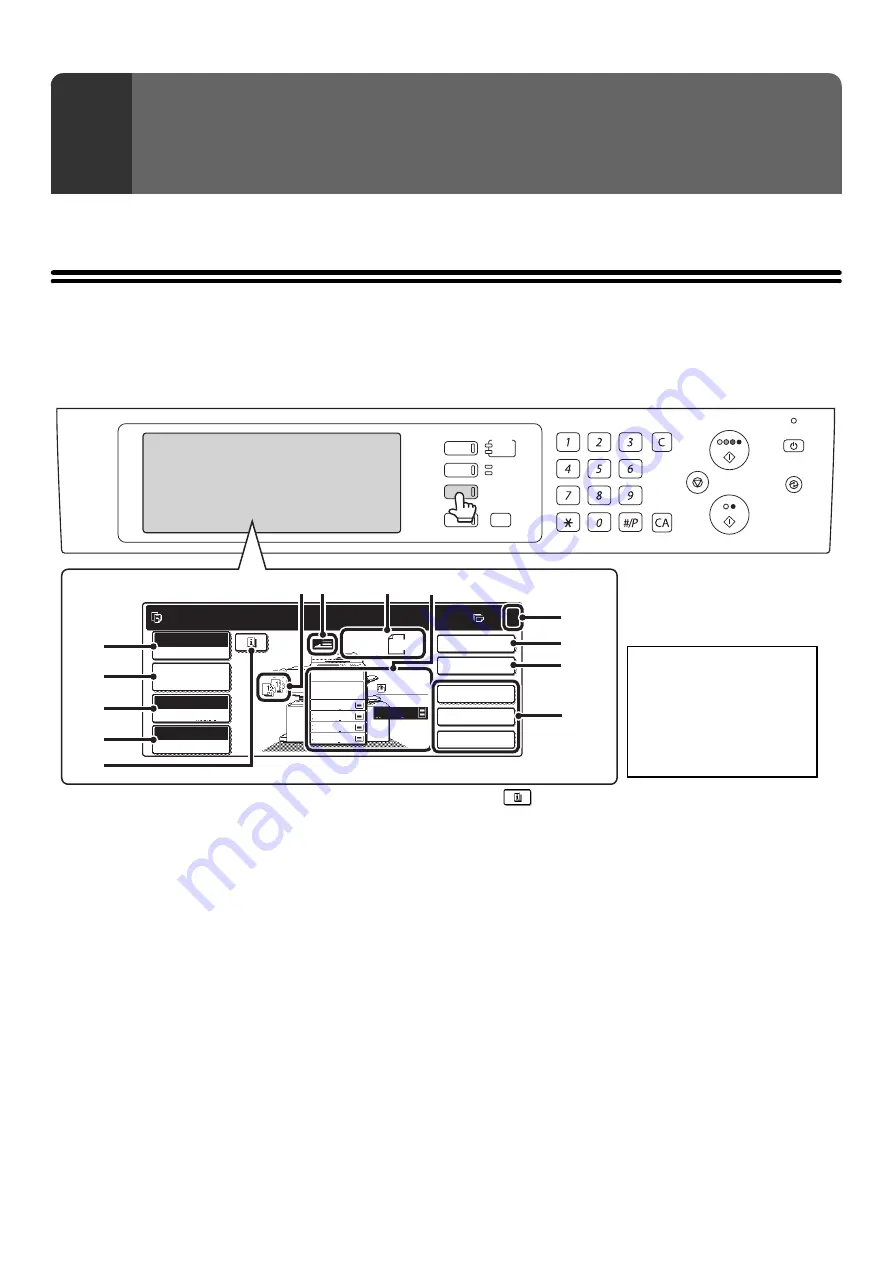
BASE SCREEN OF COPY MODE
When the [COPY] key is pressed on the operation panel, the base screen of copy mode appears.
The base screen shows messages and keys necessary for copying, and settings that have been selected.
Selections are made by touching the displayed keys.
(1)
[Color Mode] key
Touch this to change the color mode.
☞
(page 21)
(2)
[Job Detail Settings] key
Touch this key to select original settings, paper settings,
and special modes.
☞
(3)
[Exposure] key
This shows the current copy exposure and exposure
mode settings. Touch this key to change the exposure or
exposure mode setting.
☞
CHANGING THE EXPOSURE AND EXPOSURE
MODE
(4)
[Copy Ratio] key
This shows the current copy ratio. Touch this key to
adjust the copy ratio.
☞
(page 26)
(5)
key
This key appears when a special mode is selected.
Touch this key to display a list of the selected modes and
settings.
☞
Checking which special modes are selected
(page 58)
(6)
Output display
When one or more output functions such as sort, group,
staple sort, or saddle stitch have been selected, this
shows the icons of the selected functions.
☞
(page 42)
(7)
Original feed display
This appears when an original has been inserted in the
document feeder tray.
(8)
Original size display
This shows the size of the original.
When the original size is set manually, the display shows
"Manual". When an original is not placed, nothing appears.
☞
(page 33)
1
BASIC PROCEDURE FOR
MAKING COPIES
DOCUMENT
FILING
IMAGE SEND
COPY
JOB STATUS
SYSTEM
SETTINGS
LOGOUT
READY
DATA
LINE
DATA
Ready to scan for copy.
2-Sided Copy
0
Output
Special Modes
File
Quick File
Full Color
Color Mode
Auto
Exposure
100%
Copy Ratio
Original 8 x11
1
/
2
2.
3.
4.
1.
5.
8 x11R
8 x14
11x17
8 x11
Job Detail
Settings
1
/
2
8 x11
1
/
2
1
/
2
1
/
2
Plain
8 x11
1
/
2
(2)
(1)
(3)
(4)
(5)
(8)
(9)
(7)
(10)
(6)
(13)
(11)
(12)
The screen at left shows the
machine with the saddle stitch
finisher, stand/2 x 500 sheet
paper drawer, large capacity
tray and right tray installed.
The image will vary depending
on the equipment installed.
Содержание MX 3501N - Color Laser - Copier
Страница 1: ...User s Guide MX 3500N MX 3501N MX 4500N MX 4501N MX 2300N MX 2700N MODEL ...
Страница 2: ...System Settings Guide MX 3500N MX 3501N MX 4500N MX 4501N MX 2300N MX 2700N MODEL ...
Страница 127: ...MX4500 US SYS Z2 System Settings Guide MX 3500N MX 3501N MX 4500N MX 4501N MX 2300N MX 2700N MODEL ...
Страница 173: ... mx4500_us_ins book 44 ページ 2005年10月31日 月曜日 午前11時57分 ...
Страница 174: ... mx4500_us_ins book 45 ページ 2005年10月31日 月曜日 午前11時57分 ...
Страница 176: ...Document Filing Guide MX 3500N MX 3501N MX 4500N MX 4501N MX 2300N MX 2700N MODEL ...
Страница 222: ...MX4500 US FIL Z1 Document Filing Guide MX 3500N MX 3501N MX 4500N MX 4501N MX 2300N MX 2700N MODEL ...
Страница 223: ...Scanner Guide MX 3500N MX 3501N MX 4500N MX 4501N MX 2300N MX 2700N MODEL ...
Страница 354: ...MX4500 US SCN Z2 Scanner Guide MX 3500N MX 3501N MX 4500N MX 4501N MX 2300N MX 2700N MODEL ...
Страница 355: ...Printer Guide MX 3500N MX 3501N MX 4500N MX 4501N MX 2300N MX 2700N MODEL ...
Страница 370: ...15 2 Select 2 sided printing 1 Select 2 Sided Book or 2 Sided Tablet 2 Click the OK button 3 Start printing 2 1 ...
Страница 415: ...MX4500 US PRT Z2 Printer Guide MX 3500N MX 3501N MX 4500N MX 4501N MX 2300N MX 2700N MODEL ...
Страница 416: ...Facsimile Guide MX FXX1 MODEL ...
Страница 605: ...MX FXX1 MODEL MX4500 US FAX Z2 Facsimile Guide ...
Страница 606: ...Copier Guide MX 3500N MX 3501N MX 4500N MX 4501N MX 2300N MX 2700N MODEL ...
Страница 775: ...MX4500 US CPY Z1 Copier Guide MX 3500N MX 3501N MX 4500N MX 4501N MX 2300N MX 2700N MODEL ...
Страница 843: ...MX4500 US USR Z1 User s Guide MX 3500N MX 3501N MX 4500N MX 4501N MX 2300N MX 2700N MODEL ...


