63
3
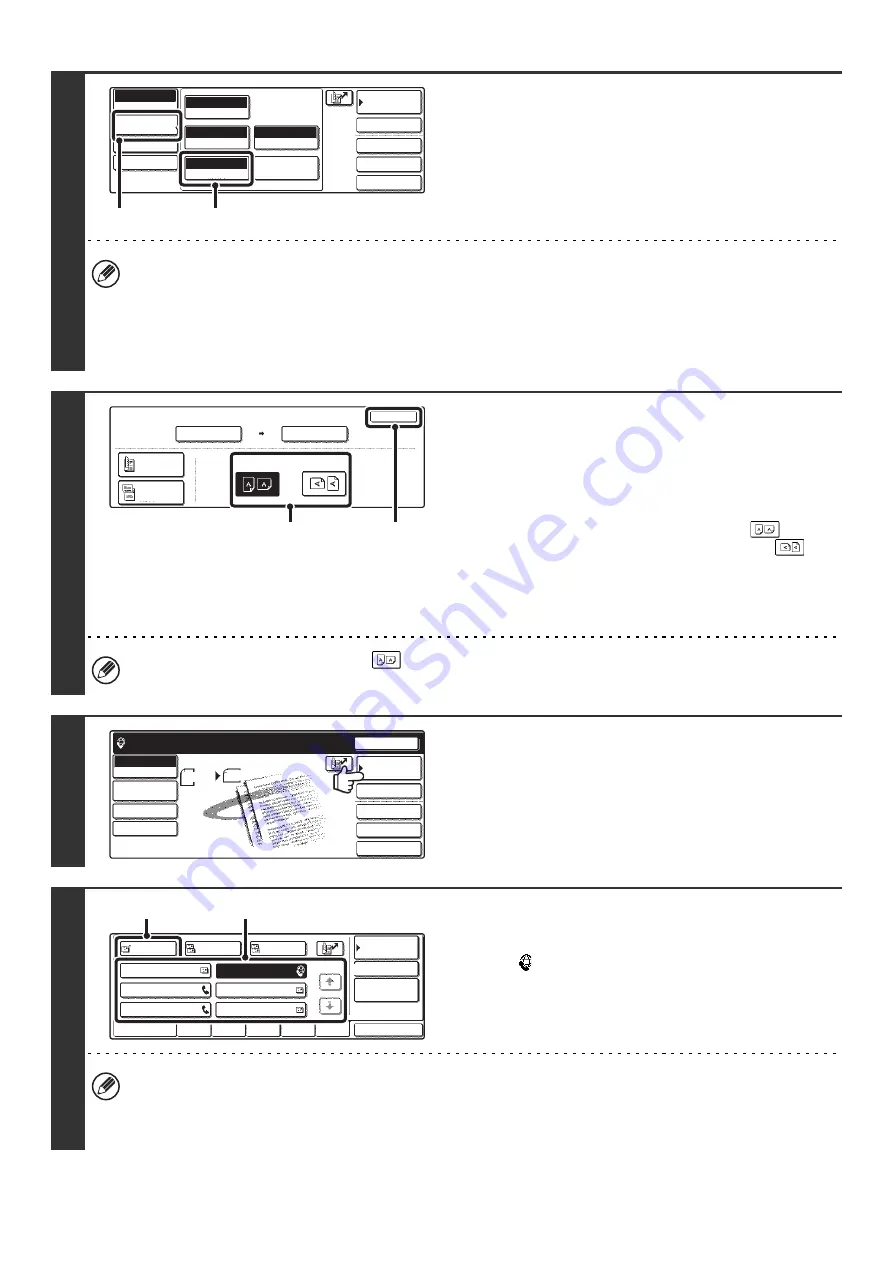
Display the original settings screen.
(1) Touch the [Image Settings] key.
(2) Touch the [Original] key.
The current settings of the [Exposure], [Resolution], [Original], and [File Format] keys appear in the top half of each
key. Touch each key to change the settings.
☞
(page 65),
(page 66),
SCANNING BOTH SIDES OF AN ORIGINAL (2-Sided Original)
SIZE AND SEND SIZE (Enlarge/Reduce)
(page 72),
4
Specify the orientation in which the
original is placed.
When specifying the orientation of the image to be transmitted,
specify the orientation of the original placed in step 1.
(1) Touch the appropriate orientation key.
If the top edge of the original is up, touch the
key. If
the top edge of the original is to the left, touch the
key.
(2) Touch the [OK] key.
You will return to the screen of step 3. Touch the [Image
Settings] key to close the menu.
The original orientation is initially set to
. If the original was placed with the top edge up, this step is not
necessary.
5
Touch the [Address Book] key.
6
Specify the destination.
(1) Touch the key of the desired destination.
The
icon appears in one-touch keys in which Internet
fax addresses are stored.
(2) Touch the [To] key.
The destination is specified.
• After a one-touch key is touched, if the screen is changed without touching the [To] key, the destination is
automatically specified.
• In addition to selecting a one-touch key, a destination can also be specified by entering it manually or retrieving it
from a global address book. For more information, see "
Quick File
File
Special Modes
Address Entry
Address Book
Internet Fax
Mode Switch
Image
Settings
Send Settings
Manual RX
Auto
Exposure
200X100dpi
Resolution
TIFF-F
File Format
Special Modes
Original
Auto 8 x11
1
/
2
(1)
(2)
Internet Fax
Original
OK
Scan Size
Send Size
100%
Auto
Image Orientation
Auto 8 x11
1
/
2
2-Sided
Booklet
2-Sided
Tablet
(1)
(2)
Quick File
File
Special Modes
Address Entry
Resend
Scan
8 x11
1
/
2
Send
Auto
Ready to send.
Address Book
Internet Fax
Mode Switch
Image
Settings
Send Settings
Manual RX
AAA AAA
CCC CCC
EEE EEE
BBB BBB
DDD DDD
FFF FFF
ABCD
EFGHI
JKLMN
OPQRST
UVWXYZ
1/1
Frequent Use
To
Sort Address
Address Review
Condition
Settings
Global
Address Search
Bcc
Cc
(2)
(1)
Содержание MX 3501N - Color Laser - Copier
Страница 1: ...User s Guide MX 3500N MX 3501N MX 4500N MX 4501N MX 2300N MX 2700N MODEL ...
Страница 2: ...System Settings Guide MX 3500N MX 3501N MX 4500N MX 4501N MX 2300N MX 2700N MODEL ...
Страница 127: ...MX4500 US SYS Z2 System Settings Guide MX 3500N MX 3501N MX 4500N MX 4501N MX 2300N MX 2700N MODEL ...
Страница 173: ... mx4500_us_ins book 44 ページ 2005年10月31日 月曜日 午前11時57分 ...
Страница 174: ... mx4500_us_ins book 45 ページ 2005年10月31日 月曜日 午前11時57分 ...
Страница 176: ...Document Filing Guide MX 3500N MX 3501N MX 4500N MX 4501N MX 2300N MX 2700N MODEL ...
Страница 222: ...MX4500 US FIL Z1 Document Filing Guide MX 3500N MX 3501N MX 4500N MX 4501N MX 2300N MX 2700N MODEL ...
Страница 223: ...Scanner Guide MX 3500N MX 3501N MX 4500N MX 4501N MX 2300N MX 2700N MODEL ...
Страница 354: ...MX4500 US SCN Z2 Scanner Guide MX 3500N MX 3501N MX 4500N MX 4501N MX 2300N MX 2700N MODEL ...
Страница 355: ...Printer Guide MX 3500N MX 3501N MX 4500N MX 4501N MX 2300N MX 2700N MODEL ...
Страница 370: ...15 2 Select 2 sided printing 1 Select 2 Sided Book or 2 Sided Tablet 2 Click the OK button 3 Start printing 2 1 ...
Страница 415: ...MX4500 US PRT Z2 Printer Guide MX 3500N MX 3501N MX 4500N MX 4501N MX 2300N MX 2700N MODEL ...
Страница 416: ...Facsimile Guide MX FXX1 MODEL ...
Страница 605: ...MX FXX1 MODEL MX4500 US FAX Z2 Facsimile Guide ...
Страница 606: ...Copier Guide MX 3500N MX 3501N MX 4500N MX 4501N MX 2300N MX 2700N MODEL ...
Страница 775: ...MX4500 US CPY Z1 Copier Guide MX 3500N MX 3501N MX 4500N MX 4501N MX 2300N MX 2700N MODEL ...
Страница 843: ...MX4500 US USR Z1 User s Guide MX 3500N MX 3501N MX 4500N MX 4501N MX 2300N MX 2700N MODEL ...


