9
STORING A DESTINATION FOR SCAN TO DESKTOP
To store your computer in the machine as the destination of Scan to Desktop, Network Scanner Tool must be installed
from the "Sharpdesk/Network Scanner Utilities" CD-ROM that accompanies the machine. To scan an image to your
computer, the Network Scanner Tool must be running on your computer.
INSTALLING THE NETWORK SCANNER TOOL
To install Network Scanner Tool, see "Sharpdesk Installation Guide" that accompanies the machine. When a standard
installation is performed, Network Scanner Tool is installed with Sharpdesk.
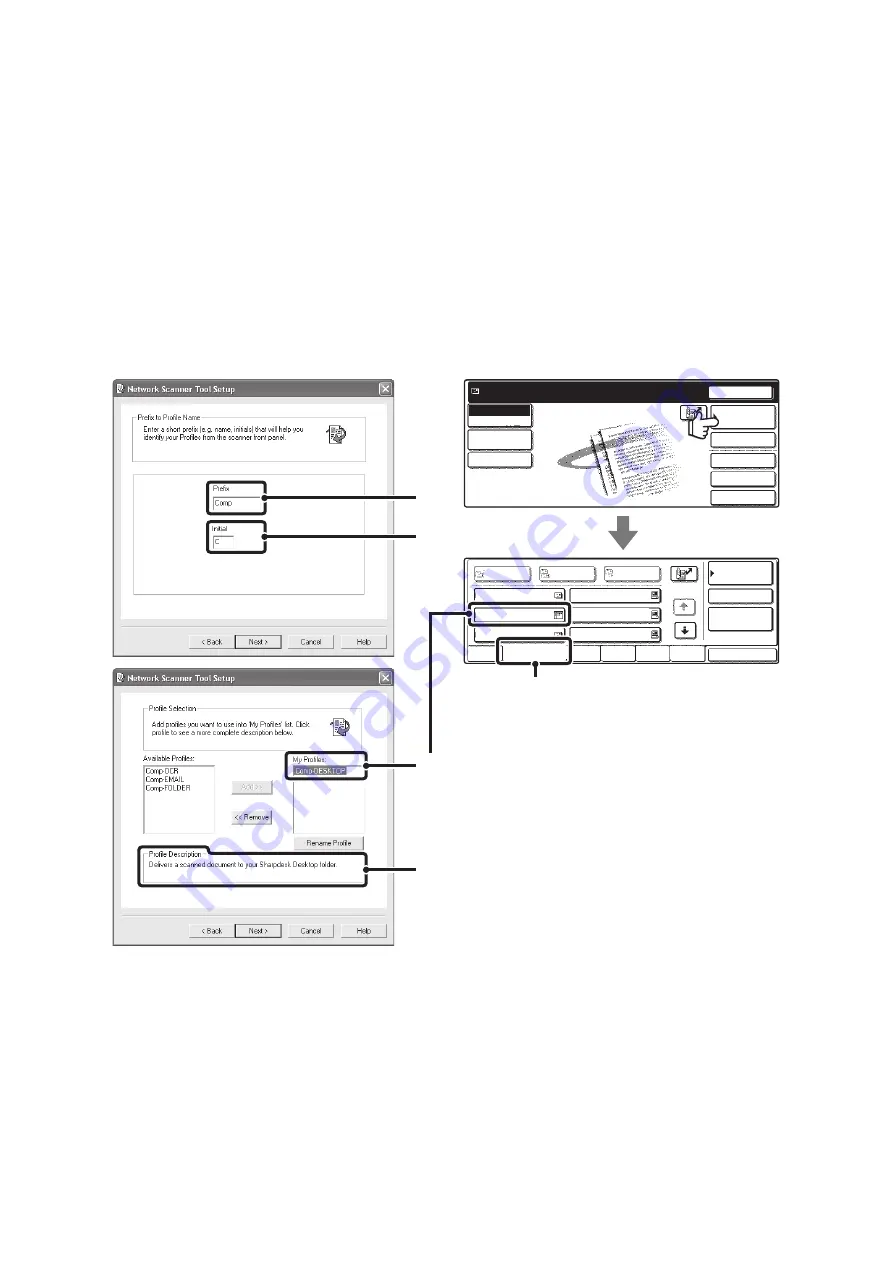
When you restart your computer after installing the Network Scanner Tool, the Setup Wizard will start automatically.
Follow this wizard to set up the Network Scanner Tool. This will store your computer in the machine as a destination for
Scan to Desktop. The stored destination will be displayed as one-touch keys in the Address Book screen.
The following window appears while the Network Scanner Tool is being set up. The item selected in "My Profiles" (C) will
be the name of the one-touch key.
The profile name is determined by the combination of the text entered in "Prefix" (A) and the profile*.
The one-touch key is assigned to an index tab in the Address Book screen based on the text entered in "Initial" (B).
* This defines how an image sent to your computer is processed. For more information, see profile explanation (D).
ADDING DESTINATIONS
See the number of licenses indicated in the "Sharpdesk Installation Guide" to know how many computers can be stored
in the machine as destinations of Scan to Desktop. To store more destinations, a license kit is required. Store Scan to
Desktop destinations by installing the Network Scanner Tool on each computer.
Quick File
File
Special Modes
Address Entry
Resend
Address Book
Scan
Mode Switch
Send Settings
Ready to send.
Image
Settings
Global
Address Search
AAA AAA
Comp-DESKTOP
EEE EEE
BBB BBB
DDD DDD
FFF FFF
ABCD
EFGHI
JKLMN
OPQRST
UVWXYZ
1/1
Freq.
Bcc
Cc
To
Sort Address
Address Review
Condition
Settings
(B)
(A)
(B)
(C)
(D)
Содержание MX 3501N - Color Laser - Copier
Страница 1: ...User s Guide MX 3500N MX 3501N MX 4500N MX 4501N MX 2300N MX 2700N MODEL ...
Страница 2: ...System Settings Guide MX 3500N MX 3501N MX 4500N MX 4501N MX 2300N MX 2700N MODEL ...
Страница 127: ...MX4500 US SYS Z2 System Settings Guide MX 3500N MX 3501N MX 4500N MX 4501N MX 2300N MX 2700N MODEL ...
Страница 173: ... mx4500_us_ins book 44 ページ 2005年10月31日 月曜日 午前11時57分 ...
Страница 174: ... mx4500_us_ins book 45 ページ 2005年10月31日 月曜日 午前11時57分 ...
Страница 176: ...Document Filing Guide MX 3500N MX 3501N MX 4500N MX 4501N MX 2300N MX 2700N MODEL ...
Страница 222: ...MX4500 US FIL Z1 Document Filing Guide MX 3500N MX 3501N MX 4500N MX 4501N MX 2300N MX 2700N MODEL ...
Страница 223: ...Scanner Guide MX 3500N MX 3501N MX 4500N MX 4501N MX 2300N MX 2700N MODEL ...
Страница 354: ...MX4500 US SCN Z2 Scanner Guide MX 3500N MX 3501N MX 4500N MX 4501N MX 2300N MX 2700N MODEL ...
Страница 355: ...Printer Guide MX 3500N MX 3501N MX 4500N MX 4501N MX 2300N MX 2700N MODEL ...
Страница 370: ...15 2 Select 2 sided printing 1 Select 2 Sided Book or 2 Sided Tablet 2 Click the OK button 3 Start printing 2 1 ...
Страница 415: ...MX4500 US PRT Z2 Printer Guide MX 3500N MX 3501N MX 4500N MX 4501N MX 2300N MX 2700N MODEL ...
Страница 416: ...Facsimile Guide MX FXX1 MODEL ...
Страница 605: ...MX FXX1 MODEL MX4500 US FAX Z2 Facsimile Guide ...
Страница 606: ...Copier Guide MX 3500N MX 3501N MX 4500N MX 4501N MX 2300N MX 2700N MODEL ...
Страница 775: ...MX4500 US CPY Z1 Copier Guide MX 3500N MX 3501N MX 4500N MX 4501N MX 2300N MX 2700N MODEL ...
Страница 843: ...MX4500 US USR Z1 User s Guide MX 3500N MX 3501N MX 4500N MX 4501N MX 2300N MX 2700N MODEL ...


