76
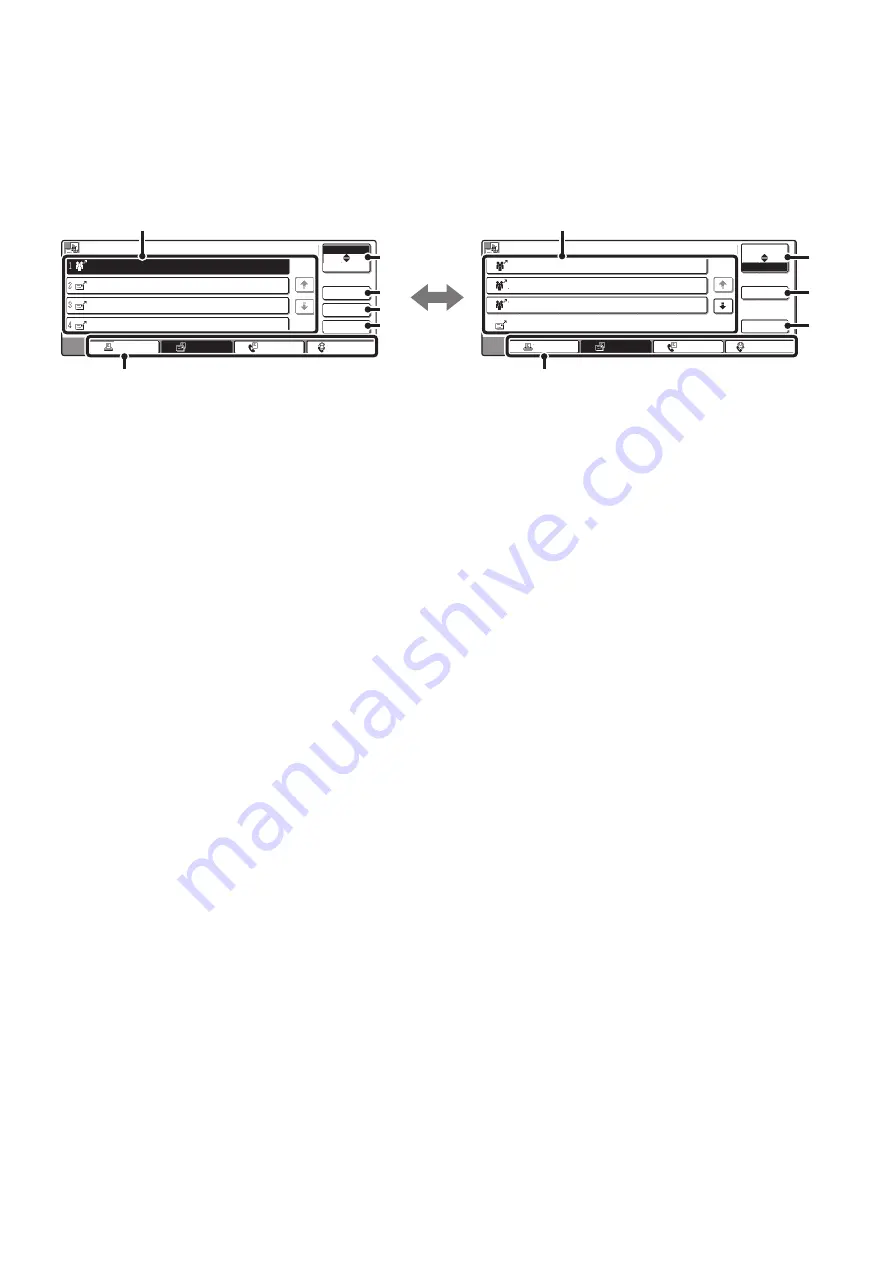
JOB QUEUE SCREEN AND COMPLETED JOB SCREEN
The job status screen consists of two screens: the job queue screen that shows reserved jobs and the job currently in
progress, and the completed jobs screen. To switch between the two screens, touch the job status screen selector key
((2) below).
Job queue screen
Complete screen
(1)
Job queue screen
Jobs are shown as keys in the order they were reserved.
Each key shows information on the job and its current
status.
☞
(2)
Job status screen selector key
Touch this key to switch between the job queue screen
and the completed jobs screen.
(3)
Job queue screen [Detail] key
This shows detailed information on broadcast
transmission jobs and the status of jobs. Select the key of
the desired job in the job queue screen (1) and then
touch the [Detail] key.
(4)
[Priority] key
Touch this key to give priority to a selected job.
☞
GIVING PRIORITY TO A SCAN TRANSMISSION
JOB
(5)
[Stop/Delete] key
Touch this key to stop or delete a selected job.
☞
STOPPING A SCAN JOB BEING TRANSMITTED
OR WAITING TO BE TRANSMITTED
(6)
Mode switch keys
Use these keys to change the job status screen mode.
(7)
Completed jobs screen
This shows up to 99 completed transmission or reception
jobs in each mode. A description of the job and the result
(status) are shown.
A broadcast transmission job is shown as a key.
(8)
Completed jobs screen [Detail] key
This shows detailed information on the results of
completed broadcast transmissions and jobs that used
the document filing function. Select the key of the desired
job in the completed jobs screen (7) and then touch the
[Detail] key.
☞
(9)
[Call] key
Touch this key to call up and use a transmission or
reception job stored with the document filing function.
Complete
Call
Internet Fax
Job Queue
Broadcast0001
10:00 11/01 990/010 NG000000
Broadcast0002
10:05 11/01 050/005 Send OK
Broadcast0003
10:08 11/01 001/001 Send OK
DDD DDD
10:30 11/01 001/001 Send OK
1/8
Address
Start Time
Address
Set Time
Complete
Priority
Stop/Delete
Internet Fax
Job Queue
Broadcast0001
10:00 11/01 000/003 Connecting
AAA AAA
10:05 11/01 000/001 Waiting
BBB BBB
10:22 11/01 000/004 Waiting
CCC CCC
10:30 11/01 000/010 Waiting
1/1
Pages
Status
Detail
Fax Job
Scan to
Print Job
Pages
Status
Detail
Fax Job
Scan to
Print Job
(7)
(6)
(8)
(2)
(9)
(1)
(6)
(3)
(4)
(2)
(5)
Содержание MX 3501N - Color Laser - Copier
Страница 1: ...User s Guide MX 3500N MX 3501N MX 4500N MX 4501N MX 2300N MX 2700N MODEL ...
Страница 2: ...System Settings Guide MX 3500N MX 3501N MX 4500N MX 4501N MX 2300N MX 2700N MODEL ...
Страница 127: ...MX4500 US SYS Z2 System Settings Guide MX 3500N MX 3501N MX 4500N MX 4501N MX 2300N MX 2700N MODEL ...
Страница 173: ... mx4500_us_ins book 44 ページ 2005年10月31日 月曜日 午前11時57分 ...
Страница 174: ... mx4500_us_ins book 45 ページ 2005年10月31日 月曜日 午前11時57分 ...
Страница 176: ...Document Filing Guide MX 3500N MX 3501N MX 4500N MX 4501N MX 2300N MX 2700N MODEL ...
Страница 222: ...MX4500 US FIL Z1 Document Filing Guide MX 3500N MX 3501N MX 4500N MX 4501N MX 2300N MX 2700N MODEL ...
Страница 223: ...Scanner Guide MX 3500N MX 3501N MX 4500N MX 4501N MX 2300N MX 2700N MODEL ...
Страница 354: ...MX4500 US SCN Z2 Scanner Guide MX 3500N MX 3501N MX 4500N MX 4501N MX 2300N MX 2700N MODEL ...
Страница 355: ...Printer Guide MX 3500N MX 3501N MX 4500N MX 4501N MX 2300N MX 2700N MODEL ...
Страница 370: ...15 2 Select 2 sided printing 1 Select 2 Sided Book or 2 Sided Tablet 2 Click the OK button 3 Start printing 2 1 ...
Страница 415: ...MX4500 US PRT Z2 Printer Guide MX 3500N MX 3501N MX 4500N MX 4501N MX 2300N MX 2700N MODEL ...
Страница 416: ...Facsimile Guide MX FXX1 MODEL ...
Страница 605: ...MX FXX1 MODEL MX4500 US FAX Z2 Facsimile Guide ...
Страница 606: ...Copier Guide MX 3500N MX 3501N MX 4500N MX 4501N MX 2300N MX 2700N MODEL ...
Страница 775: ...MX4500 US CPY Z1 Copier Guide MX 3500N MX 3501N MX 4500N MX 4501N MX 2300N MX 2700N MODEL ...
Страница 843: ...MX4500 US USR Z1 User s Guide MX 3500N MX 3501N MX 4500N MX 4501N MX 2300N MX 2700N MODEL ...


