33
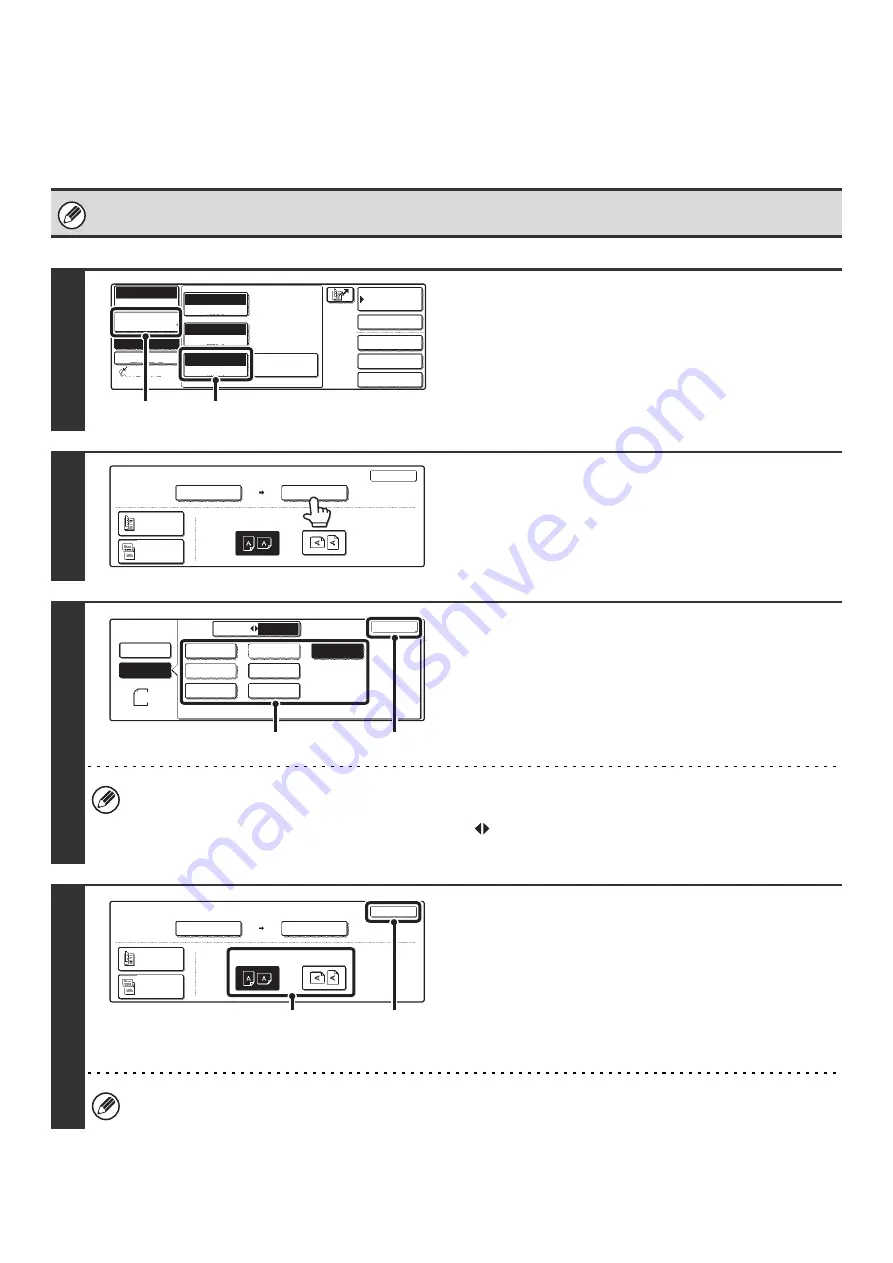
SPECIFYING THE SEND SIZE
Specify the send size as a paper size. If a send size bigger than the scan size is selected, the image will be enlarged. If
a send size smaller than the scan size is selected, the image will be reduced. The enlargement/reduction ratio that is set
using this procedure will be automatically cleared after the transmission is completed.
The send size cannot be specified when the scan size is [Long Size] or is specified by numbers.
1
Display the original settings screen.
(1) Touch the [Image Settings] key.
(2) Touch the [Original] key.
2
Touch the [Send Size] key.
3
Specify the send size.
(1) Touch the desired send size key.
(2) Touch the [OK] key.
• Depending on the paper size specified for the "Scan Size", it may not be possible to select some sizes for the "Send
Size". Size keys that cannot be specified for the "Send Size" are grayed out to prevent selection.
• To specify an AB size for the send size, touch the [AB
Inch] key to highlight the [AB] side and then specify the
send size.
4
Specify the Image orientation of the
original.
(1) Touch the appropriate [Image Orientation]
key.
If the wrong orientation is selected here, the image may
not be sent properly when using enlargement/reduction.
(2) Touch the [OK] key.
The enlargement/reduction ratio appears between the "Scan Size" key and the "Send Size" key.
Auto
Exposure
Standard
Resolution
Original
Special Modes
Quick File
File
Special Modes
Sub Address
Address Book
Fax
Mode Switch
Image
Settings
Direct TX
Memory TX
Auto Reception
Fax Memory:100%
Auto 8 x11
1
/
2
(2)
(1)
Fax
Original
OK
Auto
Scan Size
Send Size
100%
Image Orientation
2-Sided
Booklet
2-Sided
Tablet
Auto 8 x11
1
/
2
5 x8
11x17
1
/
2
1
/
2
Fax
Original
Auto
Manual
Inch
AB
5 x8 R
8 x11R
8 x14
8 x11
OK
1
/
2
1
/
2
1
/
2
8 x13(216x330)
1
/
2
1
/
2
1
/
2
8 x11
1
/
2
(1)
(2)
Fax
Original
OK
11x17
Scan Size
Send Size
129%
Image Orientation
2-Sided
Booklet
2-Sided
Tablet
Auto 8 x11
1
/
2
(1)
(2)
Содержание MX 3501N - Color Laser - Copier
Страница 1: ...User s Guide MX 3500N MX 3501N MX 4500N MX 4501N MX 2300N MX 2700N MODEL ...
Страница 2: ...System Settings Guide MX 3500N MX 3501N MX 4500N MX 4501N MX 2300N MX 2700N MODEL ...
Страница 127: ...MX4500 US SYS Z2 System Settings Guide MX 3500N MX 3501N MX 4500N MX 4501N MX 2300N MX 2700N MODEL ...
Страница 173: ... mx4500_us_ins book 44 ページ 2005年10月31日 月曜日 午前11時57分 ...
Страница 174: ... mx4500_us_ins book 45 ページ 2005年10月31日 月曜日 午前11時57分 ...
Страница 176: ...Document Filing Guide MX 3500N MX 3501N MX 4500N MX 4501N MX 2300N MX 2700N MODEL ...
Страница 222: ...MX4500 US FIL Z1 Document Filing Guide MX 3500N MX 3501N MX 4500N MX 4501N MX 2300N MX 2700N MODEL ...
Страница 223: ...Scanner Guide MX 3500N MX 3501N MX 4500N MX 4501N MX 2300N MX 2700N MODEL ...
Страница 354: ...MX4500 US SCN Z2 Scanner Guide MX 3500N MX 3501N MX 4500N MX 4501N MX 2300N MX 2700N MODEL ...
Страница 355: ...Printer Guide MX 3500N MX 3501N MX 4500N MX 4501N MX 2300N MX 2700N MODEL ...
Страница 370: ...15 2 Select 2 sided printing 1 Select 2 Sided Book or 2 Sided Tablet 2 Click the OK button 3 Start printing 2 1 ...
Страница 415: ...MX4500 US PRT Z2 Printer Guide MX 3500N MX 3501N MX 4500N MX 4501N MX 2300N MX 2700N MODEL ...
Страница 416: ...Facsimile Guide MX FXX1 MODEL ...
Страница 605: ...MX FXX1 MODEL MX4500 US FAX Z2 Facsimile Guide ...
Страница 606: ...Copier Guide MX 3500N MX 3501N MX 4500N MX 4501N MX 2300N MX 2700N MODEL ...
Страница 775: ...MX4500 US CPY Z1 Copier Guide MX 3500N MX 3501N MX 4500N MX 4501N MX 2300N MX 2700N MODEL ...
Страница 843: ...MX4500 US USR Z1 User s Guide MX 3500N MX 3501N MX 4500N MX 4501N MX 2300N MX 2700N MODEL ...


