42
CHANGING THE SUBJECT, FILE NAME,
REPLY-TO, AND MESSAGE
The subject, file name, reply-to, and message can be changed when performing a scan transmission. Preset items can
be selected or text can be directly entered.
• When performing Scan to FTP, Scan to Desktop, or Scan to Network Folder, only the file name is used.
• If the subject and file name are not changed, the settings in the Web page are used.
• If the sender name is not changed, the name set in "Default Sender Set" in the system settings is used. If this is not
configured, the administrator name in the Web pages is used.
• Selections for the subject, file name, and message are configured by clicking [Application Settings] and then [Network
Scanner Settings] in the Web page menu. (Administrator rights are required.)
• For the procedure for entering text, see "6. ENTERING TEXT" in the User's Guide.
1
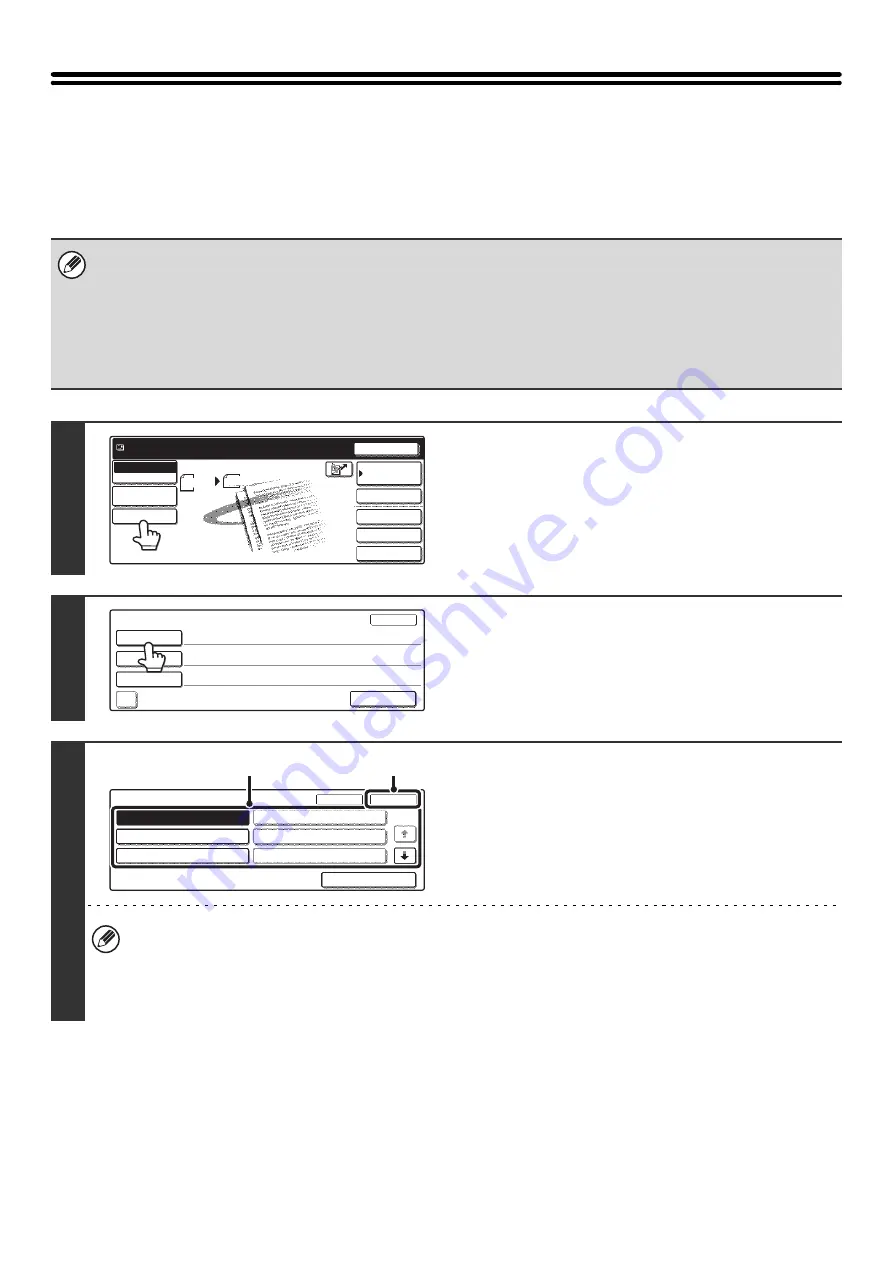
Touch the [Send Settings] key.
If you are sending to a Scan to FTP, Scan to Desktop, or Scan
to Network Folder destination, go to step 4.
2
To change the subject, touch the
[Subject] key.
3
Enter the subject.
(1) Touch a Pre-Set text key.
(2) Touch the [OK] key.
• If you wish to directly enter the text, touch the [Direct Entry] key to open the text entry screen. Enter the text and
touch the [OK] key. Up to 54 characters can be entered.
• The text in a pre-set text key can be edited by touching the pre-set text key and then the [Direct Entry] key. The text
entry screen will appear with the selected pre-set text entered. (When a destination is stored using the Web page,
up to 80 characters can be entered. However, only 54 characters will appear and can be edited in the touch panel.)
Quick File
File
Special Modes
Address Entry
Resend
Scan
8 x11
1
/
2
Send
Ready to send.
Address Book
Scan
Mode Switch
Image
Settings
Send Settings
Auto
Send Settings
OK
Subject
File Name
Reply-To
Add 'Reply to' to Cc
Body Text
Pre-Set
OK
Cancel
1/5
Direct Entry
No.04
No.05
No.06
No.01 Sub: Schedule coordinat
No.02 Sub: Monthly Schedule
No.03 Sub: Minutes of plannin
(1)
(2)
Содержание MX 3501N - Color Laser - Copier
Страница 1: ...User s Guide MX 3500N MX 3501N MX 4500N MX 4501N MX 2300N MX 2700N MODEL ...
Страница 2: ...System Settings Guide MX 3500N MX 3501N MX 4500N MX 4501N MX 2300N MX 2700N MODEL ...
Страница 127: ...MX4500 US SYS Z2 System Settings Guide MX 3500N MX 3501N MX 4500N MX 4501N MX 2300N MX 2700N MODEL ...
Страница 173: ... mx4500_us_ins book 44 ページ 2005年10月31日 月曜日 午前11時57分 ...
Страница 174: ... mx4500_us_ins book 45 ページ 2005年10月31日 月曜日 午前11時57分 ...
Страница 176: ...Document Filing Guide MX 3500N MX 3501N MX 4500N MX 4501N MX 2300N MX 2700N MODEL ...
Страница 222: ...MX4500 US FIL Z1 Document Filing Guide MX 3500N MX 3501N MX 4500N MX 4501N MX 2300N MX 2700N MODEL ...
Страница 223: ...Scanner Guide MX 3500N MX 3501N MX 4500N MX 4501N MX 2300N MX 2700N MODEL ...
Страница 354: ...MX4500 US SCN Z2 Scanner Guide MX 3500N MX 3501N MX 4500N MX 4501N MX 2300N MX 2700N MODEL ...
Страница 355: ...Printer Guide MX 3500N MX 3501N MX 4500N MX 4501N MX 2300N MX 2700N MODEL ...
Страница 370: ...15 2 Select 2 sided printing 1 Select 2 Sided Book or 2 Sided Tablet 2 Click the OK button 3 Start printing 2 1 ...
Страница 415: ...MX4500 US PRT Z2 Printer Guide MX 3500N MX 3501N MX 4500N MX 4501N MX 2300N MX 2700N MODEL ...
Страница 416: ...Facsimile Guide MX FXX1 MODEL ...
Страница 605: ...MX FXX1 MODEL MX4500 US FAX Z2 Facsimile Guide ...
Страница 606: ...Copier Guide MX 3500N MX 3501N MX 4500N MX 4501N MX 2300N MX 2700N MODEL ...
Страница 775: ...MX4500 US CPY Z1 Copier Guide MX 3500N MX 3501N MX 4500N MX 4501N MX 2300N MX 2700N MODEL ...
Страница 843: ...MX4500 US USR Z1 User s Guide MX 3500N MX 3501N MX 4500N MX 4501N MX 2300N MX 2700N MODEL ...


