11-6 DICOM/HL7
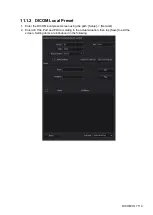
DICOM storage preset items are described as follows:
Name
Description
Configure
New
Service
Device
After setting the servers in the DICOM local screen, the
names will appear in the drop-down list. Select the name of
the storage server.
Service Name
The default is xxx-Storage, user-changeable.
AE Title
Application Entity title. It should be consistent with that of
the storage server.
Port
DICOM communication port, 104 is the default. The port
should be consistent with that of the storage server port.
TLS
Select whether to encrypt the data during network
transportation.
Maximum Retries
Set the maximum retries.
Interval Time(Sec)
Reserved.
Timeout (Sec)
Refers to the amount of time after which the system will
stop trying to establish a connection to the service.
Color Mode
Select the color mode.
Compression Mode
Select the Compression mode: uncompressed, RLE, JPEG
and JPEG2000.
Compression Ratio
Select the JPEG Compression ratio: lossless, low, medium
and high.
Allow Multiframe
If SCP supports this function, select it.
Max Frame Rate
Set the frame range for transferring cine files to DCM multi-
frame files.
SR Storage Option Select structured report sending options.
Encapsulated PDF
Select whether to encapsulate PDF format reports in
DICOM standard.
Storage mode
Set the storage mode for image and cine file:
Parallel file: save the current file, and is ready for the
storage of the next file.
Parallel frame: send the current frame, and is ready for
sending the next frame.
Transducer
Tracking
Files of images that are saved in DCM format through
DICOM contain transducer serial number information.
Add
Add the DICOM service to the service list.
Cancel
Select to cancel parameter setting.
Update
Select an item in the service list, change the parameters in
the above area, and tap [Update] to update the item in the
service list.
Service List
Delete
Select to delete the selected service from the service list.
Default
Select an item in the service list. Tap [Default] and you will
see “Y” in the Default column.
Содержание TE5
Страница 1: ...TE7 TE5 Diagnostic Ultrasound System Operator s Manual Basic Volume ...
Страница 2: ......
Страница 6: ......
Страница 12: ......
Страница 24: ......
Страница 36: ......
Страница 54: ......
Страница 56: ...4 2 Exam Preparation 4 1 1 New Patient Information The Patient Info screen is shown as follows 2 1 3 ...
Страница 110: ......
Страница 115: ...Display Cine Review 6 5 6 Tap Return on the screen or tap Freeze to exit image compare ...
Страница 120: ......
Страница 124: ......
Страница 156: ......
Страница 174: ......
Страница 192: ...12 18 Setup Select Advanced and do as follows Select MAPS and do as follows ...
Страница 202: ...13 2 Probes and Biopsy C5 2s L12 4s L7 3s P4 2s L14 6s C11 3s L14 6Ns V11 3Ws P7 3Ts 7LT4s ...
Страница 203: ...Probes and Biopsy 13 3 7L4s P10 4s L20 5s P7 3s L14 5sp SC6 1s SP5 1s 6CV1s L9 3s C5 1s L11 3VNs C4 1s ...
Страница 222: ...13 22 Probes and Biopsy No Name Description 8 Grooves of the needle guided bracket Matched with the tabs of the probe ...
Страница 226: ...13 26 Probes and Biopsy NGB 034 NGB 035 ...
Страница 250: ......
Страница 272: ......
Страница 276: ...A 4 Wireless LAN Tap Add Manually create a network profile to set ...
Страница 282: ......
Страница 318: ......
Страница 322: ......
Страница 323: ...P N 046 006959 07 1 0 ...


